*** NOTE: ALL INFORMATION IS ACCURATE AT DATE OF PUBLISHING ***
I’ve written previously about the joys of setting up Visual Studio and heading down the path of writing Dynamics 365 Reports using SSRS. Once you get through that, then the world is your oyster in the reporting sense. Getting the query to start with is done by opening the Advanced Find, creating your search then downloading the Fetch XML. Easy right? Well, until you want to write reports with lots of entities. You could potentially use multiple Data Sets… but your formulas would be a challenge. You could even try Sub Reports… but those kind of reports can then be a challenge to run. Wouldn’t it be easier if you could get all of the rows in to just one Data Set?

That’s where using Jonas Rapp’s FetchXML Builder is your friend. Using this tool will allow you to create a query combining records across multiple D365 entities. If you haven’t already downloaded the XrmToolBox, you can get it here. Once you have opened it and connected to your organisation, open the FetchXML Builder.
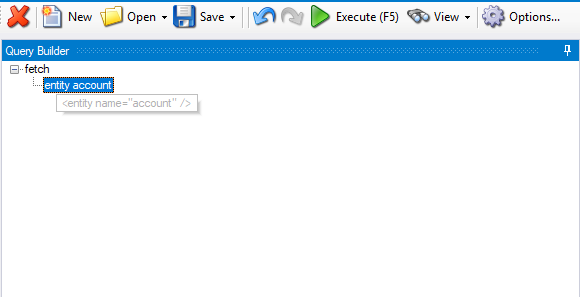
In this example we will build a report for Accounts, and display related Opportunities, Cases etc. Once the FetchXML Builder si open, start off a new query and add in the main Account entity.
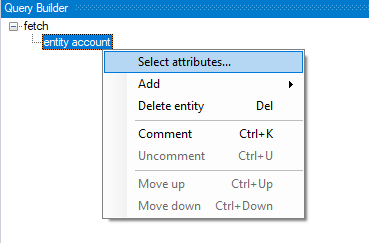
Right click on the entity and then ‘Select attributes’.
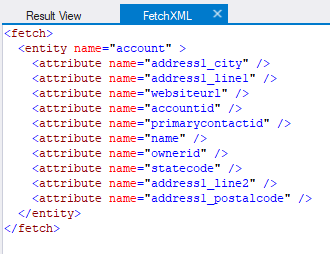
Add in all of the attributes you will need for the report.
Next, right click on the account entity in the query, then Add, and select ‘link-entity’.
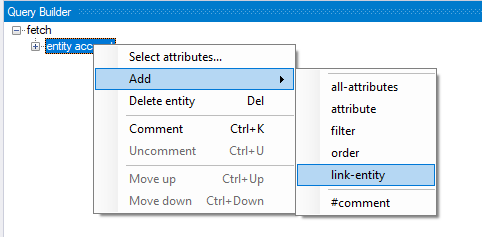
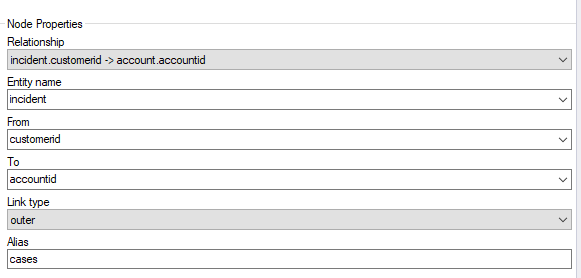
Pick the Relationship for the entity you want to add. We are going to add the case (incident) entity. The Entity Name, From and To fields will be populated. We want to make sure all Accounts will be brought back on the report, even if there are no cases, so the Link type will be Outer (rather than Inner). Type in the name of the entity as the Alias. If you don’t, all of the fields for each additional entity will be a string which could make it really challenging to know which fields are which. This way, the alias will be added in front of the field name in your query.
Add all of your entities
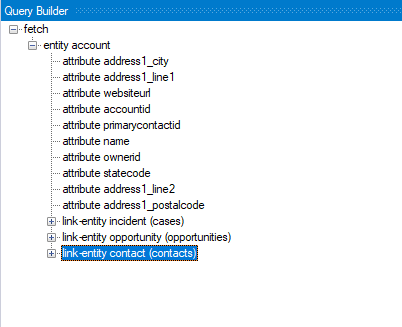
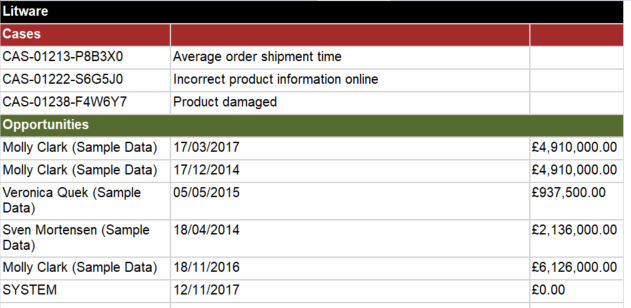
Then, do the same as you did earlier for the Account entity, and right click on the case entity and add the attributes (fields) you need for the report. You can see below this was done for several additional entities. Make sure you add in the unique identifier (typically an id) for each entity. This will be used for grouping purposes.
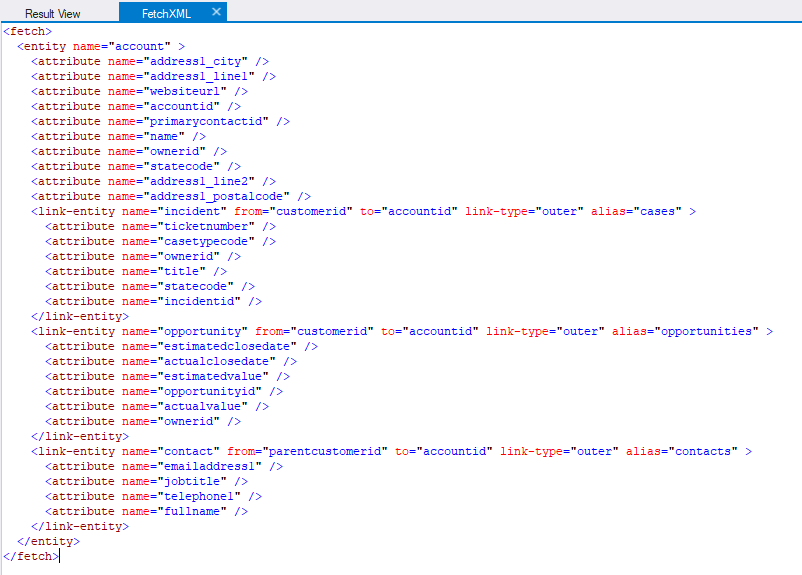
You will be able to see the FetchXML query being built for you in the main window.
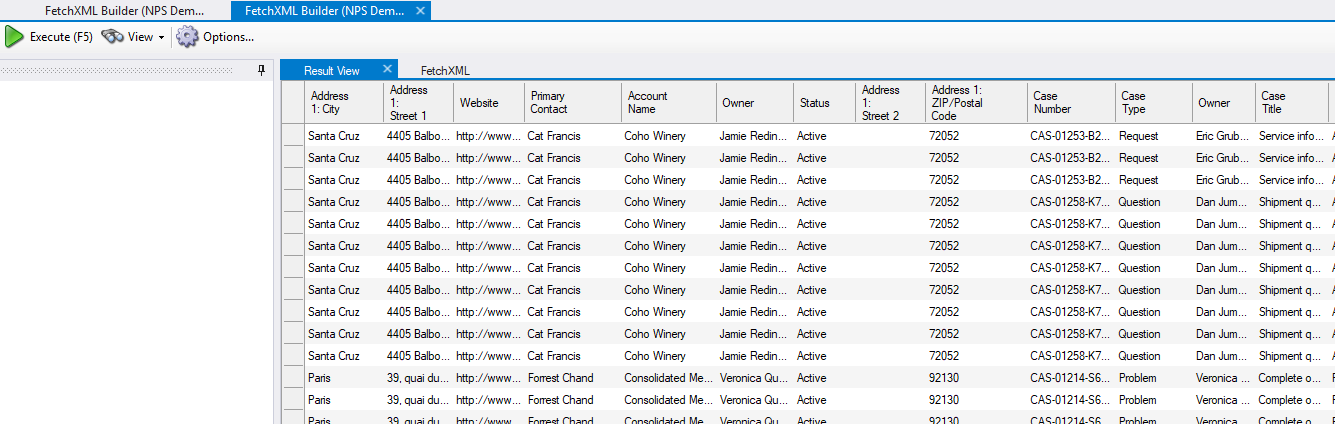
Clicking on the green arrow will execute the query and bring back results. Be careful when doing this if you have a large number of records in your database, and haven’t set any limit for the number of records to bring back. It could take some time, or worse, slow down things for users. You will likely see what looks like duplicate rows. As your query has combined all fields on a row, you will see one row for each piece of data brought back. This is fine as we are going to group the data within the report to only show each item once. Copy the query, start a new report in Visual Studio and then use the query in a new Data Set.
Creating your report
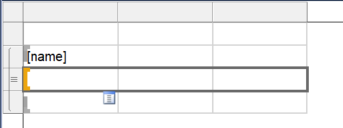
To get started, add a table to the report, then add the Account ‘name’ field in the first column of the Details row. We need to add the Account entity as the parent group, but you can’t add a group without any data in the details row. So this first step is just to get to that place. Once you have the field added, add a Parent Group to the Details row, and select the Account Id. We are not going to use the Details row in our report, so you can right click, and change the visibility to Hidden.

Now add the Account ‘name’ field in to the header for the Parent Account group. Add in any other fields you wish to display.
Next we are going to add in the cases. right click on the Parent Group and select to add a Child Group. For this initial Child Group, select to add a Header and a Footer. Group using the case id field. This will make sure each case only shows once on the report. Delete the additional column that is created. Use the child group header row and add in your case related fields. You may wish to hide the footer row, but don’t delete it just in case you need it later on (easier to unhide rather than try and add it back in).
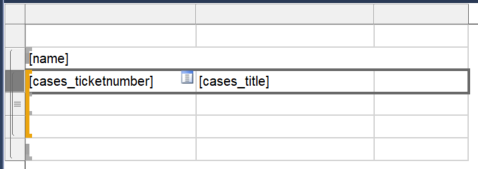
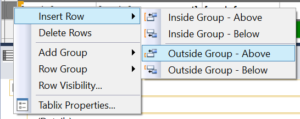
For any additional entity you want to add, right click on the last child entity you added, then select Add Group, then Adjacent After. Group on the id of the entity, and then add any fields needed on to the new group row. Notice that for any adjacent child groups you won’t see the option to add a header or footer for those.

Add the fields to the group row you created. For any headers, right click on the group row, select Insert Row, then Outside Group – Above.
Add in all the adjacent child groups you need. You can then make aesthetic changes, using font colour or background colour changes. Test your report, then publish it (check this post if you didn’t already at the beginning. It should help if you have any issues publishing the report in D365).
If you want to see how to do this, you can just watch the video.
Check out the latest post:
Removing Issues With Mobile Phone Numbers On Realtime Forms
This is just 1 of 447 articles. You can browse through all of them by going to the main blog page, or navigate through different categories to find more content you are interested in. You can also subscribe and get new blog posts emailed to you directly.
Hi Megan,
This is a nice article. I have been trying to replicate the same kind of report, but I’m unable to achieve what you have describe in you blog post. I’ve looked at it with a colleague that knows SSRS and we can’t get past the second part: ”Now add the Account ‘name’ field in to the header for the Parent Account group. Add in any other fields you wish to display.”
The display that we get is not the same that you are showing in your print screen. This may be asking a lot, would it be possible to make a video to better understand what you are describing.
Thank you
Hi Fritz, I’ve recorded a video which you should find at the bottom of this article. Hope it helps!
Hi Megan,
We are not able to install Dynamics 365 reporting extension on our 64-bit machines. When we referred below link, we got to know that it supports only 32-bit machines.
https://www.microsoft.com/en-us/download/details.aspx?id=56973
Could you please confirm if my understandings are correct? Do we have any other alternatives?
Thanks,
Ravi
Hi Ravi, it’s my understanding that 32-but programs can run on a 64-bit system but not the other way around. I have a 64-bit machine, and I am using the report authoring extension. Did you try and install it and get any kind of error?