*** NOTE: ALL INFORMATION IS ACCURATE AT DATE OF PUBLISHING ***
I’ve written previously about updating icons on custom entities the right way, but that was just for using within Dynamics 365 CRM itself. Thanks to Antti Pajunen, fellow Dynamics CRM fan and blogger, I went down another path to find out how/why icons work when creating or editing a Unified Interface App (this is with D365 Version 9). He noticed that instead of seeing nice entity icons, those pesky little jigsaw pieces were back. Grrr!!! And this is even in the standard project resource hub without making any changes. A tad annoying right?
![]()
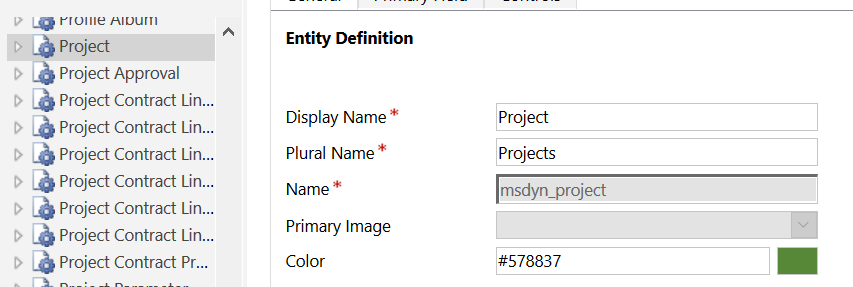
Opening up the default solution and looking at the PSA related entities, you can see they all have the annoying default custom entity icon, which results in the jigsaw piece being seen by the end user.
If you click on update icons for one of these entities, it feels a bit lazy…. the icon for entity forms is there, but there isn’t one for the web application icon. Naughty! You can of course always add one, but a bit of a pain to have to do this for all of them (because there are a lot!).
![]()
If you look at the Sitemap for the PSA Project Resource Hub, you will see the it uses the 32×32 icon from the icon for entity forms above.
Back to the update icons screen, there is a second tab for Unified Interface. It states that for best results, use a scalable vector graphic (.svg) icon with transparency enabled. I was able to use a .png file although it did look a little grainy. I added an Unified Interface icon to the Project entity.
![]()
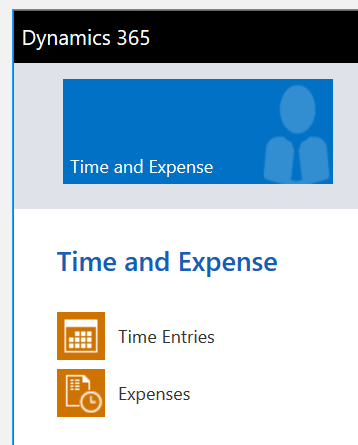
Once it’s been added and published, you can see that an icon now displays for projects.
![]()
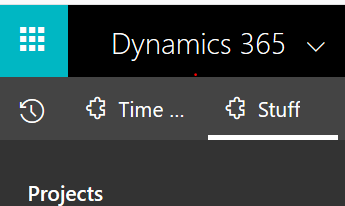
However, the top level icons (the areas in the sitemap) are still showing jigsaw pieces. 🙁 Will it never end?
After much digging, it seems these need to be added as web resources and created in a very specific way. The icons for the <Area> (SiteMap) are 85 x 71 (width x height) pixel image, white in color, and with 18% opacity. If you aren’t sure how to do this, you can use a free tool called GIMP, which is pretty easy to pick up and a lifesaver when editing images. When you add the icon make sure the name includes ‘/icons/’ before the icon file name like you see below.
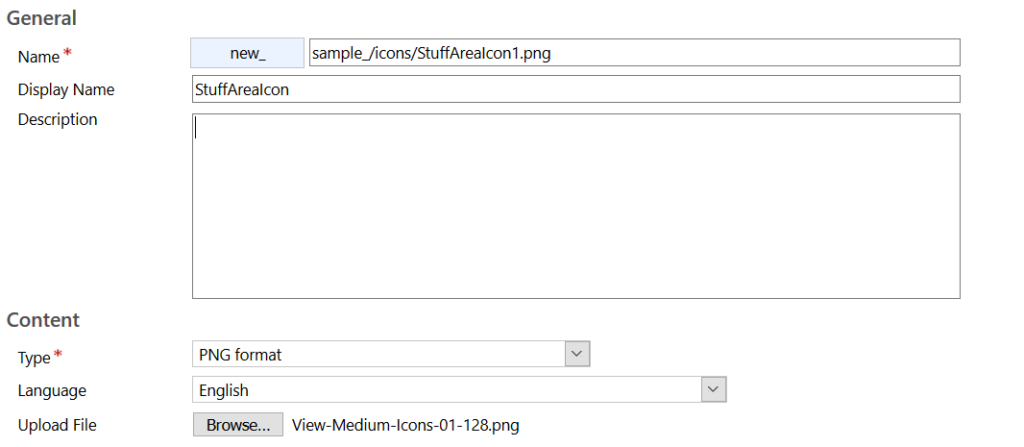
If you don’t specify the path to the icon file when you add it, it will not be accessible when trying to select the icon for the specific area in the app site map. here we can see that the new web resource I added is available and can be selected. For the last little step and extra explanation and details, check out this CRM Tip of the Day which does a great job doing so!
![]()
Check out the latest post:
Create A Segment Using Custom Event Registration Questions in Customer Insights Journeys
This is just 1 of 600 articles. You can browse through all of them by going to the main blog page, or navigate through different categories to find more content you are interested in. You can also subscribe and get new blog posts emailed to you directly.
Hi Megan
I liked your article – but have a question.
The last bit about the 85×71 icon does not really help with changing the icon for the Area in Unified Interface. It is still a puzzle icon – even for areas with a custom 85×71 icon in Classic Interface.
Did you find a way to change the icon for area map in Unified Interface?
/Marianne
I asked on facebook as well and got this article about the puzzle piece.
https://crmtipoftheday.com/1131/add-some-vector-finesse-to-your-unified-interface-app/#comment-117128
/Marianne
Thanks for both your comments Marianne. Yes, it looks like there was a little bit extra to it, so I have adjusted the article to reflect this. Always good to have more details and perspective and their tip explains that last part better than I did!