*** NOTE: ALL INFORMATION IS ACCURATE AT DATE OF PUBLISHING ***
I’ve seen quite a few questions about being able to create or update records in Dynamics 365 from new appointments via Microsoft Bookings. I wanted to see if it was possible so started digging a little bit more. It’s not pretty and for me there are still some flaws, but I’ve put together a way in which you can do this. Before we begin, know that if someone cancels their booking via Microsoft Bookings, this method will not remove that from D365… but perhaps I will find a way soon! For now, this method will work for any new or updated appointments and will create or update an appointment record in Dynamics 365. Let’s take a look!
First thing, I wanted to have a place in D365 where you could go and view all of your Bookings, so I created a new entity called Booking Calendar. I am not going to talk about how to create new entities here, there are so many great resources out there that show you, plus hopefully you have a good System Administrator, then this part should be easy. Make sure the entity is enabled for activities.
Next, I’ve added some new fields to the Appointment entity. Here we have the following fields:
- Bookings Appointment: Two Options, Yes and No. This is really just a way for you to filter and create charts, views or reports to see all of your Bookings Appointments vs. other appointments
- Bookings Calendar: This is a lookup to the Bookings Calendar entity that was added above. This will provide us with a direct link to the related Bookings Calendar from the Appointment
- Service: This can be used to display which service it is that the appointment was booked for. This is an option set field, so you can add in all of the services that you offer via your Bookings Calendar
- Staff Member: This is a look up to the User entity. We could set the Staff Member as a Required person on the calendar, or as the Owner, but in order to avoid appointments then being synced to the users Outlook calendar, which could create double appointments, we will link this using this new field instead
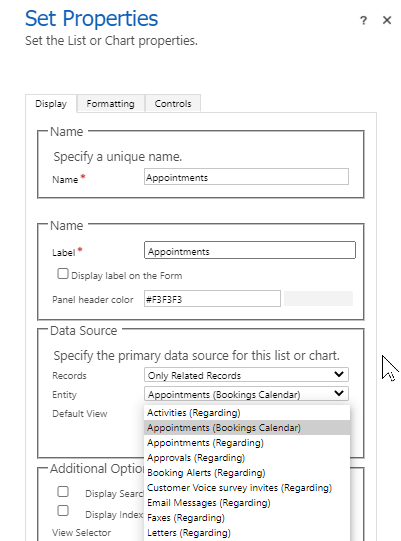
On the Booking Calendar entity, on the Main Form, add a subgrid for related Appointments using the Booking Calendar field.
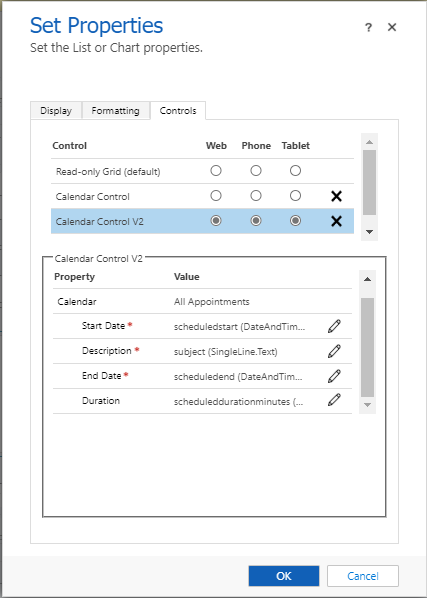
Click on the Controls tab and add a new Calendar Control. You can see there are two versions, and you can see what they will look like towards the end of this post. Set the properties with a logical value, and make sure you select the control from the top that you want to display on the Web, Phone or Tablet. Click OK, then save and publish the Booking Calendar form.
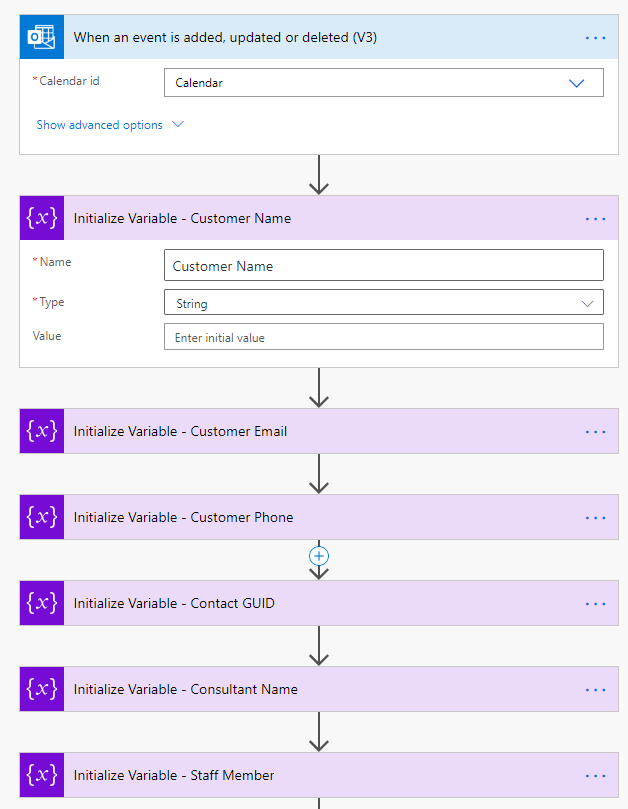
Right, now we need a flow to do the work for us. The Trigger is from the Outlook connector and is when an event is added, updated or deleted. If you don’t know how to connect to the Microsoft Bookings calendar, you can see how I did it in this post here. We then need several steps that are all initialise variable steps, with the type being string for each of them. These actions give us variables we can then append to later in the flow, then use towards the end when we need to.
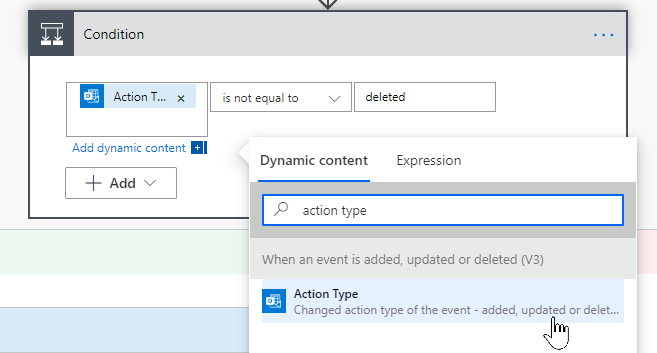
Next, we need to make sure that the action that caused the trigger wasn’t a deleted event. We could actually add this in to the trigger itself and not need this step, but I hopefully want to figure out a way to run a flow from the deleted events, so kept this in here! Feel free to ignore this step, and just add in to your trigger condition. The Action Type is the field to use.
Assuming the action type for the event is not equal to deleted, that must mean it’s either added or updated so next we will get the booking using the Id from the original trigger. You could argue you don’t need this extra step, but I like the flow to be clear so you can see exactly where things are being pulled from. Don’t fight me on it 😉
Next we will get the Start Time and the End Time for the event. We can use a Compose step, and then the two formulas you see below to get and then format the start and end times to fit our needs in the rest of the flow.
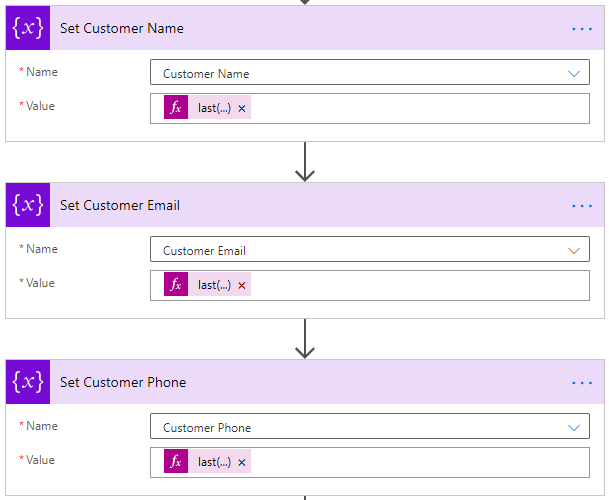
formatDateTime(outputs('Get_Booking')?['body/start'],'yyyy-MM-ddThh:mm:ss')formatDateTime(outputs('Get_Booking')?['body/end'],'yyyy-MM-ddThh:mm:ss')Now we will set the Customer Name, Email and Phone variables using the values they submitted from the Booking online. Refer to this post to find out how to handle these steps.
Then we will convert the email body to text so it strips out any of the HTML. Use the HTML to text action.
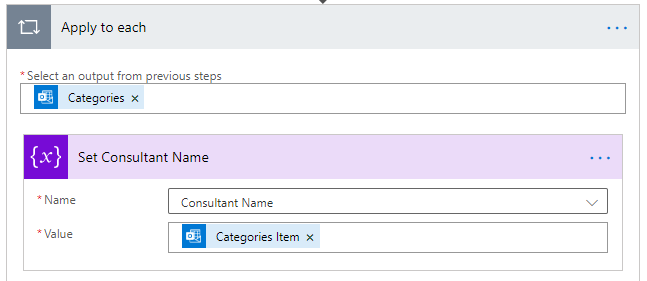
Now we will get the Consultant Name, which will have been added to the event as a Category. So we use the Categories Item and append to the Consultant Name variable.
Using the Office 365 connector we can search for users. One of the values we can search on is the Display Name. Add the Consultant Name variable as the search term.
Now we can use a List records step from the Common Data Service connector, and search for any users where the internalemailaddress eq the email found on the O365 user above.
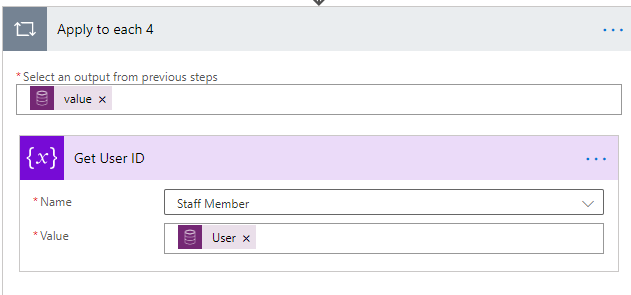
Now this is where you might need an extra step to do a condition and check to make sure a user was found. If you are just using internal staff members who all have a license for D635 AND are in O365 set up, then you will be fine, as there should be a one to one relationship. If you have Staff Members who are guests, then you will need to check first to see if a user was found in the step above. Next, set the Staff Member variable using the User id found from the step above.
Once we have done all of that, check to see if the Action Type is added. If it is, we will go down the Yes path of the condition.
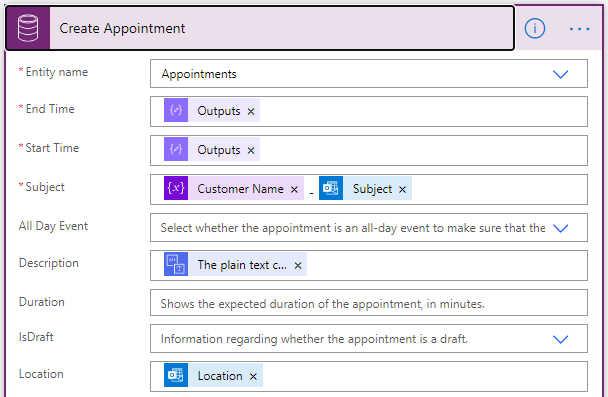
We will use a Create record step from the CDS connector and create an appointment. The Start and End times will be populated with the Outputs from the steps where we formatted them. You can make the subject whatever you want. In this instance, I’ve set it as the Customer Name variable then the Subject from the event. I’ve used the HTML to text step to then populate the Description field on the Appointment, and the Location from the event to populate the corresponding field on this activity.
Scrolling down the Appointment record, you will find the Activity Party section. Set the name as Required Attendees, and the value as the new entity name, then the GUID for the specific booking calendar you want to link it to, putting that inside ( and ).
You might need to expand the entity and click on Show advanced options to see more of the fields. We will populate the Bookings Calendar field which is a look up to the Bookings Calendar we are adding this appointment to. This is what will make sure that the appointments can then be see in a calendar overview in D365. This is set in the same way as we did above for the activity party value.
The Service option set field that was added now needs to be translated with an expression. You can see below what I have added here. We are basically comparing the subject of the event to the value of the options in our Optionset list. This will make sure that the Service field is populated correctly on the Appointment. Finally, we are linking with Staff Member field with the user we found and added to the Staff Member variable.
if(equals(triggerOutputs()?['body/subject'],'Initial Free Consultation'),916780000,
if(equals(triggerOutputs()?['body/subject'],'Premium Consultation'),916780001,
null
))
Now that the Appointment has been created, we need to see if we can link it to a Contact record and set it as regarding that contact. We will now do a List records step to find Contacts where the email address equals the email in the Customer Email variable we extracted.
For this I used the following expression to trim any white space either side of the email address just in case there was any. This would cause the search not to find Contacts potentially if there were extra spaces before or after the email when we extracted it.
emailaddress1 eq '@{trim(variables('Customer Email'))}'I’ve used a Switch Condition next. In the expression I am looking for the number of Contacts that have been found from the List step above.
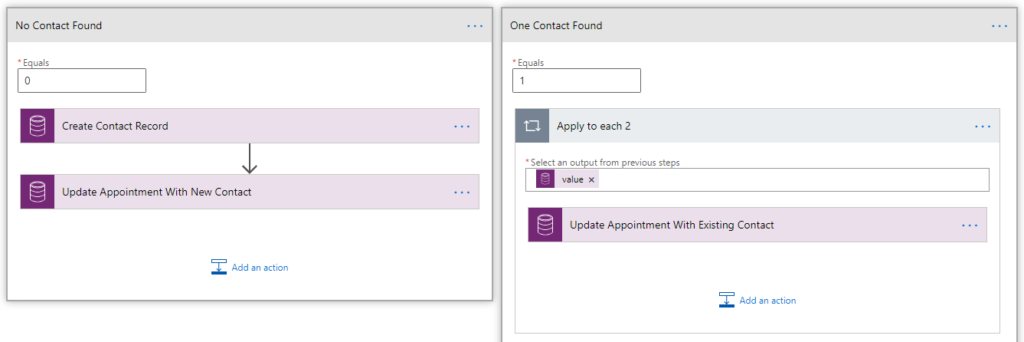
length(body('Search_For_Contact')?['value'])If the number equals 0, we follow one path, and if it equals 1 we follow another. If it’s neither, we do nothing. The Switch Condition means I just need one, rather than several Condition check actions. So, for no contacts found, we will use a Create record step and add a new Contact, populating their name, phone and email address if we have them. Keep in mind that the Name will include first and last together. You could use some steps to try and split them out, but that’s not always going to be accurate. Instead, you could just populate the Last Name, but go and update it manually later. Then we update the appointmetn and link it to the new Contact. If 1 Contact is found, just update the appointment and link it to the Contact. If there are more than one, you are on your own, go and update it manually later 😋
In the Update Appointment step, find the Regarding (Contacts) field and update it with the Contact ID from the appropriate step.
Now back to the original condition where we were checking to see if the event was a new one or one that had been updated. The no path for that condition shows what we need to do if it’s been updated. Unfortunately there is nothing to identify the appointment that we can tie back in to, other than trying to find the right Contact based on the email address, and the right Appointment based on some other criteria. First, we do a List records step and search for the Contact using the email address in the same way. You might need a step in there to then check to make sure only one was returned, that really depends on your own database and how clean the data is! Then we will populate the Contact GUID variable with the guid from the record found.
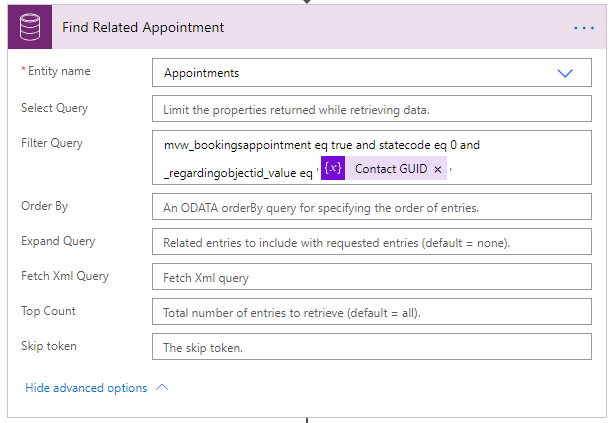
Next, we will do a list records step to find any appointments where the Appointment has a Status of Open, is a Bookings Appointment and where the regarding object is set to the Contact GUID. So, if you want to do this, you will need to make sure you mark completed appointments as Closed. Of course, if a Contact could have multiple bookings on one day, this likely won’t work for you. You could also add in search using the Subject of the event, to filter further on the type of booking.
You can then do a Condition check to see if the number of appointments found is equal to 1.
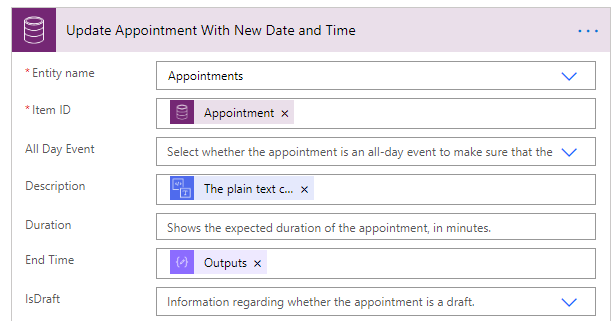
length(body('Find_Related_Appointment')?['value'])If the number of appointments found is 1, then we can update that appointment with the new date and time. If not, nothing will be done. So it’s not ideal for sure! But you will need to think about what might work for your specific environment and your given bookings and scenario.
When someone makes a new booking, a new Appointment record should now be created in D365. We can see that the Description has been populated.
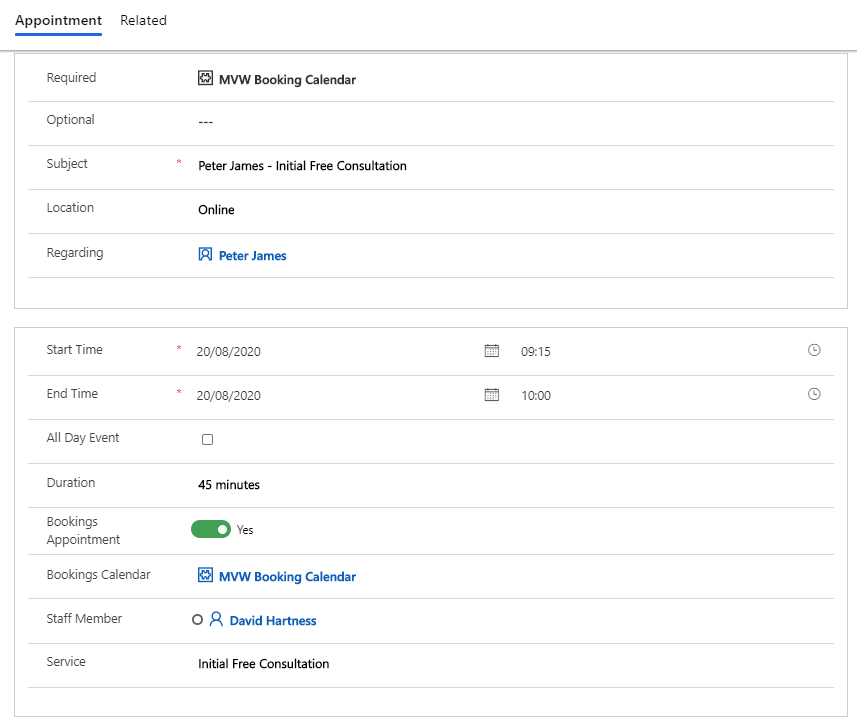
And the Appointment fields have been updated to set the Booking Calendar as required, the Subject shows the Contacts name and the Service requested, and it’s been set Regarding the Contact record. It’s set as Yes for a Bookings Appointment, been linked to the correct Bookings Calendar, and the Staff Member has been set. Finally, the correct Service from the optionset is displayed based on the subject of the booking event.
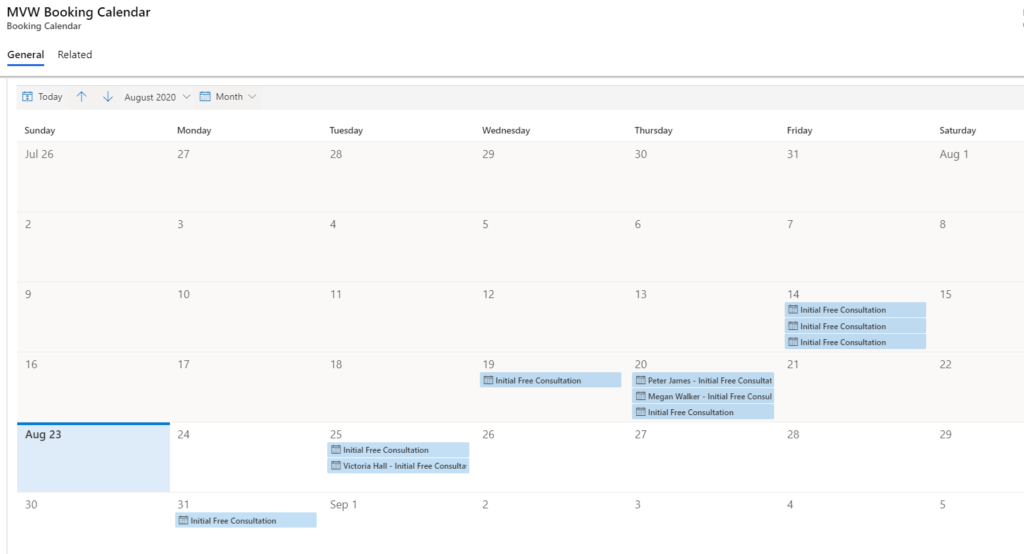
If we click on the link to the Bookings Calendar where we added the subgrid to show Appointments, we can see what the Calendar Control looks like.
And if we change it to the Calendar Control 2, we get a different overview.
This was a PAIN to figure out, and it’s not without its flaws. Having said that, it is possible to make updates in D365 via booking creations and updates from Microsoft Bookings. Making sure your appointments are updated and marked as complete is important in D365 so when Bookings updates are made, the correct records will be found to update correctly in Dynamics. You can watch how to do all of this here.
Check out the latest post:
Assign Records To A User Or A Team From Your Custom Page
This is just 1 of 571 articles. You can browse through all of them by going to the main blog page, or navigate through different categories to find more content you are interested in. You can also subscribe and get new blog posts emailed to you directly.















Any reason why you are not storing the event Id from the booking in the D365 calendar when you create it and then searching for that when updating the event?
Equally while the Get Event logic does make things easier it does rather fail when you are dealing with delete actions so I would suggest removing it.
I am not perfect? Is that a good reason why? 😊 It’s to show people how you COULD do this, and not for a production client implementation. Hopefully some grace is allowed for that…. ❤
Megan,
As we both know the obvious solution will only be revealed 30 seconds after you’ve shown it to someone else (hopefully not the end customer).
And I’m only aware of both issues because I’ve been stung by them more than once – knowing that all events have an accessible id record has solved a problem more than once over the years…
Hello Megan,
Thanks for your post.
I don’t know if you recollect my query in your mailbox. Having flow to create appointment doesn’t seems to be good approach because it will trigger for every booking appointment created in outlook.
– Aniket
Hi Ankit. It would trigger for every Appointment created on the calendar related to the one you have for your Microsoft Bookings calendar.