*** NOTE: ALL INFORMATION IS ACCURATE AT DATE OF PUBLISHING ***
There are many ways you can manage your appointments within Microsoft Bookings. You can use the mobile app, use Microsoft Teams, or simply log in to Microsoft Bookings directly. How about getting an email each morning with a list of all your bookings? It’s not possible from Bookings itself, but with a bit of investigating in to how the appointments are created, and then using Power Automate, we can get a nice email sent out on a daily basis.
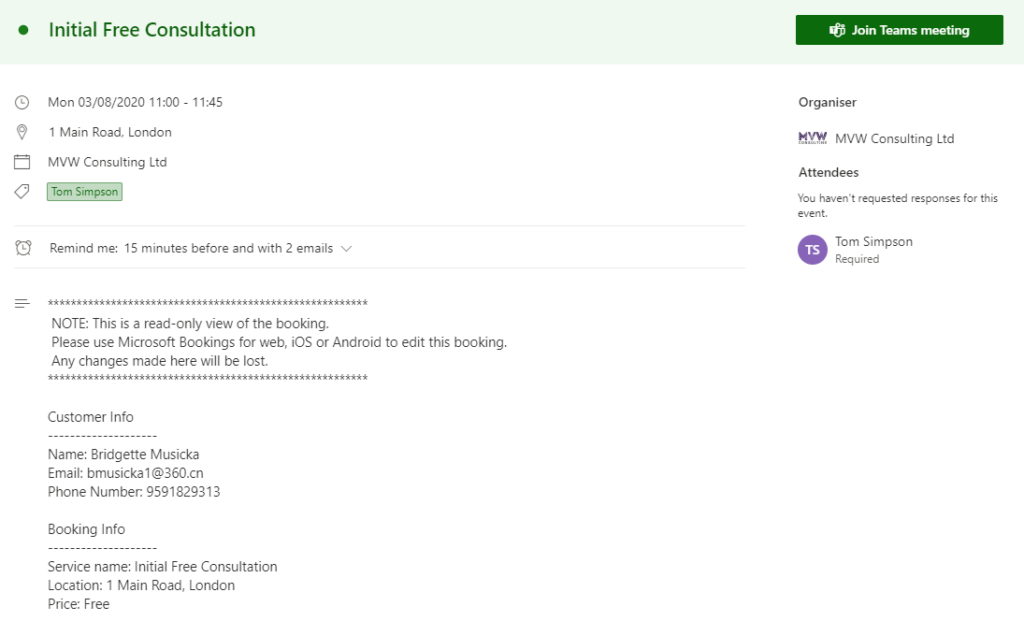
First, if we look at a booking that has been made and open it in Outlook, we can take a look at what is captured. The subject of the appointment is the name of the service that was selected. The staff member assigned to the booking is also added using a category with their full name. Any of the standard fields used on the booking form will be displayed under a Customer info section. In this example, we will focus on the standard fields and sending those along with the type of booking, start and end time, and the consultant or staff members assigned.
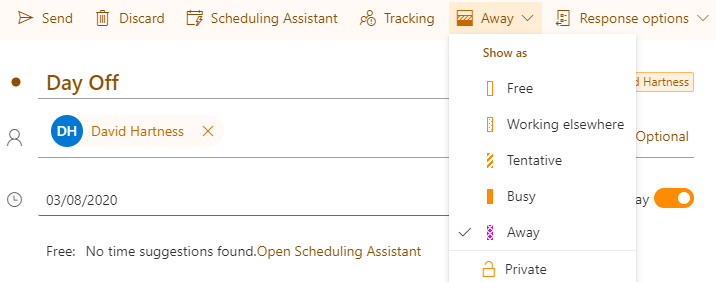
Another thing we need to be aware of, when time off is booked on the calendar, this will also be added to the booking calendar. The appointment will have the Show as option set to Away.
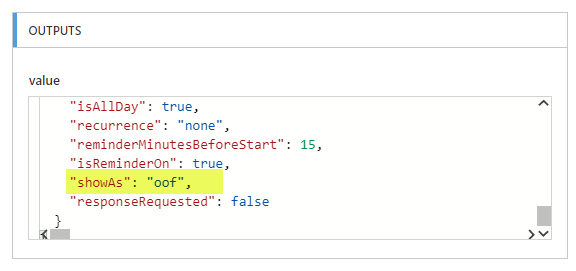
This is flagged using ‘oof’ to show Out of Office. When we send the daily email, we can use this information to exclude those appointments from showing in the list of bookings.
OK. Now that we know a bit more about the Bookings that get made and how they are constructed, let’s move on to Power Automate. First, we will set a Schedule for the trigger and set it to run every day.

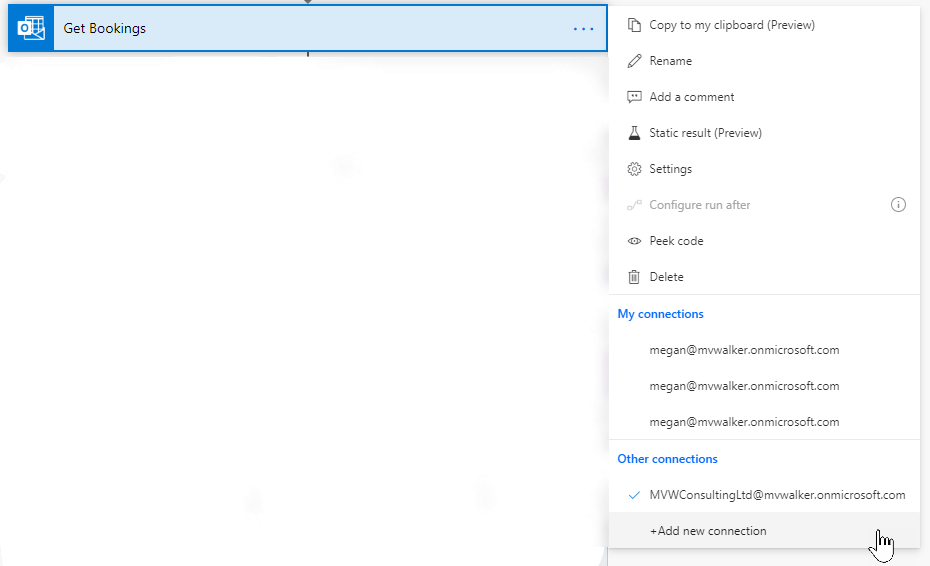
Next, we will use the Get events (currently this is V4) action from the Microsoft 365 Outlook connector. By default it will link the user that is logged in and try and show any calendars owned by that person. However, we need to get to the Bookings calendar. In order to do this, have your administrator go to the Microsoft 365 admin center, then find the calendar in the list of active users. Simply add a password to the user and save it. That’s it! Now from the Get events (V4) action step, click on the ellipsis (three dots) and then click on Add new connection from the bottom. When the login screen pops up, add the email address for the bookings calendar, then the password that was added to the user record.
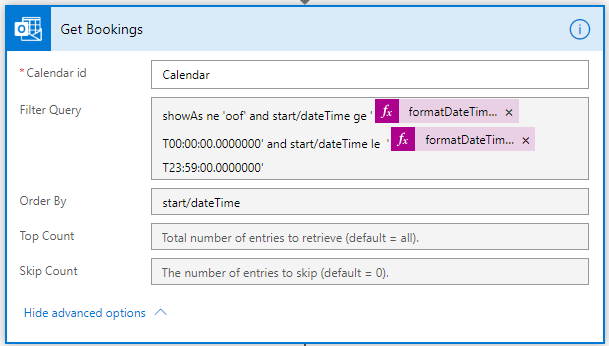
Now you should see the Calendar that is used for the Bookings calendar in the list for Calendar id. Select it (there should only be one, called Calendar). We want to make sure we only get the bookings, so we are going to add a filter query to exclude anything that has showAs set to oof. We also only want bookings that have a start time for today. To achieve this, I’ve used the start value being greater than or equal to the start of the day at midnight, and being less than or equal to the end of the day at 23:59. We can also order, or sort the events that are returned, and will use the start/dateTime to do so.
showAs ne 'oof' and start/dateTime ge '@{formatDateTime(utcNow(),'yyyy-MM-dd')}T00:00:00.0000000' and start/dateTime le '@{formatDateTime(utcNow(),'yyyy-MM-dd')}T23:59:00.0000000'
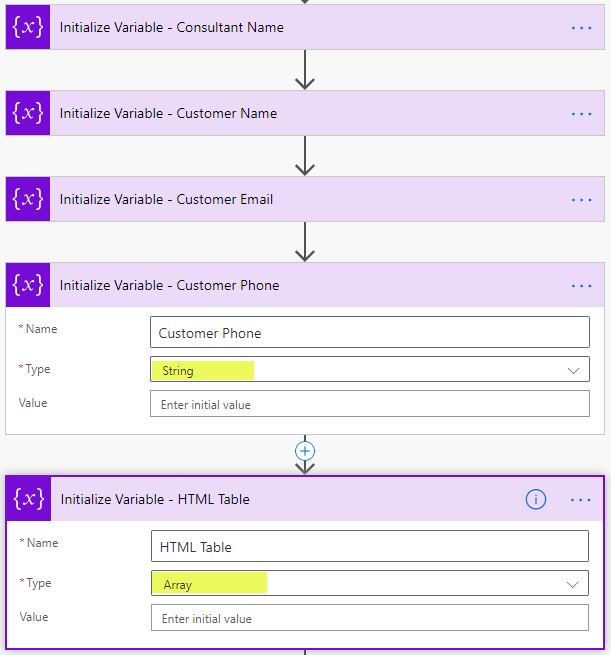
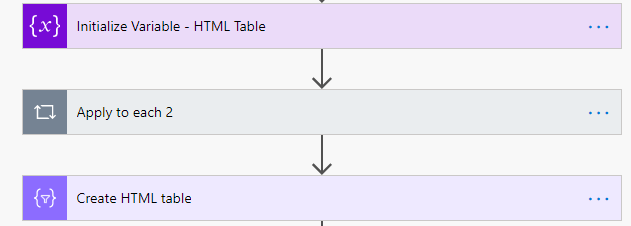
Now we need to add 5 steps, all of them the initialize variable action. The first 4 will have the type of string, and the last one will be an array. Don’t add anything into the value field. We will be populating the values later on in the flow. The string variables are for the Consultant Name, Customer Name, Customer Email and Customer Phone. The array variable will be used so that we can append to the variable and add each event with all of the information about the booking.
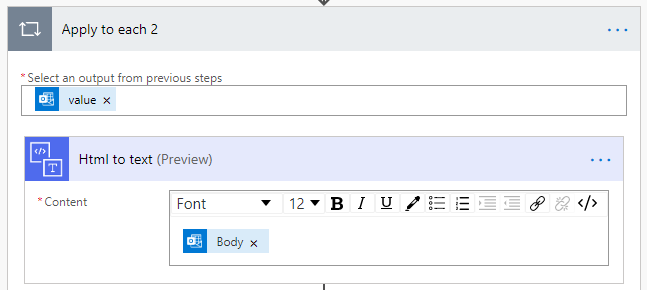
We now need to extract the customer information from each event. Adding in a new action we can take the Html of the event and change it to text. Adding in the Body from the Get events step above, this will create the Apply to each that you see below. This means that the steps that follow will all be applied to each event found based on our filtering criteria.
Going back to the booking, we can see that the Name, Email and Phone Number are added to the body of the event. We need to get those out so that we can use them in the list of bookings to be emailed daily.
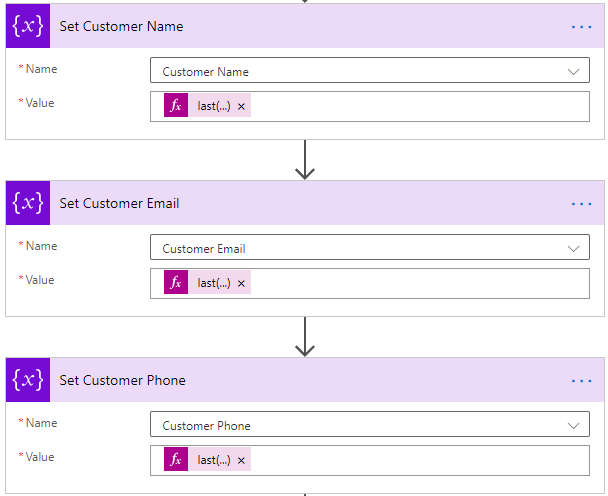
Here is where we use the variables we initialised earlier. Search for the Set variable action. We need to add three of these actions, and we will use these for the Customer Name, Customer Email and Customer Phone. So select them from the drop down. You can see the expressions used in the value for each below. We are basically splitting up the output from the Html to text step above, and getting whatever value we need. For example, for the Customer Name, the name starts after the word ‘Name:’ and then a space. Everything that comes next is the name, up until we get to the word Email. So we can split that part out and extract just the name. For the Email we get everything between ‘Email: ‘ and the word Phone on the next line. For the Phone Number, we get everything between ‘Phone Number: ‘ and then the word Booking on the next line.
@{last(split(first(split(outputs('Html_to_text')?['body'],'Email')),'Name: '))}
@{last(split(first(split(outputs('Html_to_text')?['body'], 'Phone')), 'Email: '))}
@{last(split(first(split(outputs('Html_to_text')?['body'], 'Booking Info')), 'Phone Number: '))}
Make sure you check to see what information is coming through on your appointment entries on the booking calendar. If you have this setting on the Booking page deselected, you will have extra information coming through into the Customer Info section on the bookings.
You can see below that after the phone number you have the Time Zone, so if you use the expression above to get the Phone Number, the Time Zone would also be included because that comes before the Booking Info. Just something to keep in mind to make sure you adjust these steps to work for your own scenarios and requirements.
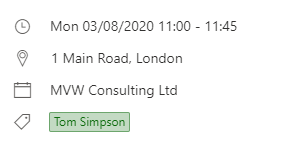
Next we are going to get the Consultant or Staff member assigned to the booking. The easiest thing to use is the Category that has been assigned. We can see in the calendar that Tom Simpson has been assigned as a category to indicate that the person Tom Simpson is going to work on this booking.
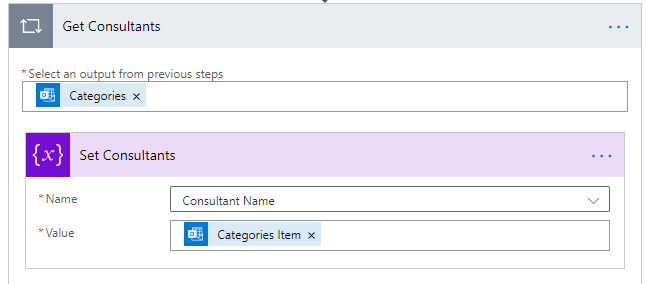
Add another Set variable action. This time pick the Consultant Name variable, and add Categories Item as dynamic content from the Get events step. This will then create an Apply to each. There should only be one Category though. Close the Apply to each once you have added it so you don’t mistakenly add more steps to it.
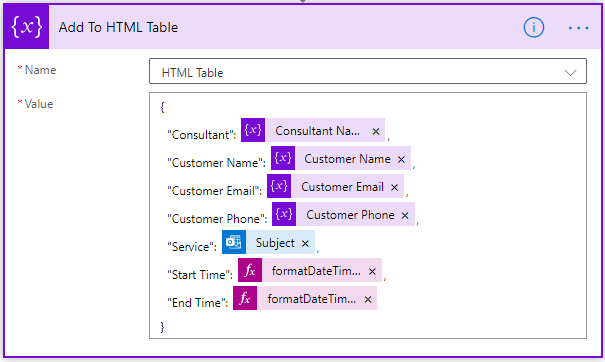
The last step in the first Apply to each is to use an Append to array variable action. Select the HTML Table variable, and then add in the values you want in the array. For the service booked, I’ve just used the Subject of the event which is nice and easy! For the Start Time and End Time I am just formatting those two values to just show the day, month and time using an expression (see the expressions below). We are taking each event found, and all of the formatted extracted values, and adding them to the array, which is essentially creating a list of all the events.
@{formatDateTime(items('Apply_to_each_2')?['start'],'dd/MM hh:mm tt')}
@{formatDateTime(items('Apply_to_each_2')?['end'],'dd/MM hh:mm tt')}
Now minimise the Apply to each. Everything else that we add sits outside in the main flow area.
Add an action using Create HTML table. Use the output from the Array variable of HTML Table. You can leave the columns to be created using the Automatic option.
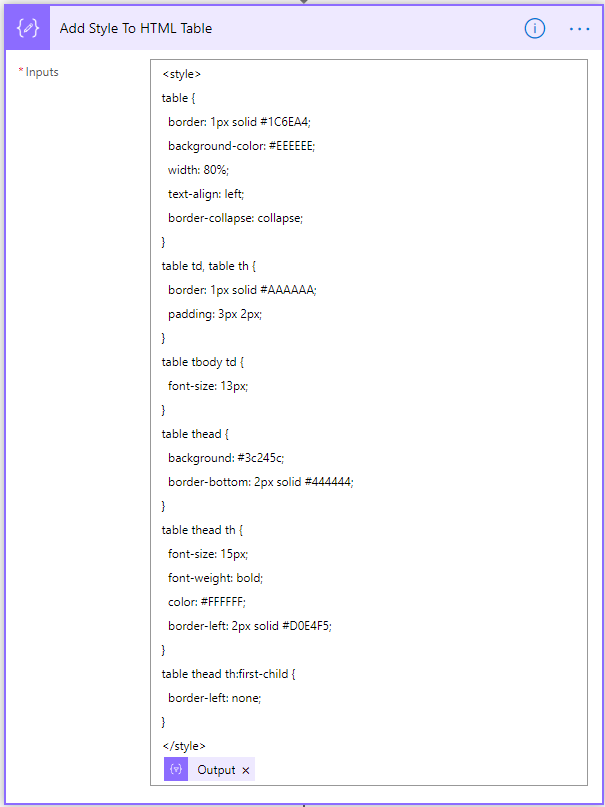
One thing I always like to do when using an HTML table step is to make it look a bit prettier than how it comes out by default. Check out this post from my friend Ryan Maclean for steps and tips on styling the table. All we are doing here is adding a Compose step, adding some CSS at the top, then using the Output from the step above.
The last step, sending the email. Add in the To person or email, then the subject, then whatever you want in the body. Then add the Output from the step above.
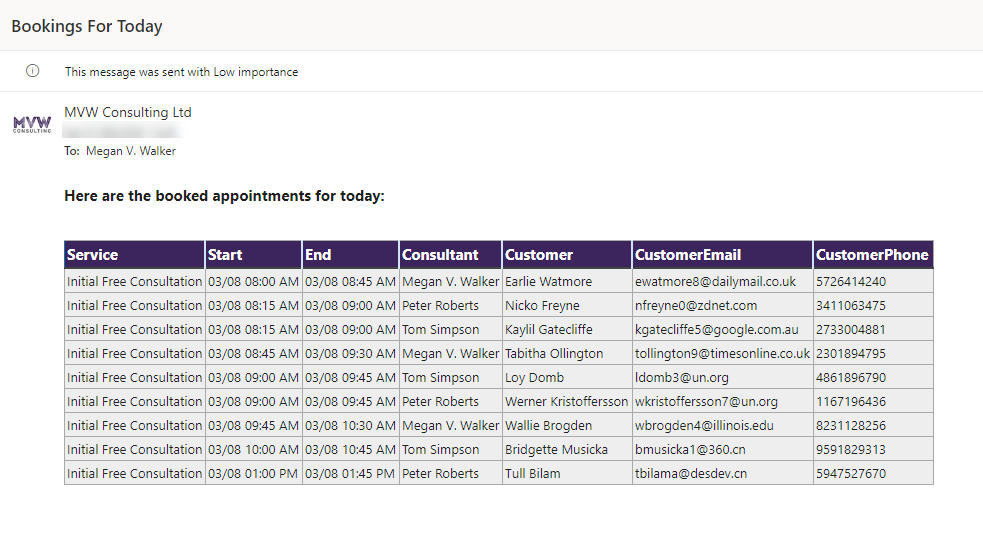
Here it is! The finished email, complete with a formatted table, and a list of all of the bookings for a specific day.
Hopefully you can see there are so many different variances of this you could use. You might want to have a step to check how many events are found, and if there are none, don’t send the email, or send it but indicate that no bookings have been found. So tons of options! We will cover more in future posts that delve further in to using Power Automate alongside Microsoft Bookings. You can watch a video on this here.
Check out the latest post:
Assign Records To A User Or A Team From Your Custom Page
This is just 1 of 571 articles. You can browse through all of them by going to the main blog page, or navigate through different categories to find more content you are interested in. You can also subscribe and get new blog posts emailed to you directly.






Hi very interesting article about how using Flow and Bookings and very usefull for a manager or individually – thanks a lot !!!!
Thanks Georges! Glad it was interesting.
Thank you so much for publishing this blog! I was able to adapt this to capture booking information in real-time to SharePoint and integrate with our Power Apps Canvas apps for our partners! Bookings has become so much more useful. I really hope Microsoft builds a native Power Automate connector with support for custom bookings fields soon!
That’s so good to hear David! Your solution sounds really cool! Yeas, a native Power Automate connector would be awesome. I know you can do stuff with the Bookings Graph API but I’ve never dug into it. https://docs.microsoft.com/en-us/graph/api/resources/booking-api-overview?view=graph-rest-1.0 – it might be easy to use for some, but I found my approach to be something more achievable for the masses!
Hi Megan,
Great example of getting the most of of Bookings.
My question is where did you get the output info where you find the “showAs” field with the value of “oof”?
I’m trying to use this example you have (with some modifications) but can’t find that anywhere.
Thanks,
Steve
Hi Steve. I got the output from the second step for Get events (V4) action. If you did that and then looked at a successful flow run, then you would see all of the events in the output. I ran that first, and noticed the showAs field and realised I needed to omit the ones that showed as oof.
Hi Megan, thanks for your great post. I am trying to implement it and it worked perfectly.
I just cant remove the \r\n in the customer information from the generated eMails. Do you have any ideas how to get rid of the \r\n in each field? That would make my eMails so much prettier 🙂
Roger
Hi Roger, apologies for the delay, I’ve been on holiday/vacation all week. I’ve looked back through my post, and I can’t see which step you are referring to as to why you get \r\n. Can you provide more detail? Or send me a message with more detail via my Contact page, then I can follow back up.
Hi Megan, thanks for your reply. I have the \r\n in the eMail see: https://photos.app.goo.gl/FstscVZSztMQ6ud38
It looks like the flow includes the line breaks from the calendar event during the parsing and generation of the email text.
Maybe this is something that happens in the German version of Bookings.
Ah OK. You could try using trim to remove the leading and/or trailing spaces on those items. https://docs.microsoft.com/bs-latn-ba/azure/logic-apps/workflow-definition-language-functions-reference#trim – so after setting the variables, when adding to the HTML table, use trim(variable) (whatever the variable is) and put that into the table. It should remove the spaces/line breaks.
Hi Megan,
Thanks for this outstanding “How to”! This is my first go at Power Automate and the way you have written this up made it really simple to follow.
Whilst I can get the whole thing working I have encountered a snag which may just be a limitation of how Bookings interacts with it’s Calendar. In my case I have just one Service which is using the “maximum” attendees feature, currently set at 4 (ie >1).
When the power automate fetches each booking from the calendar, the body returned and converted to text looks like this:
\r\n******************************************************** \r\n NOTE: This is a read-only view of the booking. \r\n Please use Microsoft Bookings for web, iOS or Android to edit this booking. \r\n Any changes made here will be lost. \r\n******************************************************** \r\n \r\nNOTE: This is a Multi customer booking. Log into Bookings to see customer information and notes for this event. \r\n \r\nBooking Info \r\n——————– \r\nService name: Visit Us! \r\nLocation: Level 7, 15 William Street Melbourne \r\n\r\n
In other words, I think it only returns the Booking Info section, but not the Customer Info section. BTW, my attendees are always employees (all having O365), I’m not sure if that’s contributes to the problem.
I suspect that this may because Bookings is storing the multiple “Customers” as some type of sub record rather than just in the HTML body of the Calendar entry. I was wondering if you had any thought on how I could try digging deeper into the Calendar event to find the missing info?
Hi Neil. I hadn’t tested it with multiple, but see the same as you. If it’s not in the calendar entry, then it might not be possible with this method. I haven’t looked at it, but you can also get Bookings Appointments via Microsoft Graph API: https://docs.microsoft.com/en-us/graph/api/bookingbusiness-list-appointments?view=graph-rest-beta&tabs=http – so it might be possible using that method… not sure.
Megan Help me.
I made a Bookings as a Group Bookings.
Name, email, and phone number is still required.
But on my calendar, the name, email, phone number is not displayed.
Custom fields are set thou.
But when i export the TSV files, im able to see all of the details of name email and phone number.
Just it doesnt appear in the calendar.
Is there any way I can edit the templates? or is it fix by microsoft?
Hi, it’s fixed by Microsoft. I had noticed the same thing, unfortunately. I do know there are some changes coming in the future with Microsoft Bookings, so it might change, but I don’t have any specifics. For now, you would not be able to use my method to get a summary of Group Bookings. You can also get Bookings Appointments via Microsoft Graph API: https://docs.microsoft.com/en-us/graph/api/bookingbusiness-list-appointments?view=graph-rest-beta&tabs=http – so it might be possible using that method… not sure.
Hi Megan,
This is a wonderful guide and get help but I have one issue, where the variable doesn’t increment to the next Customer Name, Customer Phone, Customer Email. But does pickup the rest of the data correct.
Hi Steve, sorry for the relay in responded. Is that if you have bookings that allow for more than one person to be in an appointment? If so, yes, I am not sure how to handle that with this approach. There is a Microsoft Bookings API you can use with Microsoft Graph: https://docs.microsoft.com/en-us/graph/booking-concept-overview
I’ve not looked at it, not really my area of knowledge or expertise…. But if you are a bit techie, you might be interested in reviewing?
This was incredibly helpful! Thank you so much. I’m brand new to Power Automate, and was able to put this together in less than a day. Worked great!
That’s awesome! So glad it worked Katie. 😊
Hi this is fantastic and I have managed to test an adaptation on a calendar that I have access to. Can you expand on: “have your administrator go to the Microsoft 365 admin center, then find the calendar in the list of active users. Simply add a password to the user and save it. That’s it!”
As I have had the following back from our IT guys: “it looks like there is no such password associated for the account BookingsCalendar@ourcompany.onmicrosoft.com
As it is as autogenerated system account from Microsoft and its doesn’t operate like a normal outlook calendar like mine and yours.”
Can you help further – do they need to assign a licence to the account or can they add a password and the connection work without a licence?
Any help appreciated.
Kind regards
Jon Biel
Thanks for the comment! I thought it would be easier if I emailed you back so that I can include a few screenshots for you, so hopefully what I sent will help. For anyone reading who might have the same question, first, if they go into Microsoft 365 Admin center, then go to all users, there SHOULD be a user listed with the name of your Bookings calendar. Under the licenses column, it would be listed as unlicensed. If that user is opened (or they can click on the key icon that shows in the list), then they can click on Reset password. That’s it, pretty straight forward. Once they have done this, you can then use the password to connect to that account in your flow in Power Automate.
Hey there Megan,
Very nice tutorial. When testing the flow, I get an error at the “Apply to all” step and in it when “Adding the HTML table”: BadRequest: The variable “html_table” of type “Array” cannot be initialized or updated with a value of type “Object”. The variable “html_table” supports only values of the following types: Array.
I performed all the steps as shown in the video. Do you have any idea what I am doing wrong? Many greetings from Germany
Hi Christopher, can you check your steps where you initialise the variable, and make sure the one you are using for the HTML table has the type of Array?
Hi Megan,
Thank you for the fantastic illustration, we are planning to set up multiple calendars, and we want to have a PowerAutomate flow triggered from all the different calendars.
Do you have any idea for a workaround to build a single flow triggered from multiple calendars? Is that something doable?
Thanks!
Hi Muhammad, you could have a switch statement near the top perhaps? Maybe have something that checks who the organiser is… which should be the name of the calendar. Then have a switch control that has a number of cases and then if it’s Calendar A, have a step where you have logged in as that user and do the rest of the steps, then a case if it’s Calendar B and so on.
Thanks a lot Megan for the swift reply, I was hoping to find a way to dynamically loop on different calendars (the calendar id can be retrieved from a table – so we can add new ones in the future) but it looks like it is not possible to configure the connection of Get Events programmatically.
No, as you’ve found, it’s not going to be possible based on needing those connections made. I think the switch should give you the ability to do what you need, but you will need to have one Outlook action step for each of your different calendars.
Hi Megan, thanks for your sharing.
One problem I faced is that I got the power automate email successfully but which only include 1 booking appointment in the list. However, actually I have 7 booking appointments today. I would like to ask for the solution for this, thanks!
Hi Nathan, sorry for the delay. Were you able to resolve this? Very hard to know why you only have one without seeing the flow. In the step where you are getting the Bookings, make sure you do not have anything in the Top Count field? If there is anything there it would filter the number of Bookings being found. Also making sure that the Create HTML table sits outside of the Apply to each step, otherwise it would just overwrite your data each time.
HI Megan,
First off thank you so much for this idea, I am relatively new to customizing systems myself so this has been a great help. One thing I am having an issue with is when I try to use your code snipped I am unable to use “showAs” in the expression builder, it is not an option.. can you tell me how I use this code? do I simply paste it in the filter query and omit the expression editor?
Hi Nathan, when you are adding that action, you should be able to click on the expression tab in the fly-out that opens on the right. Then paste in the code that I provided.
Still works in June 2022. Thanks for putting together this guide!
Great, glad it still works for you!