*** NOTE: ALL INFORMATION IS ACCURATE AT DATE OF PUBLISHING ***
If you have used Dynamics 365 for any length of time, you probably know what a Business Process Flow or BPF is. A Business Process Flow in Dynamics 365 gives users a clear, step by step path to follow so records are handled consistently. It keeps teams aligned by showing exactly where something is in the process and what needs to happen next. For an organisation using a BPF, it’s important to keep things up to date even when using a Custom Page to change information on a record. So this post shows how you can set a business process flow stage directly from a custom page.
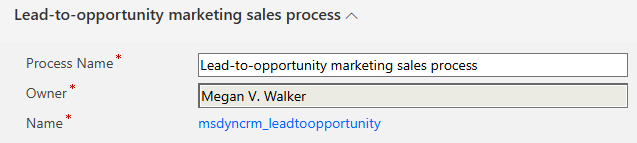
The first thing you need to do is figure out the name of your BPF. You can see it from the top of one of your records, but it can be confusing. This one is called Lead-to-opportunity marketing sales process, but this is NOT the name of it and it will take you ages to figure out what to add to your custom page if you just rely on this.

Instead, go in to your Default solution and find the process name, open it and then look at the name from here. The databased name here is msdyncrm_leadtoopportunity so that is what is important here.
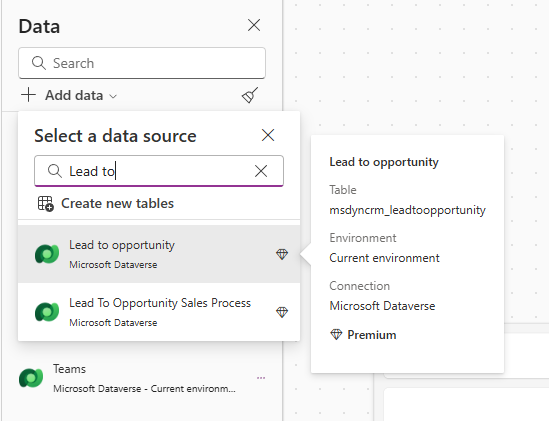
Each business process flow is actually its own table, so we need to add that in the data section of a custom page. This is why it was important to figure out the name of the BPF as just searching for it would make me think it was missing as there was no process name match. Instead, start typing in part of it then hover your mouse so you can see the table name before making sure you are adding the correct one. Each record with a BPF attached will have a row in the table you pick below and it is that record we update to move them in to a new stage of the BPF.
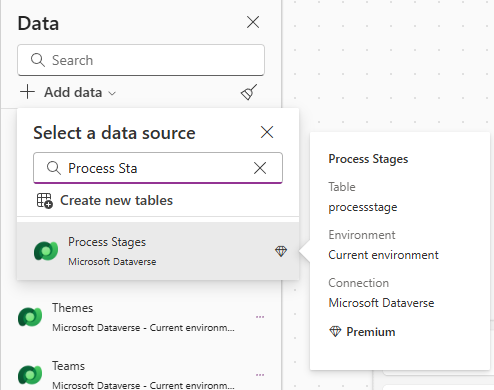
Each BPF has one or more stages which we need to add to the custom page. So add in the Process Stages table too.
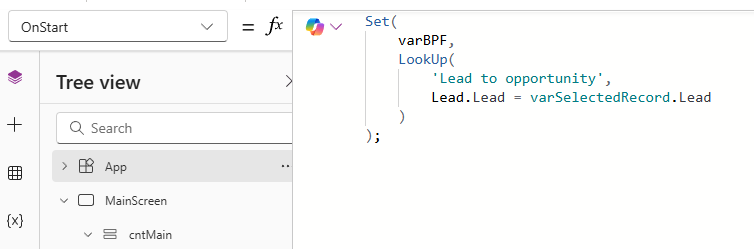
When the custom page opens, we need to find the correct BPF in the table we added that is linked to the selected record (Lead in this case) which is the record we are currently viewing in D3656 (or your test record if viewing in the editor). In the App OnStart code, add in something like this. This will create a new variable called varBPF which will be a look up to the BPF table for the record where the Lead on that table equals the selected record. So if your BPF is on an Account or Contact, you would be matching where that record equals the selected record (the record you are viewing).
Set(
    varBPF,
    LookUp(
        'Lead to opportunity',
        Lead.Lead = varSelectedRecord.Lead
    )
);
The varSelectedRecord variable assumes you have something like this at the top of the OnStart. Refer to this blog post if you are just getting started with your custom page to figure out how to put it together.
Set(
    varRecordId,
    If(
        IsBlank(Param("recordId")),
        GUID("55c3d99f-b85c-f011-bec1-6045bdd07b90"),
        GUID(Param("recordId"))
    )
);
Set(
    varSelectedRecord,
    LookUp(
        Leads,
        Lead = varRecordId
    )
);
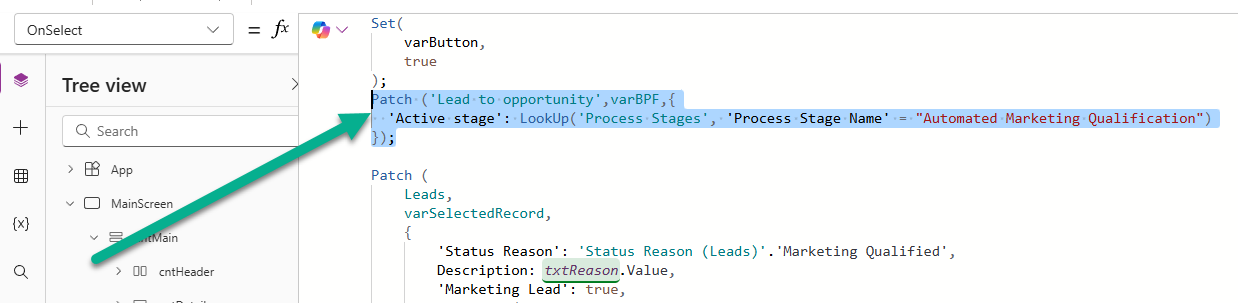
To update the record and move it to the next stage (or whatever stage you want it to be in), you will need to have a Patch statement. This will be triggered when someone presses a button on my custom page. This will Patch the BPF table (the one you added from the OnStart of the App), and specifically the record that was added to your varBPF variable. We are then going to set the Active stage field on that record and use a LookUp to find the right stage name. For this, you will add the name of the stage in quotes. You can get this name by viewing a record with the BPF active on it, or open the BPF in the edit mode to see which stage you need. You can of course add If conditions to check things before you determine which stage it should go to.
Patch ('Lead to opportunity',varBPF,{
  'Active stage': LookUp('Process Stages', 'Process Stage Name' = "Automated Marketing Qualification")
});
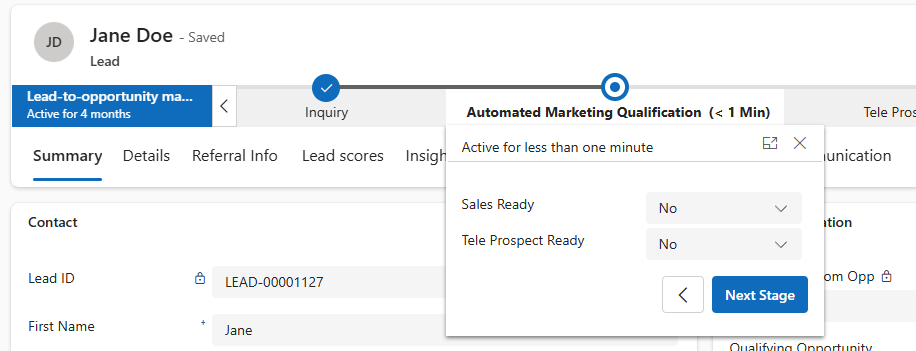
Now when someone presses a button or interacts with your custom page, it will move to whichever stage in the BPF you wanted set. Pretty straight forward really!
Check out the latest post:
Adding Custom Pages To A Model Driven App Navigation
Considering Custom Pages?
Thinking about using Custom Pages but unsure where they fit best?
I help organisations design model-driven experiences that are intuitive, scalable, and built for real users, not just technical possibility.
This is just 1 of 584 articles. You can browse through all of them by going to the main blog page, or navigate through different categories to find more content you are interested in. You can also subscribe and get new blog posts emailed to you directly.