*** NOTE: ALL INFORMATION IS ACCURATE AT DATE OF PUBLISHING ***
If you’ve been around for some time in the CRM/D365/CDS/Oakdale/Dataverse world, you will at some point have created a Calculated field. The ability to do sums, division, multiplication, setting values based on other fields is nothing new. A replacement for these calculated fields is to create them using the formula option. Formula columns have been around since 2021, but they only became production-grade in late 2023 so it’s possible you might not have used them before. They use a language called Power Fx, where Intellisense suggestions are provided as you go, helping you fix errors and understand the logic. Even if you have dabbled, I thought this list of some examples of Power Fx Formula Fields might be useful.
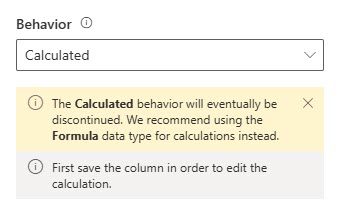
First, this is what you will see if you continue to create Calculated fields. Microsoft suggests using the Formula option instead. Although that suggestion is there, not all scenarios can be met with a Formula field. You can find the guidelines and limitations in the official documentation here, but something not listed but not supported is to reference single text fields that are the type of Email or URL. So if you wanted to check if the email field contained data in a formula, or use data from a field that was a website URL for example, it’s not currently possible. Just be aware and check out the information if you run in to any issues.
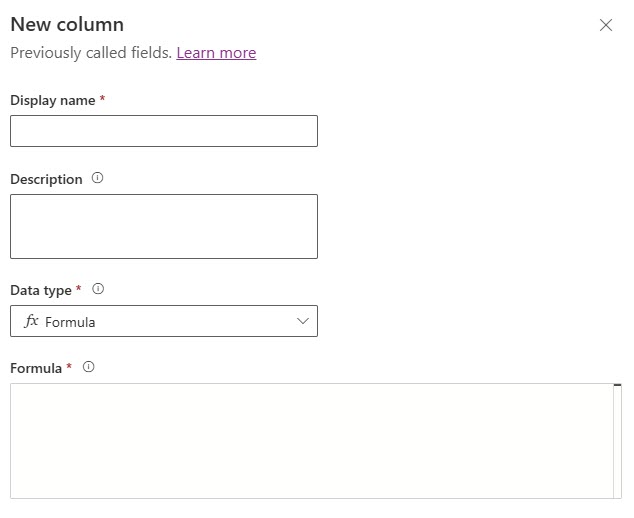
When adding a new formula column, select the datatype from the list of options. The Formula box is required and the space in which you will add your Power Fx expression. As you start typing, it can take a moment before it catches up with you and acknowledges and finds the fields and tables you are searching for, so be patient!
After you have saved the new Formula column, the data type will change and show you what kind of result the expression will yield. However, you will always know it is a formula field by the appearance of an fx icon next to each one.
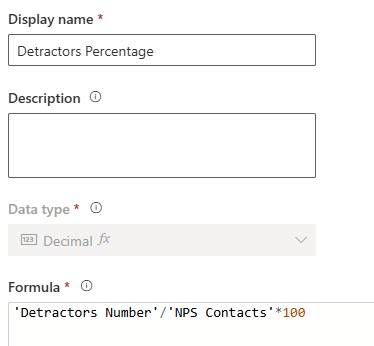
Basic Percentage Fields
A simple one to get started, and this applies to anything where you are doing a sum of some kind. Here we have a field that will provide a percentage using the values from two fields, dividing them and multiplying by 100. In this case, we use the / character for divides and * for multiplied.
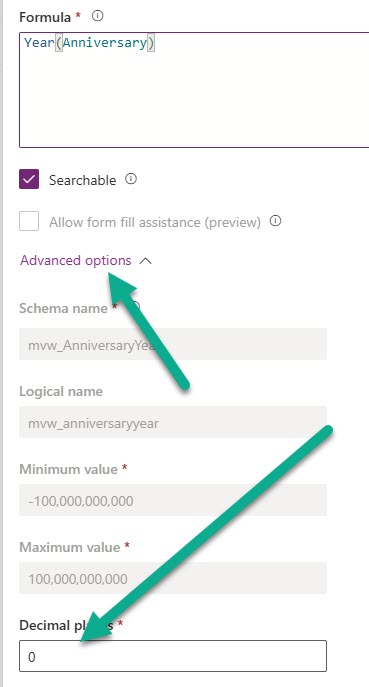
After you have saved the field, go back in to it and click on the Advanced Options. By default, if it has determined the data type is Decimal, the Decimal places will be set to 2. This might not work for the requirements of your field, so you can adjust it and set to 0 (or whatever makes the most sense).
'Detractors Number'/'NPS Contacts'*100
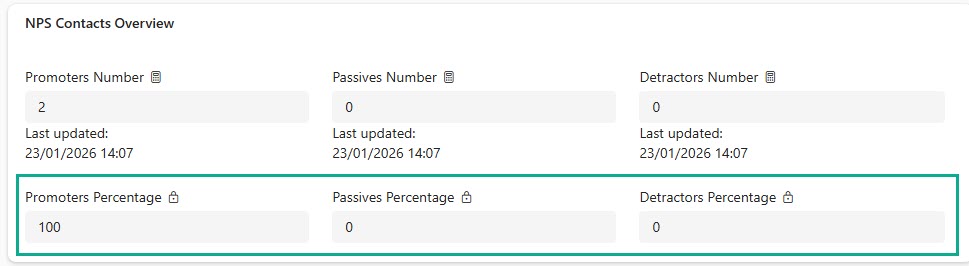
Here we can see several formula fields to show percentages linked to Net Promoter Score.
Calculations For Net Promoter Score
I’ve written about Net Promoter Score a few times, and have a process built in my own environment to capture the number of Promoters, number of Passives and Detractors, and also the percentage of each (which you can see in the example above). The Net Promoter Score formula is very specific.
We can achieve this only if we have fields that contain this information. I also only want to set a Net Promoter Score if we have at least 1 Promoter or at least 1 Detractor, otherwise we will make the field blank rather than letting it be zero. In the case of NPS, zero can be a legitimate score (can range from -100 to +100). After saving, be sure to open the column again to change the decimal places.

If('Promoters Number'>0 Or 'Detractors Number'>0,'Promoters Percentage'-'Detractors Percentage', Blank())
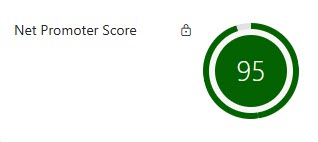
We can then see the value displayed. In the example below, I have added the Radial Score Control to the field so we can see a nice colour (more on this next).
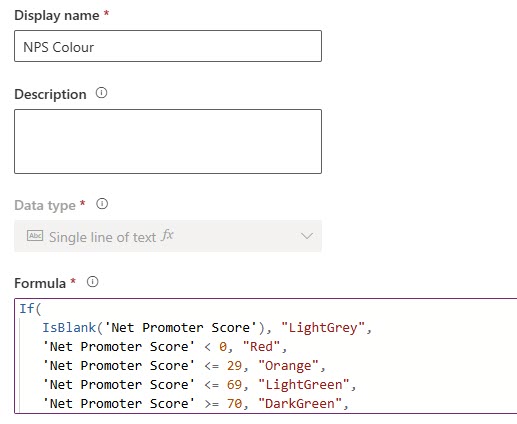
Text Field To Display Colours
This one is a field I have used in conjunction with the Net Promoter Score field, and you can see the example of it above, and also how to link it to a control component in this post. In the formula below, we are using the formula field created of Net Promoter Score, then checking if it is blank first and setting the text of LightGrey. Then going through we are doing checks to set Red if less than 0, Orange if less than 29 and so on. The colours are in the format of a keyword for named colours. Not all work, but you can find a list here to make sure you are using the correct ones.
We can then use a control like the radial score and then bind the colour to this column. The control will then use the named keyword logic to display the colour based on the value of the Net Promoter Score.
If(
   IsBlank('Net Promoter Score'), "LightGrey",
   'Net Promoter Score' < 0, "Red",
   'Net Promoter Score' <= 29, "Orange",
   'Net Promoter Score' <= 69, "LightGreen",
   'Net Promoter Score' >= 70, "DarkGreen",
   "Grey"
)
Create A Dynamic URL
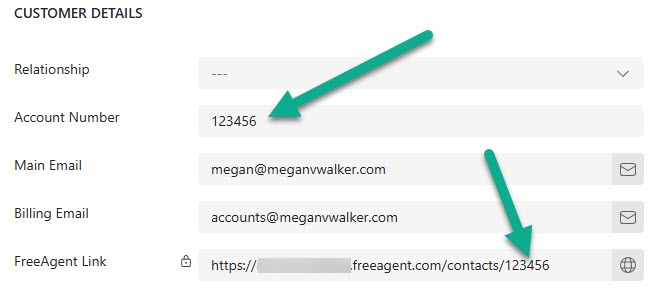
Although we can’t check URL or Email fields within a formula, we can set a URL using a Formula. Here I have created a URL that when clicked on will take me to the same Account in my finance system (FreeAgent). The basic link is the same, but the end of the URL gets a number on it. This makes it really easy to generate dynamically if I store that number in the Account Number field. If the Account Number field is blank, we don’t add anything to this field. Once you have saved the column, open it back up and you can then change the Format to make it URL which gives you a clickable option from the field rather than just a standard text field.
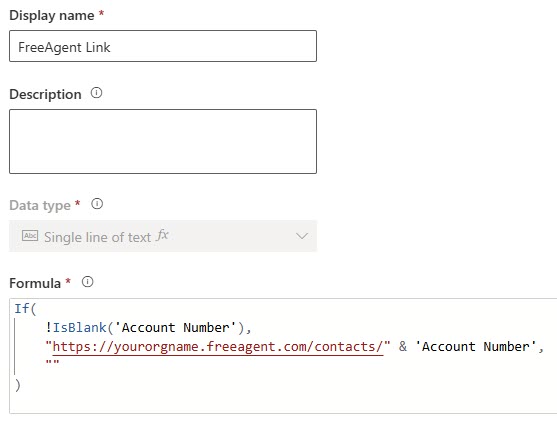
If(
    !IsBlank('Account Number'),
    "https://yourorgname.freeagent.com/contacts/" & 'Account Number',
    ""
)
Here we can see the Account Number field has a value, so the link is generated that can be clicked on. Nice!
Format Using Upper & Lower Case
This one I have used in my system to set a formatted first name and last name field to use in my marketing emails. It is not fool proof, especially where people use upper case letters within the middle of a name, so review and use with caution to see if you think it would fit in your own system. This checks the standard first name field and takes the first letter and makes it upper case, and the rest are made lower case. Then I have another one checking the last name field and doing the same. You might see a use for this on other fields that should always start with an upper case letter, or perhaps one where you want to set them ALL as upper or lower.
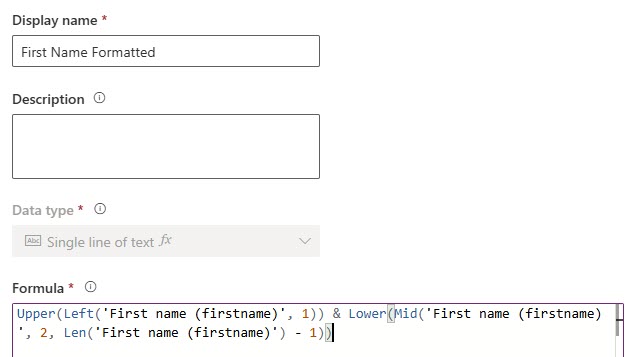
Upper(Left('First name (firstname)', 1)) & Lower(Mid('First name (firstname)', 2, Len('First name (firstname)') - 1))
Upper(Left('Last name (lastname)', 1)) & Lower(Mid('Last name (lastname)', 2, Len('Last name (lastname)') - 1))
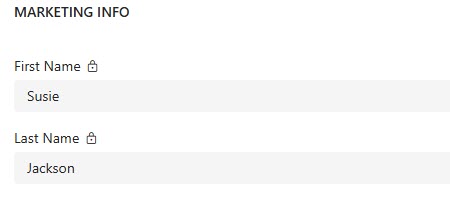
Now even if someone fills out a form submitting their details and the formatting isn’t quite right, you can have two other formula fields that adjust that formatting automatically for you.
Setting A Choice (Optionset) Value Dynamically
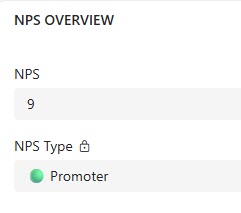
Here we can use a formula to set the value from a Choice field. We are checking a field called NPS to see what the value is, and depending on this we can then use a global choice field to set the specific value. As you type the name of the choice field, add a dot/fullstop/period right after and then it will show you all the possible values from that field. Here we can see that less than or equal to 6 is Detractor, greater than or equal to 9 is Promoter, 7 or 8 is Passive and otherwise it would be blank.
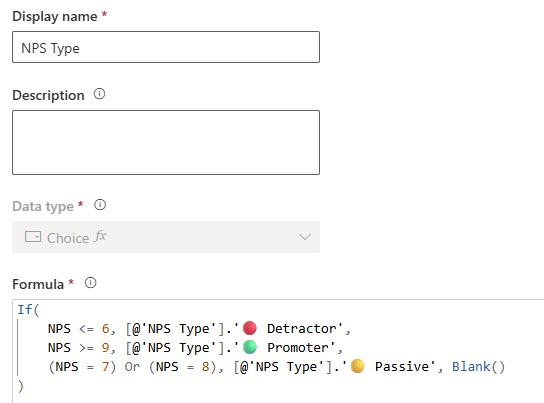
If(
    NPS <= 6, [@'NPS Type'].'🔴 Detractor',
    NPS >= 9, [@'NPS Type'].'🟢 Promoter',
    (NPS = 7) Or (NPS = 8), [@'NPS Type'].'🟡 Passive', Blank()
)
Using a formula to set a Choice field where the logic is already pre-determined (rather than someone just picking manually from a list) is a great way to keep your records up to date, and eliminates the need to have any business rules or workflows running to do it.
Record Created Today Yes/No
This is another one I use in various places in my own system. I have a process that sends out emails about new blog posts, based on if the post was created today and is therefore a New Post. For this, we are setting a field that will end up with the Data type of Yes/No. I am checking to see if the Created On date is within the last 24 hours. If it was, the field would be set to Yes, otherwise it would be No. Checking “within the last 24 hours” is usually more reliable than trying to define “today” because of how time works across systems and users. It gives more consistent results but might not be right for every scenario. This allows me to run a Journey to find if there are any New Posts that need sending out. You can see how I have used it in this post on sending blog post emails that come in from an RSS Feed.
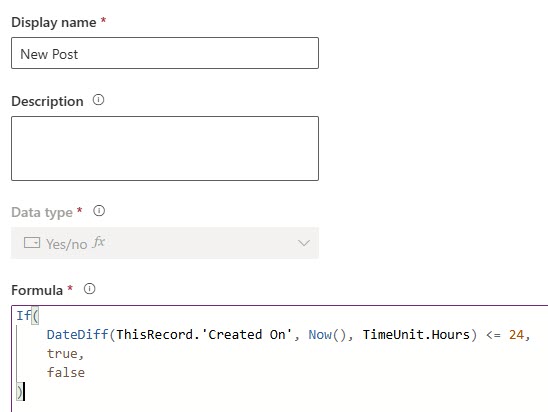
If(
    DateDiff(ThisRecord.'Created On', Now(), TimeUnit.Hours) <= 24,
    true,
    false
)
Record Created This Month Yes/No
Along similar lines, but this one is used to show if a record was created this month and gives a Yes or No field outcome. Checking the Created On date of a record, then seeing if the Month difference from that date to the current date is zero, meaning the months are the same. If that is the case, we set it to true (Yes), otherwise false (No). You can see where I have used this for sending out monthly updates for blogs using Customer Insights Journeys.
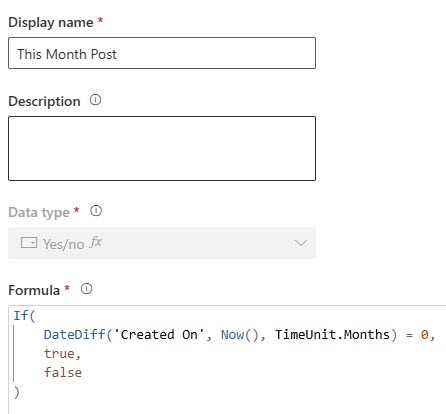
If(
    DateDiff('Created On', Now(), TimeUnit.Months) = 0,
    true,
    false
)
Record Created Last Month
This one is the same as above, but give the option for records created last month. Instead of comparing the month difference and looking for 0 (same month) it looks for those where the difference in months is 1, so therefore the previous or last month.
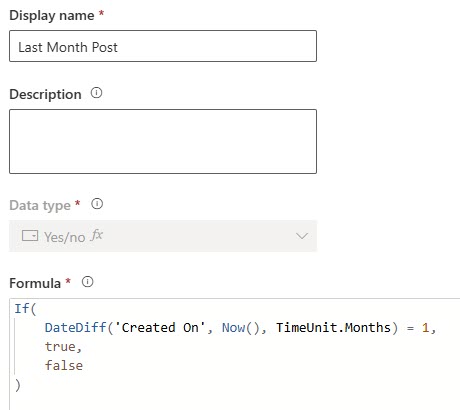
If(
    DateDiff('Created On', Now(), TimeUnit.Months) = 1,
    true,
    false
)
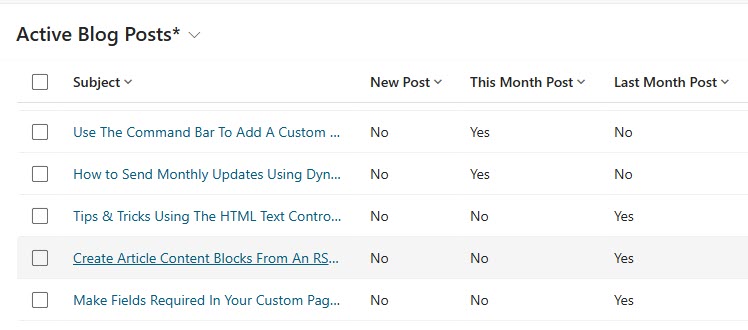
You can see all three fields used below to show New Post (is today), This Month Post (created within the current month) and Last Month Post (created in the previous month). All formulas that update right away so no faffing about with workflows or business rules on these.
Year From Date
If you want to display the year only from a date, we can do that with a formula too. If a field (Anniversary in this example) doesn’t contain anything, we will set it as blank, otherwise, we will take the year from that date.
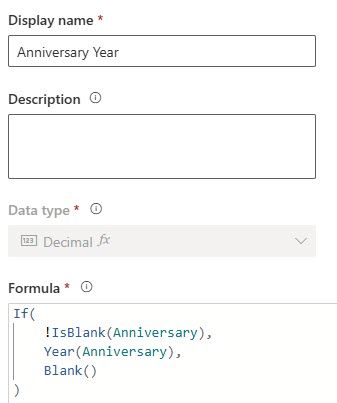
If(
    !IsBlank(Anniversary),
    Year(Anniversary),
    Blank()
)
Now, if you have worked with calculated fields before, and wanted to show something that is essentially a number (notice above it sets it as a Decimal), you will know that frustration that those fields use the global formatting structure you have set up in your system. A year, is 4 digits, which it looks as being over 1000. So 2022 would be 2,022 when displayed. Although users would get the idea, it doesn’t look so good. If you don’t care about trying to do sorting or filtering based on the fields (greater than or less than for example) and it needs to be displayed as a year would without the comma, you can format the year as a text field instead. Notice below our formula is pretty much the same but instead we are telling it to display the Year from the date as text. The "0" tells Power Fx to convert the number to plain text with no extra formatting, ensuring a clean numeric string.
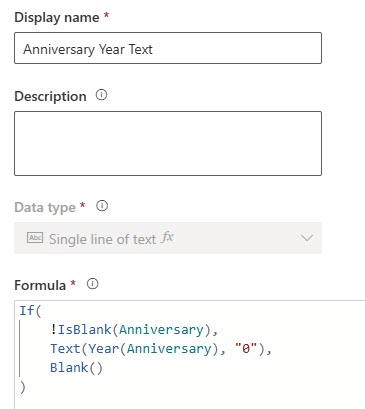
If(
    !IsBlank(Anniversary),
    Text(Year(Anniversary), "0"),
    Blank()
)
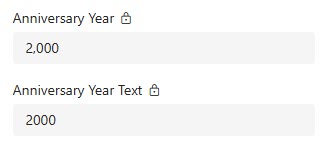
Here you can see what each option looks like. So going right to the Year and it displays as a number with a comma first, then the formatting when it is adjusted with the Text function included. Your choice!
All of the next ones are going to be created based on the Anniversary field too. Think of using a birthday, renewal date or other field in your system then calculating how many years since that date, how many days till that date rolls around, how many months, and what the ‘age’ will be on the next date.
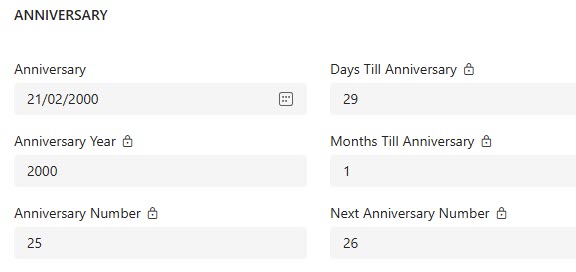
Anniversary Or Age Number
Lets consider wanting to see quickly how ‘old’ something is. We can count how many years between that date and today. We compare to see if the date this year has passed and adjusting to subtract 1 if it hasn’t already happened. We subtract 1 because DateDiff(Anniversary, UTCToday(), TimeUnit.Years) just counts full year boundaries between the two dates and doesn’t check whether the birthday or anniversary has already occurred this year. Without the subtraction, a date later in the year would be counted as a year older than it actually is.
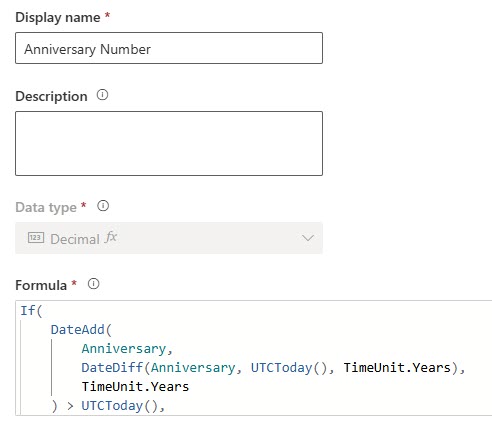
If(
    DateAdd(
        Anniversary,
        DateDiff(Anniversary, UTCToday(), TimeUnit.Years),
        TimeUnit.Years
    ) > UTCToday(),
    DateDiff(Anniversary, UTCToday(), TimeUnit.Years) - 1,
    DateDiff(Anniversary, UTCToday(), TimeUnit.Years)
)
If your date is a date and time field, try this instead using Now() instead of UTCToday().
If(
    DateAdd(
        'Subscription Date',
        DateDiff('Subscription Date', Now(), TimeUnit.Years),
        TimeUnit.Years
    ) > Now(),
    DateDiff('Subscription Date', Now(), TimeUnit.Years) - 1,
    DateDiff('Subscription Date', Now(), TimeUnit.Years)
)
Days Till Anniversary or Birthday
This one tells use how many days until the next anniversary or birthday rolls around. We can then use this for countdowns and immediately see how long we have until something happens. We check the difference between today and the date, then factor that by getting the number of days.
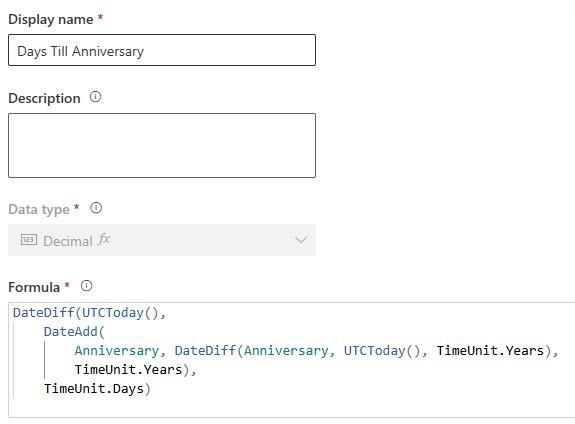
DateDiff(UTCToday(),
    DateAdd(
        Anniversary, DateDiff(Anniversary, UTCToday(), TimeUnit.Years),
        TimeUnit.Years),
    TimeUnit.Days)
Months Till Anniversary or Birthday
This one is pretty much the same as the one for days but the outcome is given to us in TimeUnit.Months rather than the Days TimeUnit.
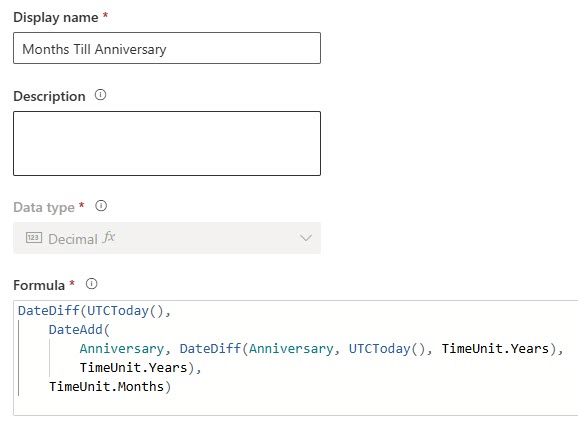
DateDiff(UTCToday(),
    DateAdd(
        Anniversary, DateDiff(Anniversary, UTCToday(), TimeUnit.Years),
        TimeUnit.Years),
    TimeUnit.Months)
Next Anniversary or Age Number
As we’ve seen in other examples, we can use a formula within a formula. This is taking the Anniversary Number field and just adding 1. Simple! We also need to make sure we set it as Blank if the Anniversary field is blank, otherwise the outcome would end up being 1 which would be inaccurate.
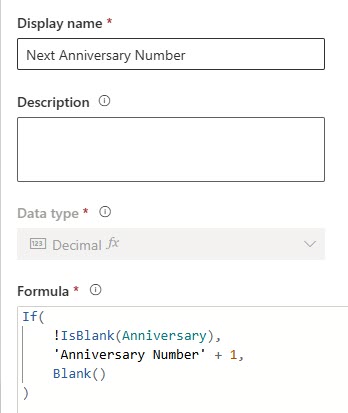
If(
    !IsBlank(Anniversary),
    'Anniversary Number' + 1,
    Blank()
)
Weekdays Since Date
Let’s say you want to track how many days since (or until) something happens but you want to exclude Saturday and Sunday, because the weekends should not be taken in to consideration. This one works by getting the total days between your two dates, then subtracting 2 days per complete week (for each 7 days), then checks the remaining days to see if they cross a Saturday or Sunday based on what today is. It was a challenge to do this one let me tell you! Depending on what you are tracking, you might need to have a new date field depending on how it was originally set up (if it is time zone specific, date/time etc).
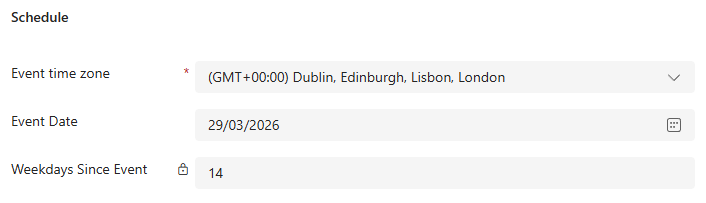
If(
    'Event Date' > UTCToday(),
    0,
    DateDiff('Event Date', UTCToday(), TimeUnit.Days)
    - (RoundDown(DateDiff('Event Date', UTCToday(), TimeUnit.Days) / 7, 0) * 2)
    - If(
        Mod(DateDiff('Event Date', UTCToday(), TimeUnit.Days), 7) >
        (7 - Weekday('Event Date')),
        2,
        If(
            Weekday('Event Date') = 7,
            1,
            If(
                Weekday('Event Date') + Mod(DateDiff('Event Date', UTCToday(), TimeUnit.Days), 7) >= 7,
                1,
                0
            )
        )
    )
)
Your Formulas
If you are new to the formula fields, hopefully this has given you some examples to think about. Or, do you have any examples you are already using? Share in the comments, would love to add them to the list. Are you trying to create something and not sure how? Ask below and I will take a look for you.
Check out the latest post:
Create A Segment Using Unmapped Fields On Marketing Forms in Customer Insights Journeys
Planning your next phase?
Upgrade without starting over
Whether you are adding new teams, regions, or functionality, I help you extend Dynamics and Power Platform and help improve forms, flows, and apps so people actually want to use them.
This is just 1 of 601 articles. You can browse through all of them by going to the main blog page, or navigate through different categories to find more content you are interested in. You can also subscribe and get new blog posts emailed to you directly.
Hi Megan,
thanks for this, I love power fx formula fields. You have just inspired me to figure out something that I should have figured out a long time ago.
I thought you could not use currency columns as source data in power fx formula columns. Turns out if you just wrap the field name in the decimal() formula it works fine. I am going to spend more time trying to push the limits of these column types. I’m also really interested in the prompt data type when that goes GA.
Ah yes, perhaps I should add as an example. The ‘guidelines and limitations’ section has a section on currency fields, link below.
https://learn.microsoft.com/en-gb/power-apps/maker/data-platform/formula-columns?tabs=type-or-paste&WT.mc_id=DX-MVP-5003395#currency-fields-usage-validations
But the main points are:
* Formula columns don’t support using a related table currency column in the formula, such as in this example.
* Direct use of currency columns and exchange rate in the formula is currently unsupported. The use of currency and exchange rate columns is achieved through the Decimal function, such as Decimal(currency column) or Decimal(exchange rate). The Decimal function makes sure the output is within the accepted range. If the currency or exchange rate column value exceeds the accepted range, then the formula returns null.
* Base currency columns aren’t supported in the formula column expressions because they’re system columns used for reporting purpose. If you want a similar result, you can use a currency column type along with an exchange rate column combination as CurrencyField_Base = (CurrencyField / ExchangeRate).