*** NOTE: ALL INFORMATION IS ACCURATE AT DATE OF PUBLISHING ***
If you are used to customisation in Model-driven Apps you will know that out of the box you can add a lookup field then filter a second one based on a selection made from the first. Call it a cascading, dependent or hierarchy connection between the two. This is something pretty common that you might come across in your custom pages, the ability to create dynamic dropdowns with related entities. In this post we will look at how we can do this, and also make sure a user can’t pick the second one without selecting from the first one initially. We can also utilise tooltips to help users understand what to do and give them additional useful information when interacting with the controls.
First things first, when doing something like this, the two entities (tables) must have some kind of link between them in Dataverse. In my example I have a table called Software Categories, then another table called Software Sub-categories. The Software Sub-categories table has a lookup field back to the Software Categories which creates the link between the two. Make sure your two tables have been added in the Data section of your Custom Page.
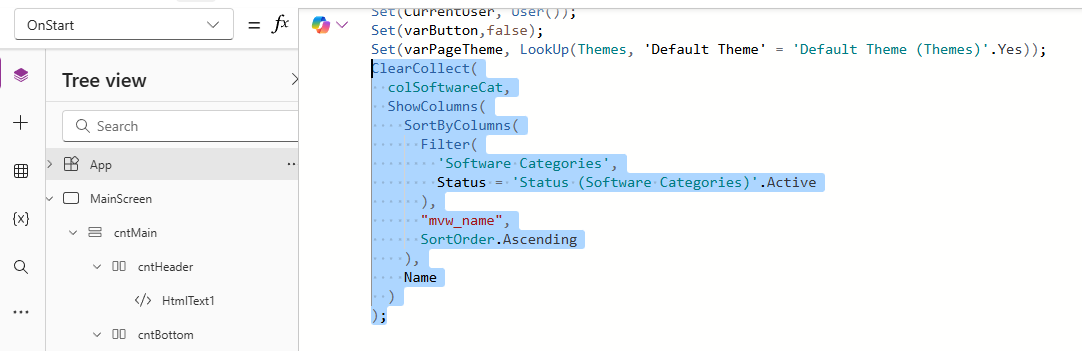
When the custom page gets opened, we need to create something called a Collection which allows us to get records from a table and filter them in some kind of way. A Collection is a temporary table your custom page creates in memory so you can work with data quickly without changing the real source. It also allows us to get the records first then put them in to the dropdown rather than attempting to filter and get the records as part of the dropdown logic itself. We add something like this to the OnStart of the App.
ClearCollect(
  colSoftwareCat,
  ShowColumns(
    SortByColumns(
      Filter(
        'Software Categories',
        Status = 'Status (Software Categories)'.Active
      ),
      "mvw_name",
      SortOrder.Ascending
    ),
    Name
  )
);
The expression works from the outside in so we declare each action, then what we want to do.
- ClearCollect – starts the creation of the collection
- colSoftwareCat – you can call this whatever you like, it is the name you are giving the collection of data
- Show Columns – this is the field that I want to show or use in the dropdown which in my case I am getting the Name column
- SortByColumns – this is how I want to sort the data, the ordering which in my case I am sorting by the name column ascending
- Filter – we add the table name, and then this allows us to filter which records to add to the collection, which in my case I just want the records where the status is Active from the Software Categories table
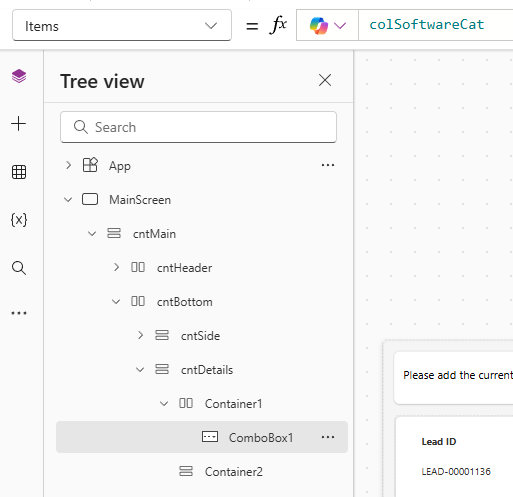
Once you have your collection, you can then add a Combo box and set the Items to be the collection that gets created when the custom page is opened. This means all of the records are ready for someone to pick from in the dropdown rather than doing everything we did in the Collection directly within the Combo box.
Now if you preview your custom page, oops! We just see a bunch of numbers, a generated ID. Not what we want!

Go back to the Combo box and look at the properties at the top on the right hand side. From there, click on the Fields, then Edit and you should be able to add the field that you included in the collection.
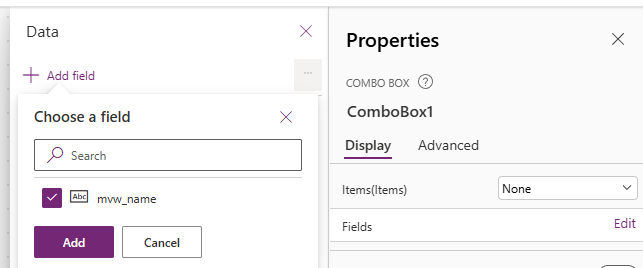
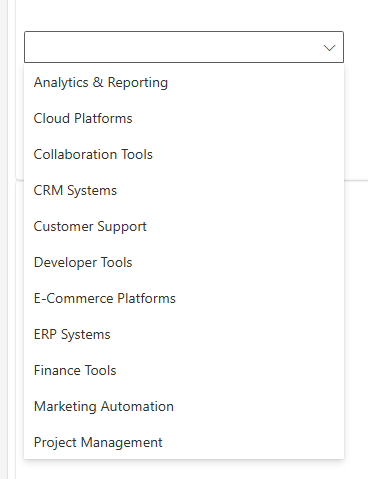
Now we see it looking as we would expect. That’s perfect, the first of the two dropdowns is ready.
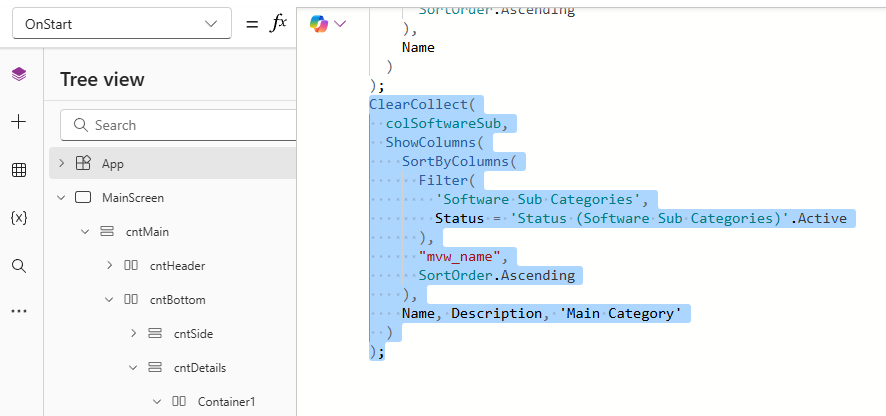
For the second one, we will do another Collection that creates from the OnStart when the custom page is opened.
ClearCollect(
  colSoftwareSub,
  ShowColumns(
    SortByColumns(
      Filter(
        'Software Sub Categories',
        Status = 'Status (Software Sub Categories)'.Active
      ),
      "mvw_name",
      SortOrder.Ascending
    ),
    Name, Description, 'Main Category'
  )
);
- ClearCollect – starts the creation of the collection
- colSoftwareSub – you can call this whatever you like, it is the name you are giving the collection of data. Just make sure it is named differently to the first collection
- Show Columns – this is the field that I want to show or use in the dropdown which in my case I am getting the Name, Description and Main Category column (which is the link back to the first table we added)
- SortByColumns – this is how I want to sort the data, the ordering which in my case I am sorting by the name column ascending
- Filter – we add the table name, and then this allows us to filter which records to add to the collection, which in my case I just want the records where the status is Active from the Software Sub Categories table
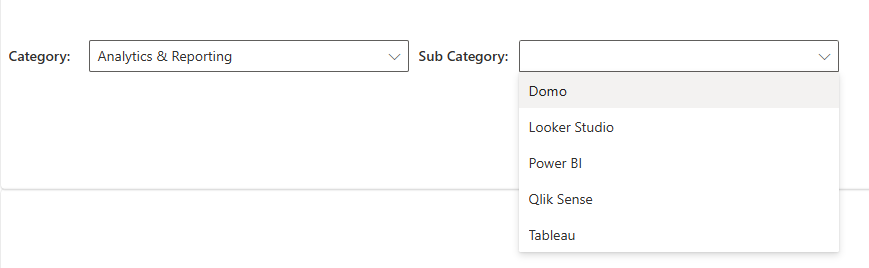
Now we add in our second Combo box and go to the Items component. For this, even though we have already created our list of Sub Categories, we only want to show values where the Main Category for those records is the one selected in the first dropdown. To do this you need to Filter the Collection then a comma, and then where the field that links the two equals the item selected from the first drop down. This is why in your second collection you want to make sure you include that column so you can use it in your filtering on the second dropdown. Make sure you also select to show the name field rather than the id by going in to the Combo box properties.
Filter(colSoftwareSub, mvw_MainCategory.Name = drpCategory.Selected.mvw_name)

Now we can see a nice filtered list of Sub Categories for the main Category selected.
But lets make sure someone cannot pick the Sub Category before picking the Category. Go to the DisplayMode of the second Combo box you added, and add something like this. What this code does is disable the second combo box control unless there are matching sub-items for the selected category in the first combo box control. Therefore, if you have not selected anything from the first dropdown, there will never be matching sub-items. Simple!
If(
  IsEmpty(
    Filter(colSoftwareSub, mvw_MainCategory.Name = drpCategory.Selected.mvw_name)
  ),
  DisplayMode.Disabled,
  DisplayMode.Edit
)
We can also also help out the user to show a message using the Tooltip control on the second Combo box. Using similar logic to the display mode expression above, we can check to see if there was anything selected from the main category drop down and if it is empty, we can show a message, otherwise we could show information from another field for the one selected.
If(
  IsEmpty(
    Filter(colSoftwareSub, mvw_MainCategory.Name = drpCategory.Selected.mvw_name)
  ),
  "Please select a main category first",
  drpCategory.Selected.mvw_description
)
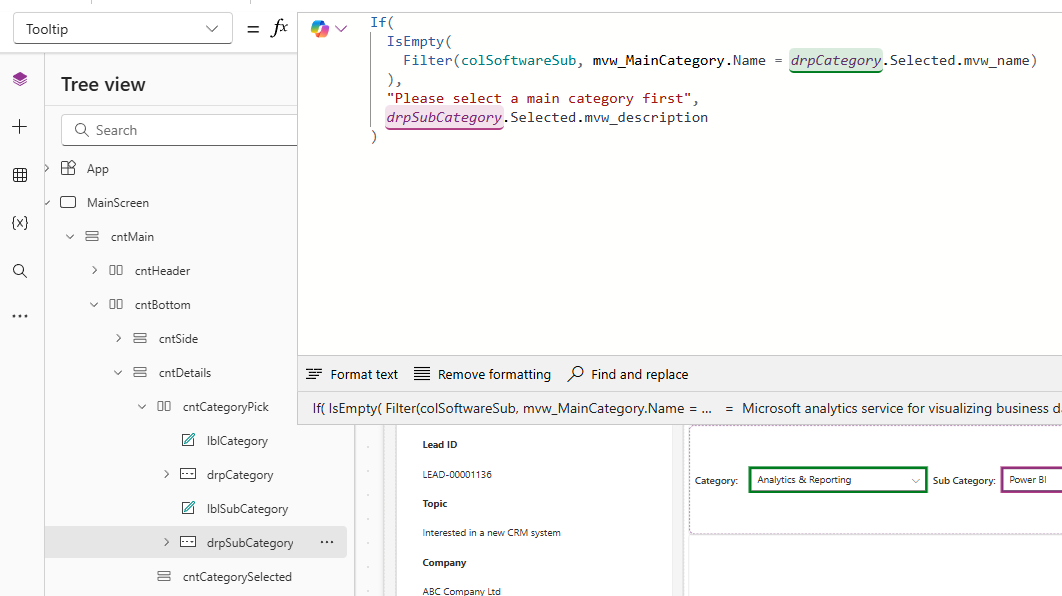
Here we can see that if the first Category is not picked, the Sub Category is read only and the message that shows when hovering your mouse indicates that the main category should be selected first.

Then once the Category has been picked and a Sub Category has been picked, hovering your mouse will show the description from that Sub Category record.

Hope that helps! Cascading or dependent drop downs are pretty common and a good thing to use to help users pick accurate data.
Check out the latest post:
Add Information Buttons To Provide Additional Details For Custom Page Users
Considering Custom Pages?
Thinking about using Custom Pages but unsure where they fit best?
I help organisations design model-driven experiences that are intuitive, scalable, and built for real users, not just technical possibility.
This is just 1 of 580 articles. You can browse through all of them by going to the main blog page, or navigate through different categories to find more content you are interested in. You can also subscribe and get new blog posts emailed to you directly.