*** NOTE: ALL INFORMATION IS ACCURATE AT DATE OF PUBLISHING ***
If you aren’t already aware, you can import a list of Contacts to Dynamics 365 Customer Voice containing their name and email address, and then send them an email with a link to take a survey. You can then use the name as a variable in the survey or email template, but that’s it…. or is it? An awesome bit of functionality that’s been introduced is the ability to now include values for each variable in your import file, and even better, you can also add a Contacts ID from Dataverse (the Common Data Service) if you want to make sure the invite and then the related response get linked to the correct Contact. Previously this was only possible if you used Microsoft Power Automate…. so to me, this is pretty huge! Let’s take a look at how to achieve this!
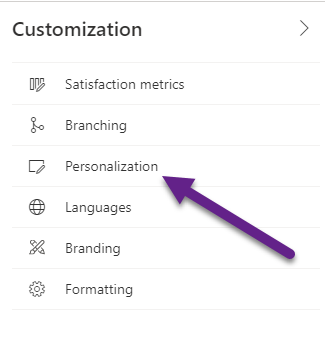
First, go to your survey, and while on the Design tab, click on the Customisation menu. Select Personalisation.
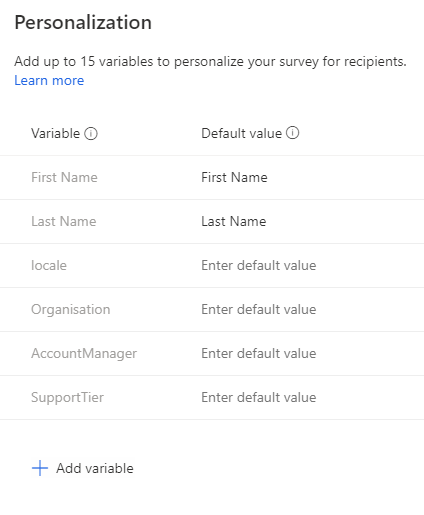
You can add up to 15 variables (although really 13 as the First Name and Last Name cannot be removed) to a survey. This gives the ability to pass through unique values to a survey so that each person gets a personalised invitation and information displayed on the survey. In the example below, I’ve added Organisation, Account Manager and Support Tier as variables. The locale variable is there by default but can be removed. This can be used to set the language of the survey displayed to the respondent. You can find out more information about that in this blog post. For now, you are just adding the name of the variable.
Once you’ve added your variables, you can then insert them in to the email template and the survey as you see fit. You can click on the image below to enlarge it, but I have added the First Name and Organisation variables in to the description at the top of the survey. I’ve added Support Tier to question one, and Account Manager to question three.
Now we are ready to send it. Clicking on the Send tab at the top, we can then select Email. From this screen, we then click on Import contacts.
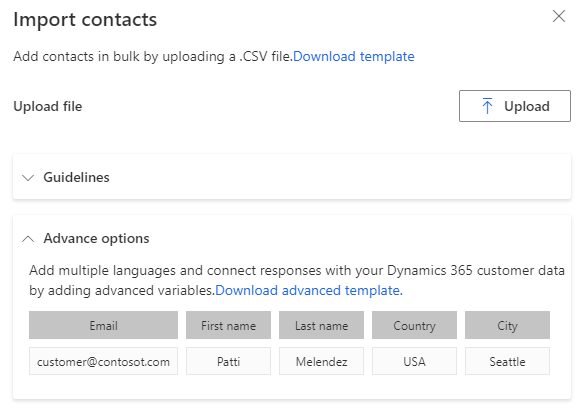
Clicking on the Advanced options section, we can see that we can download a template and use it to add in our variables, and even set the language if required.
After clicking on the download option, you get a spreadsheet with a column heading for each of the variables in your survey. Email address is also included, along with a Regarding ID and Regarding Entity Name column.
All the data for the customer/respondents should then be added. You do not need to include anything in the Regarding ID or Entity name columns. This is used to link the survey invitation and then the related response to a record in your Dataverse environment. If you are not sure how to get the GUID, speak to your System Administrator. They should be able to help. In short, you can create a view using the Advanced Find, then download the records to Excel. The columns will start at Column D. Unhide the first 3 columns, and Column A will contain the GUID. The entity name should be set as contact.
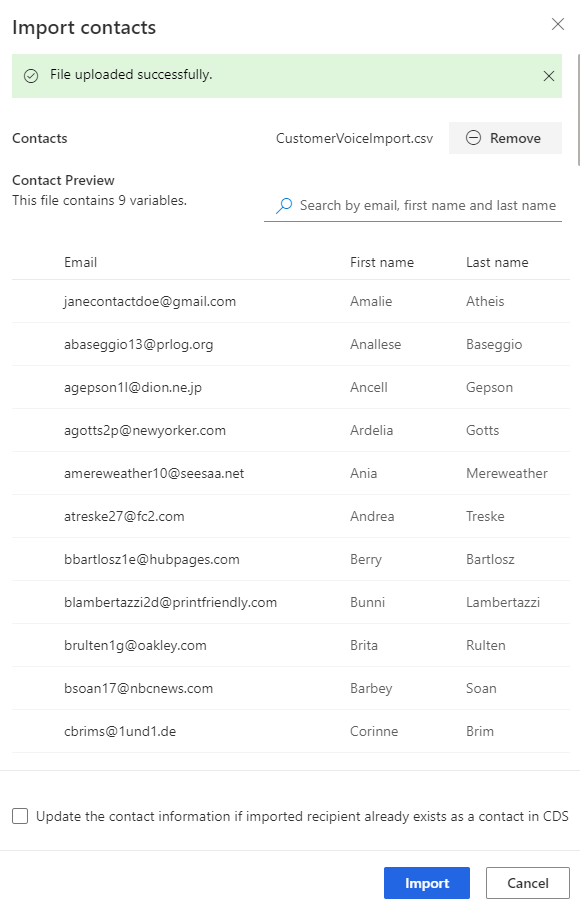
Once you have the file ready, you can go back to the Import Contacts area and upload your file. Once you have, you should see a confirmation message that it’s uploaded successfully. You’ll then see the number of variables that the file contained, and a list of all the records showing their email and First and Last Names. At the bottom, there is a box you can select if you want to update the Contact information if the Contacts already exist in Dataverse (CDS).
After clicking the blue Import button above, you will see the number of recipients that the email will be sent to. Send the email and you are done!
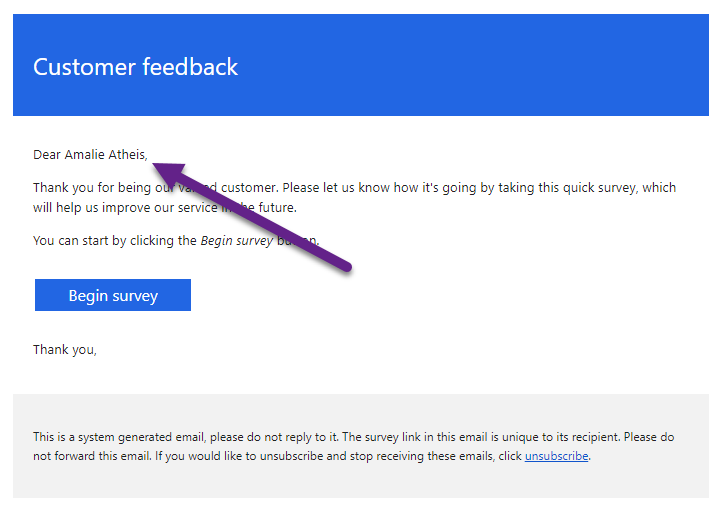
When the email is received by someone, any of the variables you added to the email template will be seen.
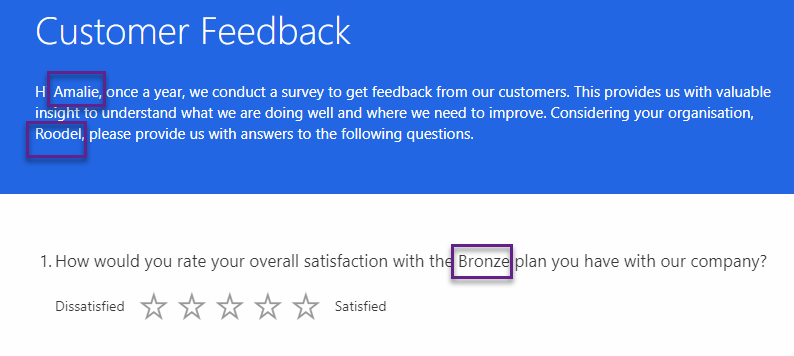
Once they click on the link to the survey, they will see all of the variables you added are populated with the actual values you imported. So this shows the First Name and Organisation populated in the description, and the Support Plan populated in the first question.
Here we can see the Account Managers name populated in the third question.
If you choose to add in the regarding ID and entity type, this will make sure the survey invite and survey response are linked to the correct Contact record in Dataverse.
And we can also then click on the activity to view the details from the survey response too.
You can watch a video on this here.
Check out the latest post:
Set A Business Process Flow Stage With Custom Page
This is just 1 of 572 articles. You can browse through all of them by going to the main blog page, or navigate through different categories to find more content you are interested in. You can also subscribe and get new blog posts emailed to you directly.








Hi Megan
This is very helpful! I have a question, can we change the sender name (instead of your name) to a more generic one like Customer Service etc?
Thank you very much!
Hi Yang, check out this link. It explains how you can change the sender name and email when sending out surveys: https://docs.microsoft.com/en-us/dynamics365/customer-voice/customize-sender-email
Hi Megan
This is very helpful when importing a file to be able to Send Personalised Surveys.
I’m trying to use an existing contact view and can’t find how I link my personalised fields to my view. It works with the default first name and last name but how do a link my custom fields to the fields in the contact entity.
Hi Sailesh, are you referring to using the send email functionality in Customer Voice, and sending to a View? If so, you won’t be able to link your fields from the view to the variables. You have two options. You either import the contacts and variables as in this blog post, or you use Power Automate and populate the variables that way.
Hi Megan,
Do you know if there is anyway to pass the variables on in the case of a chained survey? Many thanks JP
Hi John, this is the second question about doing this recently. I am looking into it, but currently, nothing that looks easy or very elegant!
Hello Megan,
I use your video to help me to import contacts with csv file but when I open the csv file, I have only one column with all datas separated with commas and not one column per data as it shown on the video. Even if i convert the csv file to get all column needed, I have an error message.
Do you know what settings have to be done please ?
Many thanks for your help,
Regards,
Franck B.
Hi Franck, I think this was you that posted this issue here? https://community.dynamics.com/365/dynamics-365-customer-voice/f/dynamics-365-customer-voice-forum/412747/issue-to-import-contacts-with-csv-file – This shouldn’t happen, so glad you shared it with the Microsoft team that work on Customer Voice. Did you get any response for them you could share that might help others?
Hi Megan
First I’d like to thank you for great guides.
I’m having some problems when trying to import the contacts. My template does not look like the one that you do get when downloading it. My show ’email,first name, last name’, all in column A. It makes it really hard for me to copy contacts like you do.
Any idea what the reason for this is?
Hi Michael, interesting that you have this issue. I noticed that someone else (I assume it’s a different person and you don’t have two names!) posted this issue on the Customer Voice forums. Might be worth checking out and commenting that you have the same issue: https://community.dynamics.com/365/dynamics-365-customer-voice/f/dynamics-365-customer-voice-forum/412747/issue-to-import-contacts-with-csv-file
You’re correct that it was a different person.
I managed to solve the issue myself. The origin was the region settings in windows. List seperator had to be changed from “;” to “,”.
Best Regards
Michael
Hello Megan,
I try to change List seperator from “;” to “,” and have the same behavior.
My customer is very interested by this Customer Voice solution but if he can’t import data from CSV file (as it seams there is no way to use OTB CRM Marketing List), he will to subscribe fot this solution.
Thank you again for your answers.
Franck
Hi Megan,
Is there a way to send out a customized post survey notification based on the response? Say I sent an NPS survey out to 10 folks, 3 came out as detractors, 2 as passives and 5 as promoters. Is there a way I can craft and send out different post survey notifications to each of these three types?
Many thanks,
Eddie
Hi Eddie – yes, you would need to use Power Automate to do that. So, your flow would be triggered based on a new survey response being received and then checking the NPS response provided. Then you could do steps to send out some kind of notification based on the responses given.
Can we customize the message “This question is required” for required question?
Also can we add text box as option in multiple options question
Hi Apoorva, not at this time, only when you add a restriction to a question and choose the Custom option and add a regex formula. If you want more on that, you can check out this post. https://meganvwalker.com/ten-custom-expressions-to-use-with-forms-pro/
Hi Megan
Firstly, *huge* congratulations that you are providing to so many users of these tools – your insights and posts are invaluable.
Secondly – I am struggling to understand if it is possible to send a large survey (800 recipients) out, in such a way that the recipient perceives the survey is anonymous, yet the survey link cannot be reused by the same person more than once.
Currently we dont import contacts to Customer Voice – but we could and send from there – and the personalisation we want to know relates to the role they have in the company and their country – so we could have this as part of the import. However, generating 800+ survey links manually is not practical. Any thoughts?
Thanks in advance.
Hi David, thank you for the lovely compliment! Check out this post…. it might be what you are looking for? https://meganvwalker.com/recording-anonymous-feedback-while-capturing-variables-in-d365-customer-voice/