*** NOTE: ALL INFORMATION IS ACCURATE AT DATE OF PUBLISHING ***
We would love to think that subscribers want to read ALL of our content we send them right? Reality is, sometimes we have more content than they want on a weekly basis, so what about offering the option to subscribe to get a summary of our content on and send monthly updates instead? For this post, I am continuing on from a post I wrote on how to use an RSS feed to send out emails for new blog posts you are publishing to your website. Instead of sending out an individual email for each post, people can subscribe to get an email on the last day of the month with all posts, or the first of the month for all content I published the previous month. That way they still get the information, but they can skim through and just click to read the blogs they are truly interested in.
Ok so first thing, this is what I wrote about getting information from your website RSS feed to generate the information in to a custom blog post table. So go and check that post out first. Then we can look at what I did to extend that to provide the option for someone to get the monthly email instead.
Blog Post Table
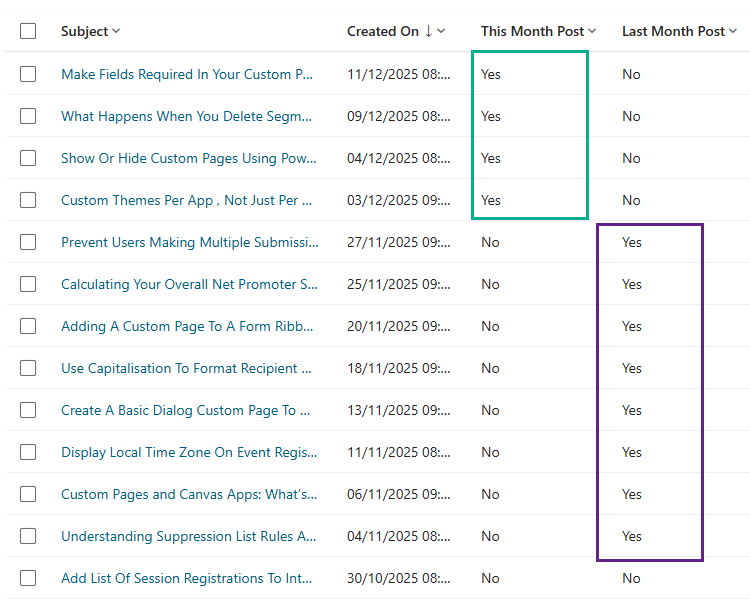
You can add in extra fields to help identify if the blog post was one from last month or from the current month. That way when I send out an email on the first of the month, I can gather all of the blog posts with Last Month Post equals YES. We can do this by adding a formula field.

It checks how many whole months have passed between the record’s Created On date and right now. Comparing it to 1 ensures only records from the immediately preceding calendar month return true. Because I am going to send out emails on the 1st of the month, the previous month will be anything from the month that ended the day before.
If(
    DateDiff('Created On', Now(), TimeUnit.Months) = 1,
    true,
    false
)
For posts from the Current Month, we just change the equals 1 to equals 0. Month difference of 0 means the date falls in the current calendar month.
If(
    DateDiff('Created On', Now(), TimeUnit.Months) = 0,
    true,
    false
)
In my example and looking at this in December, all of the posts in November show that they are a post from last month, and all of the posts from December show they are a post from this month. So you can use either field for your monthly update email.
Compliance Changes
To add the ability for someone to subscribe to the monthly updates, we need to add either a Topic or a Purpose to the main Compliance Profile. Make sure it’s clear on both your initial marketing form (where someone can subscribe) and your compliance profile preference centre form (where someone may choose to opt out) what the difference is between your monthly updates and the rest of the boxes. I have gone with a Topic for the Monthly Updates as all of the rest of the compliance is for Topics also.
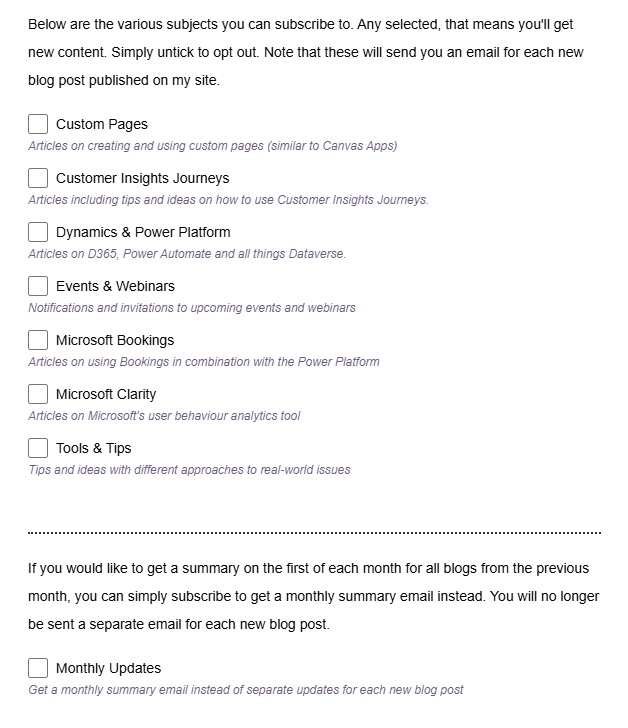
Both your opt in form and your compliance profile preference centre form should be updated to include the new topic. One thing I want to make sure of is if someone opts in to the Monthly Updates topic, it deselects ALL other Topics. If they then pick one of the main Topics, it deselects the Monthly Updates topic. That way we don’t have someone opted in to both the Monthly Updates AND other Topics that send emails out as soon as a blog post is published. It’s either Monthly or Individual Blogs they are subscribing to. Although similar, the marketing form you use and the preference centre form have slightly different scripts. First, the script for the main marketing form.
<script>
document.addEventListener("d365mkt-afterformload", function () {

    // Identify Monthly Update by topic ID (replace with your ID)
    const monthlyUpdate = document.querySelector(
        '.consentBlock[data-editorblocktype="Topic"] input[value^="78510fa2-94d6-f011-8543-6045bd12522f"]'
    );

    if (!monthlyUpdate) return; // form hasn't rendered the checkbox you expect

    // Get all Topic checkboxes (Purpose checkboxes excluded by design)
    const allTopics = Array.from(
        document.querySelectorAll('.consentBlock[data-editorblocktype="Topic"] input[type="checkbox"]')
    );

    // All topics except Monthly Update
    const normalTopics = allTopics.filter(cb => cb !== monthlyUpdate);

    // Monthly Update → untick all other topics
    monthlyUpdate.addEventListener("change", function () {
        if (monthlyUpdate.checked) {
            normalTopics.forEach(cb => cb.checked = false);
        }
    });

    // Any normal topic → untick Monthly Update
    normalTopics.forEach(cb => {
        cb.addEventListener("change", function () {
            if (cb.checked) {
                monthlyUpdate.checked = false;
            }
        });
    });

});
</script>
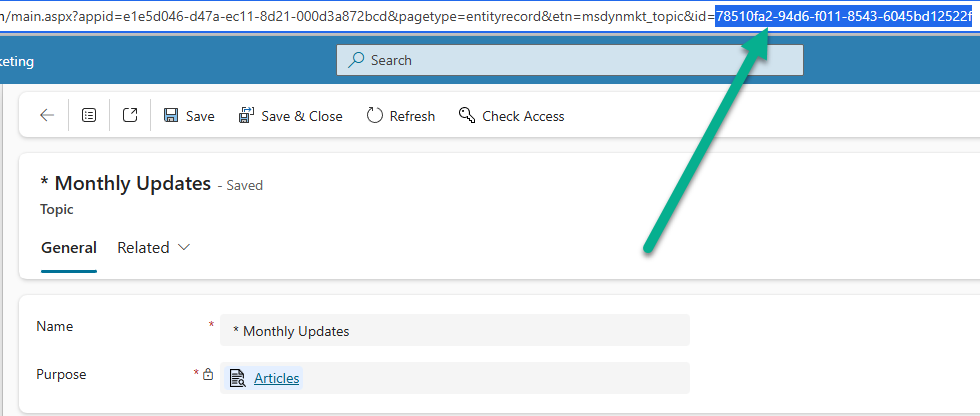
Replace the topic value above with the topic value from your environment. You can find this by opening up the Topic record then getting the id right from the end of the URL. The script above then uses this topic and if you click it, it will untick all other topics. Likewise when you tick a different topic, it will untick the Monthly Updates topic.
For the Preference Centre form, the script also needs the topic GUID set with the one from your own environment.
<script>
document.addEventListener("DOMContentLoaded", function () {

    // Get the Monthly Updates checkbox (target by topic ID)
    const monthlyUpdate = document.querySelector('input[value^="78510fa2-94d6-f011-8543-6045bd12522f"]');

    // Get all TOPIC checkboxes, excluding Purpose checkboxes
    const allTopics = Array.from(document.querySelectorAll('.preferenceCenterCheckbox[data-editorblocktype="Topic"] input[type="checkbox"]'));

    // Filter out the monthly update from the list
    const normalTopics = allTopics.filter(cb => cb !== monthlyUpdate);

    // When Monthly Updates is selected: uncheck all other topics
    monthlyUpdate.addEventListener("change", function () {
        if (monthlyUpdate.checked) {
            normalTopics.forEach(cb => cb.checked = false);
        }
    });

    // When any Topic is selected: uncheck Monthly Updates
    normalTopics.forEach(cb => {
        cb.addEventListener("change", function () {
            if (cb.checked) {
                monthlyUpdate.checked = false;
            }
        });
    });

});
</script>
Monthly Updates Segment
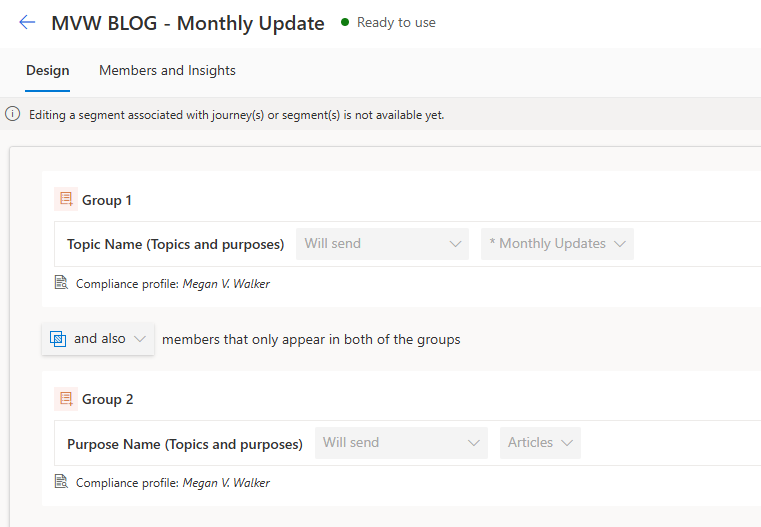
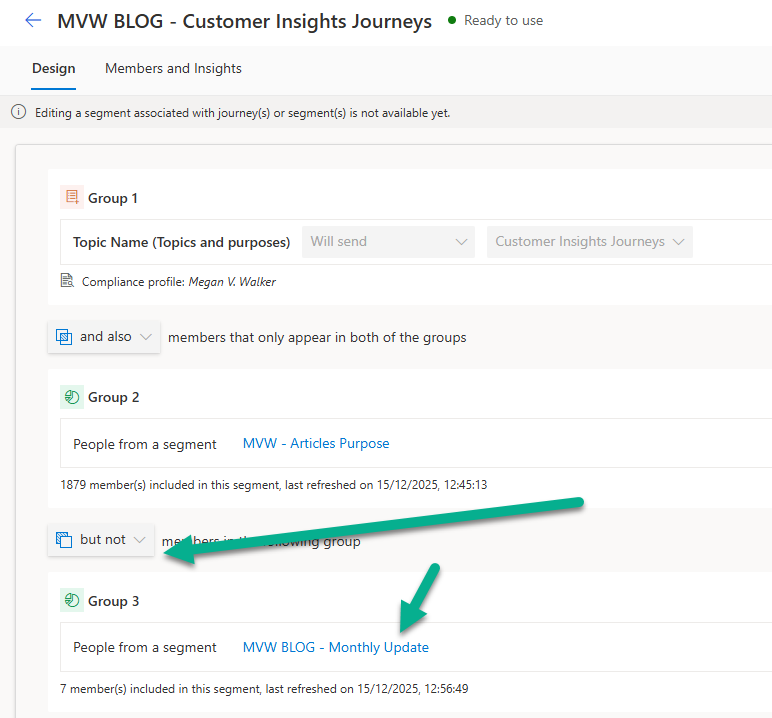
Now make sure you have a segment for your people that want the Monthly Updates. For this, do two groups, one for the new Topic with Will send, and one for the main Purpose with Will send. You might also want to include the attributes of Status equals Active and Email Address contains @ to be sure you are pulling in records that are legitimate and your membership numbers are accurate.
Then in any of your other segments that send emails to people opted in, be sure to include a group for ‘but not’ a part of your new Monthly Updates segment.
Monthly Updates Email
For your emails, you will use two lists. These will gather all of the blog posts from the previous month so we can display the right blog posts and information about what month they are from. Lists are created from the Personalise menu on the right of the email. From there, click on Add list from the bottom of the list section.
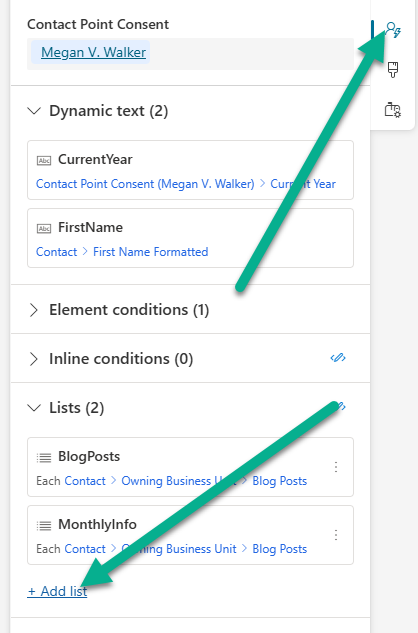
If you followed my other post about adding the Blog Post custom table, your list will come via the Contact, then Owning Business Unit, and then Blog Posts. We can then filter the list to make sure it only pulls in 1 item where the This Month Post = Yes or the Last Month Post = Yes (depending on when you want to send your update email out for the month). On one of the lists, set it to the max amount of items to be 1, then pull in the columns of Blog Image (if you are using it) and the Created On field. Order by Created On Ascending. This will get the first blog post for the current or previous month.

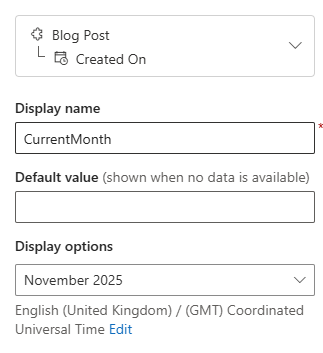
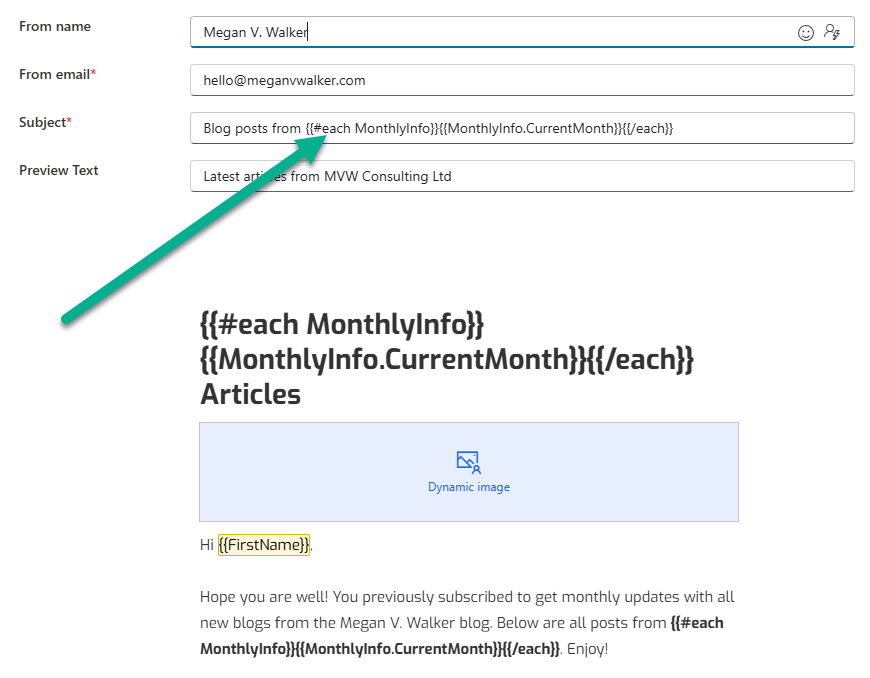
For your Created On field, you can set the display options to show the month and year like you see below.
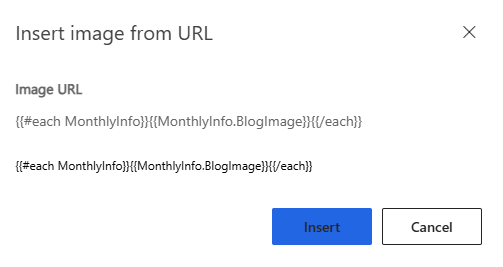
If you want to set an image dynamically you can use the blog image from the first blog post in that month, again only if you are bringing in the images for each blog post. If not, you can just upload an image should you wish to show one at the top of the email. You will choose to insert the image from a URL then use the code from the list {{#each MonthlyInfo}}{{MonthlyInfo.BlogImage}}{{/each}} (or whatever it is for your list).
We can then use the same list to show the Month and Year from the blog post we found in our first list. I’ve also used the same code from the list to show the month and year at the top of the email in a header, and also in the initial paragraph.
You now need a second list that will include more information from the blog posts, but instead of only pulling in 1 record, you can set the max to up to 100 items. If you have more than 100 blogs in a month, you might want to rethink your blogging 😉 – but you can’t pull in more than that using this method. Below you
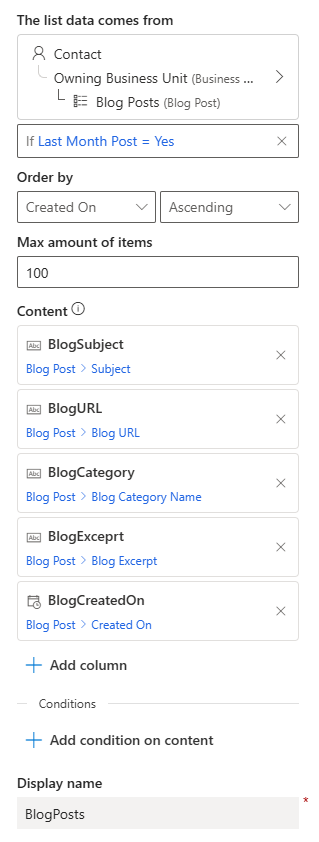
We can then use the code from the second list to layout how we want each blog post to be displayed in the email. Just with the list used above, everything must be wrapped with the {{#each List Name}} logic and finish with the {{/each}}.

Monthly Updates Journey
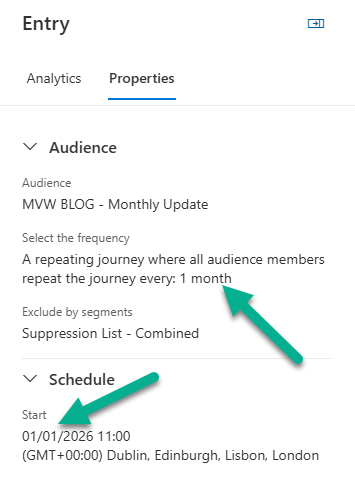
For the Journey, make it a repeating Journey that repeats each month. From the Microsoft documentation, the same date on the new month is used and if the month doesn’t have that date, the last day of the month is used. For example, a journey starting on January 31 and repeating every month will run on January 31, February 28 (or February 29 if it’s a leap year), March 30, April 31, and so on. So below we can see there is a Journey that will start on the 1st January 2026, and should continue to run on the first of each month in an ongoing Journey. or we can do December 31st which would then run on the last day of each month moving forwards.
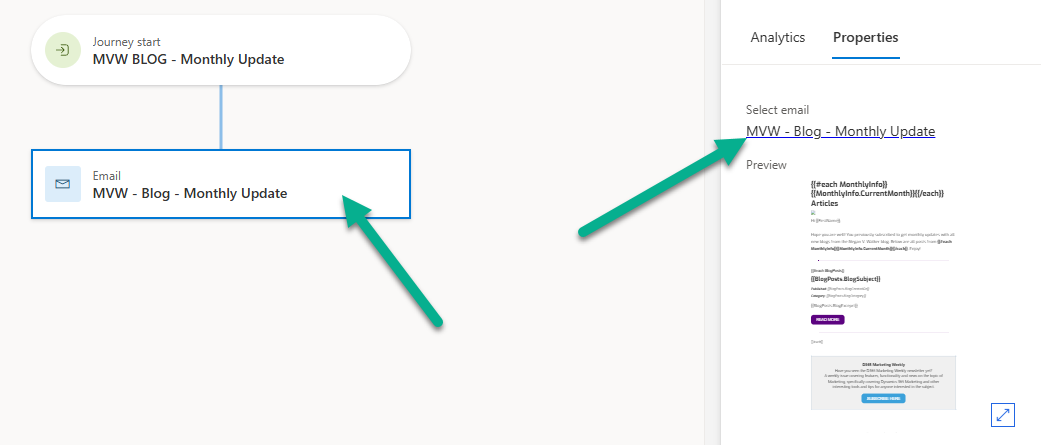
The Journey is very straightforward and just sends out our dynamic email with all blog posts where the Last Month Post field is set to YES or the This Month Post field is set to YES depending on when you want them to go out.
When the email goes out, the subject will include the month and year. It will also be included at the top of the email and in the email introduction.
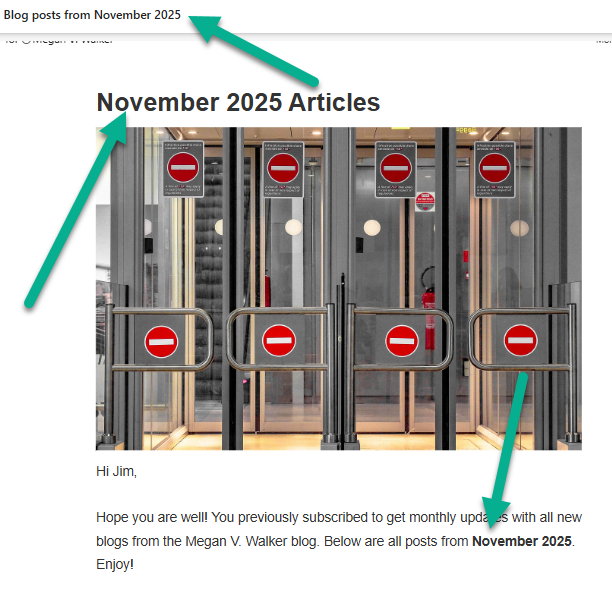
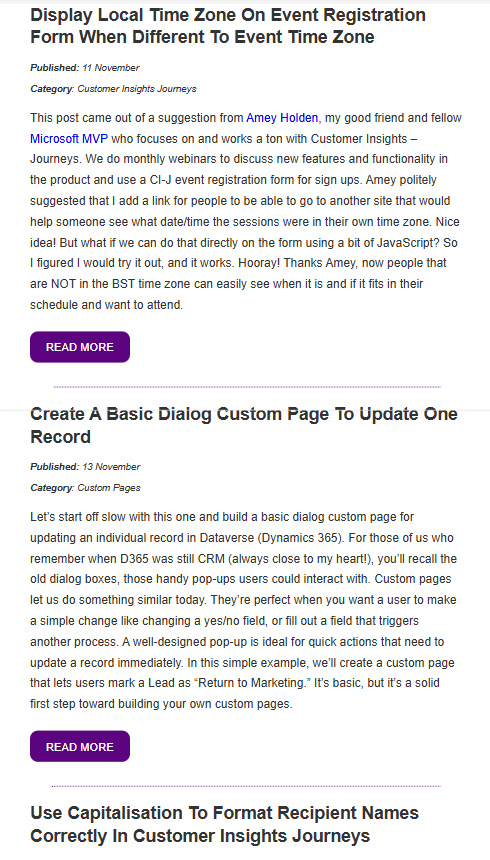
All of the blogs from the previous month will be listed out nicely including the blog title, published date, category, excerpt and a link to each post.
Check out the latest post:
Add Information Buttons To Provide Additional Details For Custom Page Users
This is just 1 of 580 articles. You can browse through all of them by going to the main blog page, or navigate through different categories to find more content you are interested in. You can also subscribe and get new blog posts emailed to you directly.