*** NOTE: ALL INFORMATION IS ACCURATE AT DATE OF PUBLISHING ***
Personalisation of emails using dynamic text (pre-defined tokens) has been around in Dynamics 365 Marketing for some time. You can add in text that you pull in from the Contact record, or from records related to the Contact. For things like the Contact’s First or Last Name, that’s pretty simple and easy to do. However, not everyone using the Marketing App knows exactly where to pull in things like the related Account Name, or other values tied to linked records, especially where there are multiple fields that look back to an Account record.
So how do you make sure ALL of the marketers are getting the correct data and don’t have to guess? By setting up values known as pre-defined tokens. Let’s look at how to do this.
Enabling Pre-defined Tokens
This feature that is part of Real-time Marketing comes from the Wave 1 2022 release notes, you can see the item here for more info. I also did one of my videos from the A to Z of Real-time Marketing on this, with T for Tokens. Previously these tokens were per email and not available to other people when they were creating their own emails. Now we can change this. Note, at the time of writing this post, this feature is in public preview and is set for General availability in April 2022.
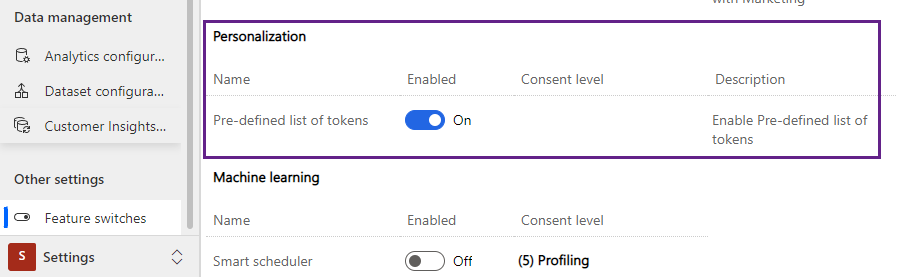
To start using this, go to the Settings area, then Feature switches. Look for the one called ‘Pre-defined list of tokens’ and turn it on to enable. Then save at the top. I noticed it took a while before I could use them in an email, so be patient if you don’t see the rest of the features in this post right away.
Accessing Pre-defined Tokens
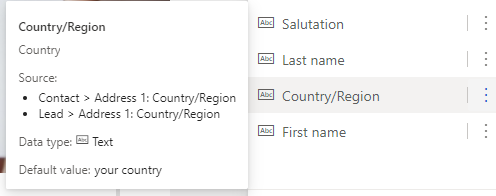
Now from an email, any email, click on Personalization. There are a few tokens in there already based on standard things that might be used for an email.

If you hover your mouse over a token you can see the source of where the value would come from if you were to add it to an email.
Removing Pre-defined Tokens
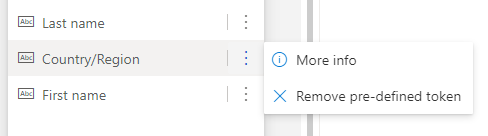
If you click on the ellipsis (three dots) next to the token, you can then click on more info or remove pre-defined token. More info shows you pretty much the same as when you hover over it. It would be a good idea to remove the pre-defined list and remove any you know your organisation will not use.
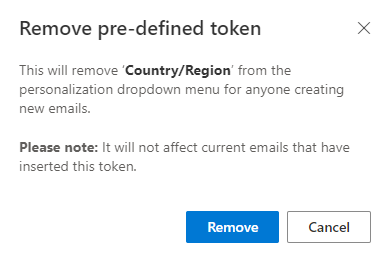
Selecting to remove one gives us a confirmation window to make sure we want to delete it. Any emails that currently use the token will not be altered. Click Remove to get rid of it so it cannot be selected from the list anymore.
Adding Pre-defined Tokens
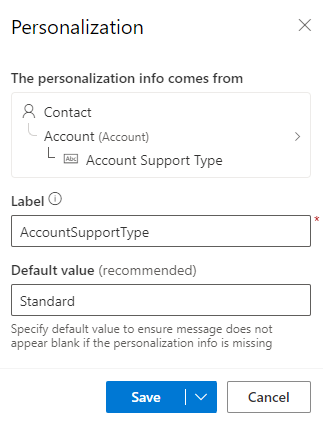
Clicking on New token from the bottom of the Personalization screen gives us the screen you should be used to where you can find where the value should come from. Here I am creating a token for the Account Support Type and providing the default value that will be used if that field is empty. Note that the label cannot contain spaces.
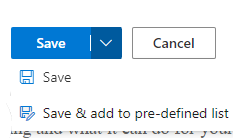
Clicking Save gives us two options. We can either save to add only to this email, or save it and add it to the pre-defined list of Tokens. This means others will be able to use the Token moving forwards.
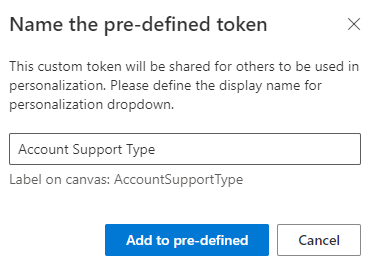
We now need to give the token a name that does allow for spaces. Make it logical so users know what it is.
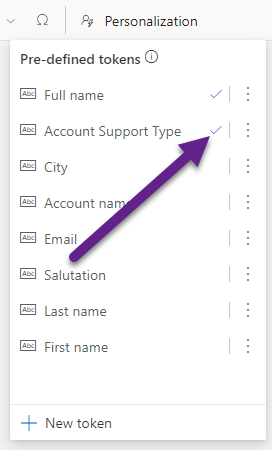
Now if we click on the Personalization option again, we can see our new token, and a tick mark is next to it to indicate it is being used in the email we are creating.
I think this is a great feature. It provides the ability for someone to create all of the most commonly used personalization you will use in your emails and make sure they are mapped to the correct source in Dynamics 365. Love it!
Check out the latest post:
Send Unique Event Registration Response With QR Code Using No Code
This is just 1 of 449 articles. You can browse through all of them by going to the main blog page, or navigate through different categories to find more content you are interested in. You can also subscribe and get new blog posts emailed to you directly.
Really awesome post & its helpful also!!