*** NOTE: ALL INFORMATION IS ACCURATE AT DATE OF PUBLISHING ***
Simple right? I just want to invite people to my next event. You can already if you create a segment, then send them an email with the event info, but how do we know that the person I invited is also the person that registered? How can we tie that all together? This post gives you one way to do this and create an event invitation process with a custom Event Invitations table, and a way to figure out who accepted your invitations and linking them as the Event Registrations come in. It’s quite a lot, but hopefully it all makes sense, so get a cup of coffee and dig in!
Event Invitations Table
First things first, we need a new table. I’ve created an Event Invitation table with the following columns. Some should be pretty obvious but I will talk through some in more detail. The lookups are all to existing tables for Contact, Event and Event Registration. Those with fx next to the data type are formula fields.
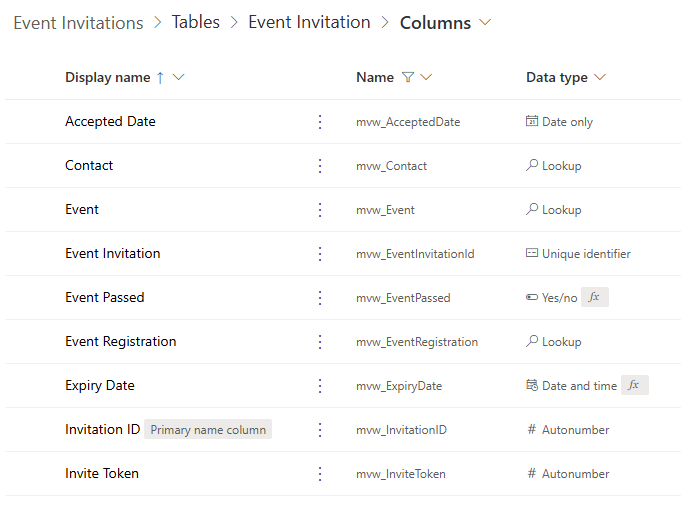
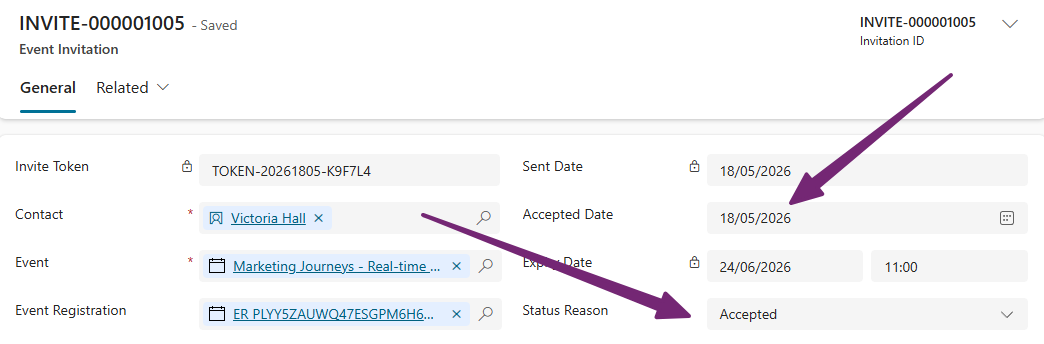
When I created the table, I named the primary name column Invitation ID. Once the table exists, set the data type to auto number and change required optional so that you don’t have to manually add it when you create a new invitation record. Instead, we are going to use something that is really just for internal reference more than anything. We can use a prefixed number by setting the value of the prefix (INVITE or something logical), the number of digits. This will generate the next number available each time a new record is created. Although this isn’t needed, it can make users lives easier down the road.
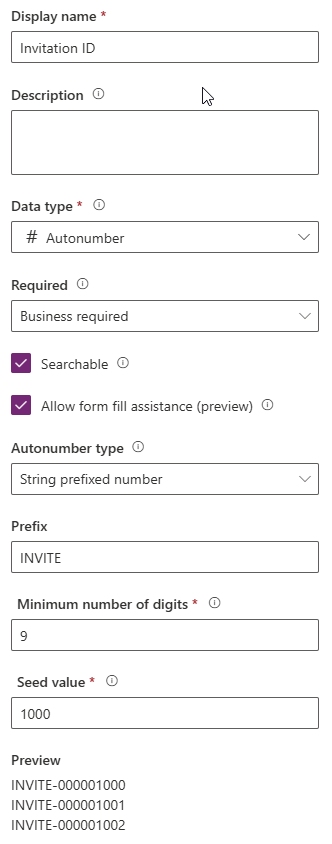
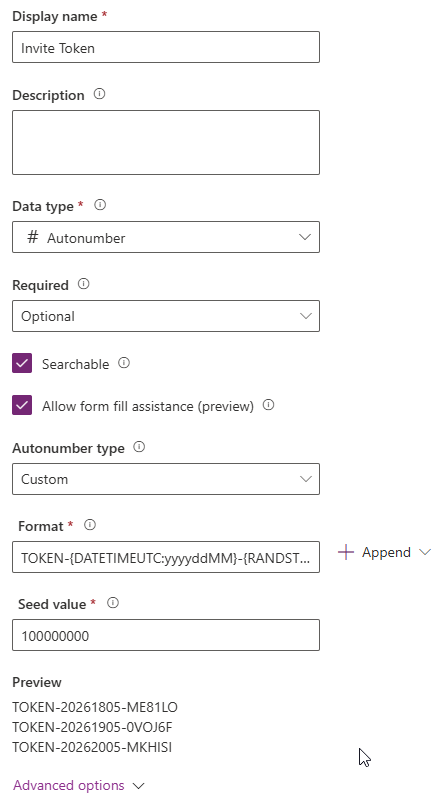
The other one that will be an auto number string field is for generating a unique token that we will use to pass through to a button on the email we send to the Contact inviting them. We can store this and pass back through the form when they register to use to link the invitation with the registration. More on this later on. You can use what ever logic you like, but I have a custom type and used the following to generate the word TOKEN, then the year, day and month, then a random string with 6 characters.
TOKEN-{DATETIMEUTC:yyyyddMM}-{RANDSTRING:6}
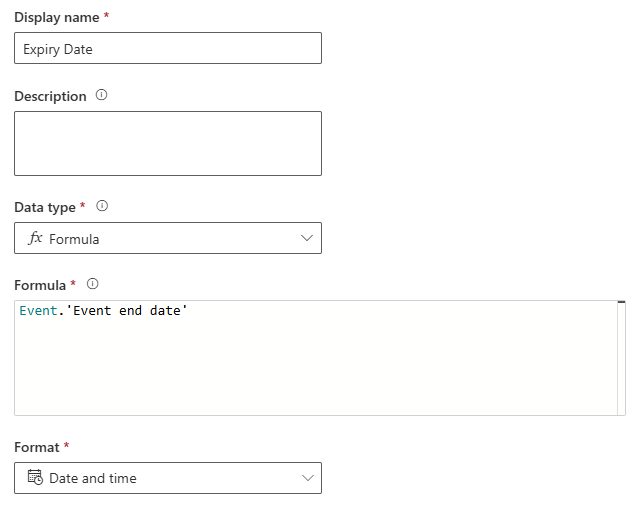
I am setting an expiry date on the invitation to use the end date and time of the Event the invitation is for. I can then use this later on to determine if the invitation is expired or not which can also be valuable if sending Journeys and wanting to send reminders etc. This is a formula type field. Just type the word Event then a dot, and then start typing to find the Event end date. Set the format of date and time.
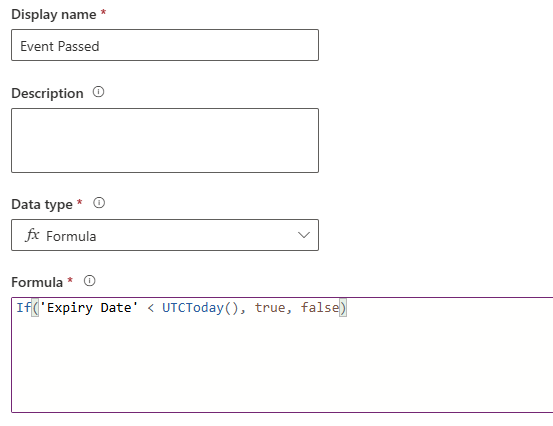
Another formula field for you. This will determine if the Event has passed. We are checking to see if the Expiry Date of the Event Invitation (field you just created above) is in the past, less than today. If so, the value is true (or Yes), otherwise it’s false (or No). This will be updated automatically on the Event Invitation records for you.
If('Expiry Date' < UTCToday(), true, false)
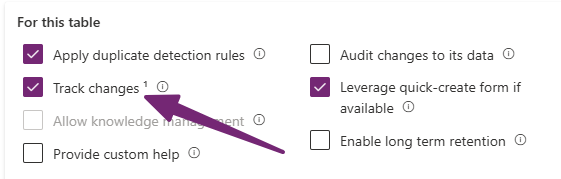
I also updated the Status Reason field to change Active to Invited, then added Accepted and Expired as two additional values. Invited should be the default value. If you ever want to use Event Invitations in a Segment, make sure you set Track changes for the new Event Invitations table.
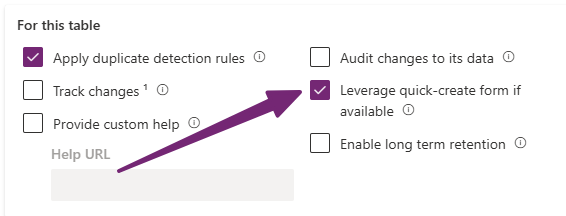
Finally, add all of your fields to your main form, arranging them in a logical way. If you want to create a quick create form (that you can click on from an Event), set this field to selected on the Event Invitations table. Then create a Quick Create form which really only needs the Event lookup field and the Contact lookup field on it. Simple.
Business Rule For Expired Invitations
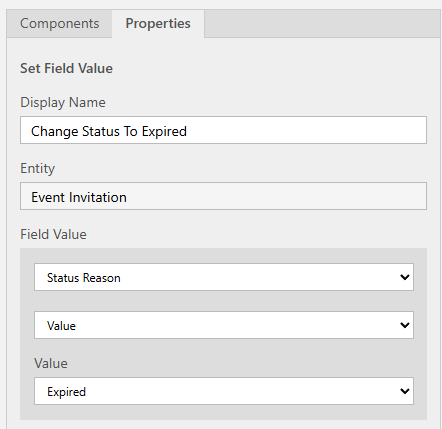
Once you have all your fields added, you can create a simple business rule at the table level. This just has a condition and a step to set the value of the Status Reason field.
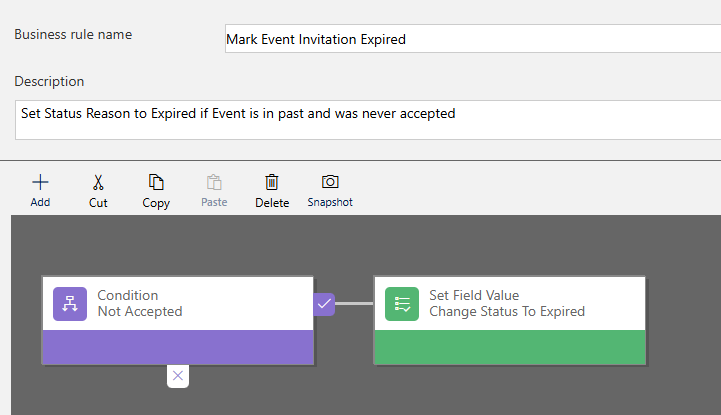
The condition needs two rules. If the Event Passed field is YES and the Status Reason field does not equal Accepted.
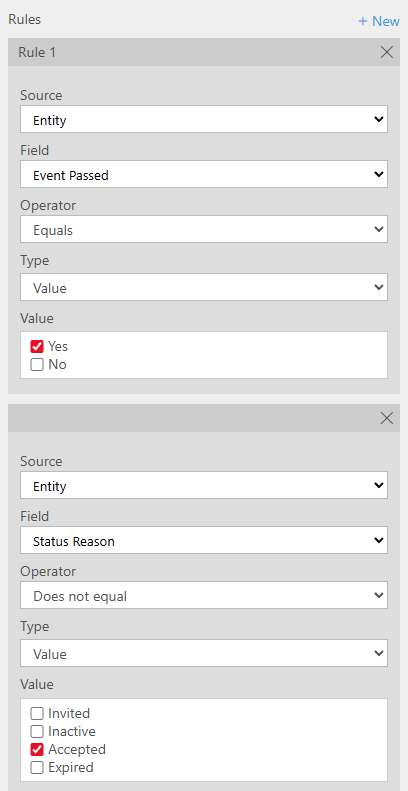
Then we set the Status Reason value to Expired. This means anyone that was invited but never accepted will now have the invitation set to Expired. Not required, but a nice to have and easy to do.
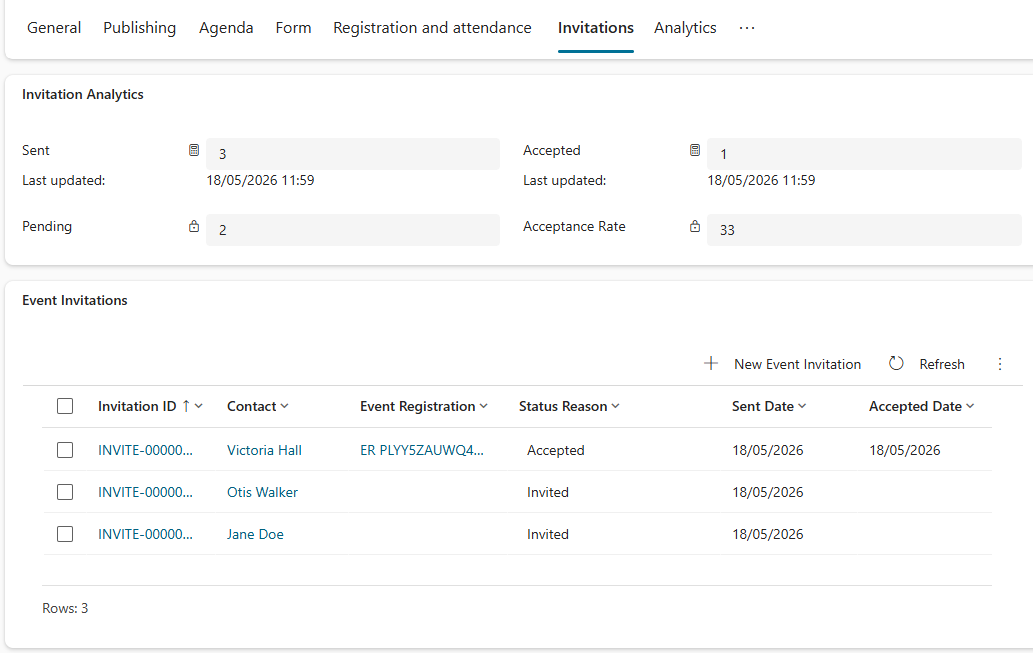
Invitation Analytics
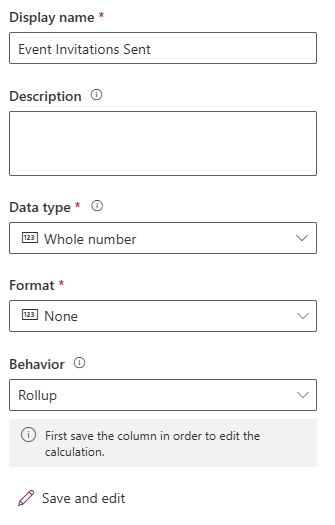
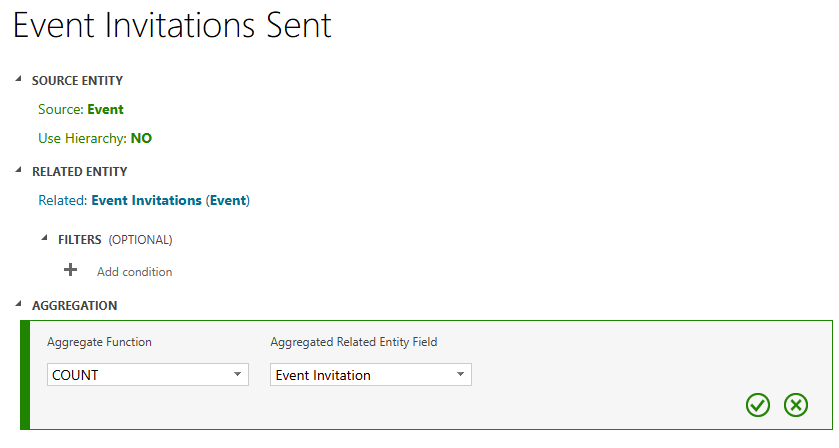
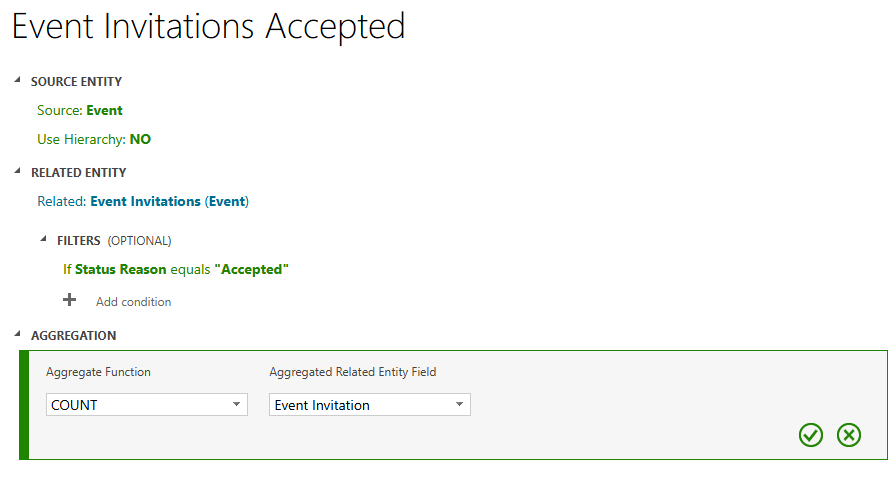
If we are sending out invitations, how about some analytics to see how many accept and how many are pending? Not required, but another nice to have and easy to do. This should be done on the Events table. First, I need the number of Event Invitations sent. Add a new whole number field and set the behaviour as rollup. Save and edit and you should get a pop up to add the logic. If you get an error, just click on the name of the new field you opened and click edit again. A little quirk, it seems to work second time around.
For this, we need to pick the Event Invitations related entity. Then the aggregation is Count of Event Invitations.
Add a second rollup field for Event Invitations Accepted. Pick the same related entity, but add in a filter of Status Reason equals Accepted. Then set the Count for Event Invitations again.
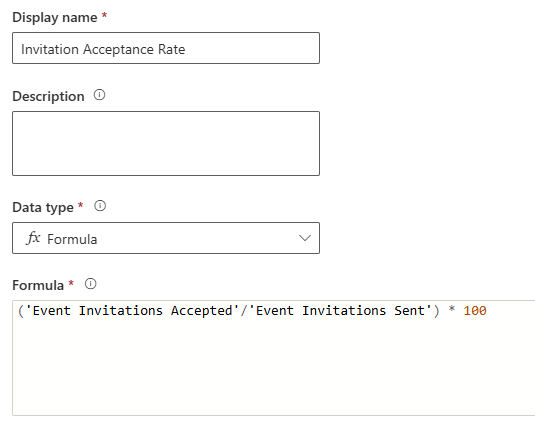
These next two could be calculated or rollup, but we CAN use a formula field which I would always choose when it’s an option. Add a formula field for the Invitation Acceptance Rate. Assuming you called the fields above the same as mine, you can just use this formula, where we divide the accepted invitations by the invitations sent, then multiple by 100 to get the acceptance rate.
('Event Invitations Accepted'/'Event Invitations Sent') * 100
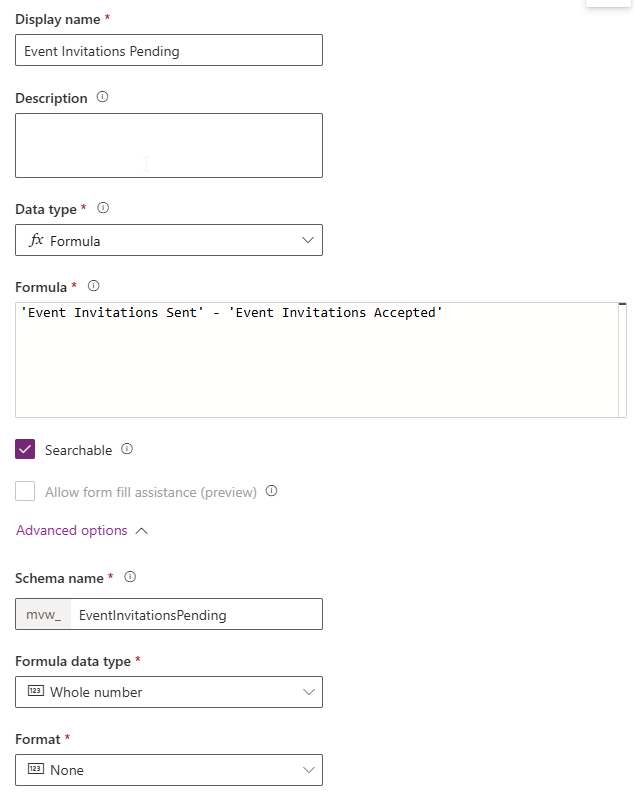
Lastly, let’s just show the number of invitations pending, another simple formula using our two rollup fields. We are just subtracting the number of accepted invitations from the total invitations sent value. Easy!
'Event Invitations Sent' - 'Event Invitations Accepted'
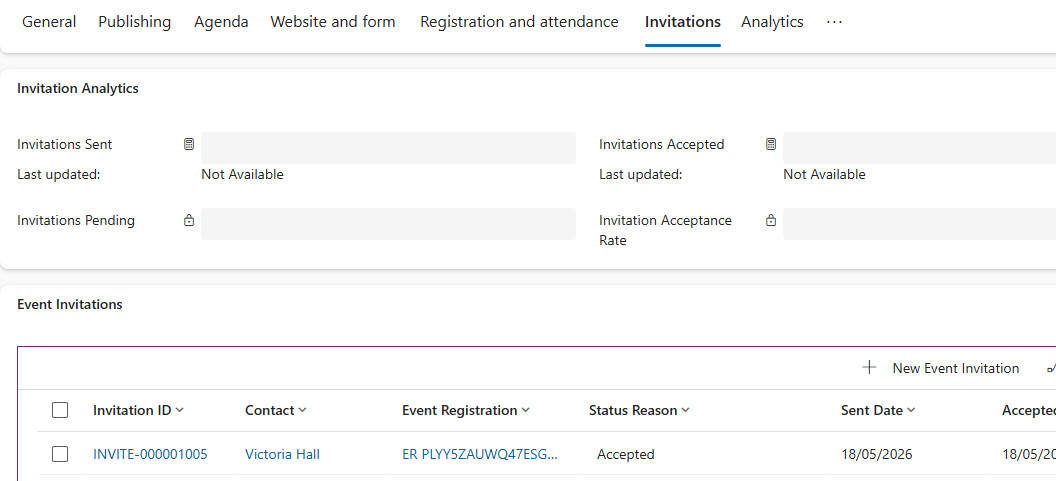
You can then add the fields to a tab on a custom Event form. Feel free to add to the out of the box layout but be warned this can often cause new functionality from Microsoft to either not work, or not even show up. I have the standard form and my own custom Event overview that I use and switch between. I’ve also got a sub grid of the Event Invitations records that are linked to the Event.
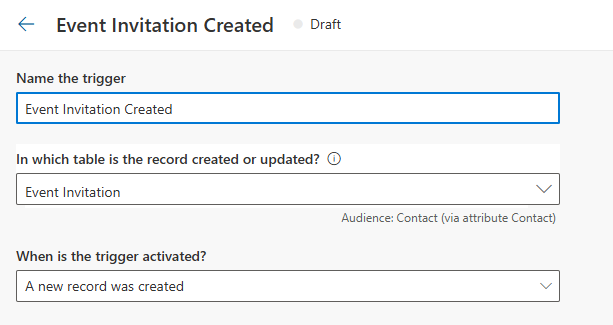
Event Invitation Trigger
This has to be the easiest part, the trigger in Customer Insights Journeys. Create a new one that fires on the Event Invitation table when a new record is created. Job done, just make it ready to use.
Event Invitation Email
Once you have the trigger, you can create a lovely email. What you add to the email is up to you, but the values should be taken from the new Event Invitation trigger you created above. In my email I am setting the image dynamically via the trigger from the Event Image. Then showing the Event Name along with the Event Start and Event End. That way the same email can be used over and over no matter which Event it is for.
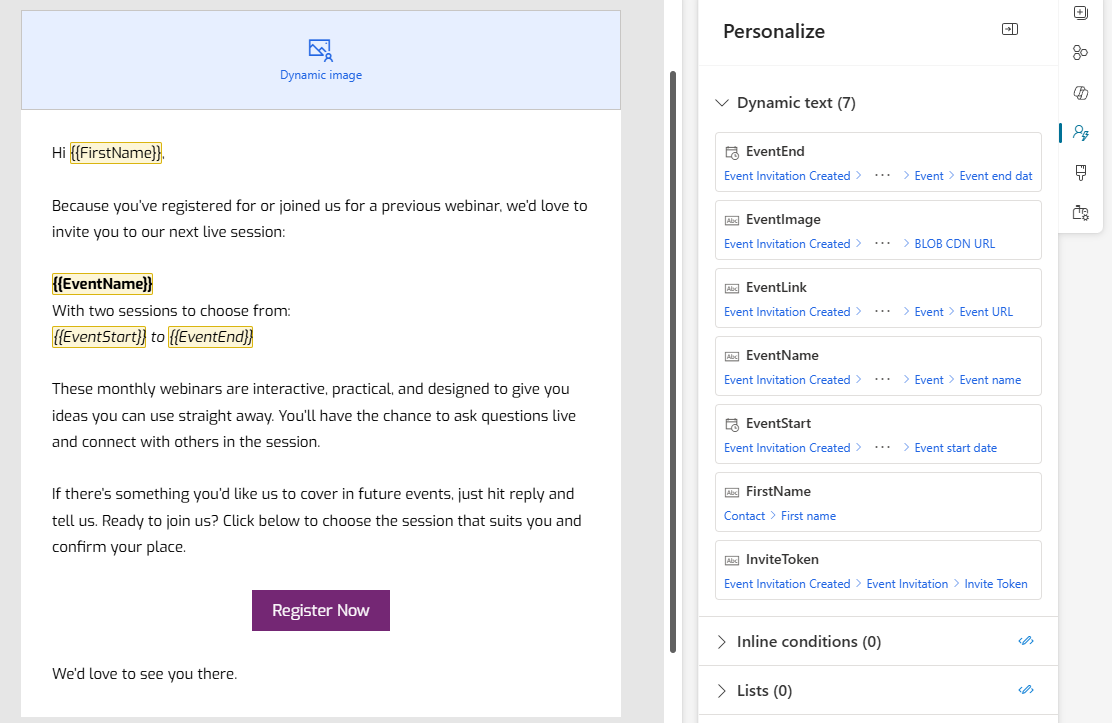
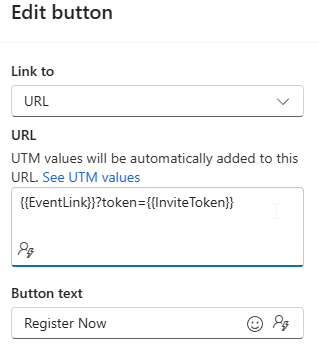
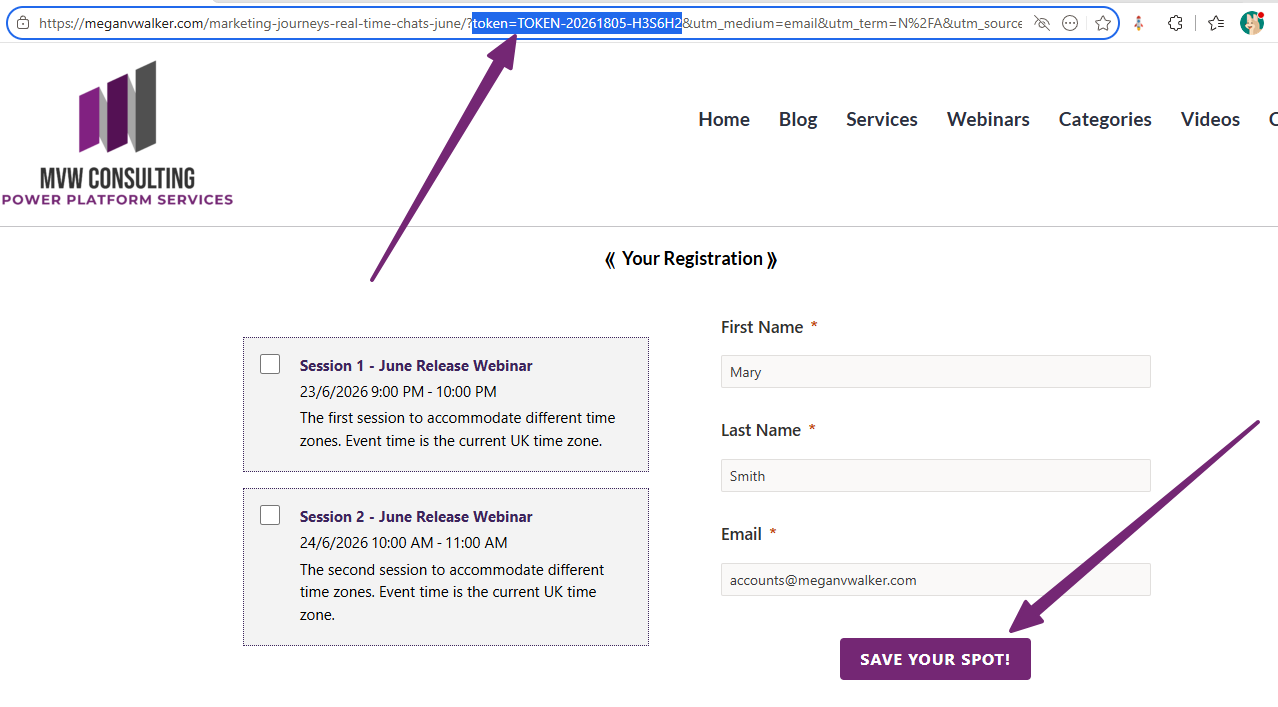
The URL of the button needs to be the Event URL from the Event via the trigger, then after that, we are adding a parameter for the Invite Token. The easiest way I’ve found to get the dynamic values in is to just add them directly in to the URL field like this. {{EventLink}}?token={{InviteToken}} – when you add in values with double curly brackets, they automatically show up in the list of values in the personalisation section.
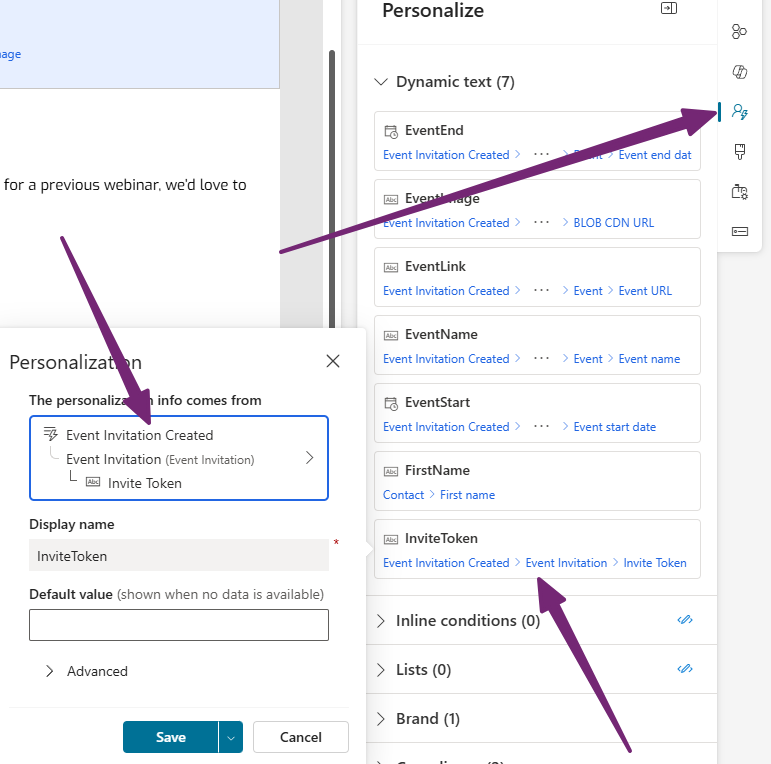
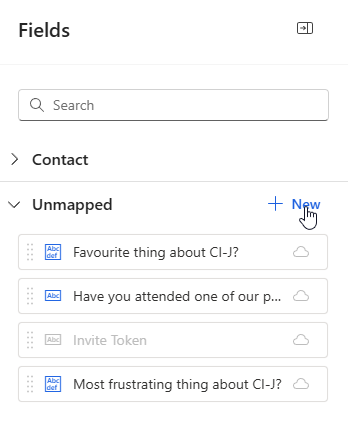
If you click on the person icon from the right of the email, you will see anything unmapped will have a red icon next to it. Click on the thing that needs mapping, then go through the trigger to find the right value. In this case, we need the Invite Token value from the Event Invitation record. When we send out this email when an Event Invitation is created, it will pass through their unique token value which we can then use to find and link correctly to the Event Registration created for the Event.
Event Registration Form
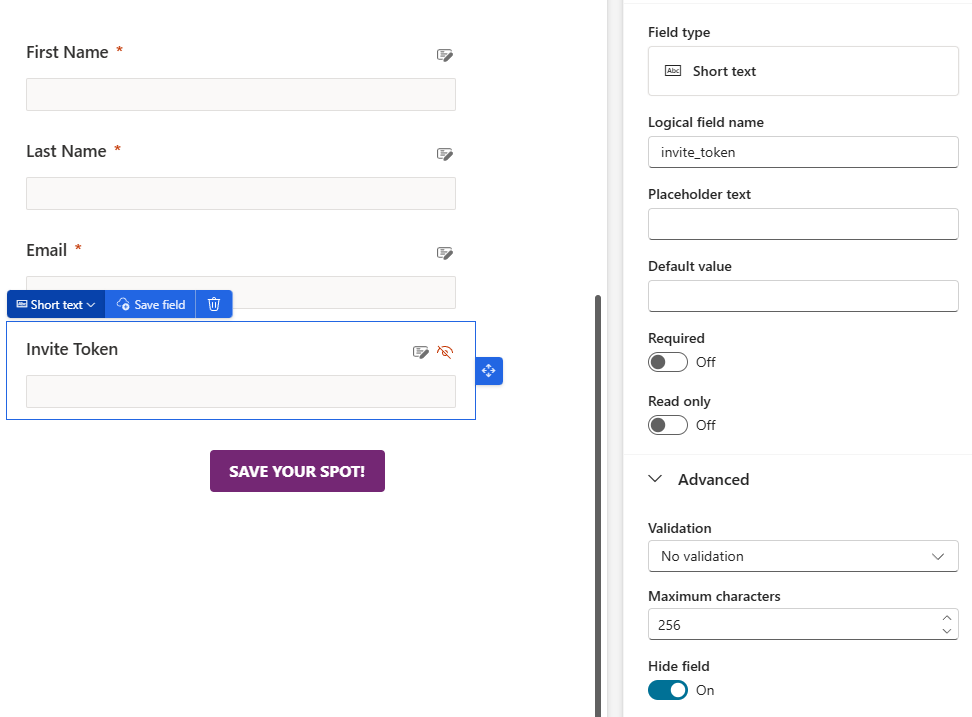
Alright, we are almost through! This one is needed on your Event Registration form. We need to add a new unmapped field that I will call Invite Token, so you can do the same (or know if you call it something else you will need to change the script I give you). Add an unmapped field to your event registration form.
Change the logical field name to invite_token. You might want to show the field to start with when you test it so you can see it working, but ultimately you will need to hide it so it’s not visible to the person registering.
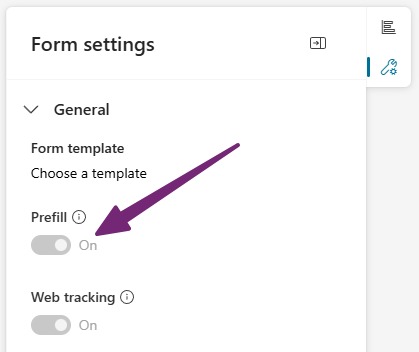
Bonus, turn Prefill on in the Form settings so that when someone registers from the link in the email, it populates the values for their name and email (and any other fields you might have on the registration form).
Then go in to the HTML of the form and add the script below. Put it directly below the close <style> tag. This looks to see if there is a token parameter in the URL when the form is being filled out, and if there is, it takes it and populates it in the hidden invite_token field on the form. Easy right?
  <script>
    window.addEventListener("d365mkt-afterformload", function () {

    const params = new URLSearchParams(window.location.search);
    const token = params.get("token"); // match your URL parameter exactly

    if (!token) return;

    // CIJ forms use data attribute selectors
    const tokenField = document.querySelector("[name='invite_token']");

    if (tokenField) {
        tokenField.value = token;

        // Optional: prevent user editing
        tokenField.setAttribute("readonly", true);

        // Important: trigger change so CIJ detects it
        tokenField.dispatchEvent(new Event("change", { bubbles: true }));
    }
});
</script>
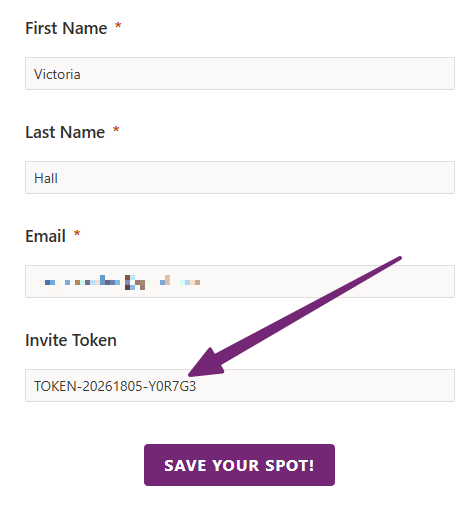
For testing, I left it unhidden so I could see it actually works. Just make sure you hide it again after you have tested your own! If you aren’t sure about where the value of that field goes, check out this post that explains all of the custom unmapped event registration questions and how they are stored. This is important for the next part, a flow in Power Automate.
Event Invitation Journey
Your Event Invitation Journey should be pretty easy. It’s a simple Trigger start, using the new Trigger you created earlier.
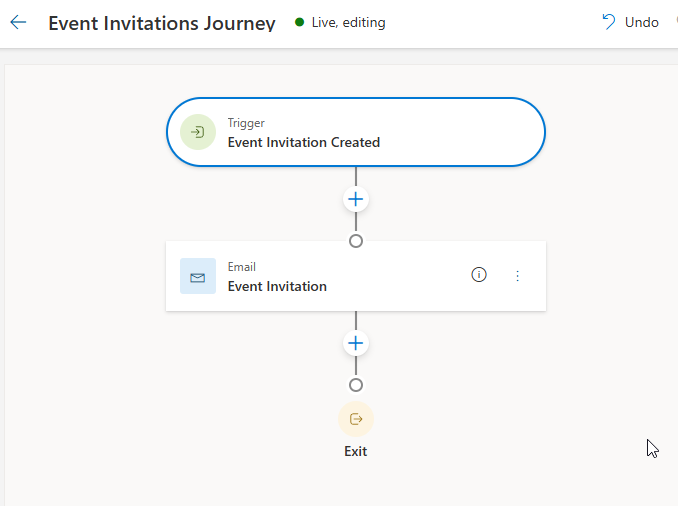
Then it’s sending out the email you created that pulls the details from the Event Invitation Created Trigger. Easy. Anything else that happens if the person registers should be handled via your standard Event Registration Journey so that it doesn’t matter if someone registers from an invitation, or via a link directly on your website, we want them all going through the Event Journey.

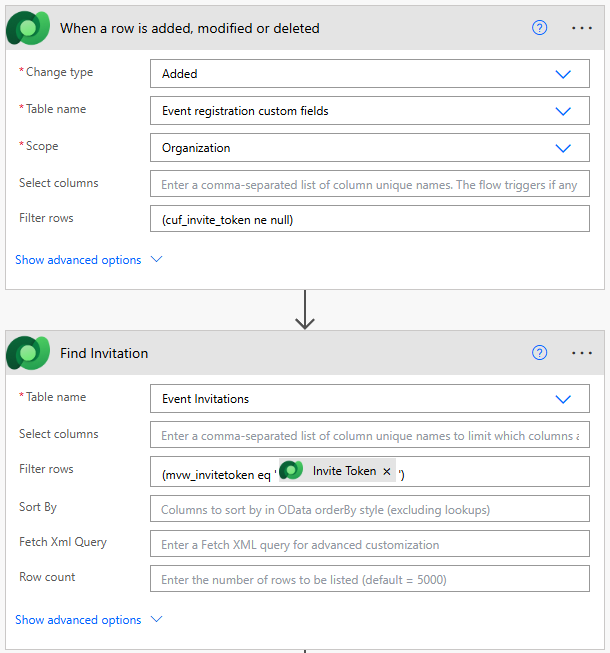
Event Invitation Flow In Power Automate
Our flow is needed so that when someone registers and the Invite Token value is populated in the Event registration custom fields table, we can find the Event Invitation and link it to the Event Registration. It starts with the change type of Added on the Event registration custom fields table, using the filter of (cuf_invite_token ne null) – unless you named your custom field on the registration form something different, then change it to your own field name. Using this filter makes sure the flow only fires when there is an Invite Token present and not if someone came via another link (meaning not invited) where it would be empty. The cuf is needed, that’s the prefix added by Microsfot for the custom unmapped fields. The next step is a List rows step (that I named Find Invitation) using the filter below, where the Invite Token field equals the value that was submitted via the form.
(mvw_invitetoken eq '@{triggerOutputs()?['body/cuf_invite_token']}')
The next step is an Update a row step to update the Event Invitation record we found in the previous List rows step. The Row ID can be set by using the following expression. This assumes you renamed your List rows step to Find Invitation also. If not, change that part. Also be sure to set the prefix of your field correctly instead of using mvw (unless that’s also your prefix when adding new tables and fields!). This takes the first record found from the List rows step rather than creating an ugly and unnecessary Apply to each step.
@{first(outputs('Find_Invitation')?['body/value'])?['mvw_eventinvitationid']}
I am also setting the Accepted Date on the Invitation. We can just use utcNow to use todays date.
@{utcNow()}
We then need to link the Event Invitation to the new related Event Registration record. This value is found on the Event registration custom fields table and can be set using this formula. Finally, I am changing the Status Reason to Accepted.
msevtmgt_eventregistrations(@{triggerOutputs()?['body/_msevtmgt_eventregistrationId_value']})
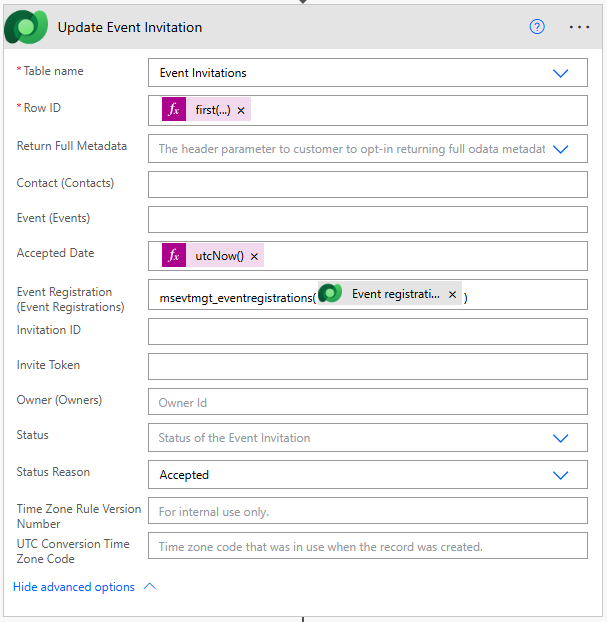
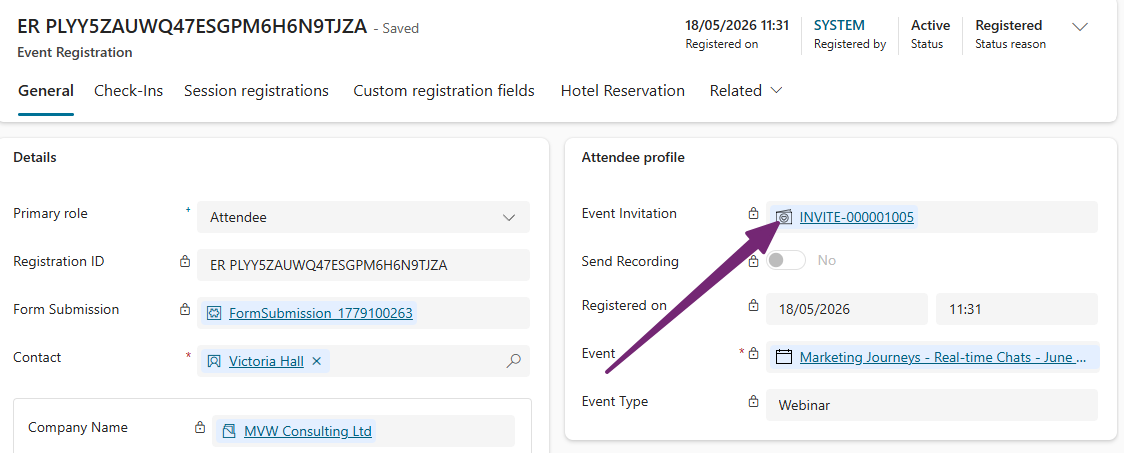
I also added a Lookup field on the Event Registration table which is to link back to the Event Invitation. Nice to have a full circle so we can see the information from both places. So we add in another Update a row action on the Event Registrations table. You need to add in the plural value for the name of your table (so the prefix, underscore, then eventinvitations) then we use the same formula to get the first record from the list rows step, and set the event invitation id which is the unique GUID for the found record. That’s it, just a few steps to the flow. Save and publish.
mvw_eventinvitations(@{first(outputs('Find_Invitation')?['body/value'])?['mvw_eventinvitationid']})

To test it, fill out your form with an Invite Token populated in the value, then make sure your flow runs without any errors.
Sending Invitation To Contacts
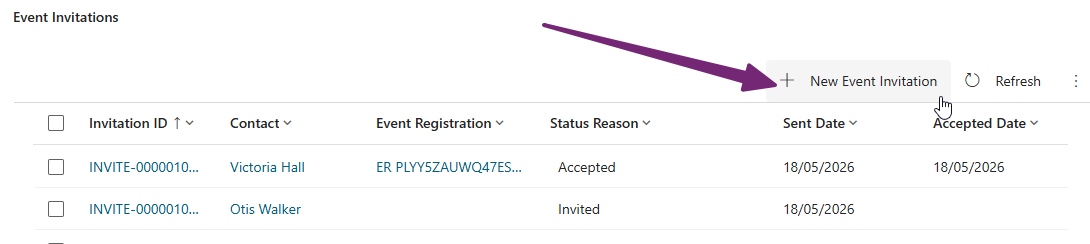
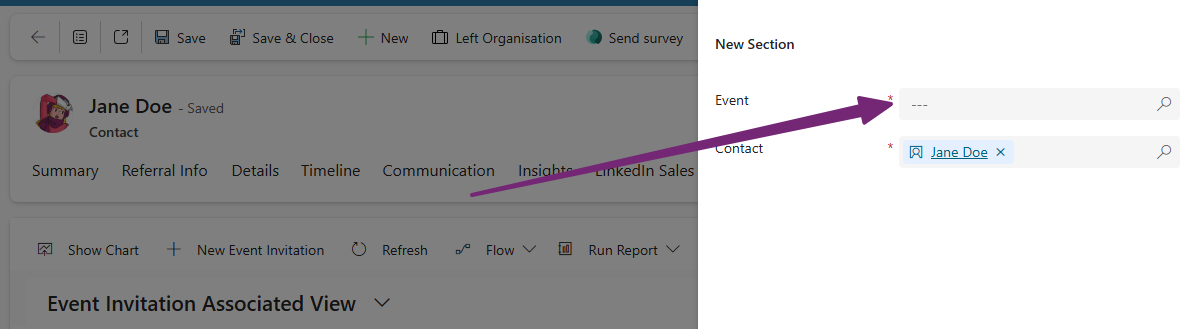
Alright. Now you have everything set up and ready to go, let’s start inviting some Contacts! There are several ways you can do this. If you added Event Invitations as a sub grid to your Event, you can click New Event Invitation, add the Contact and save the record. Easy!
You could also add an Event Invitation tab to the Contact table, or go to the Related Records section and find Event Invitation and send from there. Just add the Event and you are done, again, Easy!
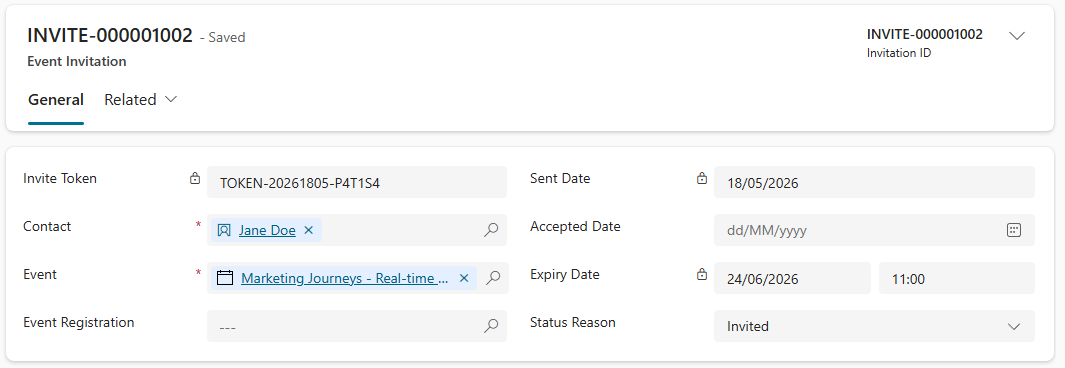
When you create the Event Invitation, it creates a record that has things populated for you including the Invitation ID, the Invite Token, the Sent Date (which is just the Created Date renamed), the Expiry Date pulling from the Event, and the Status Reason of Invited.
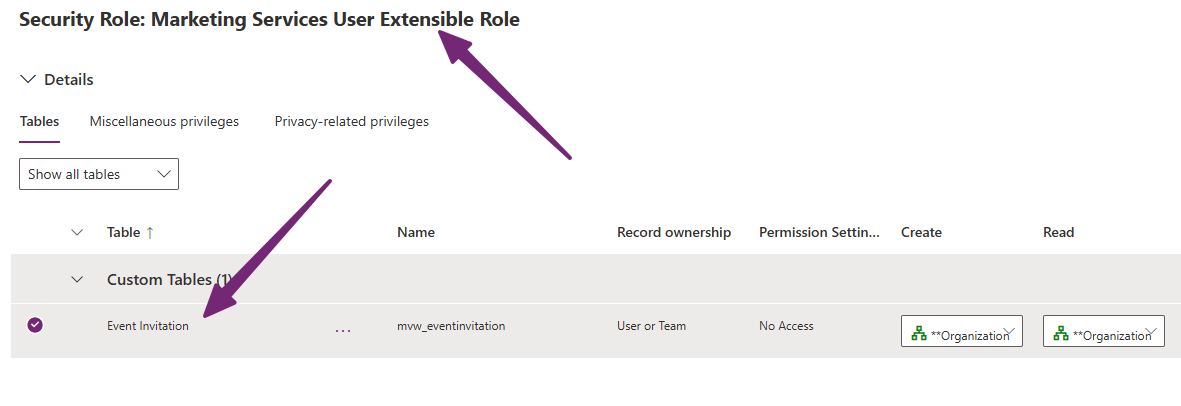
If you want to use a Journey to create an invitation for each person in a segment to do this faster, first you must edit the Marketing Services user Extensible Role to give it permissions to create the record, and allow it to link to the Event and Contact. Find the security role and give it the following access:
- Event Invitation Table – Create, Read, Append
- Event Table – Append To
- Contact Table – Append To
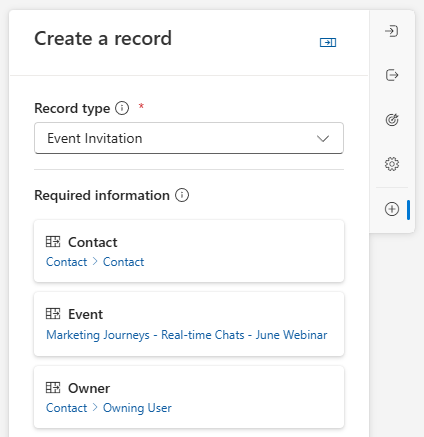
You can then create a Journey from a Segment including all of the people you wish to invite, and just add one step to create a new record and pick the Event Invitation record type. Set the Contact as the Audience Contact, pick the Event and set the appropriate Owner for the new record. Publishing your Journey will mean all of the people from the segment will get an Event Invitation created which will put them in to your Journey that sends out the marketing email.
Final Working Process
Phew! That was a lot right? In reality, it took a few hours to create the process, with quite a bit of testing to make sure it all worked. I then used it for real to invite people to the June Webinar with Amey Holden and I. The email goes out, fully customised dynamically (no need to ever edit the Email once you’ve created it). The Register Now button has the token variable being passed through it.
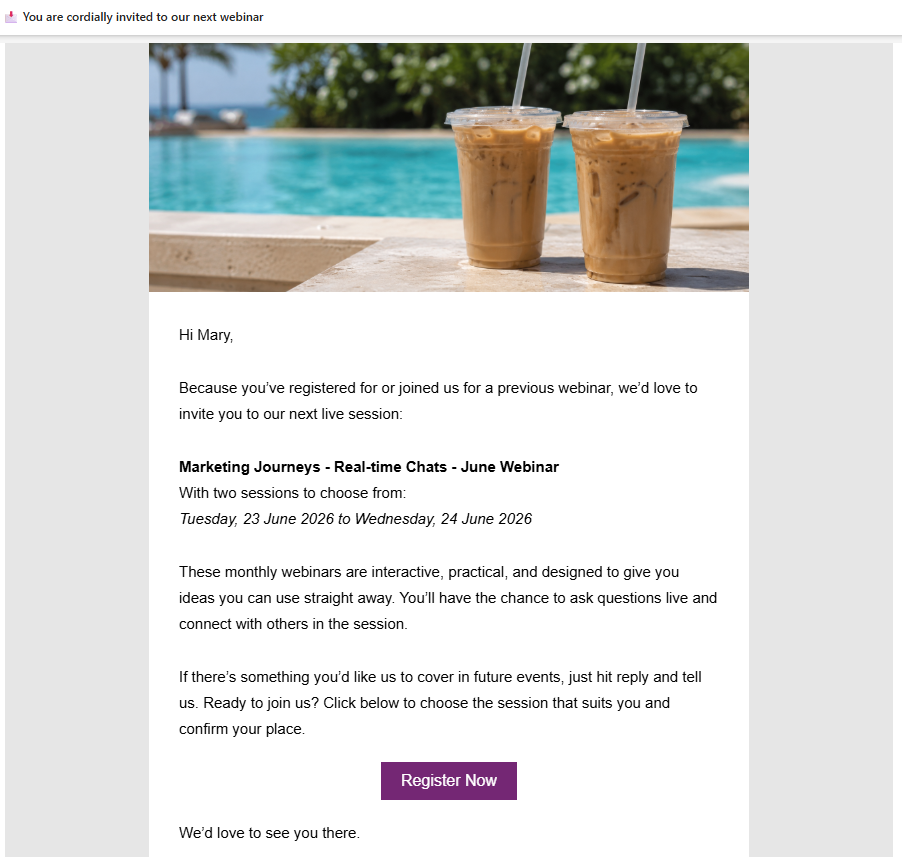
Clicking on the button passes through the token id to the browser URL and populates it in to the hidden field on the form. All other values are also populated when using prefill on the form making it even easier for your existing Contacts to register.
The registration gets submitted, and because the Invite Token was present in the submission, it kicks off the flow running in Power Automate, finds the related Invitation and sets it as Accepted with the Accepted Date of today, and links to the Event Registration record that was just created.
If you added the lookup to the Event Invitation from the Event Registration, you will see that populated too.
We can then start to see some Invitation Analytics get populated for the Event. Love it! 💖
Sometimes I feel like we shouldn’t have to come up with things like this and they should just exist out of the box, BUT then I appreciate how much I was able to customise this process to suit my needs and really make it a solid way to invite people and then see who has accepted all from the event record. What do you think? Would you like a process like this, and will you be adding it to your own environment?
Unsure about your Customer Insights set up?
Customer journeys are powerful, but only if the platform, data model, and compliance framework are aligned.
I work with teams using Customer Insights Journeys to make sure it is set up correctly, data is compliant, and journeys deliver without surprises.
This is just 1 of 591 articles. You can browse through all of them by going to the main blog page, or navigate through different categories to find more content you are interested in. You can also subscribe and get new blog posts emailed to you directly.