*** NOTE: ALL INFORMATION IS ACCURATE AT DATE OF PUBLISHING ***
Do you have a need for users to easily create records to link to another record? Then view them immediately afterwards? In this post we have a custom page where we can add a list of current software that is being used by a Lead and their organisation. This gives a user the ability to quickly create and view related records from one place and also prevent them from creating duplicate records. This assumes you have a record type that is possible to link to a record many times, so a one to many relationship. Let’s take a look!
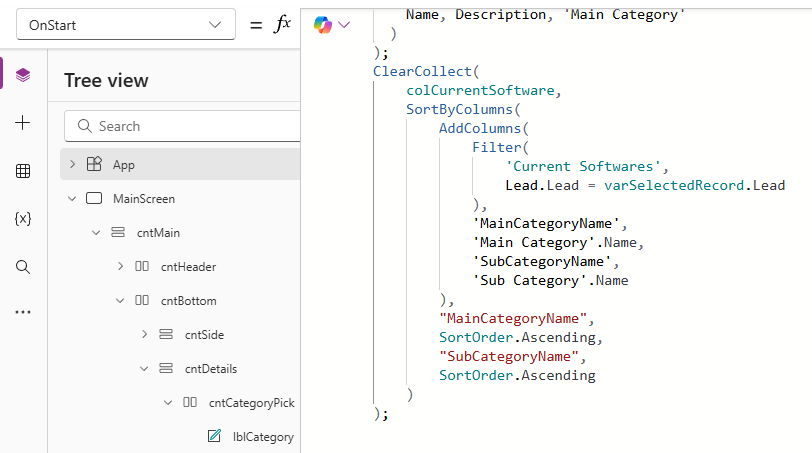
So first things, we need to create a collection when the custom page is opened. We are going to create and display records called Current Software which is linked to the Lead record we are looking at. To make sure we can see any existing Current Software records, we need to load them all in first when the page opens.
ClearCollect(
    colCurrentSoftware,
    SortByColumns(
        AddColumns(
            Filter(
                'Current Softwares',
                Lead.Lead = varSelectedRecord.Lead
            ),
            'MainCategoryName',
            'Main Category'.Name,
            'SubCategoryName',
            'Sub Category'.Name
        ),
        "MainCategoryName",
        SortOrder.Ascending,
        "SubCategoryName",
        SortOrder.Ascending
    )
);
Here is what we are doing in the collection:
- ClearCollect – starts the creation of the collection
- colCurrentSoftware – you can call this whatever you like, it is the name you are giving the collection of data
- SortByColumns – this is how I want to sort the data, the ordering which in my case I am sorting by columns I am creating in the next step, AddColumns. I am sorting by MainCategoryName ascending first, then SubCategoryName ascending second
- AddColumns – this allows us to create ‘new temporary’ columns that we can then use elsewhere in the custom page. For this, I am defining MainCategoryName as the name from the Main Category field on the Current Software table, then defining SubCategoryName as the name from the Sub Category field on the Current Software table
- Filter – we add the table name, and then this allows us to filter which records to add to the collection, which in my case I just want the records from the Current Softwares table where the Lead on those records equals the selected Lead we are viewing
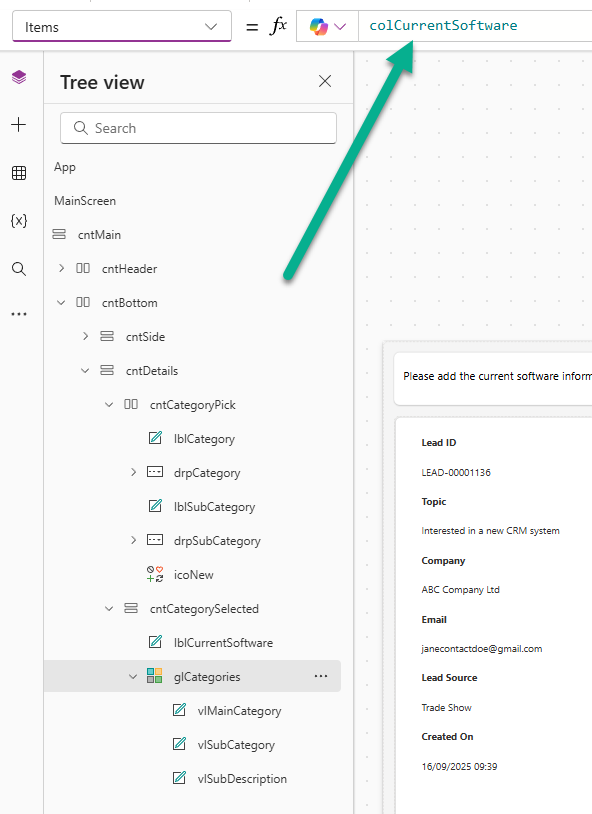
Ok, now we have the initial collection being created, we then are going to create a control to add new records. For this, I have two combo boxes, one has a collection of Software Categories and the other is a filtered combo box of Software Sub Categories. Check out this post for more on how to do these kind of cascading dropdowns.

After the combo boxes, add an icon/ I have used the Add icon.
We can define the colour of the icon. Here I am getting the colour from the default them of the Dataverse environment which you can read about here.

The Display mode of the icon determines if we can click it or not. We don’t want people clicking to try and add things if they have only picked the main category and not the sub category, or not picked either of them. We also don’t want someone adding the same record again if there is already a Current Software record that exists for the Lead with the same exact Category and Sub Category. So this will check and if the category drop down is blank, or the sub category drop down is blank, or the collection we created OnStart of the page already includes a matching combination, the button will be disabled, otherwise it’s in edit mode which means we can press it.
If(
    IsBlank(drpCategory.Selected) || IsBlank(drpSubCategory.Selected) ||
    !IsBlank(
        LookUp(
            colCurrentSoftware,
            'Main Category'.Name = drpCategory.Selected.mvw_name &&
            'Sub Category'.Name = drpSubCategory.Selected.mvw_name
        )
    ),
    DisplayMode.Disabled,
    DisplayMode.Edit
)
Ok now on to what should happen when the Add icon is pressed, and this goes in to the OnSelect of the icon. We are doing a few things here.
First of all we are setting a variable called varNewSoftware, then Patching the new record, meaning we are creating it. We are setting the Main Category, Sub Category and Lead, all of which are lookups so must use the LookUp() function.
// Patch the new record
Set(
    varNewSoftware,
    Patch(
        'Current Softwares',
        Defaults('Current Softwares'),
        {
            'Main Category': LookUp(
                'Software Categories',
                Name = drpCategory.Selected.mvw_name
            ),
            'Sub Category': LookUp(
                'Software Sub Categories',
                Name = drpSubCategory.Selected.mvw_name
            ),
            Lead: LookUp(
                Leads,
                Lead = varSelectedRecord.Lead
            )
        }
    )
);
After that we are adding that new record to the colCurrentSoftware collection (the one we created at the OnStart of the page).
// Add new record to collection with extra columns for sorting
Collect(
    colCurrentSoftware,
    AddColumns(
        varNewSoftware,
        'MainCategoryName', varNewSoftware.'Main Category'.Name,
        'SubCategoryName', varNewSoftware.'Sub Category'.Name
    )
);
Then finally we are resorting that collection so it keeps the original ordering of everything.
// Re-sort the collection
ClearCollect(
    colCurrentSoftware,
    SortByColumns(
        colCurrentSoftware,
        "MainCategoryName",
        SortOrder.Ascending,
        "SubCategoryName",
        SortOrder.Ascending
    )
);
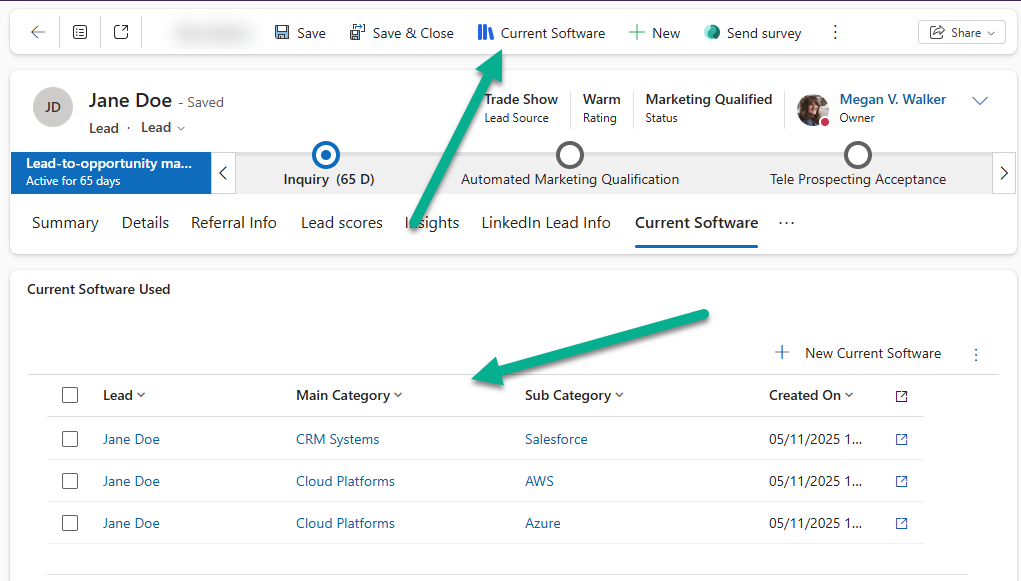
Now go ahead and add a vertical gallery and setting the Items as the original collection we created. This will show all of the records that were there already when we opened the custom page, then will also include any of the new records we add by patching through when pressing the Add icon. You can adjust the gallery to show fields from the records.
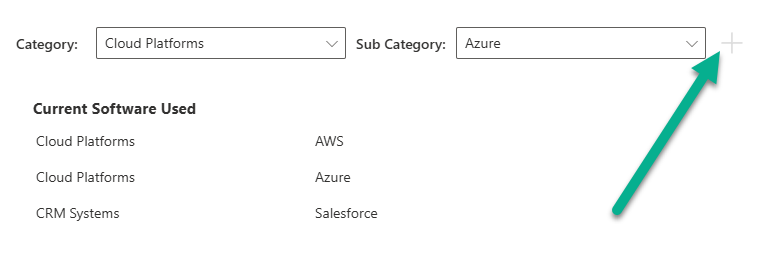
Now when a user picks a Category and a Sub Category they can click the icon button.
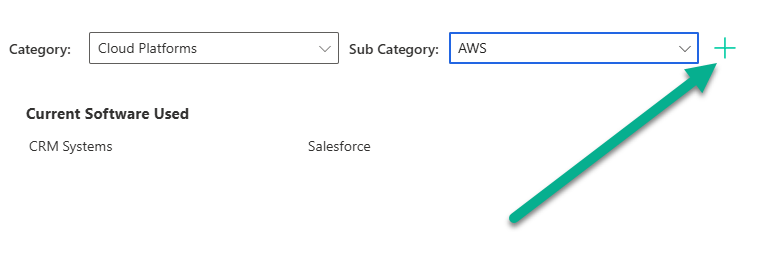
We can see that Cloud Platforms and AWS was added to the gallery. However, if we then try and pick something already in the gallery (Cloud Platforms and Azure in this example), the icon is disabled so the user doesn’t try to add duplicates.
We can then add the custom page to the ribbon so someone can interact with it from the Lead record. You can of course show a sub grid with the related records. If you really want to make sure someone adds them using the custom page, you could adjust the command bar on the sub grid to hide the New button so they can’t click and add things that way.
When a user opens the custom page, they can see all existing records, then immediately get a refreshed gallery when new ones are added. Nice and slick!
Check out the latest post:
Adding Multiple Screens To A Custom Page To Provide Confirmation Of New Record Creation
Considering Custom Pages?
Thinking about using Custom Pages but unsure where they fit best?
I help organisations design model-driven experiences that are intuitive, scalable, and built for real users, not just technical possibility.
This is just 1 of 576 articles. You can browse through all of them by going to the main blog page, or navigate through different categories to find more content you are interested in. You can also subscribe and get new blog posts emailed to you directly.