*** NOTE: ALL INFORMATION IS ACCURATE AT DATE OF PUBLISHING ***
I think creating a Custom page is pretty easy. Once you have the basics you can create the bare bones pretty quickly including some functionality with a Patch statement to update your records. It’s the fine tuning and making sure the custom page works all the time and doesn’t allow users to submit multiple times, or press a button without filling out fields you want them to. If you work on Model-driven Apps (MDA) it’s pretty simple to just set a field as required on a table. With Custom Pages you need a little bit more than that. In this post we will look at a few tips to make fields required in your custom pages, or at least give the appearance of them being required.
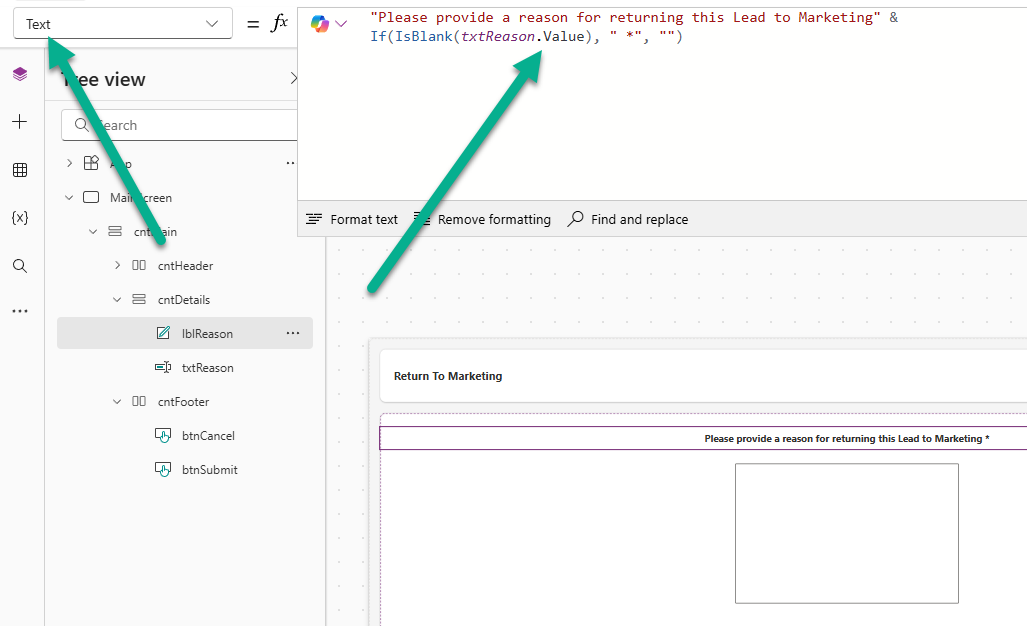
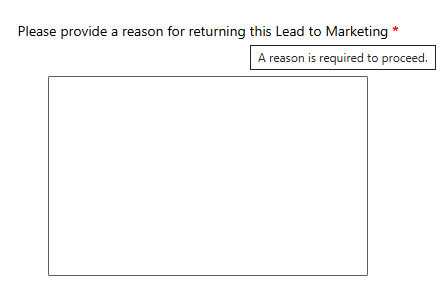
First, it’s actually the label we will add some logic to rather than the text box we want them to fill out. Here we have a label that asks the user to provide a reason. So lblReason is for txtReason which is the multi-line text box below it.

The first thing we can do is prevent the Submit button from being pressed if the text box is empty. For this, go to the Button then the Display Mode. If you’ve read any of the other posts I’ve done on Custom pages you will have seen then one that disables the button after it is pressed the first time, setting a varButton variable as true. We’ll include that same approach in the displaymode formula on the button. The logic is as follows:
It enables (DisplayMode.Edit) only when:
txtReason.Valueis not blank, andvarButtonis false.
That means if varButton is true, or the text box is empty, the button is disabled.
If(
!IsBlank(txtReason.Value) && varButton = false,
DisplayMode.Edit,
DisplayMode.Disabled
)

Now that takes care of them not being able to submit without anything in that value, but it would be good to indicate that on the label too in some way. There are a couple of options I will show, with the last being my preferred, but this gives you choices. First we can add a formula to the Text itself. Right after the label text closed quote, we can add the & symbol then have a formula that adds an asterisk if the txtReason.Value (the text box) is blank/empty. If not, there is no asterisk added. Better!
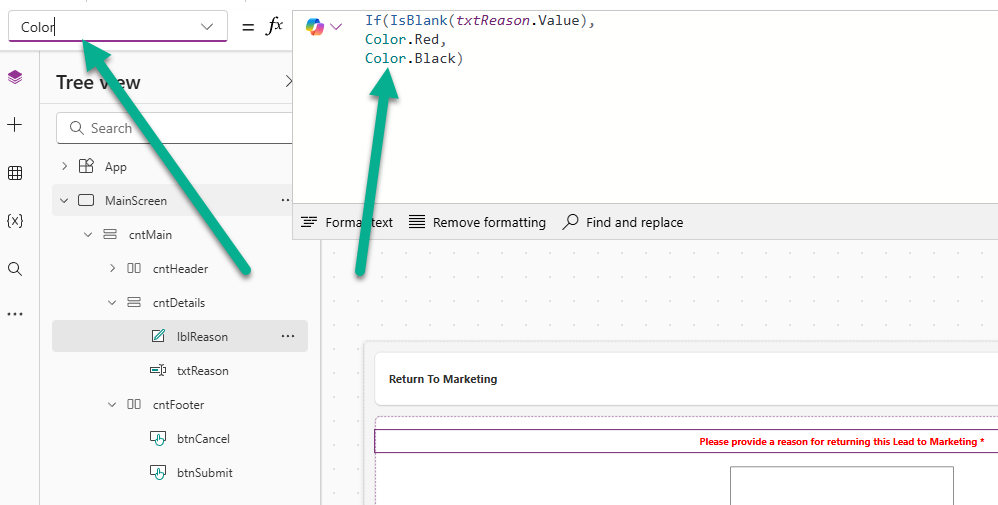
What about a colour change too? No one likes their work marked in red so let’s show it in red if the txtReason.Value is blank and if there is a value the label will be in black. Add this formula to the Color property.
Ok so the above options work… but you know what works better and looks nicer? Using an HTML component instead of a text one. This allows you to add HTML within the text which means you can change the font color and weight rather than having the whole thing black or red.
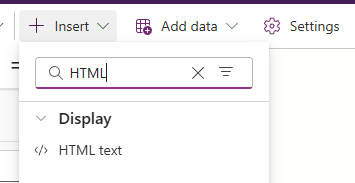
If you know HTML then this should be really easy for you. If you don’t, a few simple things you can use. Start in the quotes with your HTML and you can add <center> which will centre the text. Then add the initial text you want on the label, then close the quotes. Then you can add the & symbol and add in that same formula to check if the txtReason.Value is blank, and if it is you will add an asterisk. This time it will have HTML around it to set the font color as red and use <b></b> to make it bold. If there is a value in that field, you would do nothing.
"<center>Please provide a reason for returning this Lead to Marketing" &
If(IsBlank(txtReason.Value), "<font color=red><b> *</b></font>", "")
You can see with the comparison, it is less harsh just making the asterisk red rather than the whole thing. Make sure you remove the original label if you had one and just leave the HTML one.

You can also add in a Tooltip at the bottom of the Properties of the HTML component.
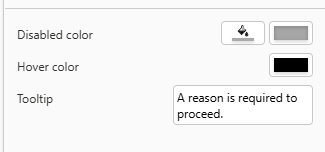
Then when someone hovers their mouse over the label they will see it for further clarification.
Save and publish your custom page, then publish the MDA to make sure it picks up your changes. Now when someone opens the custom page, they will not be able to submit it unless they fill out the required fields you have set!

Check out the latest post:
Create Reusable Content Cards in Customer Insights Using Content Blocks
Considering Custom Pages?
Thinking about using Custom Pages but unsure where they fit best?
I help organisations design model-driven experiences that are intuitive, scalable, and built for real users, not just technical possibility.
This is just 1 of 575 articles. You can browse through all of them by going to the main blog page, or navigate through different categories to find more content you are interested in. You can also subscribe and get new blog posts emailed to you directly.