*** NOTE: ALL INFORMATION IS ACCURATE AT DATE OF PUBLISHING ***
Microsoft is continually making changes to Dynamics 365 Customer Voice. This includes new functionality that’s immediate and noticeable and sometimes comes in the form of a simple new field that allows us to do so much more. The Details of the Survey Response or msfp_questionresponseslist field is one such field. In this post let’s dig in to see what it contains, and how we can leverage to send notifications with all of the question responses when a new survey response is received.
If you are using a Model-driven Power App, you can get access to the Details of the Survey Response field by adding it to a Survey Response form.
The JSON data stored in this field is a combination of a question id value along with the response given to that related question.
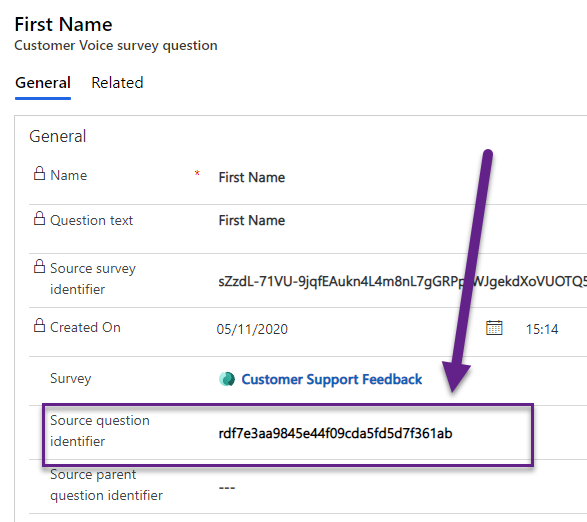
[{"questionId":"rdf7e3aa9845e44f09cda5fd5d7f361ab","response":"Jane"},{"questionId":"r69f624974be14d27833de98b88789e99","response":"Doe"},{"questionId":"rc89fc12228994cca8859ee52d603764b","response":"janecontactdoe@gmail.com"},{"questionId":"r71a563df4d834de99b26bea21ee6f5dd","response":"5"},{"questionId":"r7b6d88e115c64d50aae01da4e2062ee8","response":"9"}]If we look at the Customer Voice survey question record, we can see the Source question identifier, which is the field used in the JSON.
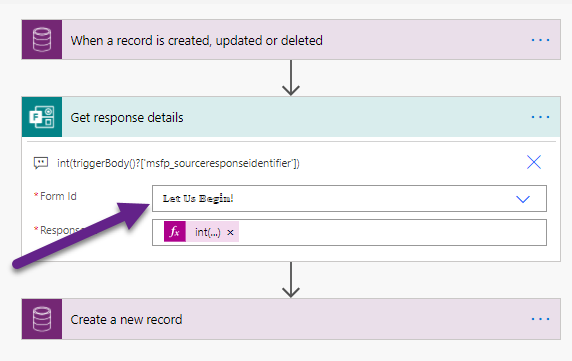
We can use the msfp_questionresponseslist in Power Automate to then get access to the question responses and take action on the data in a couple of ways. First, keep in mind that if you want to easily get the questions and their responses currently, you would need to use the Microsoft Forms connector, and the Get response details action. From there, you would need to specify EXACTLY which form to get the responses from…. meaning any kind of notification would need one flow per survey… not ideal.
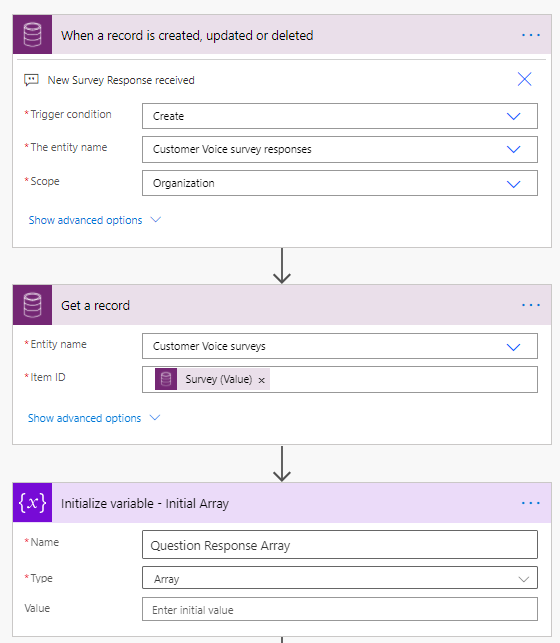
Let’s look at a different approach using the JSON from the new details field. Our first step is the same as above, the trigger from the Common Data Service current connector, using the condition of Create for the Customer Voice survey responses entity. We then add in a get record step for Customer Voice surveys, using the Survey value from the trigger. This will get us the related survey so we can include this in the email notification at the end. Nothing more exciting than that! Then use an initialise variable action and create one with the type of array. This will be used later so that we can populate it with each Question Text and then the related Answer for the Survey Response.
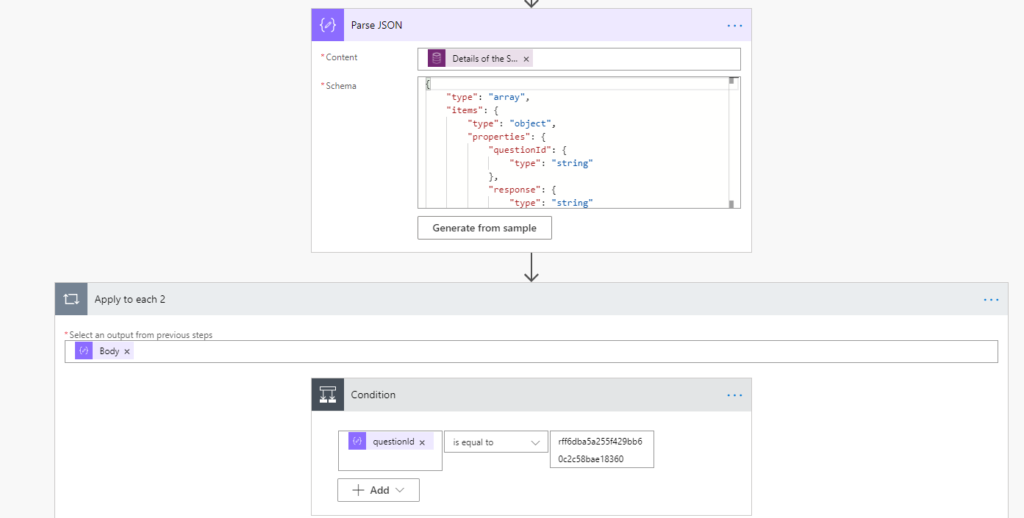
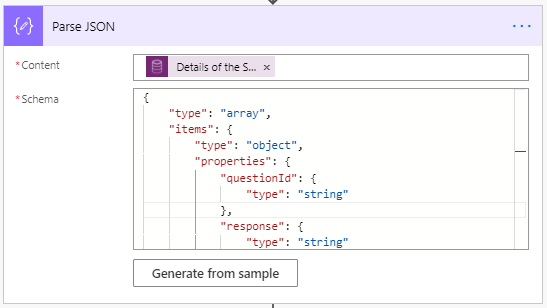
Now we add a Parse JSON step. The Content needs the Details of the Survey Response value, and the Schema required can be found below. Just copy it, then paste it into the Schema field. Simple.
{
    "type": "array",
    "items": {
        "type": "object",
        "properties": {
            "questionId": {
                "type": "string"
            },
            "response": {
                "type": "string"
            }
        },
        "required": [
            "questionId",
            "response"
        ]
    }
}
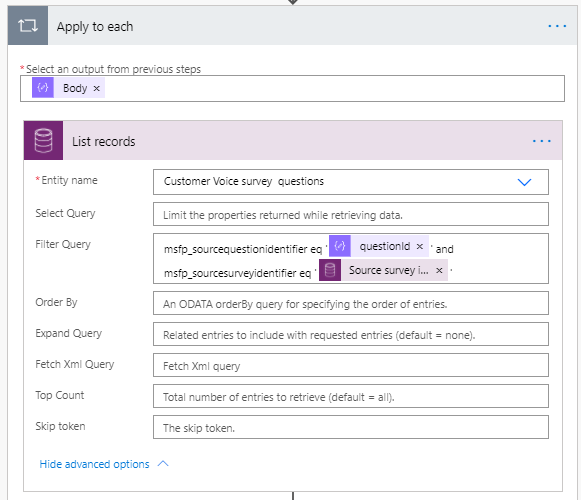
Our next step will allow us to find the related question so we can get the text. As we’ve seen, the details provided in the JSON include the question ID and the response provided by the person submitting the survey. It doesn’t give us the text of the question. So, add in a List records step from the Common Data Service connector. Select the entity of Customer Voice survey questions. In the Filter Query, we need to pull back only those questions where the msfp_sourcequestionidentifier is equal to the one with the same questionid as found in the Parse JSON step. We also need to define the query by adding in the mspf_sourcesurveyidentifier. If we have copied a survey, this will create two unique survey id’s, but for copied questions, they will have the same ID. So, adding in both of these makes sure we get the unique question needed. As soon as the filter query is added, the Apply to each will be added to your flow, no need to hunt for it to add manually! The Body value from the Parse JSON step above (which shows in light purple) will be added in to the field where it states ‘Select an output from previous steps’.
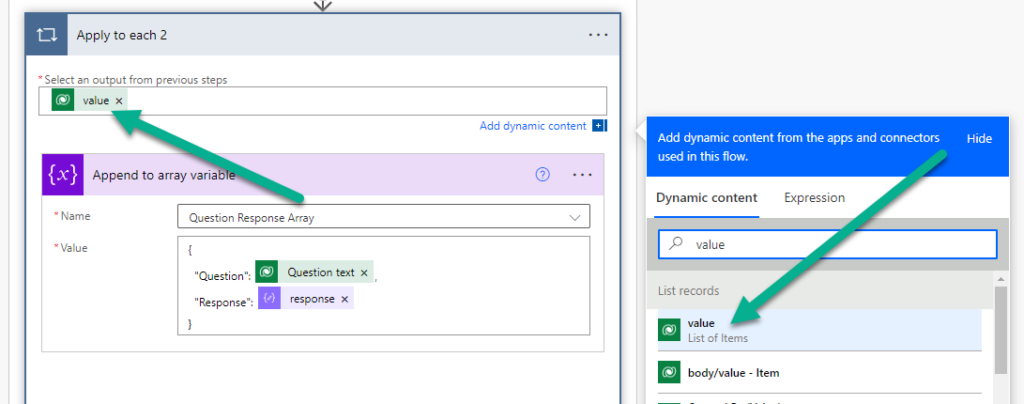
msfp_sourcequestionidentifier eq '@{items('Apply_to_each')['questionId']}' and msfp_sourcesurveyidentifier eq '@{triggerOutputs()?['body/msfp_sourcesurveyidentifier']}'Now within the Apply to each step, add another step and search for Apply to each to add a second one. This will name it Apply to each 2. In the top field, search for dynamic content of value. Find the one that is at the top of the List records as you see below (ignore that these values are green, this is a new screenshot updated 05/07/2022 which has used the most up to date colour of the Dataverse connector).
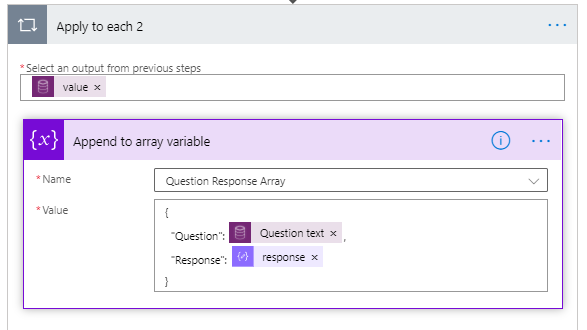
The next step is an append to array variable action. Select the variable you created at the beginning, and then add in your curly brackets. Between those, add a name for your column header in quotes, followed by a colon, then the value you need to add. Separate the lines by a comma. So you will end up with something like this.
{
  "Question": @{items('Apply_to_each_2')?['msfp_questiontext']},
  "Response": @{items('Apply_to_each')['response']}
}
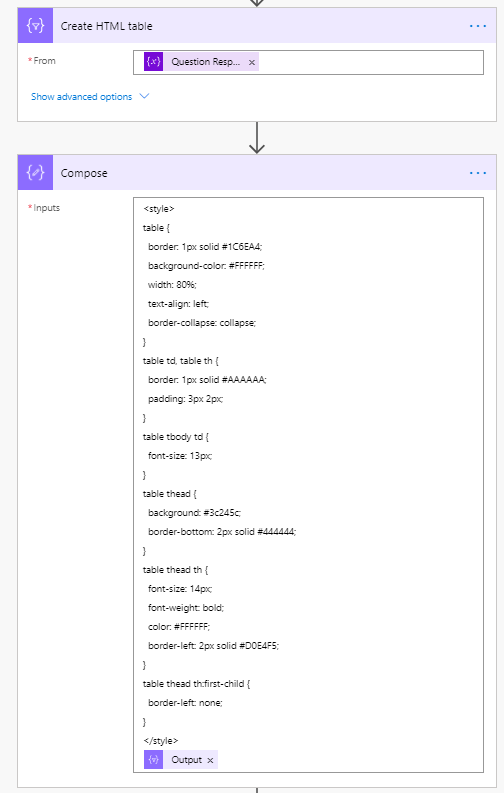
Next, we will use the Create HTML table action, using the variable we populated. Important to note, this must sit OUTSIDE of the Apply to each steps above so it runs after all of your questions and responses have been added to the array. The Compose step underneath is used to add a bit of styling to the table to make it look nice. Check out this post from my good friend Ryan Maclean for how to do this. It’s really simple yet so effective!
The final step is to create your email or whatever notification you have for your own requirements. This one is simple and just shows the name of the survey and then the outputs from the Compose step that formatted the table.
Next time a survey response is received, an email will be generated, including all of the questions and the answers provided. You could of course use the Get record step many times to get more details about the person who provided the response as required. You could also create a task, post a notification in Microsoft Teams, or share details of this information using Customer Insight cards.
One final thing to note, you could also use Power Automate to check for an individual specific question when it is answered. To do this, add a condition step to check and see if the questionid is equal to a specific id, then if Yes, carry on and add in the rest of your actions.
You can also watch the video on how to do this here.
Check out the latest post:
Set A Business Process Flow Stage With Custom Page
This is just 1 of 572 articles. You can browse through all of them by going to the main blog page, or navigate through different categories to find more content you are interested in. You can also subscribe and get new blog posts emailed to you directly.




I spent about 20 hours working on this myself a couple weeks ago and finally gave up and instead just embedded the subgrid of the responses into my custom entity, which worked for my purposes, but I’m going to give this a try today as it would be much better. Thanks!
Oh perfectly timed then! This was just added on Friday I believe… so it’s VERY new!
Worked well. I don’t typically use the common data service (current environment) because I have flows organized differently and have many environments… but used it for this for testing, since the regular common data service didn’t have the same trigger. Everything worked great though, wish I hadn’t wasted all those hours trying to figure this out myself.
Glad it worked Terry. The (current environment) is the latest one and ideally, all flows for CDS should use this one. A good post to review about the comparison between the two is this one: https://saralagerquist.com/2019/12/15/cds-vs-cds-what-connector-should-i-use-in-power-automate/
Thanks for this. It works brilliantly. I just followed the steps you listed – I am not really good at this 😛
Suppose in the last step, when email is being sent, I want to include the email ID which was mentioned in the response to survey question “Email” so that the respondent also gets the same email copy, would that be possible?
Hi Nitesh, yes, just look at the last screenshot I added to the article. You would do that, and pull back the question for your email using the ID. Then your condition has two paths. If the condition is met (meaning the question is the right one with the email address), add an action step to send an email, and put the response value into the Email To field. If the condition is not met, do nothing.
Any chance you can do this again with the Dataverse bits b/c now this has changed and the naming conventions are different.
Hi Abe, probably not likely for a while, sorry! Not enough time right now.
Do you have steps for creating the Model-driven Power App for this purpose?
Hi Barbara, here is a link to Microsoft’s documentation page on how to build your first model-driven app – https://docs.microsoft.com/en-us/power-apps/maker/model-driven-apps/build-first-model-driven-app – good luck!
Hello Megan, thanks for your efforts on this.
Could you please clarify for me, the flow step “Apply to each 2”, I am not sure what the variable in the CDS expression “value” is in “*Select an output from the previous step”. Each time I try this I get another Apply to each step created.
Hi Chris, amazingly I was able to find the old flow from almost 2 years ago. I’ve reviewed and adjusted the text and added in a new screenshot that hopefully should help explain it a bit better! Power Automate changes all the time, and I know there are ways I could improve the flow, so certainly review and adjust where it makes sense. The new text hopefully helps!
Hello Megan. Thank you for your prompt response to this. I am guessing that something has changed with the connector, since you created the original flow. The “List Rows” option that should be available from Dynamic content, does not show anything called Value, it only shows one thing relating to List Rows, something called “Current Item”, and I cannot see the Question Text reference either.
If you send me a contact option, I will send you a screenshot of the flow.
Any ideas?
regards
Chris
Hi Chris, feel free to fill out the form on my contact page. I’ll follow up then you can share your screenshot. Will help you if I can, but this was from a while ago. 🤔