*** NOTE: ALL INFORMATION IS ACCURATE AT DATE OF PUBLISHING ***
If you’ve been doing anything with Events and running them specifically for online webinars you might have struggled with the ICS file option, or even the Join in Teams link. It can be a pain, and the ability to import an ICS file is challenging and frankly not all that obvious to a lot of users. Clicking on a link and having Outlook online open with all of the event details already in there is a LOT easier in terms of user experience. How can we do that with Customer Insights Journeys? This post will show you how. It might look like a long post, but most of it is breaking down the formula field you need to create to explain each step. It’s pretty quick and simple really!
First, props to my very good friend Amey Holden. She and I both have created unique Join In Teams links for Event Registrations over the years, but she just recently wrote about using a Formula field to do it rather than generating via Power Automate. This is much easier so check it out! I had been looking at using something called a deep link which can be used to direct someone to specific content with values populated such as an email, but more important can be used to create a link for an appointment in Outlook. The approach in this email assumes using Microsoft Teams Webinar for the Event, and in my example I am adding a link to add a Session Registration rather than Event Registration. You can easily modify this approach by adding your new field to the Event Registration if that is what you typically only work with.
We are going to end up with a custom formula field. If you want a bit of an overview of formula fields because you’ve never used them before, check out one of my other blogs here. The structure begins with a base URL. We can then pass through a series of parameters in to the URL to set the Subject, Start Date/Time, End Date/Time, Location (Microsoft Teams), and the body of the appointment including a unique link to join the webinar in Microsoft Teams. Before creating the new field, we need to do something to get the Start/End date and time in an ISO 8601 extended format combined date and time string in UTC. It will need to be a text string rather than a date, so we need to do some formulas on the session (or event) to set the UTC values correctly. If we don’t and just try and use the out of the box start/end time in UTC format field, we will get errors due to time zone issues.
So you will add two new fields. UTC Start Date and UTC End Date. Again, either add to the Event table or the Session table (or both if you have both Events and Sessions). Pick the field type of Formula for each.
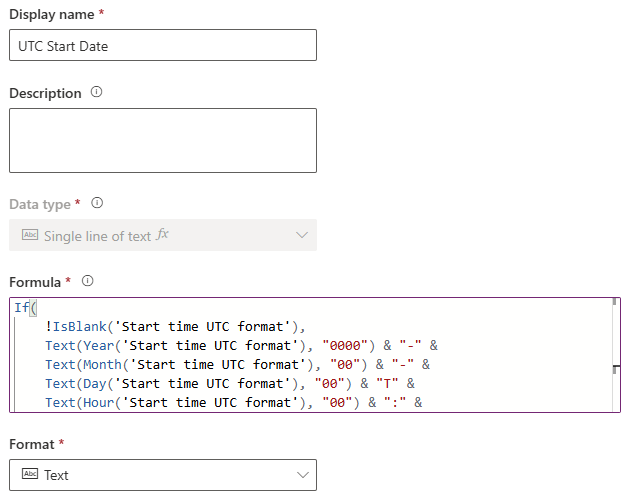
This is the formula for UTC Start Date.
If(
    !IsBlank('Start time UTC format'),
    Text(Year('Start time UTC format'), "0000") & "-" &
    Text(Month('Start time UTC format'), "00") & "-" &
    Text(Day('Start time UTC format'), "00") & "T" &
    Text(Hour('Start time UTC format'), "00") & ":" &
    Text(Minute('Start time UTC format'), "00") & ":" &
    Text(Second('Start time UTC format'), "00") & "Z",
    Blank()
)
This is the formula for UTC End Date.
If(
    !IsBlank('End time UTC format'),
    Text(Year('End time UTC format'), "0000") & "-" &
    Text(Month('End time UTC format'), "00") & "-" &
    Text(Day('End time UTC format'), "00") & "T" &
    Text(Hour('End time UTC format'), "00") & ":" &
    Text(Minute('End time UTC format'), "00") & ":" &
    Text(Second('End time UTC format'), "00") & "Z",
    Blank()
)
Once you have those added, you can go to the Session Registration table (or Event Registration table) and add a new formula field. It will end up being a single line of text, but you can set the format to be a URL.
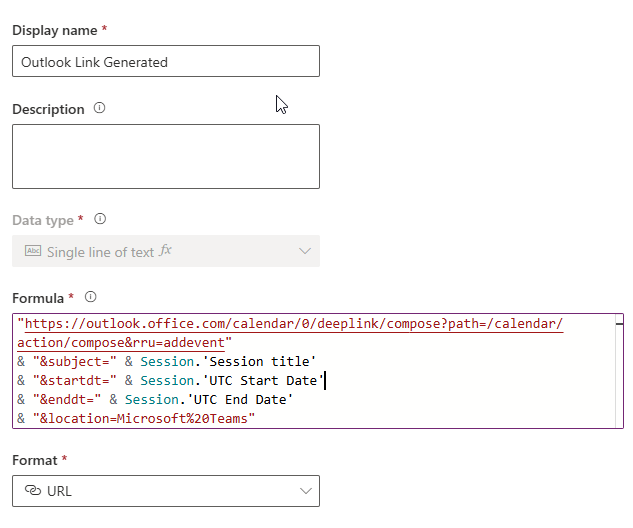
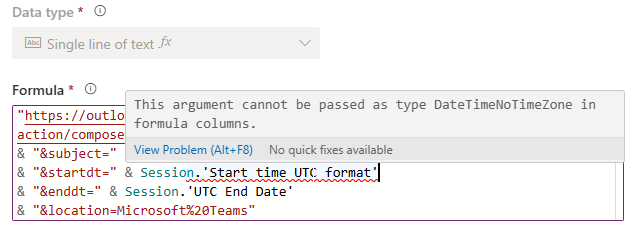
This is the formula you need. If you named the two new date and time fields the same as me, this should work for you. If you are doing this on the Event Registrations, just change where you see the word Session to the word Event and it should work.
"https://outlook.office.com/calendar/0/deeplink/compose?path=/calendar/action/compose&rru=addevent"
& "&subject=" & Session.'Session title'
& "&startdt=" & Session.'UTC Start Date'
& "&enddt=" & Session.'UTC End Date'
& "&location=Microsoft%20Teams"
& "&body="
& "Hi%20" & Contact.'First name (firstname)'
& "%3Cbr%3E%3Cbr%3E"
& "Look%20forward%20to%20seeing%20you%20online!"
& "%3Cbr%3E%3Cbr%3E"
&
If(
    IsBlank(Session.'Teams URL'),
    "",
    "Join%20session%3A%20%3Ca%20href%3D%22"
    &
    Substitute(
        Substitute(
            Left('Event registration ID'.'QR code', 103)
            & "checkin/stream?eventRegistrationId=&sessionRegistrationId="
            & 'Registration ID'
            & "&redirectUri="
            & Session.'Teams URL',
        "%", "%25"),
    "&", "%26")
    & "%22%3EMicrosoft%20Teams%20Session%3C%2Fa%3E"
)
Let me break down each part. First we use the bas Outlook ‘create event’ link. It opens Outlook on the web directly into the “create calendar event” screen using a deep link. Everything after this is just extra details being pre-filled into the event. Compose tells Outlook to open the event editor and rru=addevent ensures it opens in “add event” mode.
"https://outlook.office.com/calendar/0/deeplink/compose?path=/calendar/action/compose&rru=addevent"
Next we add in the session title (or your event title). subject= is the Outlook parameter for the session name. Session.’Session title’ dynamically inserts the session’s title from the Session that the Session Registration record is linked to. Every session registration created gets the correct session name automatically.
& "&subject=" & Session.'Session title'
Next we set the start and end times. This uses the two new fields that you added. startdt= sets when the session begins enddt= sets when it ends. Both values are taken in UTC format to avoid time zone issues. This ensures the event appears at the correct time for all users, regardless of location.
& "&startdt=" & Session.'UTC Start Date'
& "&enddt=" & Session.'UTC End Date'
Next we are setting the meeting location. I am hardcoding this value to “Microsoft Teams” and %20 is URL encoding for a space. You could put something different if you have another option you are using for your online webinars. In my example, the calendar event clearly shows it is an online Teams meeting.
& "&location=Microsoft%20Teams"
Next I am building the body of the calendar appointment using some dynamic values. It includes a greeting using the contact’s first name. It then has some line breaks to put the next part on another line using %3Cbr%3E, then a closing message with another line break after it. So the body renders like:
Hi John
Look forward to seeing you online!
Everything is URL-encoded so Outlook can interpret it correctly.
& "&body="
& "Hi%20" & Contact.'First name (firstname)'
& "%3Cbr%3E%3Cbr%3E"
& "Look%20forward%20to%20seeing%20you%20online!"
& "%3Cbr%3E%3Cbr%3E"
Now we are checking to make sure the session has a Teams join link. If it is blank, nothing is added, but if it exists, the Teams join link is built and inserted into the email body.
If(
    IsBlank(Session.'Teams URL'),
    "",
Within that check, I’ve included some more text to say ‘Join session’ and then adds in an <a href to make the next part a hyperlink.
"Join%20session%3A%20%3Ca%20href%3D%22"
This is the core of the join link. It takes part of a base QR code URL (Left(…, 103)) from the related Event Registration, then appends a check-in / stream path, inserts the registration ID dynamically including the related session id, then adds the Teams redirect URL. This is where you can check out the post from Amey from the start to see how/why she took this approach, this is all her. 😄 Note that out of the box, a Session Registration does not get its own QR Code, and all we are doing is using it to get the organisation details.
I’ve used two Substitute() functions to safely encode so that % becomes %25 and & becomes %26. This is critical because URLs inside URLs would otherwise break if not encoded properly.
Substitute(
    Substitute(
        Left('Event registration ID'.'QR code', 103)
        & "checkin/stream?eventRegistrationId=&sessionRegistrationId="
        & 'Registration ID'
        & "&redirectUri="
        & Session.'Teams URL',
One note, if you DID want a QR code for each Session Registration, you could use this formula on a new field on the Session Registration table.
If(IsBlank(Event.'Teams URL'),Blank(),Left('Event registration ID'.'QR code',103)&"qrcode/")&Substitute('Registration ID'," ","+")
Finally, I am closing the hyperlink. %22 closes the href attribute (“), the visible link text is “Microsoft Teams Session”, and <a> closes the anchor tag. So the final output is a clickable link inside the calendar invite body.
& "%22%3EMicrosoft%20Teams%20Session%3C%2Fa%3E"
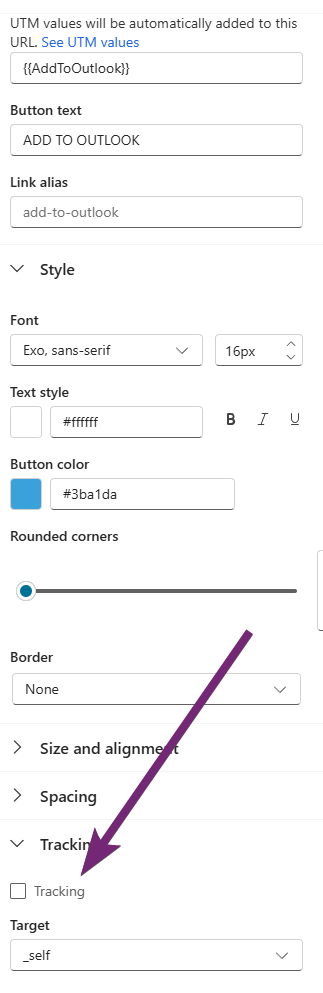
Alright! Once you’ve added the formula, you should be able to save it (wait a moment if you don’t see the Save button), then add it to your Session Registration (or Event Registration) form so you can see it. You are now able to include it in an Email. I have a custom Session Registration trigger, which ideally you also have if you are sending out emails specific to Session Registrations. You can also access Session information via out of the box triggers using Lists. Here you can see I am adding my new field dynamically which I am putting on a button. There is a feature that allows you to prevent HTML encoding. Make sure you select this to turn it on. That means it doesn’t try and change the information and encoding things within the value our formula has set. We don’t want the email trying to change anything!
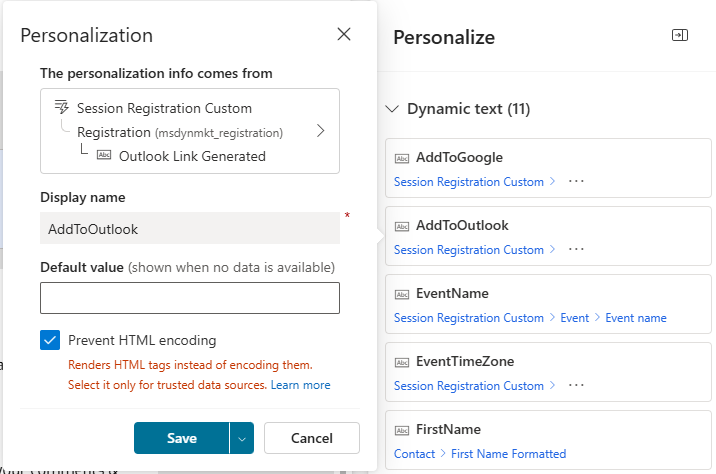
Again, we do not want the email messing with our link and trying to add in additional parameters, so make sure on your button or wherever you are adding this link, you scroll to the bottom, expand tracking, and untick the tracking box that is always on by default. You won’t know who has clicked on it, but I think having this option is worth it, and we just have to sacrifice stats on that specific button link.
When the email is sent out, it might look something like this.
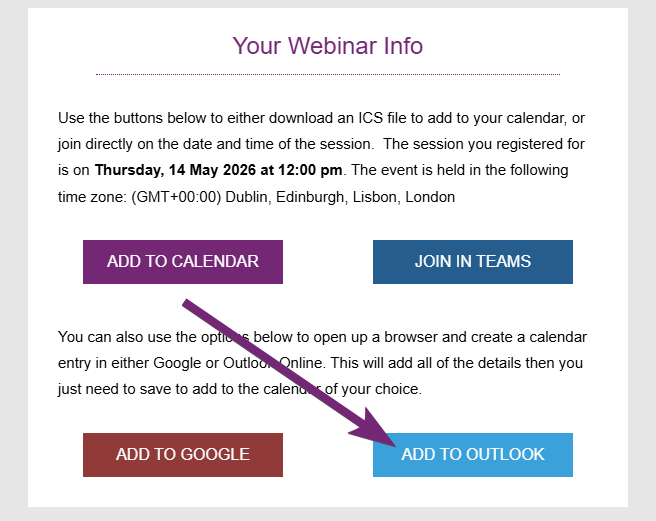
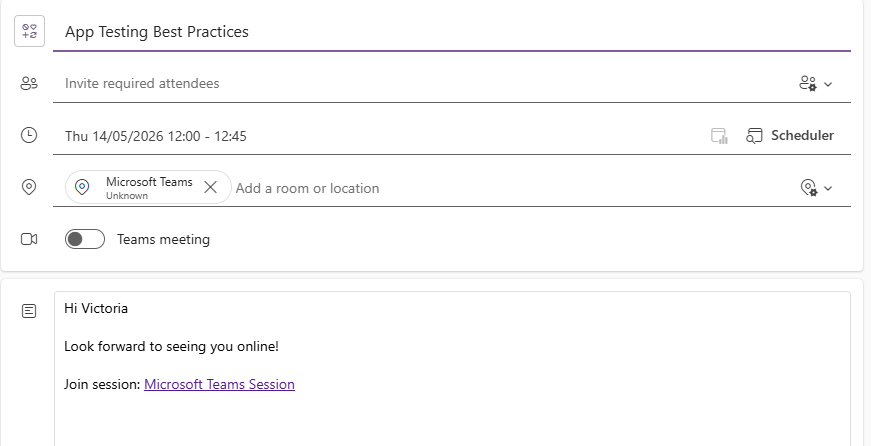
Clicking on the Add To Outlook button opens up a browser window with all of the information we passed through in the URL for our custom formula field. The name of the session, the date and time, location of Microsoft Teams, contacts name and a message along with their specific unique link to join the session.
Check out the latest post:
Use Custom Event Registration Questions To Branch Your Journeys In Customer Insights
This is just 1 of 603 articles. You can browse through all of them by going to the main blog page, or navigate through different categories to find more content you are interested in.
Hi Megan – really helpful content, thank you!
Have you ever come across a situation where a contact has two Outlook apps installed: Outlook and Outlook (classic)? We ran into an issue where the .ics calendar file would only work in Outlook (classic), but when clicking the file normally it defaulted to Outlook and threw an error.
The only workaround we found was to right‑click the file and select Open with > Outlook (classic), but that’s not very intuitive and easy for users to miss.
Do you have any recommendations or known workarounds for this kind of scenario?
Thanks again!
Hi Linh, oh Outlook is such a pain sometimes! I haven’t seen an error, so I would report that to Microsoft in case they are not aware. See what their feedback is.