*** NOTE: ALL INFORMATION IS ACCURATE AT DATE OF PUBLISHING ***
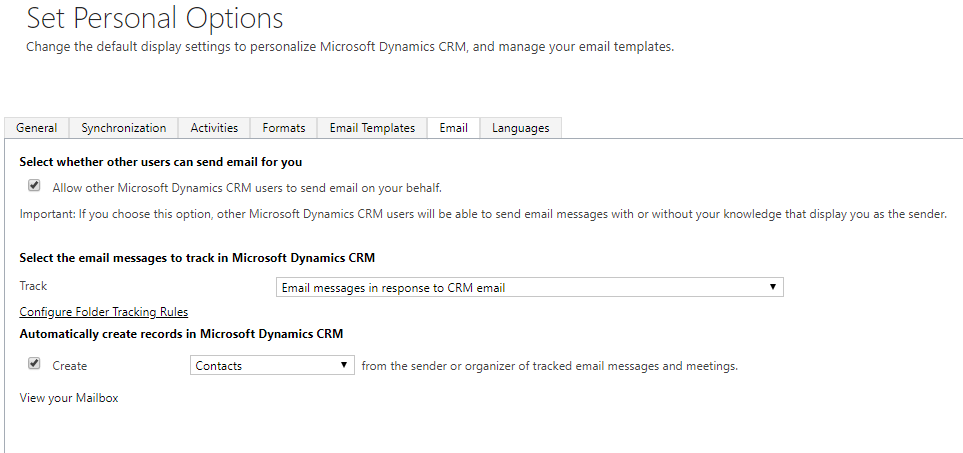
If you’ve worked with CRM/D365 for long enough, especially if you are a System Administrator, you will be familiar with the following three settings that a user can access in their Personal Options on the Email tab. Three little settings, but they can cause such frustration. 🙁 Each setting has it’s own challenges if a user changes them from what your organisation deems to be ‘right option’. In this post we will look at creating a notification which will trigger when a user changes any of these three settings. Plus, we will look at why changing them isn’t always a good idea.

Using Microsoft Flow, our trigger will be when a record is updated, and it’s the User Settings entity we will be looking at.
We need a condition to check if any of the three settings are different to our desired settings (whatever you deem those to be). In this post we want to make sure the settings are as follows:
- Automatically create records in Microsoft Dynamics 365 = 0 (unticked)
- Select the email messages to track in Microsoft Dynamics 365 = 1 (Email messages in response to Dynamics 365 email)
- Select whether other users can send email for you = Yes
So if any of the settings above are different, we want to get an email letting us know.
So that we can get an email that is clear and can be understood by anyone reading it, we are going to use three different Compose action steps. This will allow us to map the numbers from the database for each item, and determine what text is displayed instead. Our first one determines if Contacts or Leads are created in D365CE automatically if a user is tracking an email and the email address isn’t found in D365CE. This can be a pain especially if the user doesn’t realise they are doing this. It creates a record without a name… and what’s the point in that? So we have 0, 1 and 2. If it’s set to 2, that’s going to create a Lead record, 1 will create a Contact and 0 won’t create anything. Add an expression in the Input.
You can copy and paste this as your Expression.
if(equals(triggerBody()?['autocreatecontactonpromote'], 2),'Yes - Leads',
if(equals(triggerBody()?['autocreatecontactonpromote'], 1),'Yes - Contacts',
'No'))
Next we are looking at the type of email messages that will be tracked in CRM. There are four options. The safest and most common option to use is ‘Email messages in response to Dynamics 365 email’. There is always at least one use that changes it to ‘All email messages’ or ‘Email messages from Dynamics 365 Leads, Contacts, and Accounts’. What can often happen is that personal or confidential emails end up getting tracked when a user has these set as they end up tracking everything without knowing (or thinking about it). So if it doesn’t equal 1 which is the option we want, this will trigger the notification email.
You can copy and paste this as your Expression.
if(equals(triggerBody()?['incomingemailfilteringmethod'],0),'All email messages',
if(equals(triggerBody()?['incomingemailfilteringmethod'],1),'Email messages in response to Dynamics 365 email ',
if(equals(triggerBody()?['incomingemailfilteringmethod'],2),'Email messages from Dynamics 365 Leads, Contacts, and Accounts ',
'Email messages from Dynamics 365 records that are email enabled ')))
The last setting determines if other users can send emails on our behalf. This tends to make users nervous (and I wish it wasn’t written in that way to scare them!). Without this selected, if there are any workflows trying to run that send an email FROM that user, the workflow will fail. We want this selected as Yes. If it’s no, the notification email will be triggered.
You can copy and paste this as your Expression.
if(equals(triggerBody()?['issendasallowed'],true),'Yes','No')After the three compose steps we will get the User using the SystemUserId from the initial trigger step.
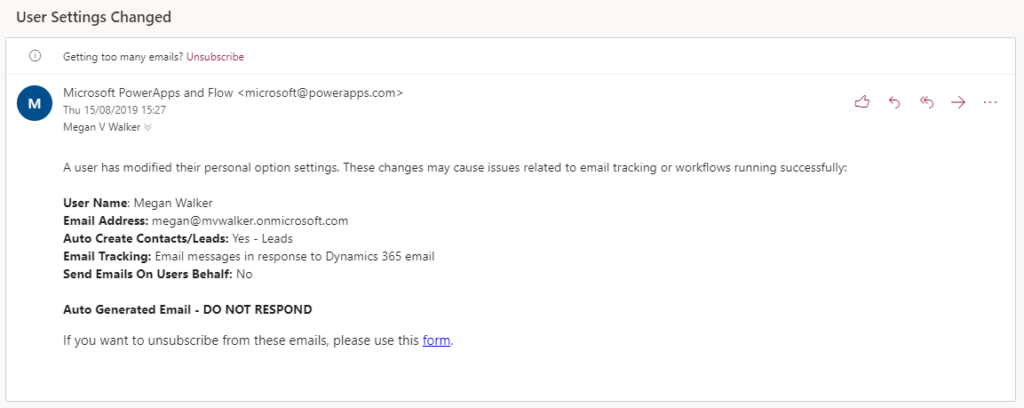
Last, we can compose our email. You can use an Outlook action, but I like the mail connector that comes from microsoft@powerapps.com. It’s very obviously system generated and feels more like a notification. Set up the To email address (you can have it go to multiple people), and add in the subject. For the Email Body you can see the User Name and Email Address coming from the User entity. Then we are pulling in the Outputs from the three compose steps where the values have been mapped.
Below you can see the finished email that is generated when a user updates their personal options and changes one of those three fields, and changes them to values we don’t want as an organisation. Hope you found this useful!
Want to just watch how to do this? Check out the video below:
Check out the latest post:
Assign Records To A User Or A Team From Your Custom Page
This is just 1 of 571 articles. You can browse through all of them by going to the main blog page, or navigate through different categories to find more content you are interested in. You can also subscribe and get new blog posts emailed to you directly.


One thought on “Notification For Changes To User Settings”
Comments are closed for this post.