*** NOTE: ALL INFORMATION IS ACCURATE AT DATE OF PUBLISHING ***
In a previous post, I wrote about how to create alert rules and then manage those alerts in Dynamics 365 Customer Voice. The alerts functionality is great, but perhaps not everyone responsible for helping resolve those Customer Satisfaction issues will have access to Customer Voice. Plus, the person setting up the surveys might not even know who should be assigned those alerts. In November 2020, there were 115 million Microsoft Teams users. So how about using Teams to manage those Customer Voice alerts? Let’s look at how this can be achieved.
You can watch a video on this here.
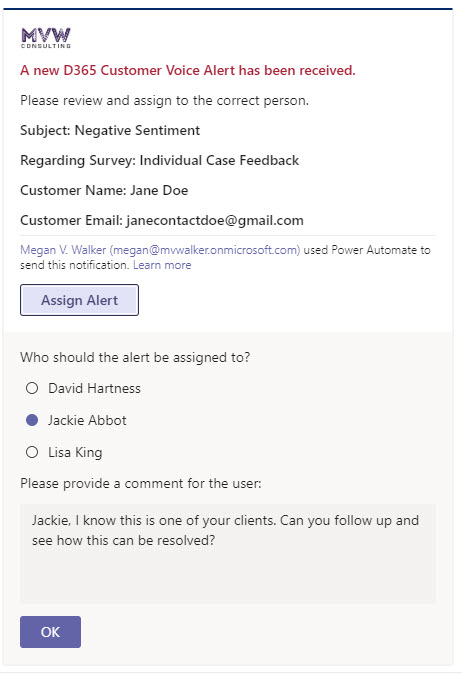
This is what we are aiming for. A nice adaptive card that will be posted to an admin channel in Teams, where a user can click an Assign Alert button, pick the user, add a comment for them and assign it correctly. That user will then receive a notification in another channel in Teams, providing them a link to go directly to the Alert in D365 (Dataverse).
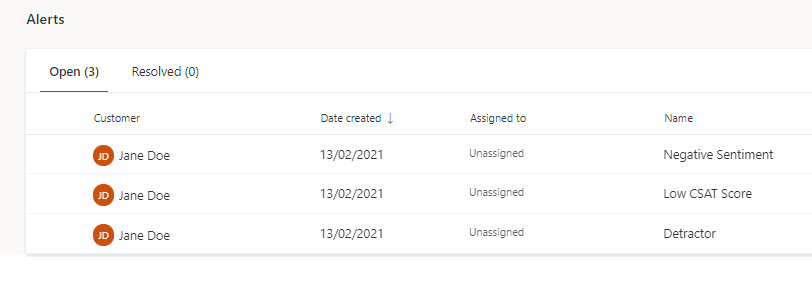
First, here is what the alerts look like when they are generated based on the survey responses received. They are not assigned to anyone. If you want to know how to set up your alerts, read through this post first.
In Microsoft Teams, we have a Team with a few channels. We will use the Alerts Admin channel to send the Adaptive Card so that someone responsible for assigning out the alert can interact with it. We will then use the Alerts Assignment channel to post a message and tag the user that the alert has been assigned to.

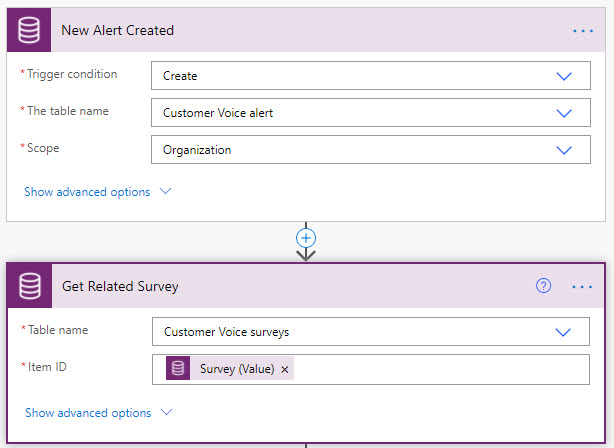
In Power Automate, we will start a new flow. The trigger will be from the Common Data Service (current environment), or Dataverse, connector. You’ll need the option for When a row is created, updated or deleted, and select Create as the trigger condition. The table name is Customer Voice alert, and the Scope of Organisation. Add in an action from the same connector, and choose the Get row (was the Get record) action, and select the Customer Voice surveys table. You can then add the Survey (Value) from the initial trigger step. We are getting the survey so that we can add the name of the survey to our Adaptive Card notification.
Next, we will add in an action step from the Microsoft Teams Connector. We need to use the Post an Adaptive Card to a Teams channel and wait for a response.
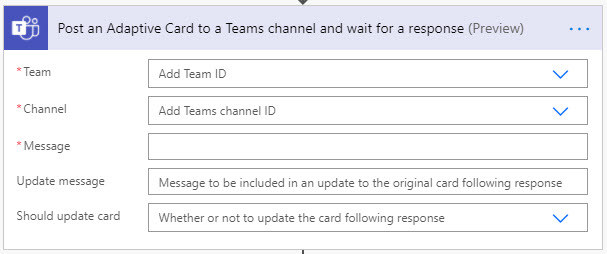
I renamed it in my flow, but here we can see the same action step with some values filled in. I’ve selected the Team and the Channel I want the card to be posted to. Next, I need to add in the Message for the card. To do this, you can start from this site Samples and Templates | Adaptive Cards. I’ve also shared the entire JSON that I created at the end of the blog if you want to use that as a starting point.
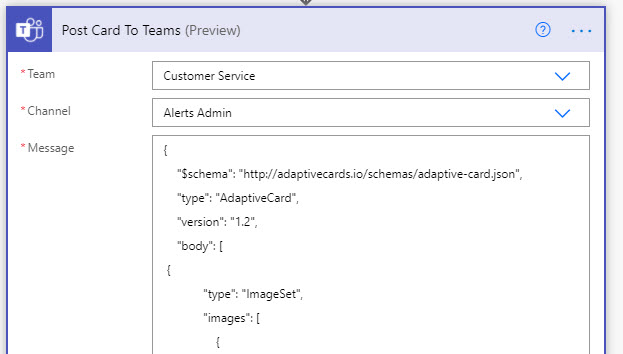
A couple of sections to point out. I wanted to show some information about the alert, giving the subject, name of the survey and the customers name and email address. This might help know who to assign the alert to. You could add in further information if you wanted to even get the Owner of the related Contact, or their Account Name etc.

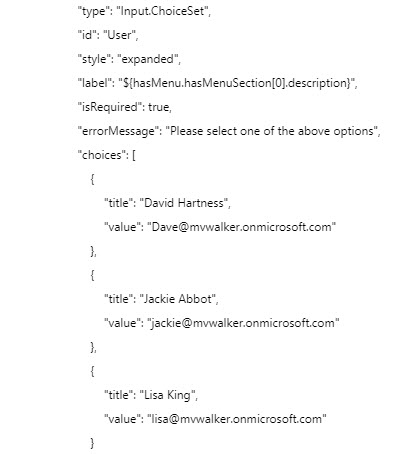
Another section is being used to create a list of Choices. The user sees the name of the user, but the value is what’s important behind the scenes and helps us to then actually assign the Alert record to the correct person. The id at the top of this section is important (which I have called User), as we will then use the value selected in the next step.
At the bottom of this action step, we will have a message that will be used once the card response has been submitted and will be updated on the card. This also means that only one user can interact with it rather than each Admin in our Team Channel trying to do the same thing.

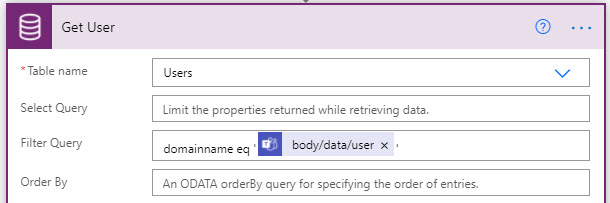
Once we have the Teams action step added, we can then use values from it in the next steps in the flow. I wanted to get the User that is tied to the email address of the person selected from the Adaptive card. I can do a List rows action step from the Common Data Service connector, and look through the Users table. Using a simple filter query, I can search for the user where the domainname eq and then the User value provided (i.e. the email address of the person who was selected from the Adaptive card).
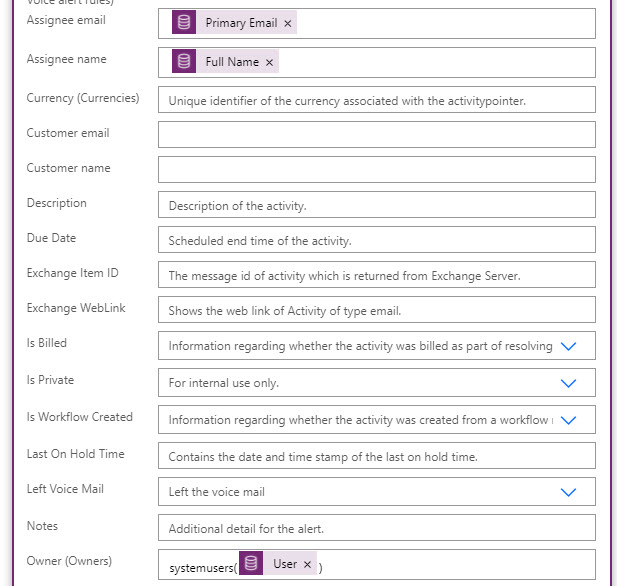
We will then have an Apply to each step where we can use an Update row action from the Common Data Service connector, to update the Customer Voice alert record. Use the Activity value in the Item ID field.
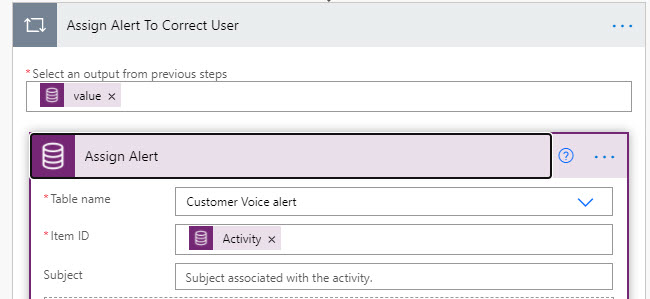
We will then add the Primary Email field and the Full Name field from the Get User step above, and populate those into the Assignee Email and Assignee Name fields. In the Owner field, we can use systemusers and then the User ID value to update the record and assign it to the correct person. Make sure the User ID has ( and ) around it as you see below. One thing to keep in mind, if you want to assign the alert to a user in D365, they must have a security role that provides them with access to the Activity entity. Without that, an error will occur and the flow will fail at this point.
In order to notify the user a bit faster, we will generate an @ mention token for the user. This means they will be tagged when we post a message back into teams to let them know they have been assigned an alert to follow up on. Use the Get @ mention token for a user action from the Microsoft Teams connector. Then add the Primary Email from the Get User step we created above.

The last action step of our flow is the action to Post message in a chat or channel. Now there are quite a few options you could use for this last step, and it really depends on your own requirements. I have two channels, one for the Admins and one for the rest of the Customer Service team. I figured better to post in to a Channel so if someone is on annual leave or off work for other reasons, at least another member of the team could see it and pick up the alert if needed. You can also post as a user (the one the connector is logged in as), or the flow Chat bot. You can see below that by using the output from the @mention step above, we can tag the correct user. I’m able to also pull the userComments that were provided by the person who interacted with the Adaptive card in the Alerts Admin channel. We can then create a URL which someone can click on to jump in to D365 and access the alert directly if needed.

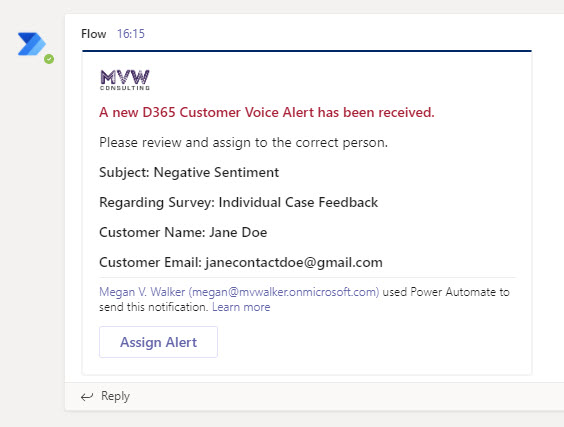
Let’s see it in action. A new customer voice alert has been received, so that triggers the flow which creates an adaptive card posted to our Alerts Admin channel in the Customer Service Team. Any user with access to the channel can click on the Assign Alert button.
They can then pick the most appropriate person from the list, and can provide a comment for the user. Clicking OK will update the card and allow the flow to continue.
The card will then be updated, which means everyone else in the channel knows it’s been taken care of and actioned.

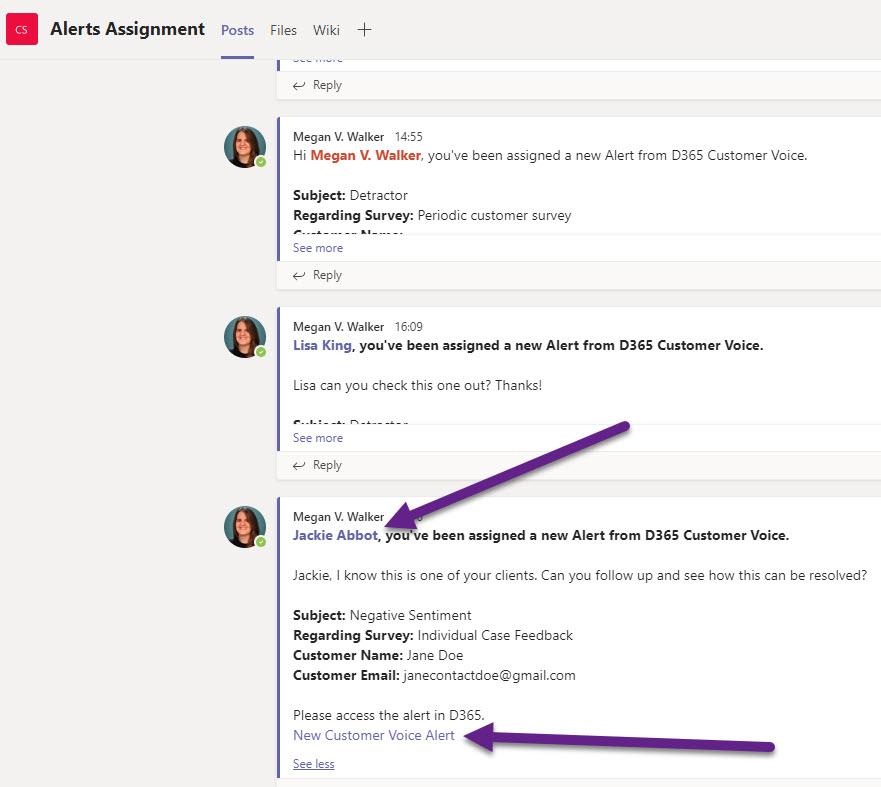
Over in the Alerts Assignment channel, the user Jackie Abbot has been tagged using the @mention functionality. The comment entered in to the Adaptive card is displayed, along with details of the alert and a link to get to it in D365.
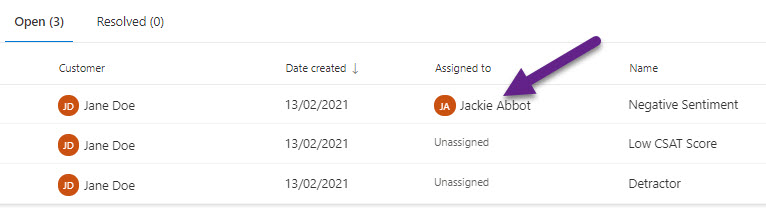
If we look in Customer Voice, we can see that the alert shows it’s been assigned to Jackie.
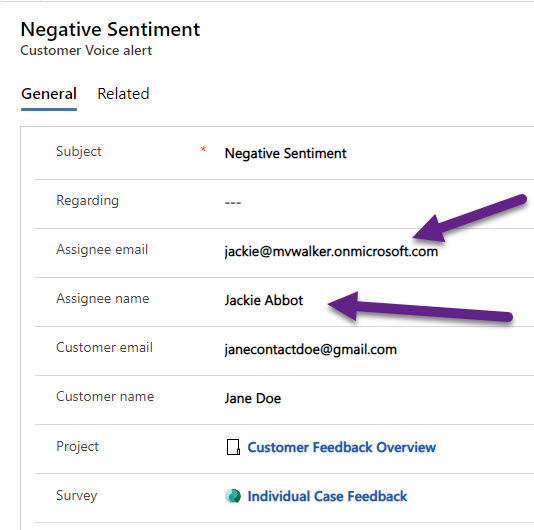
And if we look at the same record in D365, we can see that Jackie has been added to the Assignee email and Assignee name fields.
You can copy and paste the JSON schema below in to your own action which is step 3 from my flow above. Be sure to change the items in the choices section, and if you wanted to use an image, add that in to the URL section near the top in the ImageSet type.
{
    "$schema": "http://adaptivecards.io/schemas/adaptive-card.json",
    "type": "AdaptiveCard",
    "version": "1.2",
    "body": [
 {
            "type": "ImageSet",
            "images": [
                {
                    "type": "Image",
                    "size": "Medium",
                    "url": "LINK TO YOUR IMAGE HOSTED ONLINE"
                }
            ]
        },
        {
            "type": "TextBlock",
            "text": "A new D365 Customer Voice Alert has been received.",
            "size": "Medium",
           "weight": "Bolder",
            "wrap": true,
            "color": "Attention"
        },
        {
            "type": "TextBlock",
            "text": "Please review and assign to the correct person.",
            "wrap": true
        },
    {
            "type": "TextBlock",
            "text": "Subject: @{triggerOutputs()?['body/subject']}",
            "wrap": true,
            "weight": "Bolder"
        },
    {
            "type": "TextBlock",
            "text": "Regarding Survey: @{outputs('Get_Related_Survey')?['body/msfp_name']}",
            "wrap": true,
            "weight": "Bolder"
        },
    {
            "type": "TextBlock",
            "text": "Customer Name: @{triggerOutputs()?['body/msfp_customername']}",
            "wrap": true,
            "weight": "Bolder"
        },
    {
            "type": "TextBlock",
            "text": "Customer Email: @{triggerOutputs()?['body/msfp_customeremail']}",
            "wrap": true,
            "weight": "Bolder"
        },
        ],
    "actions": [
        {
            "type": "Action.ShowCard",
            "title": "Assign Alert",
            "card": {
                "type": "AdaptiveCard",
                "body": [
 {
                        "type": "TextBlock",
                        "text": "Who should the alert be assigned to?",
                        "wrap": true
                    },
                    {
                        "type": "Input.ChoiceSet",
                        "id": "User",
                        "style": "expanded",
                        "label": "${Employee.EmployeeSection[0].description}",
                        "isRequired": true,
                        "errorMessage": "Please select one of the options",
                        "choices": [
                            {
                                "title": "Employee Name 1",
                                "value": "employee1@yourdomain.com"
                            },
                            {
                                "title": "Employee Name 2",
                                 "value": "employee2@yourdomain.com"
                            },
                            {
                                "title": "Employee Name 3",
                                 "value": "employee3@yourdomain.com"
                            }
                        ]
                    },
 {
                        "type": "TextBlock",
                        "text": "Please provide a comment for the user:",
                        "wrap": true
                    },
                    {
                        "type": "Input.Text",
                        "id": "UserComments",
                        "isMultiline": true,
                        "label": "Comments"
                    }
                ],
                "actions": [
                    {
                        "type": "Action.Submit",
                        "title": "OK"
                        }
                ],
                "$schema": "http://adaptivecards.io/schemas/adaptive-card.json"
            },
            "style": "positive"
        }
    ]
}
You can watch a video on this here.
Check out the latest post:
Assign Records To A User Or A Team From Your Custom Page
This is just 1 of 571 articles. You can browse through all of them by going to the main blog page, or navigate through different categories to find more content you are interested in. You can also subscribe and get new blog posts emailed to you directly.
Very cool functionality. I just used it in a large demo to showcase CV, Teams and D365 Customer Service.
Question: Have you customised the Alert “entity” before to be able to further report in how alerts were closed? For example having an option set for a “closure code’?
Would you add it on the entity in D365 and have powerautomate update it from Teams? then report on the data in the dataverse? any other ideas?
Thanks for all your great blogs posts!
Hi Julian, I haven’t but it could be done and certainly done from Teams like you suggested. You can customise all of the Customer Voice tables now, so you could add a new field with Close Reason, or anything else really. You would definitely need to use Power Automate for it though.