*** NOTE: ALL INFORMATION IS ACCURATE AT DATE OF PUBLISHING ***
With Outbound Marketing, when you created a marketing form, you could have submissions check against existing Leads AND Contacts. Realtime Marketing forms only allowed for one or the other, until now! Hooray! This is definitely a much needed new feature, where we can determine the default settings for your marketing forms. This provides you with the ability to determine what should happen, how submissions should be checked and what happens after forms are submitted. There are a few things to be aware of before you start using it, so take a look!
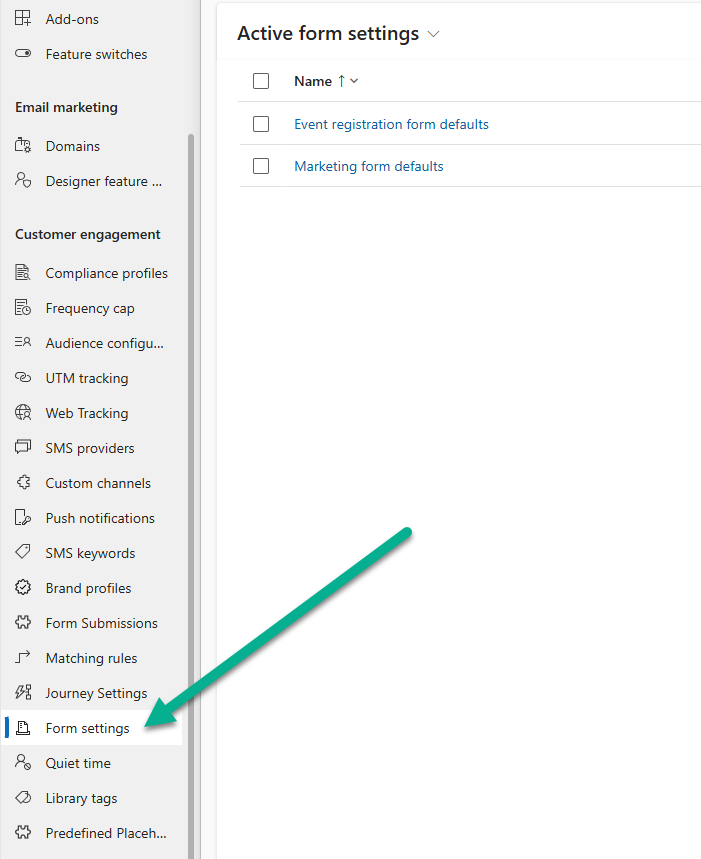
First, make sure you are on the latest version, then you should see the Form settings option with all of the new bits and pieces. You will notice two records already set up. In the first instance, I suggest using those ones, and in fact, on the documentation page from Microsoft they tell you not to delete them, so yeah, don’t delete them. 😉
This post will focus on the one for Marketing forms. If it isn’t already marked as Yes for the Default, go ahead and do that. From the General screen you can determine if you want to use Prefill fields on your forms. You can also set a default action once a form is submitted (posted), along with a thank you message and notification message.
The Audience tab determines what you want to have set for the target audience on your forms by default. You should see three options already there. I want to use Lead & Contact so will select that one.
Click on your audience settings record to update more defaults. This is where you can determine what rules to use for Lead & Contact. Each time a form is filled out, in the example below, a new lead will always be created. Remember that these are going to be the defaults, you can always override these settings when you create your marketing forms. For the Parent contact matching rules, we can then determine what to do if the form is submitted by a Contact that already exists (using the parent contact matching rule). We can even determine if the contact should be updated with the submitted data, and if a new Contact should be created if there wasn’t an existing one found. This is perfect! This feels much more inline with a typical sales process and organisation that is only creating Contacts when a Lead gets qualified. So review the options and set them in a way that makes sense for your client or organisation.
OK now on to the Lead-Contact Mapping tab. Standard functionality exists that allows you to map fields from one record type to another. So, if you qualify a Lead, and it creates a Contact, Account and Opportunity, specific fields from the Lead can be set up to map in to equivalent fields on the other records. This mapping should really only be reviewed from here so you can see which fields match and are mapped between Leads and Contacts. If you think anything is missing, check with your System Administrator so that they can set up these mappings the correct way (using a solution and starting from a Development environment and deploying appropriately).
If you are a System Administrator reading this… you might break out in hives… but know only people with that level of access can click on this and actually impact your mapping from Lead to Contact. Still, it’s not great, just make sure you haven’t got marketing people with System Administrator access who might be curious and click the button.
If someone does click the Generate mappings button, this will pop up. Again, I am not an advocate for doing this, and instead making sure it’s done using best ALM practices between environments. I’ll get off my high horse now, just don’t generate mappings from here.
For those of you that are responsible for reviewing mappings, it’s this relationship that is used to allow users to add shared fields to the marketing forms. If you’ve never updated it before, would be a good idea to check it out.
You don’t need reCAPTCHA on your forms, and about 85% of my clients don’t use it, but there is the option to set this up. If you are getting a lot of spam and feel you need it, you can review the documentation from Microsoft to implement it with some additional code.
Once you’ve updated all of your settings, save the record, you are done. Now if you navigate to one of your existing forms, you will see that you have a drop down for the audience where previously this was read only. It will be very tempting to just swap this to Lead & Contact right?
Well you can of course, but you will then get this message… and it will just remove ALL of your fields. So yeah, maybe not one to do on your most important forms! If you do this, you will need to readd all of your fields and any custom scripts. Just be careful!
The form settings now has all of the extra settings we saw in the Settings area, and assuming you set that record as the Default, you should see them all listed the same. Now we can adjust if needed for specific forms, but this gives us a good starting point.
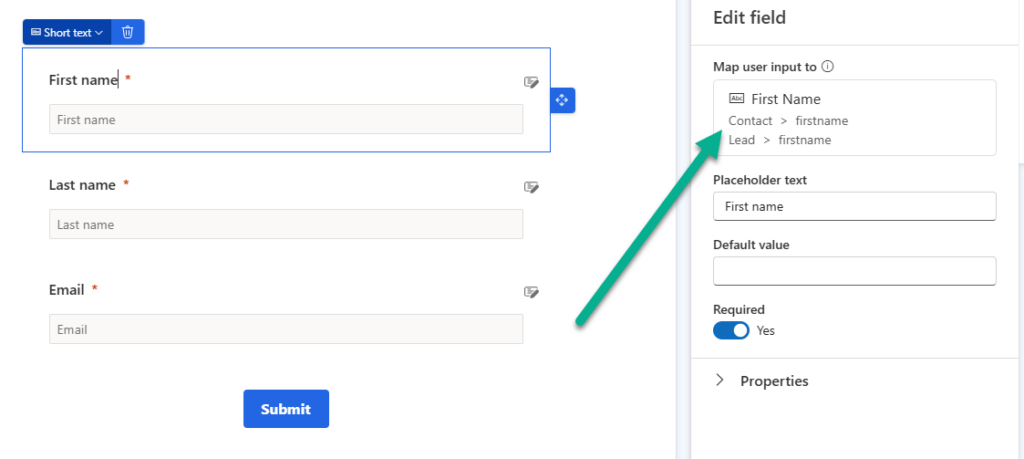
Adding the fields is pretty much the same as it’s always been, but now when you search for them, if you want a field to check/update both Leads and Contacts, be sure to pick the one from that section.
Here we can see the First Name will be mapped to the firstname field on the Contact and the firstname field on the Lead.
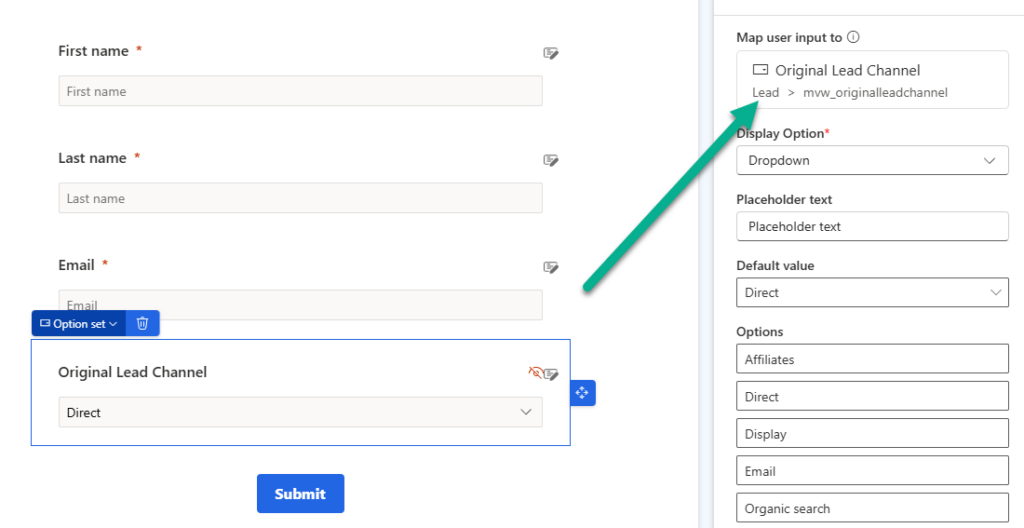
The great thing is we can add fields to the form that are unique or specific to EITHER the Lead or the Contact. We can see that this field only has a link back to the Lead table.
Once the form is filled out you will see that the form submissions look the same as before, with the Linked Record being set (once the form submission finishes processing).
However, instead of going direct to the Lead or Contact, clicking on the Linked Record will take you to the Created linked entity record which has a link to both the Lead and Contact records that the form submission is linked to.
If there was a found Contact (or you chose to create one), that will be added to the Related Contact (or Parent Contact for lead) field.
The form submission will be on the timeline for both the Contact and the Lead.
And the insights will show the form submitted on bot the Contact and the Lead.
I think you’ll agree, this is a much better approach to forms and offers flexibility in making sure you are linking new Lead to existing Contacts, and creating new data only when it’s required.
Check out the latest post:
Setting Up reCAPTCHA v2 For Your Realtime Marketing Forms
This is just 1 of 571 articles. You can browse through all of them by going to the main blog page, or navigate through different categories to find more content you are interested in. You can also subscribe and get new blog posts emailed to you directly.


Hi Megan – appreciate your posts.
Once question on Contact update vs create. Did you find any way to not create a new contact if one already exists, but also not update it (or at least some of its information)? Ideally we would not create a duplicate, but at the same time have concerns that anyone could submit a form with an e-mail address, and have that form posting update e.g. a name, phone number, company information – there is potentially for the person posting not to be who they say there are, and messing up what was good data!
Hi Greg, I would expect you would need to set the Update matched contact with submitted data to No and the Create a new contact if there was no match to an existing one to also be No. There isn’t currently an option to pick WHICH fields should be used to update back on an existing record, so you would be better setting to No so none of the information is updated.
Hi Megan, thank you for another amazing post. You mentioned that on a matched contact, it would update the ‘Parent Contact for Lead’. In my tests, this works great when using the rule to always create a new lead and to match a contact (update – yes, create – no). However, when testing to match a lead (update – yes, create – yes) and to match a contact (update – yes, create – no) if it finds both records it doesn’t update the relationship (lead’s parentcontactid). Would this be an intended behavior?
Interesting, only Microsoft can answer if that is intended behaviour. Perhaps raise a support ticket to check?