*** NOTE: ALL INFORMATION IS ACCURATE AT DATE OF PUBLISHING ***
I recently worked with a client who are using Microsoft Bookings to allow someone to book a demo via a link on their website. They are also then manually adding a new Lead (or Contact) in to Dynamics 365. As they’ve begun using D365 Marketing (Customer Insights Journeys), and the person is agreeing to terms and conditions when they book an appointment via Bookings, the question was, well how can we then get that back in to Dynamics to make sure that person is opted in for future marketing communication. This post shows how we can use Microsoft Bookings then take that booking and turn it in to a Lead along with Opting them in to the main Communication Purpose and any Topics linked to that Purpose.
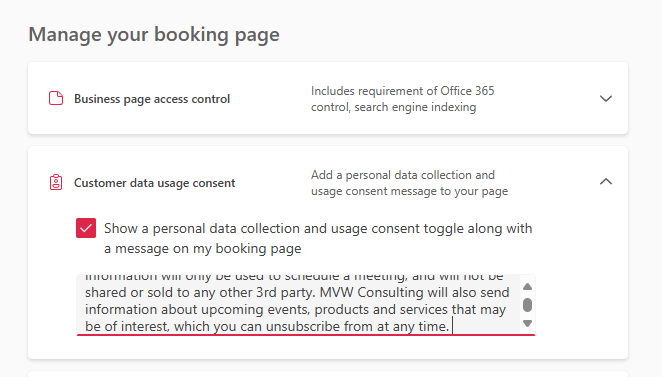
First, this post isn’t going to explain how to use Bookings, for that you can check out a number of other posts I’ve written in the past on the subject. In brief, once you have your booking page and services set up, you’ll want to make sure you check one of two things to make sure when someone is making the booking that they know what your terms and conditions are. the first is when managing the booking page, go to Customer data usage consent. Here you can make sure that the person has to agree to a data collection and usage consent statement. Consider using this to let people know what they will be agreeing to when they make the booking.
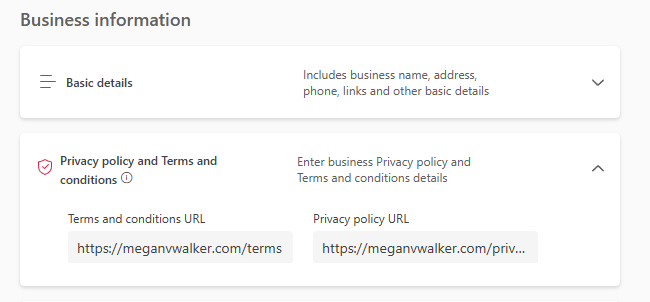
The second place you can add information about your terms is under the Business information section, then under Privacy policy and Terms and conditions where you can add links that people can then click on to find out how their data might be used. I am not a lawyer and not advising you legally, so it’s up to you to figure out what you might need to use or how to word those terms.
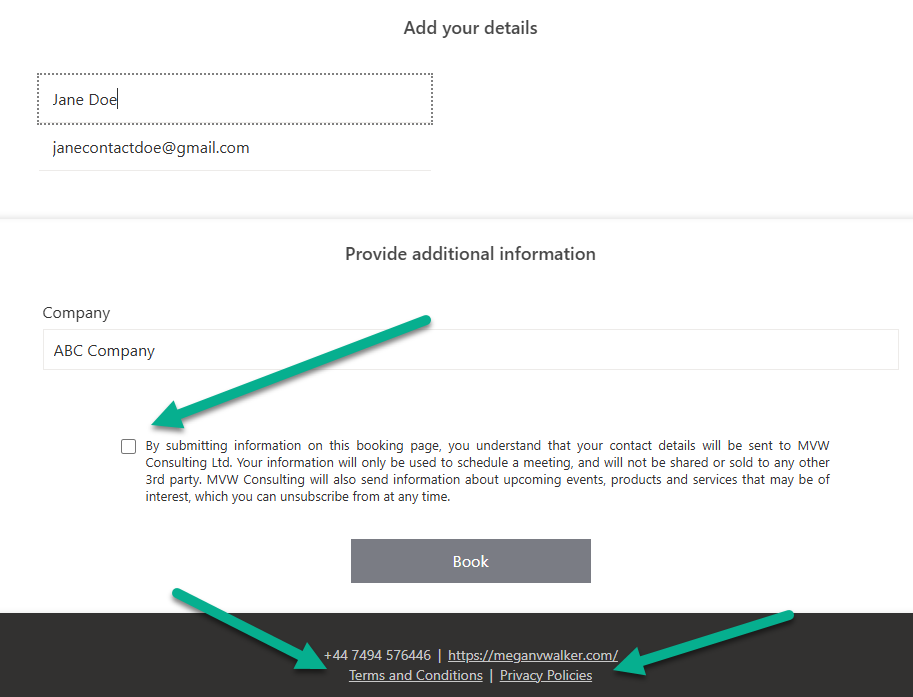
Here we can see the personal data collection and usage consent statement being displayed along with links to the Terms and Conditions and Privacy Policy added to the Bookings page.
Once you’ve got that sorted, now we need to build a flow in Power Automate that will trigger when someone books an appointment via your Microsoft Bookings calendar. Search for the Microsoft Bookings connector and use the trigger of ‘When a bookings appointment is Created’. You will need to check the URL for your booking page first to know how to connect to it via Power Automate. Let’s say the URL to the Bookings page is this: https://outlook.office365.com/owa/calendar/ABCCompanyBookings@meganvwalker.com/bookings/ – we just need the part in the middle that is like an email address. Add that in as the custom value for the Bookings page like you see below.

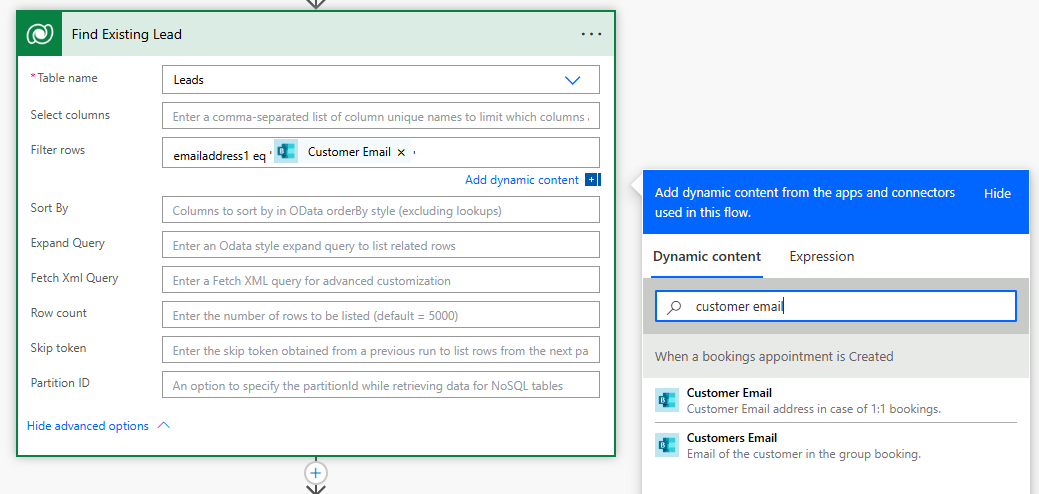
The next steps will be unique for your own requirements, but in this example I am going to check to see if the person who submitted the Bookings form is already in D365 as a Lead already. You might want to have a new Lead every time, in which case you can ignore the check first and just go right to adding a new Lead, but let’s look first just in case you want to only have 1 Lead per email address. We add in a List rows step from the Dataverse connector and look for Leads. Then in the filter rows you will add in to filter Leads where the email address field equals the Customer Email field from the Microsoft Bookings appointment. One thing to notice, in the Microsoft Bookings values that are returned, you will see duplicate fields. Go with the ones for 1:1 Bookings in this case. By all means go for it if you are setting up group bookings but you will need to use lots of variables and check arrays to do so (not covered in this post!).
emailaddress1 eq '@{triggerOutputs()?['body/CustomerEmail']}'
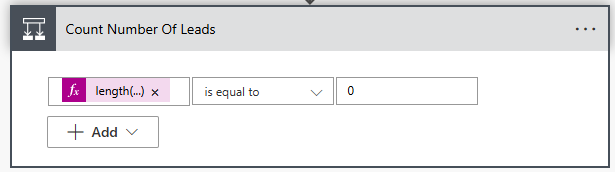
Now we’ve got a step where we are checking to see if the number of Leads found is zero. If it is, we will create a new one. If not, that means at least 1 Lead is found, and you can then decide what to do based on your own requirements. Assuming you’ve renamed your step above like I did, you can just copy the expression below and use that like you see below. We are then checking to see if it is equal to 0.
length(body('Find_Existing_Lead')?['value'])
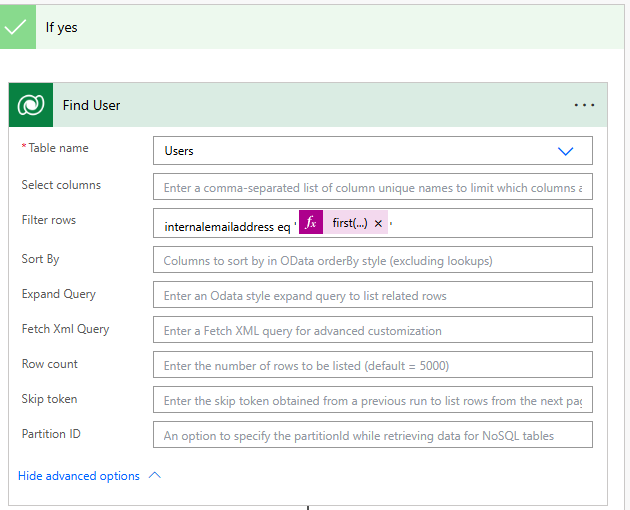
Again, we are going down the yes path. No can be left empty if you don’t want to create a new one when there is already an existing one. I want to also assign the Lead to the staff member that the Microsoft Bookings appointment was assigned to. So our first step on the yes branch is to use the Dataverse connector and another List rows step. To avoid lots of ‘Apply to each’ steps, we will use the expression below to make sure we select the first user (and should be the only user) found in the list of Staff Members passed back through via the Microsoft Bookings trigger. and we are going to pass through their Email Address. This will then let us match to a system user found in D635.
internalemailaddress eq '@{first(triggerOutputs()?['body/StaffMembers'])['EmailAddress']
}'
This next step is to then add the new Lead. Now the values that you set are entirely up to you, and could be different based on the questions are asking. Microsoft Bookings has some standard fields you can add, but you can also do custom questions that are stored in an array when passed back, so you might have to do a bit of testing and checking to see what’s available and where. Notice that some things are set using a value passed directly from Microsoft Bookings with the blue background, and others are being set as an expression with the pink background. I’ll share what I passed back below.

First Name and Last Name
This is a tricky one and might not always be accurate. The name is stored in one field, but we can take a logical guess and split it up in to two. Using the split function we can then populate the First Name field with this:
@{split(triggerOutputs()?['body/CustomerName'], ' ')[0]}
And the Last Name field with this:
@{split(triggerOutputs()?['body/CustomerName'], ' ')[1]}
Topic
Important to know what the Lead is all about, and luckily the name of the Service the person selected is passed through the Microsoft Bookings connector so it makes sense to use this as the Topic on the Lead.
@{triggerOutputs()?['body/ServiceName']}
Email address is also nice and easy because it’s passed directly as a named value in the Microsoft Bookings connector.
@{triggerOutputs()?['body/CustomerEmail']}
Phone Number
Another easy one with the Phone Number. Only decision to make is if you map it in to the Mobile Phone or Business Phone field on the Lead.
@{triggerOutputs()?['body/CustomerPhone']}
Company Name
I added Company Name as a custom field so I could capture it and add to the Lead. Customer questions and their answers are stored in an array called Custom Question Answers, then it’s the Answer value we need. In this case as their is just one custom question used, I can just use the first answer value found in the Custom Question Answers array like this. If you have multiple questions you will need to dig further in and add extra steps to find the right answer.
@{first(triggerOutputs()?['body/CustomQuestionAnswers'])['Answer']}
Description
There is a standard field that can be added to the bookings form for customer notes. Now annoyingly, anything filled out there isn’t stored in the Customer Notes for 1:1 booking even though all of the other values are stored that way. Instead, it’s in the Customers Notes field, which is the notes of the customer in the group booking. So to get that, we need to check the Customers array passed back and then get the Notes value for those detail. I’ve added them to the Description field on the Lead.

@{first(triggerOutputs()?['body/Customers'])['Notes']}
Owner
Now for the Owner of the Lead, remember the step before we started creating the Lead where I used a List rows step to find the User in D365 that matched the email address on the Staff Member booked against the appointment? We can use that to set the Owner of the Lead like you see below.
systemusers(@{first(outputs('Find_User')?['body/value'])['systemuserid']})
Lead Source
Finally, this is more of a nice to have. Add in Microsoft Bookings as an option in your Lead Source field. Then just set that so you know where the Lead came from.
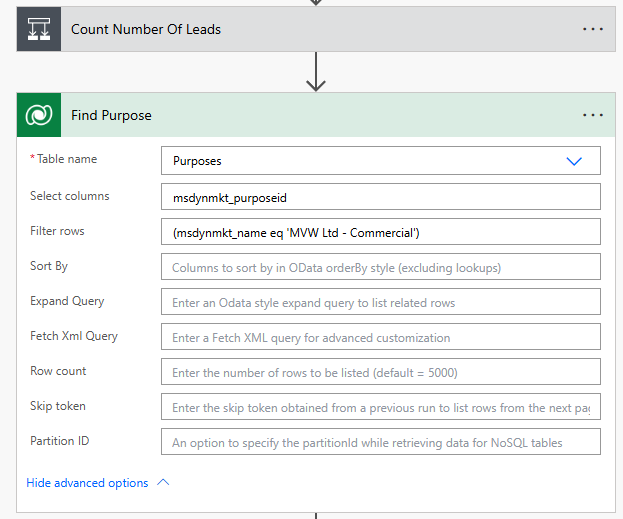
Ok so now that condition check is finished, we need to set or update consent for this person. We close the condition and add a new Dataverse connector action, another List rows step. This time we are looking for a Purpose record. Select the msdynmkt_purposeid column, and then use the filter rows step to look for the Purpose with the name of the Purpose you want to update. Even if you only have one Compliance Profile, it’s a good idea to rename your Commercial Purpose as there is a default one (that cannot be deleted). Or you could rename that default one to DNU so the flow doesn’t get confused trying to find the right one. You could also filter based on the GUID of the Purpose and use msdynmkt_purposeid instead of msdynmkt_name.
(msdynmkt_name eq 'MVW Ltd - Commercial')
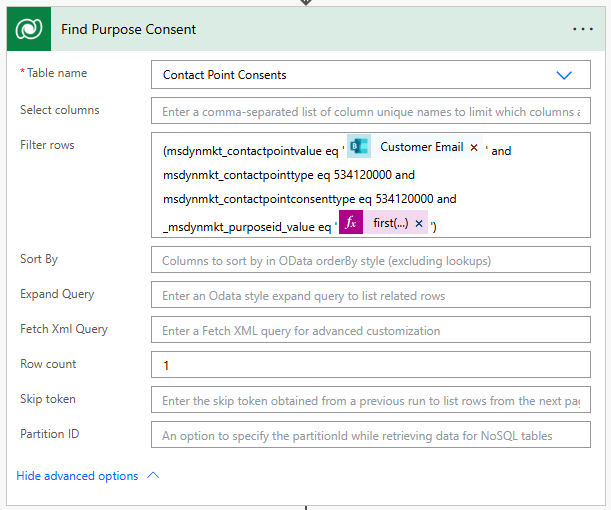
Once we’ve found the Purpose, we want to check and see if the Lead already has a Contact Point Consent record for that Purpose. If you have no clue what that is, check out the series of posts I did on this topic first. So it’s yet another List rows step searching on the Contact Point Consents table. The filter rows step is looking for records that have the same email address as the person who submitted the form, it’s got the type of Email, consent type of purpose and the purpose id of the same one we found in the last step. There should never be more than 1 found but you can still set Row count 1 just to be sure.
(msdynmkt_contactpointvalue eq '@{triggerOutputs()?['body/CustomerEmail']}' and msdynmkt_contactpointtype eq 534120000 and msdynmkt_contactpointconsenttype eq 534120000 and _msdynmkt_purposeid_value eq '@{first(outputs('Find_Purpose')?['body/value'])['msdynmkt_purposeid']}')
Now we are doing another condition check but this time to see if the we found a Contact Point Consent for the Lead that matches the Purpose, so is it equal to 1. If yes, we use the Update a row step to update it, otherwise Create a row step to add a new one. You’ll see a list below of what was done in each step.
length(body('Find_Purpose_Consent')?['value'])
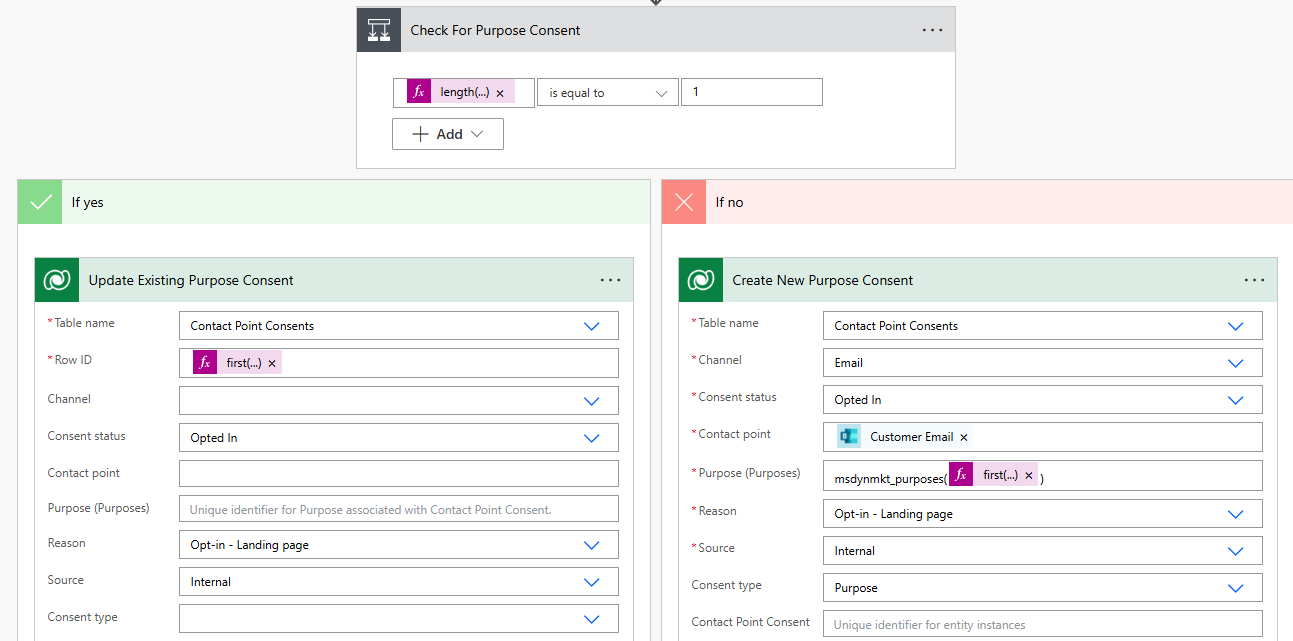
Update Existing Purpose Consent
- Row ID is the following expression: @{first(outputs(‘Find_Purpose_Consent’)?[‘body/value’])[‘msdynmkt_contactpointconsent4id’]}
- Consent Status – Opted In
- Reason – Opted In -Landing Page
- Source – Internal
- Who requested the change – Microsoft Bookings Submission (you can type in whatever you need here)
Create New Purpose Consent
- Channel – Email
- Consent Status – Opted In
- Contact point – @{triggerOutputs()?[‘body/CustomerEmail’]}
- Purpose – msdynmkt_purposes(@{first(outputs(‘Find_Purpose’)?[‘body/value’])[‘msdynmkt_purposeid’]})
- Reason – Opt In – Landing Page
- Source – Internal
- Consent Type – Purpose
- Who requested the change – Microsoft Bookings Submission (you can type in whatever you need here)
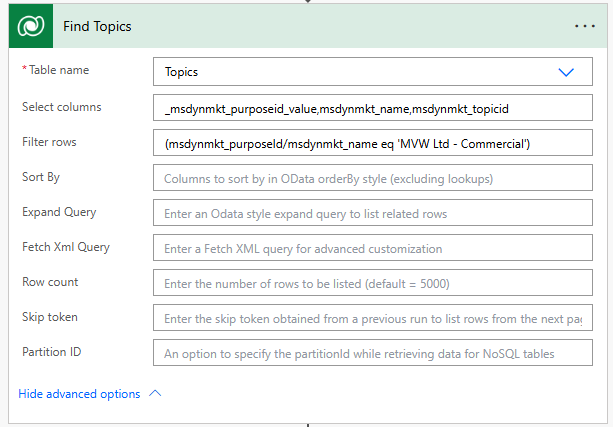
Now we will do something similar with the Topics. We will do a List rows step looking in the Topics table. Select columns will be _msdynmkt_purposeid_value,msdynmkt_name,msdynmkt_topicid. Then the filter rows is filtering all topics where the related purpose name is whatever you are looking for.
(msdynmkt_purposeId/msdynmkt_name eq 'MVW Ltd - Commercial')
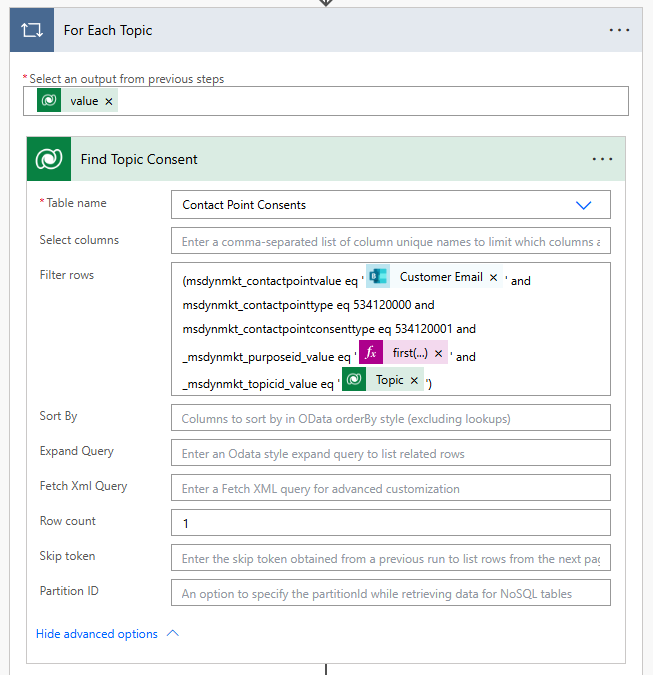
Now we intentionally want to add an Apply to each step so that for every Topic that belongs to the Purpose, we will check to see if there is an existing Contact Point Consent record and update to Opted In if there is, otherwise, create a new one. You cannot delete Contact Point Consent records and there cannot be duplicates so updating existing ones is the way to go if the person already has one. So for each Topic we are checking to see if there is a Contact Point Consent for the same email address as the person who submitted the Microsoft Bookings form, and the type is Email, the consent type is Topic, the Purpose is the value we found earlier, and the Topic is the current one we are reviewing in the Apply to each step.
(msdynmkt_contactpointvalue eq '@{triggerOutputs()?['body/CustomerEmail']}' and msdynmkt_contactpointtype eq 534120000 and msdynmkt_contactpointconsenttype eq 534120001 and _msdynmkt_purposeid_value eq '@{first(outputs('Find_Purpose')?['body/value'])['msdynmkt_purposeid']}' and _msdynmkt_topicid_value eq '@{items('For_Each_Topic')?['msdynmkt_topicid']}')
Finally, we are doing another condition check to see if there is a Contact Point Consent for the Topic being checked. If yes, we update that one to Opted In, otherwise we create a new one.
length(body('Find_Topic_Consent')?['value'])
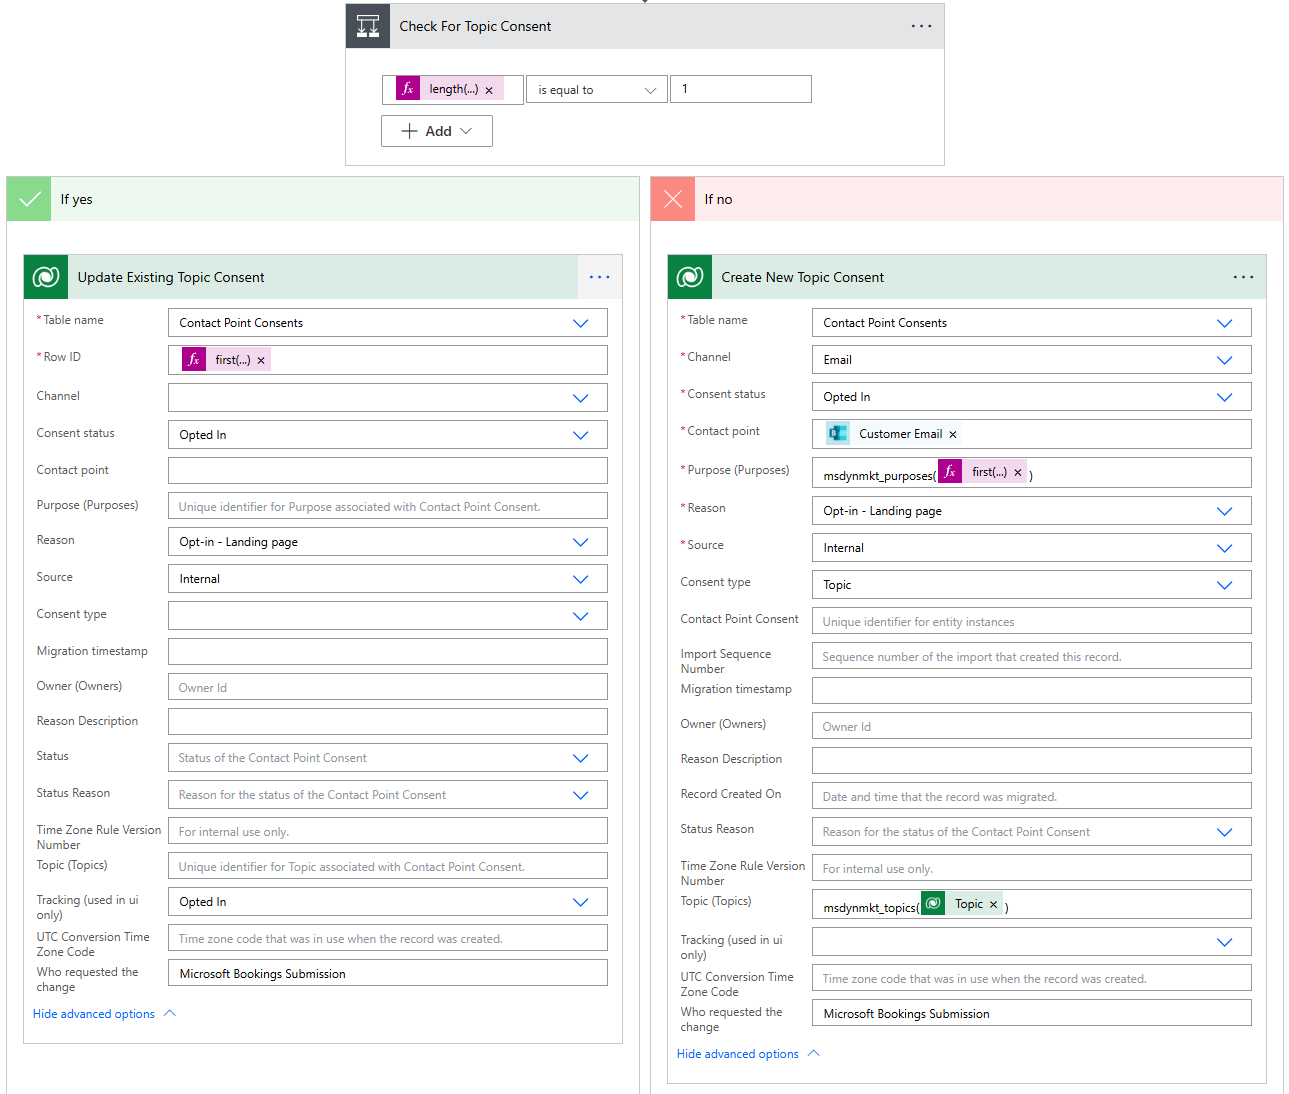
Update Existing Topic Consent
- Row ID is the following expression: @{first(outputs(‘Find_Topic_Consent’)?[‘body/value’])[‘msdynmkt_contactpointconsent4id’]}
- Consent Status – Opted In
- Reason – Opted In -Landing Page
- Source – Internal
- Who requested the change – Microsoft Bookings Submission (you can type in whatever you need here)
Create New Topic Consent
- Channel – Email
- Consent Status – Opted In
- Contact point – @{triggerOutputs()?[‘body/CustomerEmail’]}
- Purpose – msdynmkt_purposes(@{first(outputs(‘Find_Purpose’)?[‘body/value’])[‘msdynmkt_purposeid’]})
- Reason – Opt In – Landing Page
- Source – Internal
- Consent Type – Topic
- Topic – msdynmkt_topics(@{items(‘For_Each_Topic’)?[‘msdynmkt_topicid’]})
- Who requested the change – Microsoft Bookings Submission (you can type in whatever you need here)
I hope this helps. Although I’ve used Microsoft Bookings as the example, you could of course use the same concept to set compliance with other 3rd party tools and process the data back in D365.
Check out the latest post:
Use Custom Event Registration Questions To Branch Your Journeys In Customer Insights
This is just 1 of 603 articles. You can browse through all of them by going to the main blog page, or navigate through different categories to find more content you are interested in. You can also subscribe and get new blog posts emailed to you directly.