*** NOTE: ALL INFORMATION IS ACCURATE AT DATE OF PUBLISHING ***
If you’ve started using the new Realtime Marketing Forms for Events, you will have discovered it’s a little bit different to creating them in Outbound. For a start, you can’t create them from the forms area (yet, here is hoping that gets added!), and have to actually create an Event to then create a new form. Then if you want to edit it, you have to remember which Event it was added to and go back in to that Event to then try and make changes. It’s not all that intuitive! With a few small and quick changes that any user can do, we can access those forms a whole lot faster. Let’s take a look at the process!
I’ve not going to get in to creating your Event Registration forms that much other than a few steps. If you want something awesome in more detail, check out these two posts from Carl Gustavsson: Events In Real-time Part One & Events In Real-time Part Two. There is one event registration form created out of the box called Default registration form. You can edit it and make changes to it, but sometimes you might want another version of the form. To do this, currently you need to click on the lookup for the forms, then click New Form.

You then pick a template…

Then make your changes and save and publish the form. From that point, the only way to get back to it seems to be to go back to the Event, then go back to the tab with the form, then click on it to make changes. However, we can do something simple to get access to them faster!

Navigate to the forms section in Realtime marketing then open the Active Marketing Forms view. Click on the Edit filters option.

You can see there is a filter on this view to show forms that do not have a marketing form type of Registration form. You can click the three dots and then delete that filter.

Next, click on Edit columns.

From here you can add in additional columns and change the order of them, including adding in that Marketing form type field.

You can then drag the columns to resize them and click to sort by a specific column. Once done, you should notice a star next to the name of the view. This indicates that a change was made and that change will only be kept if you save the new layout and filtering as a new view. Click on the drop down then click Save as new view. Give the new view a name.

Once you’ve done that, you will have the option to set it as the default view which means each time you go to the forms area that will be the view displayed.

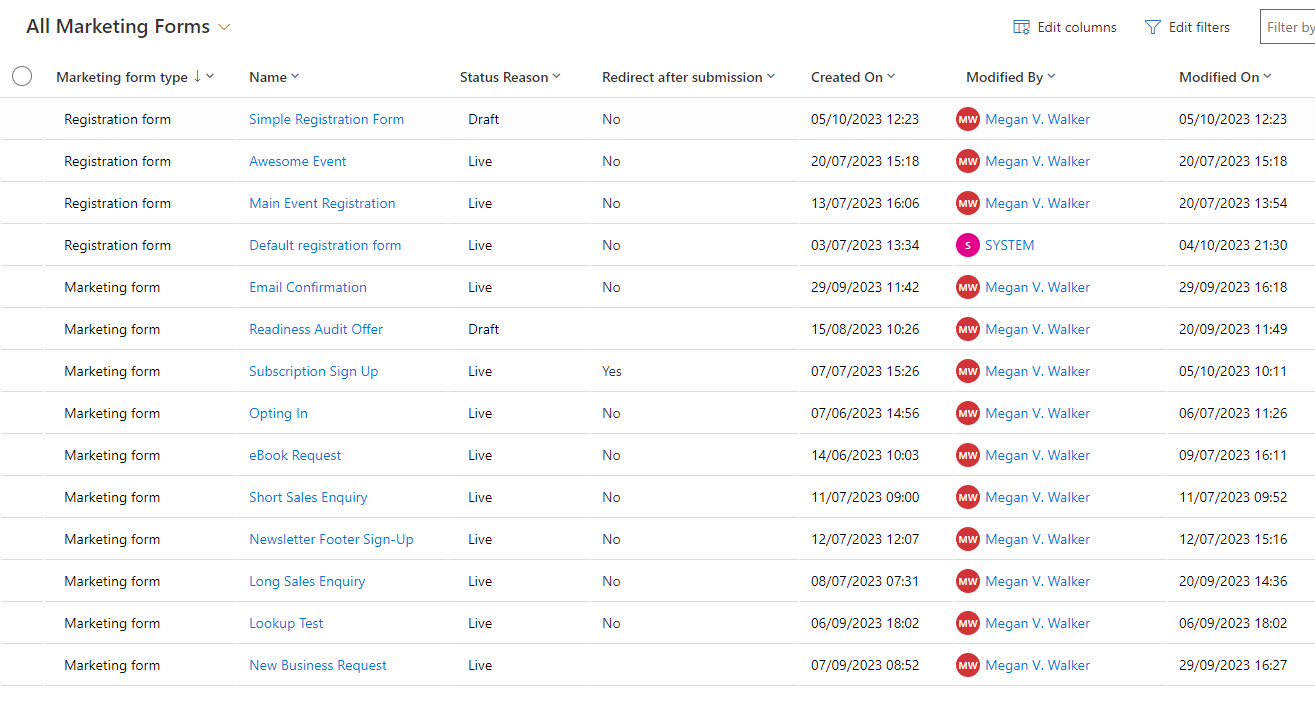
Now we have a full list of ALL marketing forms regardless of if they are registration or marketing forms. Again, you still can’t create a new Registration form from here, but you can easily go in to an existing one to make changes without having to hunt through the Events! If you want to know how to share your new view with another user, you can check out this post towards the end with some steps on how to do this.
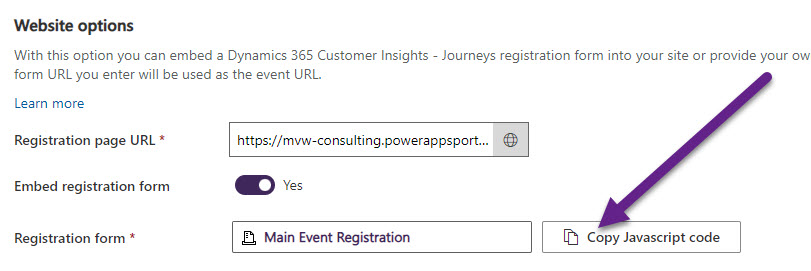
One last thing to be aware of with regards to your JavaScript code when embedding the forms in a website. You might be tempted to get the code by opening the form, clicking on Publish options and then copying the code from there. DO NOT DO THIS! There will be no way to link that form to a specific event.

Instead, make sure you have linked the form to your event, then click to copy the JavaScript code from the Event itself. That way, the correct references for the Event are pulled through and anyone registering will be linked to the correct event. This also means you can actually get away with having ONE form for Events and each time you add to an event and copy the JavaScript code, the person filling out the form will get an Event Registration record tied to the CORRECT event each time. Hooray!
Check out the latest post:
Use Custom Event Registration Questions To Branch Your Journeys In Customer Insights
This is just 1 of 603 articles. You can browse through all of them by going to the main blog page, or navigate through different categories to find more content you are interested in. You can also subscribe and get new blog posts emailed to you directly.
Hi Megan!
Thank you for this! I know many of my clients have missed this functions! Another function a lot of clients are upset about is the lack of creating custom registration fields, fields they dont want to have stored in the CRM system, such as food preferences etc. Do you know anything about when this will come in real-time marketing?
Hi Charlotte, it’s coming in July out of the box: https://learn.microsoft.com/en-gb/dynamics365/release-plan/2024wave1/customer-insights/dynamics365-customer-insights-journeys/collect-extra-customer-information-without-creating-custom-attributes?WT.mc_id=DX-MVP-5003395
However, if you are feeling brave, this article shows how you could do it now, but you would need to be comfortable with HTML: https://community.dynamics.com/blogs/post/?postid=3a361b7e-80b0-ee11-92bd-002248527d3d&utm_source=D365-Marketing-Weekly&utm_medium=referral&utm_campaign=issue-38
Hi Megan,
I would also like to extend a thanks for this article. I recently developed a an onsite event check-in canvas app uses a barcode scanner to capture the attendee Event registration QR code and then creates a check-in record via a submit button that triggers a flow in Outbound. My client now prefers to use Realtime Marketing forms for Events. Do you know if this is possible to point event check-in app to use realtime marketing forms or if any limitations? Many thanks
Hi Sol. There should be no need to change anything with your app. The tables for event registrations and check-ins are exactly the same with Realtime and Outbound. It’s only the online form part of an Event that will change if you start to use Realtime. Everything else about it is the same.
Hi again Megan!
I wanted to hear if you have seen any updates on my previous questions regarding the Custom registration field? Because as far as I can see it seems that they have removed it completely from the wave release plan? Do you have any other or more information about this? I hope this is not the case as many of my clients, from all over the world really are waiting for this features to be available..
Kind regards,
Charlotte
Hi Charlotte, it’s still out there but sadly it’s been pushed to February 2025!!! https://learn.microsoft.com/en-gb/dynamics365/release-plan/2024wave2/customer-insights/dynamics365-customer-insights-journeys/collect-extra-customer-information-without-creating-custom-attributes?WT.mc_id=DX-MVP-5003395
Hi Megan,
I am looking for something similar to what Charlotte mentions above in event registration forms. I specifically want two fields on the registration form that will get saved to the Event Registration record, (number of adults attending and number of children attending). It looks like public preview now pushed to March 2025.
Thanks,
Seán
Yeah it still has some time to go, gets pushed back and back. 🙄
Hello Megan. We’ve been using D365 CIJ Events quite successfully. But one area we’re struggling with is being able to identify which registrations come from our Linkedin campaigns. Do you know if it’s possible for an Event to use two different registration Forms? The idea is to create one registration form for LinkedIn traffic and another one for all other traffic (email campaigns, etc..).
Or we going int he right direction or is there another way of doing this?
Thank you! Laura
Hi Laura, you can’t use two different registration forms for an event, but you could do something to capture any UTM parameters coming through via the traffic to your website (assuming you are embedding the form on your website?). You can then use a script to get any values and populate them in to hidden fields on the form: https://meganvwalker.com/using-browser-session-storage-referrer-utm-params/