*** NOTE: ALL INFORMATION IS ACCURATE AT DATE OF PUBLISHING ***
One of the cool things you can use in Emails in Realtime Marketing (in the Customer Insights – Journeys) app is personalisation. Accessing data is pretty simple, and Microsoft have even provided a list of pre-defined values for you such as Full Name and First Name to add to your emails. You can also add in new placeholders for you and other users to access quickly too. But what if someone on the team adds too many, or the wrong mapped ones. Or what if you want to get rid of some of the out of the box ones? In this post I will walk through how to do that and also how to adjust the security access when necessary.
This feature came out in March 2022. At that time, you could easily remove what they termed ‘Pre-defined tokens’. You could click the three dots next to one of the options and then select to remove if you didn’t need it.
Now when you do that for one of the out of the box items, you just get a More info link and nothing else.
Clicking on More info and you can see where it is mapped from so you know where the values would be coming from if used in an email.
You can however remove a custom item still which is good.
But what about when people add more of them? Anyone with access to the marketing app can do this, which isn’t necessarily a good idea!
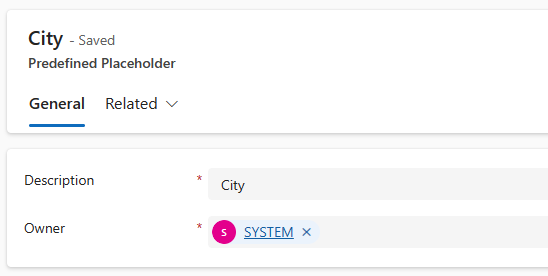
When someone does this, the records are saved in a table called ‘Predefined Placeholder’.
Unfortunately this table cannot be edited in any way, and it’s completely locked.
However, we can add access to this table in the Customer Insights – Journeys app by editing the sitemap. Add a new page.
Then you want a Dataverse table.
Then search for the Predefined Placeholder table. Save and publish the app.
Now again, because the table is locked, we can’t add any new views, but you can create a custom view and share it with others. After adding the link to the app via the sitemap, go to that section and edit the standard view that is there. Here you can add in new columns that you might want to see.
Then adjust the filters. For this, I will filter via language so I only see those without a language, or where it equals English.
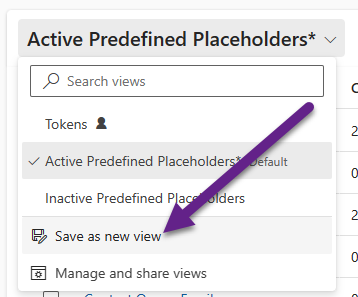
Now I can save this as a new view.
And then share that view as Read only to a Marketing Team that exists in my environment.
Once you have your view set up and shared, you can then find the placeholders you want to remove (or rename) and delete from here.
Should you want to remove access to this, you will need to make a copy of one of the existing out of the box Marketing security roles so that you can then remove the Create access to the Predefined Placeholder table. Just make sure you then give your users the new security role, and then keep an eye out for any new tables that might need to be added to your custom security role in the future. Definitely not ideal but doable.
Once you’ve moved the create access, when someone tries to save a new Predefined Placeholder (or token), they will get an error instead.
Check out the latest post:
Formatted List Of Speaker Profiles For Event Session Emails
This is just 1 of 498 articles. You can browse through all of them by going to the main blog page, or navigate through different categories to find more content you are interested in. You can also subscribe and get new blog posts emailed to you directly.


