*** NOTE: ALL INFORMATION IS ACCURATE AT DATE OF PUBLISHING ***
Back with another post that focuses on Event Management and different approaches you can take. This one was inspired by a question from a reader on one of my blogs, and also a recent reminder from Malin Martnes on one of her posts about using Lists in emails. The reader wanted to know if when someone checked in, you could provide them with a list of the sessions they had registered for (thanks for the question Jet!). In this post we will use an out of the box trigger, no need for coding of any kind. We will create an email that can be sent to the attendee when a check-in record is created, so really just for in person events. Let’s take a look!
First thing, create a new email and give it a good subject and preview text. Start adding the text you want at the start of the email. If you want to add a custom image or the name of the event etc. make sure you take them from the Marketing Event Check-in trigger. More on how to get the event image and other information on this post here.

Next we will create a list to display all of the sessions someone registered for. Click on the personalise icon from the right of the email and then click Add list.

Now we need to find the Marketing Event Check-in trigger and then open it and click on Marketing Event Check-in Reference.

From the check in, we now need to get back to the Event registration record that it’s linked to. This allows us to keep things unique to each person going through the Journey and receiving this email. So find the Event registration link and click on that.

From there, we want to get to the Session Registrations as these are linked back to the Event Registration.

Now we need to add the columns (fields) we want to show on the email. Clicking on the columns input gives us a drop down of the options available. But hang on a second, where is the session name or the start or end time? Huh?

Instead, click on this lovely little link underneath for Advanced options.
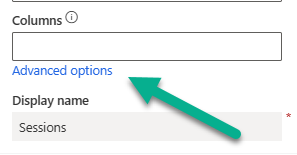
This is the good stuff, now we can get directly to the Session record rather than the Session registration as before. Click on this option.

Now you can then search for the values from the Session that you want to display in the List to the person that checked in. Here we will pick the Session title.

I also want to show the start and end time. Don’t forget to set the right format and language for the dates to show in a way that works for your requirements.

Once you’ve added all of the columns, make sure you set the Order by to be Session registration ascending. This should work but do some testing to be sure. I had previously used Version Number ascending which looked like it had worked, but seems to be that it doesn’t work ALL the time. You can also set the max amount of items. Set this to be the max possible number of sessions someone could register for at the event. Finally click save and copy.

From here, you can copy the code that is generated.

Paste it directly in the email where you would like the list of sessions to be displayed.

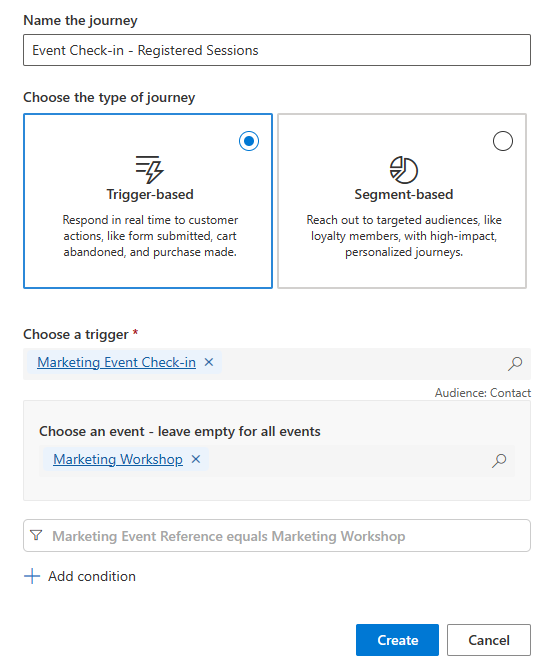
Now you need to publish that email (although read on first to see other options before you make it live) and use it in your Journey. The Journey needs to start from the Marketing Event Check-in trigger. You can then set a filter for a specific event too.
Now when someone registers, you get a nice lit of all of the sessions they registered for which is emailed to them as soon as they are checked in to the event using a QR Code (or done manually).

Now even though that information above is correct, it’s not all that pretty right? Just literally a list of data. We can make it a bit nicer though. First, I want to add in some new elements to the CSS of the email.

Now using that, I can create a table rather than using the code that was generated for me. I still need to use all of the aspects, but need to comment out the each parts otherwise that interferes with the info shown in the email.

Now when the email goes out, it looks a whole lot nicer.

Here you can see the email for someone who registered for different sessions. So a nice personalised email for each attendee that checks in to the event. Lovely!

If you want to use the CSS and HTML I used here as a starting point, feel free to copy the CSS below:
    table.sessions {
      border: 1px solid #ccc;
      border-collapse: collapse;
      margin: 0;
      padding: 0;
      width: 100%;
      table-layout: fixed;
      background-color: #ffffff;
    }

    table.sessions tr {
      background-color: #fffff;
      border: 1px solid #ddd;
      padding: .35em;
    }

    table.sessions th,
    table.sessions td {
      padding: .625em;
    }

    table.sessions th {
      font-size: .85em;
      letter-spacing: .1em;
      text-transform: uppercase;
      background-color: #3c245c;
      color: white;
    }
And the HTML for the table part here. You will need to find the right place to put it within the HTML so it appears in the correct place in your email:
                               <table class="sessions">
                                  <thead>
                                    <tr>
                                      <th scope="col">Session</th>
                                      <th scope="col">Start</th>
                                      <th scope="col">End</th>
                                    </tr>
                                  </thead>
                                  <tbody>
                                    <!-- {{#each Sessions}} -->
                                    <tr>
                                      <td scope="row" data-label="Session">{{Sessions.Session}}</td>
                                      <td data-label="Start"> {{Sessions.Starttime}}</td>
                                      <td data-label="End">{{Sessions.Endtime}}</td>
                                    </tr>
                                    <!-- {{/each}} -->
                                  </tbody>
                                  <tfoot>
                                    <tr>
                                      <th scope="row" colspan="3"><br></th>
                                    </tr>
                                  </tfoot>
                                </table>
Check out the latest post:
Use Custom Event Registration Questions To Branch Your Journeys In Customer Insights
This is just 1 of 603 articles. You can browse through all of them by going to the main blog page, or navigate through different categories to find more content you are interested in. You can also subscribe and get new blog posts emailed to you directly.
Hi Megan. Thanks for this post. Do you know if the formatting of the sessions list with css would work in the same way on a Real-time registration form when using the Sessions element?
Also, would you have any insights on how to get the session dates and times to be displayed in European format (dd/mm/yyyy)?
And finally, I would like to visually separate the list of sessions per day (for an event that spans 4 days). Any idea on how this could be done?
Many thanks for your ideas and insights!
Joris
Hi Joris, it’s very limited on the registration forms in terms of what you can/can’t do. I saw that Carl Gustavvson recently wrote about pulling in an image dynamically but not sure I’ve seen anyone doing anything with the sessions part – https://www.carlgustavsson.se/2025/01/08/how-to-dynamically-set-event-images-on-registration-forms-in-dynamics-365-customer-insights-journeys/ – might be worth messaging on his site too to ask if he has done anything with this?
Thanks Megan. I’ll have a look at Carl’s site.
Great blog. Is there a way to send a different email depending on the session a person has signed up to. My bet would have been journeys but there doesn’t seem to be a option for session in there.
Really good question Damesh and it got me thinking. I’ve not tested it although will likely test out in the future to write up a blog. I think this could be really useful. You could start your journey with the same trigger but add a condition so it only runs when the Check-in type is Session check-in.


Then on an attribute branch, you can split out the emails based on the specific session. You would go via the Marketing Event Check-in Reference through the Session registration (which is required for a Session check-in, then use the Session lookup (the top option in blue) to then be able to pick the specific session:
That way you can then have all the sessions listed out in one Journey, then allow someone to go through the Journey more than once so that each time they check in for their session they get an email.
Ah I think I mis-read your original question… and thought it was related to the check-ins. For session registration, you can just create a new Dataverse trigger that would fire when someone registers specifically for an event, then use that in your journey.

This blog was a real help!
Unfortunately sorting on version number is not resulting in a correct order of the starttime.
Did anyone find a solution to sort on the correct starttime
Hi Anneke, I had seen it work a few times but then noticed it stopped working. I have since changed it to sort by Session registration which again, seems to work. Hope that it stays that way. I have updated the blog and screenshot to reflect that change.
Please remove my previous reply. I have been retesting and it seems to work 🙂
I think I would try sorting by Session registration (see updated screenshot on blog) as the version number seems to be sometimes working. Not entirely sure when or how that is being set.