*** NOTE: ALL INFORMATION IS ACCURATE AT DATE OF PUBLISHING ***
When considering the right approach for your online marketing forms, it’s not always possible to use forms created in Customer Insights – Journeys (D365 Realtime Marketing forms). You might not want to recreate them all, or you might already be using another solution that you aren’t ready to replace just yet. Whatever the reason, if you’ve authenticated the domain within the marketing app, you can use those existing forms and map them back through to Dynamics so your Contacts and Leads are created and updated automatically without the need for any complicated workflows. This blog will show you how to use the form capture functionality for Realtime.
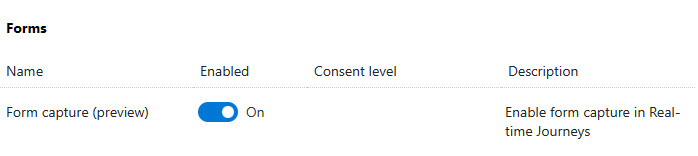
First thing, make sure you are on the latest version, then go in the setting area, feature switches and turn on the form capture option. Note at the time of publishing, this feature is in preview and therefore has it’s own feature switch. This might not be the case if you are implementing later on.
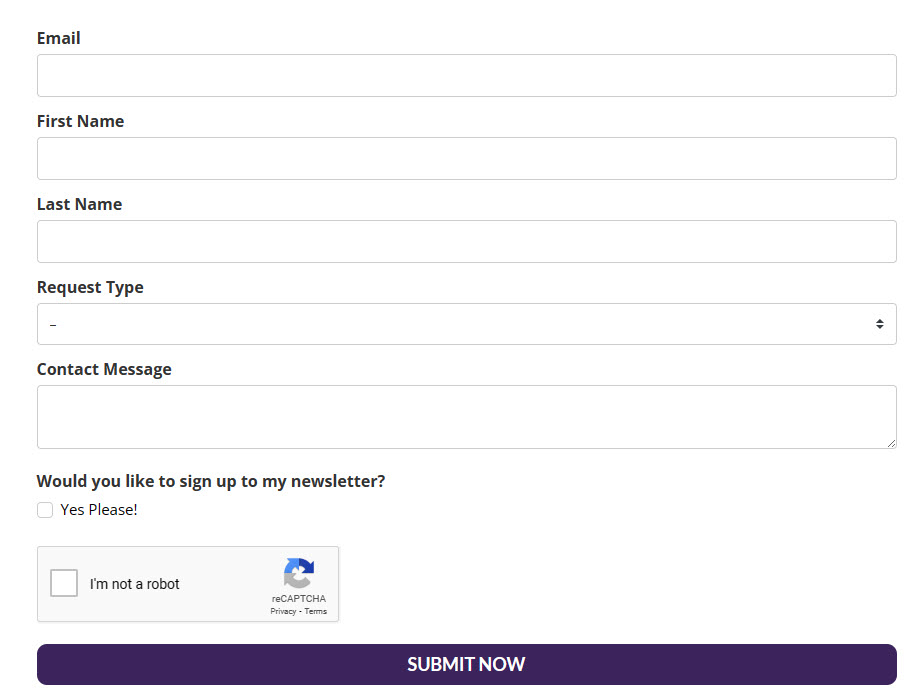
Next, consider the form you want to use for the form capture. I’ve got a form created using a service called Mailerlite that is embedded on my own website. Fairly simple, and I have all of these fields also set up as fields on the Lead table.
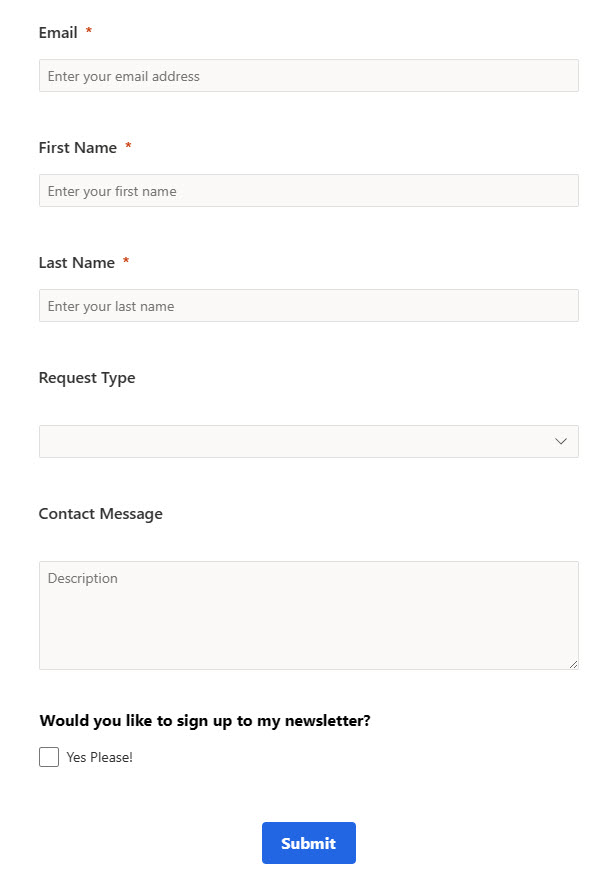
Now I need to make sure I have a form created in Realtime Marketing. It doesn’t matter what it looks like, so don’t worry about styling it in anyway as this form will never actually be shown to anyone. Just make sure you include all of the same fields. You can have fields on your external form that you don’t include here, but just understand that without a matching field for a Lead or Contact, you will miss information without any way to map it. The bottom field for signing up to my newsletter is a Purpose field that when ticked will set a Contact Point Consent record to Opted In.
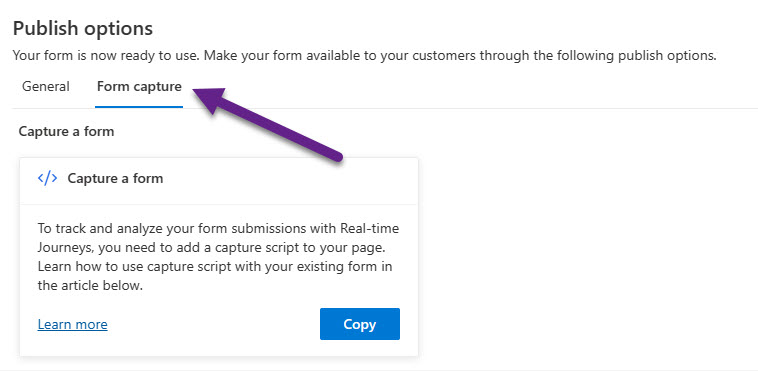
Once you’ve created the form, go ahead and publish it. You’ll now see an option for Form capture. Click this, and then click on the Copy button to get your script.
Paste the script in to something like notepad where you will be able to edit it. Your script will include a link to this Microsoft documentation page: Capture forms in Customer Insights – Journeys – Dynamics 365 Customer Insights
You’ll see that the code includes a script right at the top, then includes a series of sections that include ***Please fill***. These will all need to be replaced with values from your external form. The form needs a value set to make sure it can be found on the page, then each form field needs the value from your form to be mapped to the Dataverse (D365) field name. All other information is provided for you and doesn’t need any modification.
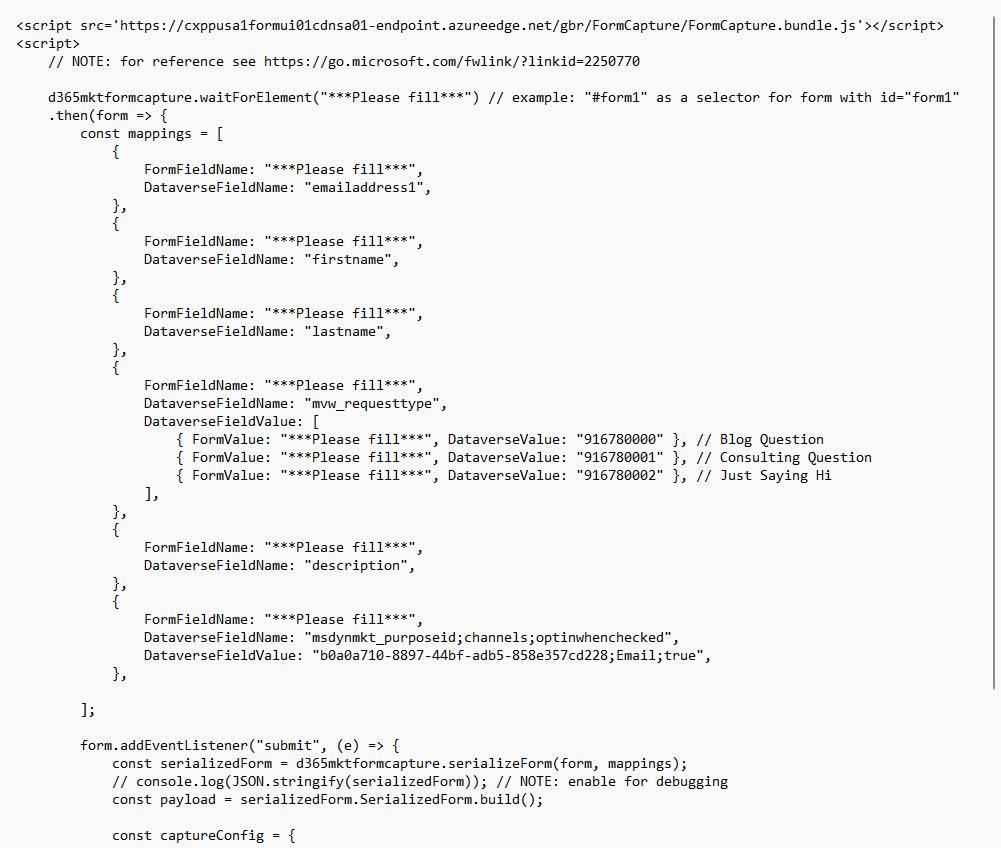
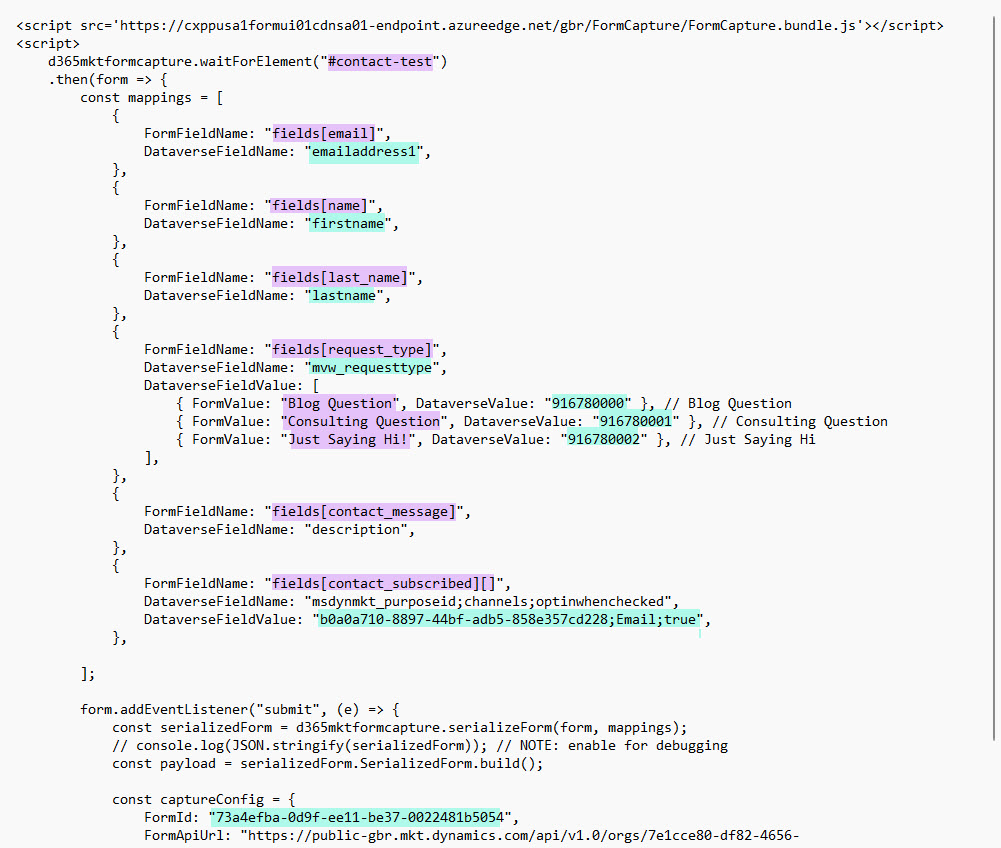
Quite often, a form is given an ID. This provides a way for the form to be found and accessed by the script. My form did not have an id assigned to it, but it’s simple to add. Just find the start of the form code for your external form, then add in id=”name-of-form” to it. See below, I provided the id of contact-test. Doesn’t need to be complicated, the simpler the better. Then take the same id and add it to the top of the script provided by the form in D365 as the form id (see screenshot below where I show my modified script).

Next you need to get the form field name from each of the fields on your external form and add them to the script. The easiest way is to view the form on your website and click in to the first field. Then right click with your mouse, and then click on Inspect.
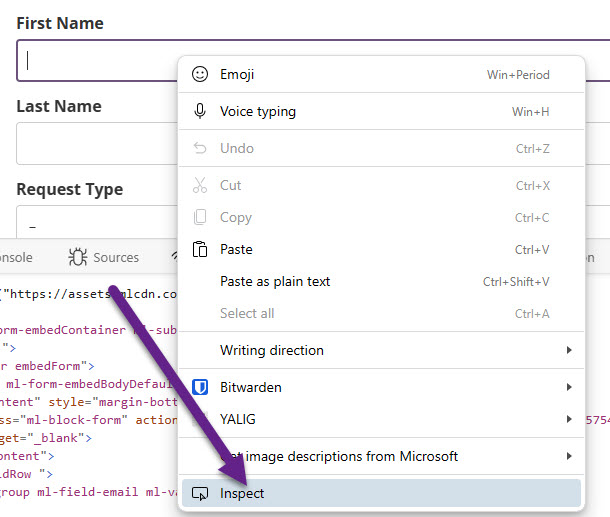
This will then show the code of the form and should open up the input element for that specific field. You are looking for the name of the field like you see below. My email field is called fields[email]. Your form could have a name like Email or email_address for example. You will need to inspect it to be sure.

Go through the same exercise for all of the fields on your form and update them in the script. Below you can see the places I adjusted the script in purple. These are all of the elements that exist on my external form that are mapping in to the items in blue which are from Dataverse. Notice the field for Request Type that has three values. The Dataverse values are added in to the script automatically for you. All I needed to do was add in what the value is that is included in my external form that maps to the correct option. It should be pretty straightforward. The FormId at the bottom will be populated automatically in the script and maps to the correct form in D365, which should not be changed.
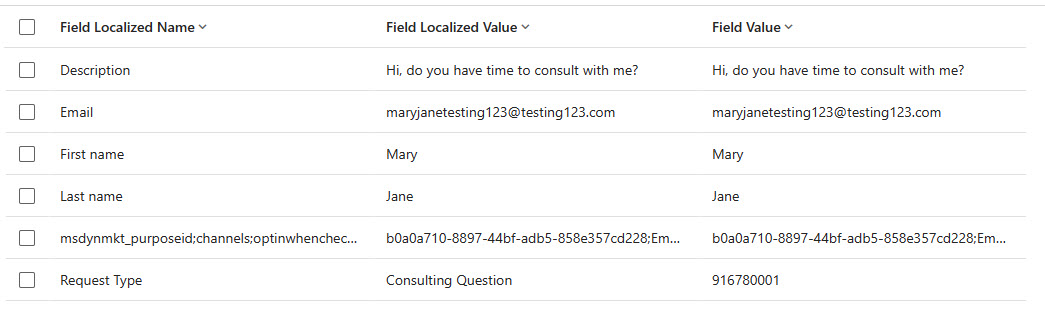
Now take your entire modified script, and add it directly below where your form is on your web page. This likely will be after a closing form tag that looks like this </form>. Now refresh your form and fill it out. Wait a few moments and you should end up with a form submission on the form in D365. Here we can see all of the fields filled out and mapped in to the correct field on the Lead/Contact that was either created or updated.
Check out the latest post:
Use Custom Event Registration Questions To Branch Your Journeys In Customer Insights
This is just 1 of 603 articles. You can browse through all of them by going to the main blog page, or navigate through different categories to find more content you are interested in. You can also subscribe and get new blog posts emailed to you directly.
I’ve been desperately waiting for this feature 🙂 Thanks for the post!!
You are very welcome Johannes!
Hi Megan,
thanks for your instructions!
Is there a way to set default values in the mapping? In my case I need to set some values in the background (rating of the generated lead). There is no corresponding field on the external form.
Hi Valentin, good question and I just tested a few things and figured it out.
Add the fields to your form in D365, then take a look at the form capture script. It should have added those in to the script. For example, I added a field called Customer Relationship that I might want to set to the value of Prospect. This is what it includes in the script.
{
FormFieldName: “***Please fill***”,
DataverseFieldName: “mvw_customerrelationship”,
DataverseFieldValue: [
{ FormValue: “***Please fill***”, DataverseValue: “916780000” }, // Customer
{ FormValue: “***Please fill***”, DataverseValue: “916780001” }, // Previous Customer
{ FormValue: “***Please fill***”, DataverseValue: “916780002” }, // Microsoft MVP
{ FormValue: “***Please fill***”, DataverseValue: “916780003” }, // Microsoft Employee
{ FormValue: “***Please fill***”, DataverseValue: “916780004” }, // Prospect
{ FormValue: “***Please fill***”, DataverseValue: “916780005” }, // Student
{ FormValue: “***Please fill***”, DataverseValue: “916780006” }, // Subscriber
{ FormValue: “***Please fill***”, DataverseValue: “916780007” }, // Webinar Attendee
],
},
What I need to do instead, is just set the field name and then the value I want to use. So the above would become this:
{
DataverseFieldName: “mvw_customerrelationship”,
DataverseFieldValue: “916780004”,
},
Other fields might be a two option in which case the value would be 0 for No and 1 for Yes (or whatever your options are). Text would just simply be whatever text you wanted to use:
{
DataverseFieldName: “msdyn_isminor”,
DataverseFieldValue: “0”,
},
{
DataverseFieldName: “department”,
DataverseFieldValue: “Finance”,
},
Just insert the mapping somewhere in to the main form capture script and then test it out. The information should then pass through in to D365 and be used to update the record created or updated via the form submission. Hope that helps!
Hi Megan,
I’m encountering a CORS issue when submitting the form on the external website while utilizing the Form Capture feature in Realtime marketing. Since these features are still in the development phase, I’m uncertain whether Domain authentication is necessary. Are you familiar with this requirement?
Thanks
Hi Swati, oh yes, you would definitely need to have the domain set up, you can’t just add the script to any domain that you haven’t already added the ownership record and the TXT record for embedding the forms in your DNS.
Great post! I was wondering where it was. Thanks for the post. Can a Google Tag Manager (GTM) Tracking script be added? In outbound, you could add a tracking script, but I couldn’t get GTM to work. I would get the error: “The Webpage you entered doesn’t contain the required tracking script. Before trying again, you’ll need to add a script to the webpage.
Hi JP. Are you referring to Website tracking as per this? https://meganvwalker.com/filter-google-tag-manager-traffic-d365marketing/
There is no website tracking script for Realtime Marketing yet, so you would need to continue on with the Outbound script (if you have Outbound).
Hi Megan
nice post!!
i was wondering whether we can use form submitted values to segment upon them. But it does not seem to be suported yet
i was thinking in createing a custom table and grab de values from the field submission values and insert them into the custom table so we can segment but i dont know if im missing something and there is an easier way to do it
thanks a lot
best regards
Hi Javier, thanks for your comment! Unfortunately there isn’t the option to add in field submissions to search in segments. The table needs to have Change Tracking enabled on it. That field is locked for many of the marketing tables, including this one. Before going off an doing a custom table, it might be worth reviewing this first as it shows how to check those fields via a Journey – https://community.dynamics.com/blogs/post/?postid=3a361b7e-80b0-ee11-92bd-002248527d3d
Hope that helps in some way.
Hi Megan,
Thank you for the great post. I have a similar question, but with a slightly different situation. I manage more than five different WordPress instances, and each instance has hundreds of form pages that all use the same form (unfortunately, with different field names and form IDs). I’d like to use the form capture function to get leads into Dynamics 365, but I’m not sure how to use form capture with multiple pages. Is there any way to do this without creating a form capture for each page, which is practically very hard to do?
Thank you,
Hi Matt, when you say different field names, are you referring to the labels of the fields? So they would still need to be mapped in to the same form back in D365? You should absolutely be able to do it with one Realtime Form as each form on you site could have a different script added with the same form ID (from D365). You can then create a different script for each page on your website that has a slightly different form and just follow the directions in the blog post. So yes, you will have to have a different modified script for each form, but you should be able to have just one form in D365 to map them back in to.
Hi Megan,
Thank you for a great post. I am looking into using this feature for a newsletter sign-up form where I would like the subscriber to also fill out, among others, Country and Company. In my solution these are both look ups, but I am unsure if it is able to use the form capture feature for look up fields. Do you have any experience with this?
Thank you!
Hi Anne, check out this post, it should give you what you are looking for! https://meganvwalker.com/lookup-fields-with-default-option-available/
How did you update consent from the Subscribe field? I assume this isn’t the out of the box consent element that can be added from the marketing form editor? Did this require some automation to populate from a static consent field?
Hi Anneke. On your 3rd party form you will need a tick box that indicates someone is subscribing. On your form in D365 Marketing, you will need to add the Purpose on to the form. You should see that towards the bottom of the code you get from the D365 Marketing form, and just simply add the field name from your 3rd party form. You should be able to see it in the screenshots on the blog post in my example. Hope that helps!
Thanks Megan for this article,
What if a new field was added or old field was removed from the web-form, then we have to repeat the process from the beginning right (add the field to Marketing form > have another script > Map > publish the script on the website?)
Hi Serge – you would get a new script, but you should be able to just adjust the script you added to the website and either add or remove that parts that cover the fields you adjusted if that makes sense.
Thanks for your insightful article.
For the consent part, that means there should be an equivalent field in the website right?
Have you ever encountered this issue with the form submissions? Exception ‘InvalidPluginExecutionException’ occured: Consent submission processing failed due to invalid submission format. Ensure that the form is using the correct FormLoader script.
Thanks!
Hi mkxx – I have not. Perhaps check the web page and make sure there isn’t a different script hidden in there somewhere?
Great article! You’ve explained the process so clearly.
Form capture adds so much flexibility.
We faced the same error as mkxxx: Exception ‘InvalidPluginExecutionException’ occured: Consent submission processing failed due to invalid submission format. Ensure that the form is using the correct FormLoader script., CorrelationId: xxxx.
For anyone else who has landed here looking for a solution, we resolved it using the field ID for the consent checkbox rather than the field name.
I hope this helps someone.
Hi Megan,
Thanks for your nice article,I have a question as I am doing OTM to RTM transition, I would like to ask if it is possible to directly copy the HTML of the OBT marketing form in the new RTM From and then do the field mapping? As this would greatly reduce the migration workload
Hi Briana, sadly no, there is no way to do that. You will need to manually recreate all of your Outbound forms in Realtime.
Hi Byron, I’m still struggling with mapping the consent checkbox from the website. Are you saying we should try to map to FormFieldID instead of FormFieldName? Meaning just changing the capture code? We are getting the same error message you are referring to.
FormFieldID: “agreed-to-terms”,
DataverseFieldName: “msdynmkt_purposeid;channels;optinwhenchecked”,
DataverseFieldValue: “2d8cd2af-821f-ef11-840a-6045bd5ecd3a;Email;true”,
Hi Megan,
Thanks for your post. How does authentication happen to enable the data be pushed into Dataverse? Does the form have to be owned by a service account?
Hi Ikenna, no, it can be owned by any user as long as they have permissions to the tables referenced on this post: https://meganvwalker.com/security-access-to-users-for-realtime-forms/
Thanks Megan
Hi Megan,
Thanks for that post, it was exactly what I was looking for!
I’ve created a form and put the form capture code. Everything is great but when I submit it, it reloads the page without a response message (success, error, etc).
Is there any custom events in Form Capture as on Embed Form?
How do you manage that?
Thanks a lot!
Isabelle
You are welcome Isabelle. I would expect any message or redirects would be based on your form on your website as that is the actual code of the form. The code you get from the form in D365 is allowing the values of that outside form submission to be pushed back in to D365 on a Lead or Contact. So anything happening after submission, I would look at your actual form for that.
Hi Megan!
Thanks for this post 🙂 I am wondering if you have any insight on whether the forms will be possible to embed into emails in CIJ in the future? From what I can find, it is only possible to embed them on external websites at the moment. We are looking at building tasks for our teams but would also like to give the customers the option to choose if they want to be contacted or not depending on a trigger. Rather than assuming that they do.
Hi Raisa, I wouldn’t have thought so. Pretty sure you can’t fill out a form in an email, using any functionality. It’s just not what emails are for.
Hi Megan – I am attempting to get this to work with Gravity Forms on our WordPress website, but Gravity Forms does not use the default Submit function that the CIJ Form Capture script is listening for. Do you have any suggestion or advice? We have switched to CIJ from ClickDimensions so I’m sure there may be some other users in the same position looking for a solution 🙂
Hi David, hmmm good question. I can’t remember what plugin I used to do all my tests. Have you checked with support to see if they have any suggestions? It could be that you just need to alter the script slightly.
Hi, the form capture is working for me, but I just added some unmapped fields and they are not being submitted. I used the same name for these fields in both my external form and Dynamics. The provided JavaScript code doesn’t mention these fields, it seems to only concern the mapping. Any idea ? Thanks 🙂
Hi Cédric, good question! I just looked at the form capture JavaScript, it adds in the type of radio, checkbox and option set, but none of the others. The documentation doesn’t address unmapped fields so it’s unclear if it is supported or not. I have contacted Microsoft to see if it should be possible. I will let you know what I find out!
Hi Cédric, I checked for you and had the following response. Hope this helps!
The unmapped fields are supported in form capture scenario.
You can use the DataVerseFieldName in form capture mapping to set the logical name of an unmapped field. Assuming the logical name doesn’t match any existing mapped field name.
Example for short text field type:
const mappings = [ {
FormFieldName: “firstName”,
DataverseFieldName: “MyUnmappedField” }];
The similar approach applies to other field types.