*** NOTE: ALL INFORMATION IS ACCURATE AT DATE OF PUBLISHING ***
I’m working on a project that has a requirement to move a file from a file column (field) on one table (entity) to a file column of the same name on a different table. There is no way to map these fields using the standard Dataverse mapping functionality, and using Power Automate presented challenges and resulted in needing three actions just to achieve this. A quick call to others in the community for how they might achieve it brought in a solution provided by Guido Preite, just to help me achieve it in just one action step. I mean how awesome is he? I wanted to share how to get his solution (free of course), add it to your environment and then use it in Power Automate.
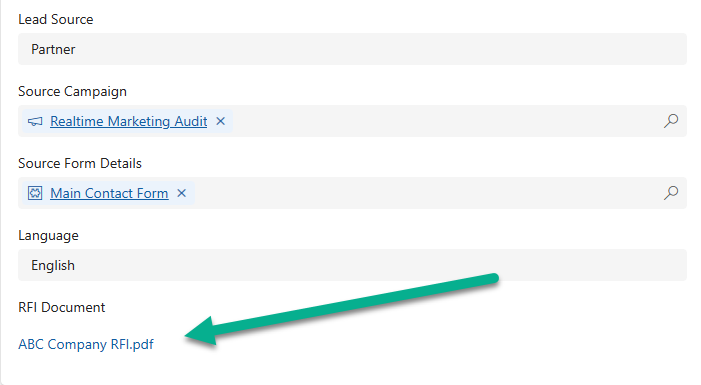
First of all, what is a file column? Adding fields to a table in Dataverse gives you file type options, one of them being a file type which allows you to add a document to it. In my example, I’m going to use the business case of having an RFI (Request For Information) document on a Lead, that then should be moved across to the corresponding Opportunity if the Lead is qualified. This makes it easier for the sales person working on the Opportunity to access the document without needing to go back to the Lead. When adding a file column, make sure you click on the Advanced options to set the maximum file size. By default it’s 32768 KB but you can go all the way up to 131072 KB by making the change you see below. Note that if you don’t do this upon creation, you cannot change it later.

Once you’ve got your file column you can add it to your form. Here we can see it on a Lead record.
Now on to how we get it on to the Opportunity if that Lead gets qualified. I had tried the approach of using the Dataverse connector in Power Automate, then the action of ‘Download a file or an image’ from the Lead table. Then I used the action of ‘Upload a file or an image’ to the Opportunity table. The challenge I was running in to was the name of the file would only ever show ‘Untitled.txt’ regardless of the real file name or file type. In stepped fellow MVP Chris Piasecki who shared that he had also run in to this issue, and needed to add an extra List Rows action on the file attachments table to get the file metadata like filename, type, size etc. So that meant 3 steps needed:
- Download File
- List Rows to get Filename
- Upload File
What a total pain! At this point, another MVP, Guido Preite came a long and said casually, oh I just created a custom api for you that will move the file from one column to another in one step. Oh to be this smart! I followed the steps to add his solution and it worked beautifully. So the first thing, go to GitHub – GuidoPreite/FileCustomAPIs and then click on the most recent item in the Releases section.

From there, download the managed zip file. This will give you the solution you need to install in to your own Dataverse environment. You will need to be a System Administrator in order to do the import. So if you aren’t stop here and check with them first to see if they are happy importing this for you.

Now go ahead and import the solution via make.powerapps.com (or go old school classic if you still haven’t broken that old habit 😉).

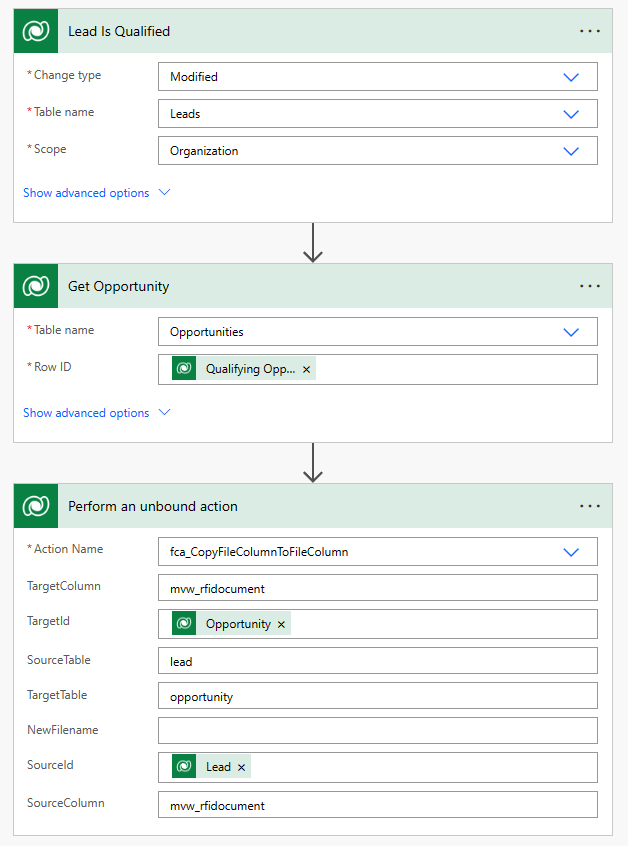
Now it’s off to Power Automate to build your flow. I’ll show you my full flow at the end, but for now, let’s focus on the important step that uses Guido’s solution. Add a step using ‘Perform an unbound action’.

Then type in fca to find the action of Copy File Column To File Column.

Now you just need to fill in the blanks. Note that the order of the parameters might display differently in your flow, but they should all be there. You are basically selecting the table, file column and record ID from the source (where you are getting the file from), then the same for the target (where you want to put the file).
- Target Table – in my case it is lead. Just type the database name of the table
- Target Column – the database name of the file column you added
- Target ID – you will get this using the dynamic content option to find the unique id
- Source Table – in my case it is opportunity
- Source Column – the database name of the file column you added
- Source ID – you will get this using the dynamic content option to find the unique id
The last parameter is New File Name. You can leave this empty, but if you add something here it will use that as the name of the file. Otherwise it will use the actual file name which in my case is preferred.

Now go ahead and run your flow or do whatever it is that will cause the flow to trigger. I qualified my Lead, which in turn started the flow running and moved the document for me. Awesome!

In case you want to do something similar, this is the quick and simple flow I created.
So thank you to Chris for sharing his experience, and a MASSIVE thank you to Guido for his efforts in creating the custom api solution for us ALL to benefit from!
Check out the latest post:
Use Custom Event Registration Questions To Branch Your Journeys In Customer Insights
This is just 1 of 603 articles. You can browse through all of them by going to the main blog page, or navigate through different categories to find more content you are interested in. You can also subscribe and get new blog posts emailed to you directly.
Thank you Megan! You have this uncanny knack of providing these insights just when I need them… 🙂
You are welcome! It’s a great solution from Guido.