*** NOTE: ALL INFORMATION IS ACCURATE AT DATE OF PUBLISHING ***
Using Realtime Marketing from Dynamics 365 (Customer Insights – Journeys) gives you the ability to customise your emails, and using dynamic conditional content, set different variations based on field values. One common field to use is that of a custom language field. You could ask for this information, or you could use a piece of information found within the developer console of a browser that shows the language set for the person filling out a form. In this post, I will walk through a way you can use that information to set a language field for each Lead or Contact filling out your Realtime forms.
First, determine which languages you would like to use. There are a couple of language fields you might already see (for example, if you have a portal installed), but I would suggest adding a new global Choice field for this and call it something like Preferred Language, or Marketing Language. Add in all of the languages you want to offer content in and include them in the field. Make a note of the value numbers that are assigned. That will be needed later on.

Now add a new field to the Lead and/or Contact table called Language (or whatever you want to call it). For this, choose the option to sync with a global choice, and then pick the new Choice field you added above.

If you do this for both Lead and Contact, best practice would be to add to the Lead to Contact mapping and make sure your new language fields are mapped. That way, when qualifying a Lead, the Language will be mapped through to the new Contact record created so you won’t miss that data moving forwards.

Now add your new field to your Realtime Marketing form(s). For this, I have a form that will create and update Leads. Once the field has been added, I’ve marked the field as hidden so it’s not shown to anyone.

Now comes the script… but a couple of things to be aware of first. When picking a language for the browser, if I look for English, you can see there are many options. Each one has a different code, but all would be prefixed with en for English. Canada would be en-CA, India is en-IN, and United Kingdom is en-GB.
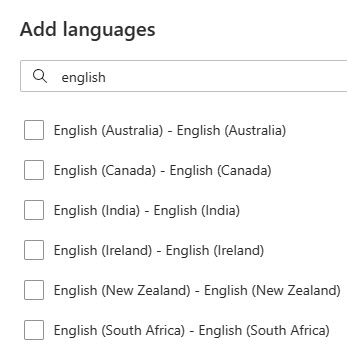
You can find all of the two digit codes here, so make sure you review for the language list you have created on your choice field, as those will be needed for the script. DO NOT try and add all variations of a language like I mentioned above. You only need to map the base language. https://www.w3schools.com/tags/ref_language_codes.asp
Moving on to the script, you will need to add it directly below the closing </style> tag like you see below, and before the closing </head> tag.

I’ll walk through the script now to explain. The first thing it does is wait until the form loads on the page before running through and trying to do anything. Then it does the following:
- Sets the language of the user variable by accessing navigator.language from the browser console
- Sets the language field you created by accessing it via the ‘title’ of the field. If you didn’t name the field on the Lead and/or Contact Language, then you will need to adjust that to include the field name you DID use
- Next we create some language mappings. This is where you will need to have the two character code from the list of languages provided on the link above, and then map to the value for the same language in your new global choice field. For example, fr is for French which maps to a value of 916780001 on my choice field
- After setting all of the mappings, the script is setting a default language (English in my example) so that if the browser language doesn’t match any listed in the mappings, something will still be set
- Then the list of mapped languages is checked against the langUser variable to see if there is a match. It uses ‘contains’ rather than equals so that it doesn’t matter what variant of a language someone uses in their browser, a match can still be made
- The found language code is then set using the matching value on to the Language choice field on the form
- Finally, the Langauge and Value are being logged in the Developer Console so you will know it’s working (not required, but handy to have)
<script>
    document.addEventListener('d365mkt-afterformload', function () {
        var langUser = navigator.language;
        var langField = document.querySelector("select[title='Language']");

        if (langField) {
            var languageMappings = {
                'fr': '916780001',
                'de': '916780002',
                'es': '916780003',
                'nl': '916780004',
                'it': '916780005',
                'sv': '916780006'
            };
            var defaultLanguage = '916780000';
            var selectedValue = defaultLanguage;

            // Check if langUser contains any language code
            for (var languageCode in languageMappings) {
                if (langUser.toLowerCase().includes(languageCode)) {
                    selectedValue = languageMappings[languageCode];
                    break;
                }
            }
            // Clear all selections first
            for (var i = 0; i < langField.options.length; i++) {
                langField.options[i].selected = false;
            }
            // Set the selected option
            var selectedOption = langField.querySelector("option[value='" + selectedValue + "']");
            if (selectedOption) {
                selectedOption.selected = true;
            } else {
                console.error("Selected option not found: " + selectedValue);
            }
            console.log("Language: " + langUser, "Language Value: " + langField.value);
        } else {
            console.error("Language field not found");
        }
    });
</script>
Once you have updated the script above to meet your own requirements, add it to your Realtime Marketing form and make it live. Then go and check out your form. Oh, one little trick to make sure you are looking at the most up to date version of your form, add the following to the end of the URL where your form is embedded #d365mkt-nocache. That will make sure you see it exactly as it should be.
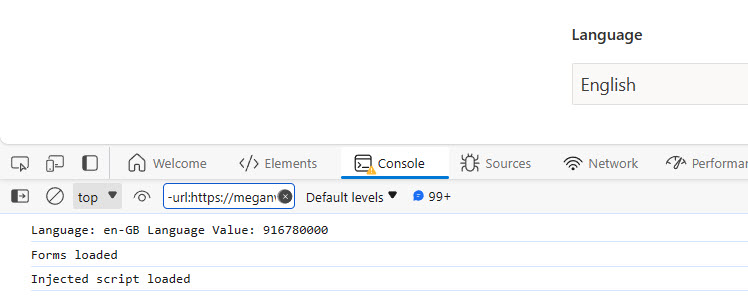
Now press function and F12 on the webpage. It should open up the Developer Console for you to review. If it all worked, you should see that the language and language value are showing in the log. Here we can see en-GB for my browser which is the language I use. The language of the form is also set to English.
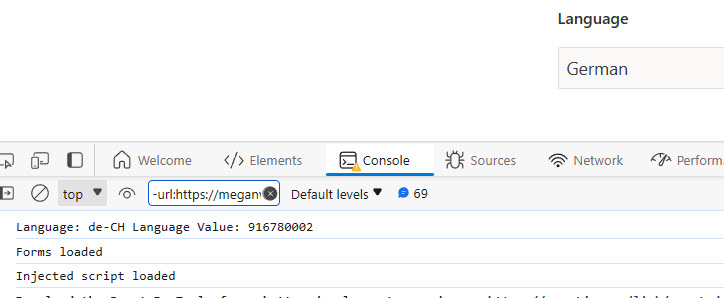
If I update the language in the browser settings to German (Switzerland), we can see the language passed through is de-CH, which I have mapped to make sure the language on the new Lead or Contact record is set to German.
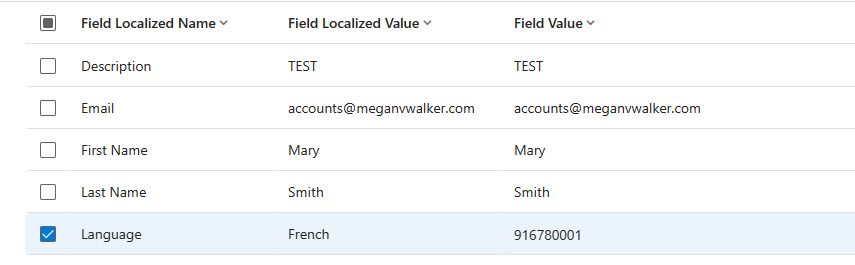
Once the form is submitted, the language field will be set on the submission. You’ll be able to see the label and value from the option that was set on the field submission for the Language field and it will be set accordingly on the related Lead or Contact record.
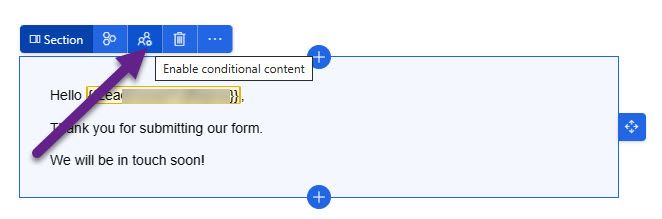
Last thing, if you want to use this in your emails, here is how you can do that. First, from the section you’ve added your text box to, click on the enable conditional content option.
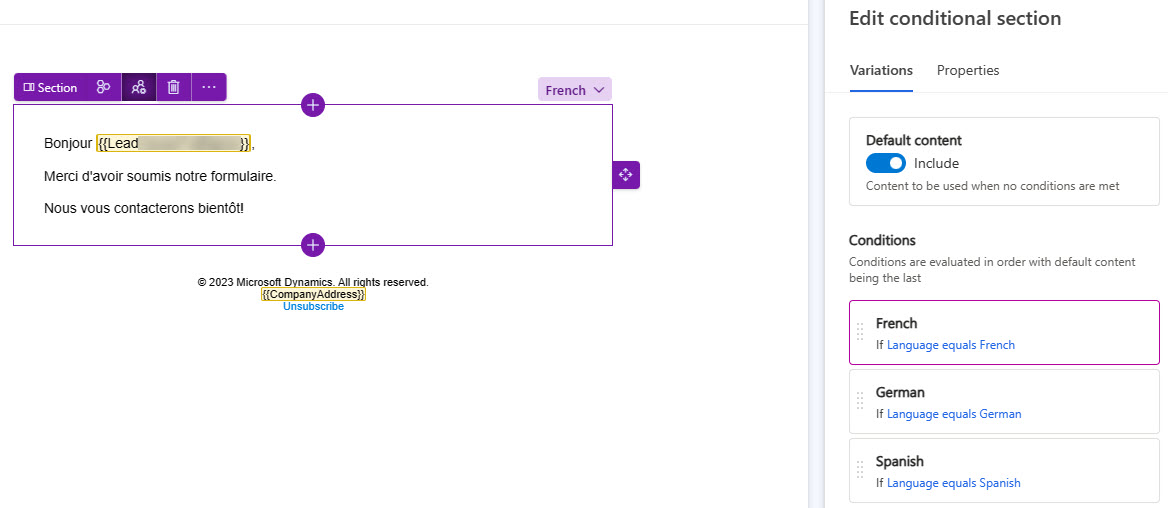
Then you can define a condition using the language field from the record and indicate the condition to determine when this variation of the section will be shown. So here, the condition being looked for is that the language on the Lead record equals French.
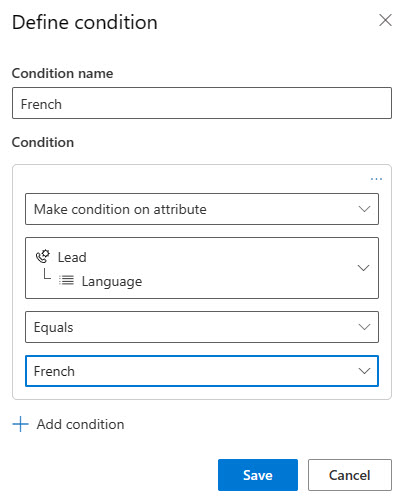
If it does, the French version will be displayed. Simple!
Check out the latest post:
Use Custom Event Registration Questions To Branch Your Journeys In Customer Insights
This is just 1 of 603 articles. You can browse through all of them by going to the main blog page, or navigate through different categories to find more content you are interested in. You can also subscribe and get new blog posts emailed to you directly.
In this scenario, there is a customer insights journey app with emails available in three languages. The setup involves three separate preference centers, each corresponding to a different language. The English preference center serves as the parent, with the other two duplicating the consent settings from the ‘parent’ preference center.
Specifically, the configuration consists of three identical emails, each in a different language, and each associated with its respective preference center. These elements are incorporated into a journey with three lanes, each tailored to the language preference of the contact.
While contemplating the possibility of simplifying the setup using customized HTML, as exemplified in this blog post, my aim is to find an uncomplicated out of the box solution.
What would you advise in this scenario?
Hi Selim, so are you looking for a way to have one email with different links to the different preference centres for each language? If so, I have not seen a way to do this unfortunately. Although it might be possible, it’s not something I have been able to create yet.
Hi Megan!
Thank you for this great blog, lots of inpiration here. We are looking at a similar scenario, where we want to add JavaScript to Dynamics Customer Insights real-time event registration forms, not only “standard” real-time Marketing forms. The script works as expected on Marketing forms, but seems to be ignored on the event registration form. Are there known limitations here? Any tips or workarounds?
Best regards,
Venke
Hi Venke, I’ve not tried adding JS to the registration forms so not sure, it might be stripped out automatically. Are you embedding the registration form on an external domain? If so, you could try adding the custom script directly below the form script and see if that works.