*** NOTE: ALL INFORMATION IS ACCURATE AT DATE OF PUBLISHING ***
When submitting a Realtime Marketing form, there are two options available in terms of the end user experience for the submitter. You can either display a thankyou message, or redirect them to another page. I’ve written previously about how to display a message and then redirect, and also how to change the default image that gets shown. In this blog, I’ll show how you can display a message and a button that can be clicked to access another page. So consider a form for downloading a white paper. After submitting the form, a button can be shown that the person can click to access a PDF or open a new web page. Let’s take a look!
First we have our Realtime Marketing form. Just a few fields and a submit button. Nothing fancy.

On the form settings area, we can add something to the thank you notification field, or set a redirect after submission. We will leave the redirect turned off, but in the thank you notification field, add the URL where the white paper or eBook is stored (or whatever you want to have someone access after submitting the form). Based on the fact that this value will be ‘displayed’ once the form is submitted, we can use a bit of JavaScript magic to access that URL and use it on a button instead.

Open the HTML of the form. We are using the thank you notification field for the download URL, so we need to set the actual message in another way. To do this, we are adding a few lines to include in a DIV that will be hidden at first using a specific CSS class (hidden-btn), then set to display after the form is submitted. You can see the message in text ‘Thank you for submitting the form. You can access the content by clicking the button below:’. Then a section that will display as a button with the words Download Content on it. Add this just below the opening <body> tag and above the opening <form class-“marketingForm”> element.

Here is the code, feel free to use and then make it your own.
<div id="successMessage" class="hidden-btn">
        <div class="btn-message">Thank you for submitting the form.
            <br>
            You can access the content by clicking the button below:
            <div class="btn-style">
                <button id="download">Download Content</button>
            </div>
        </div>
    </div>
Next we need a script to find the URL we added to the success message field, then remove the CSS class that is currently hiding the DIV above. Finally, we want to make sure that when the ‘Download Content’ button is clicked, the URL that opens is the one we added to the success message field.

Here is the script for you. Assuming you’ve set and named everything the same as me in your DIV, this should work as is for you.
    <script>
        document.addEventListener('d365mkt-afterformsubmit', function (event) {
        event.preventDefault();

        var form = document.querySelector('.marketingForm');
        var redirect = form.getAttribute('data-successmessage');

        document.getElementById('successMessage').classList.remove('hidden-btn');

        document.getElementById('download').addEventListener('click', function () {
            window.open(redirect, '_blank');
        });
    });
    </script>
We’ve got a couple more things to add to the HTML, this time within the <style> section. You can add it to the top of the section. The new styles will do the following:
- .hidden-btn – this will keep the DIV hidden until we are ready for it to be displayed
- .btn-style – this will style the button and make sure the placement is in the middle
- .btn-message – this will style the text of the message that displays above the button

        .hidden-btn {
            display: none;
        }

        .btn-style {
            position: absolute;
            margin: auto !important;
            padding-top: 2em;
            left: 45%;
        }

        .btn-message {
            text-align: center;
            color: #000;
            font-size: 16px;
            line-height: 2.5em;
            font-family: Segoe UI;
            margin-left: auto;
            margin-right: auto;
            padding-top: 3em;
            padding-bottom: 8em;
        }
The following styles all need to be added to make sure that the little icon that shows when a form is submitted is hidden, and the value from the success message field is hidden (which is where we’ve added the download URL to.
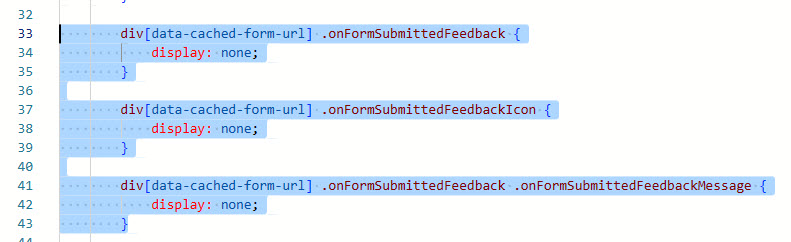
        div[data-cached-form-url] .onFormSubmittedFeedback {
            display: none;
        }

        div[data-cached-form-url] .onFormSubmittedFeedbackIcon {
            display: none;
        }

        div[data-cached-form-url] .onFormSubmittedFeedback .onFormSubmittedFeedbackMessage {
            display: none;
        }
Now go ahead and test it out! You might need to adjust your btn styles a little bit to get the alignment and placement of the message and button looking good on your specific web page, but it should end up looking something like this.

Hope that helps!
Check out the latest post:
Microsoft Collections Alternative Using Raindrop.io
This is just 1 of 590 articles. You can browse through all of them by going to the main blog page, or navigate through different categories to find more content you are interested in. You can also subscribe and get new blog posts emailed to you directly.