*** NOTE: ALL INFORMATION IS ACCURATE AT DATE OF PUBLISHING ***
For my own website, I have a way for people to subscribe to different categories of blog posts. I give them a subscription page and the option to select which types of content to receive. I appreciate that not everyone is interested in all of the areas I cover, so they can select accordingly so that when a new blog post hits my RSS feed, an email goes out to only those who want that kind of content. ClickDimensions has an RSS Feed connector, essentially giving users the ability to create the same kind of experience. D365 Marketing does not, BUT now with Real-time Marketing I figured out a way that we can achieve this. I use WordPress and make sure each blog post has its own category, so I am approaching this from that perspective. Sorry, this is a long one, but there are a lot of important parts to get right to make it work. Read on to find out how!
Subscription Lists
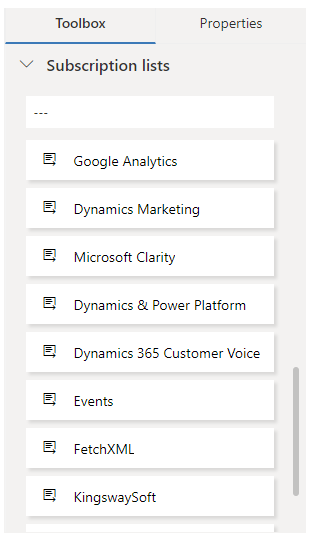
The first thing we need to do is set up subscription lists from the Outbound Marketing area. These are basically marketing lists with a fancier name. For my example, I have set up a different subscription list for each category I have in WordPress. Make sure you keep the subscription list name the exact same wording as you have on your category in WordPress so there is a match (important later on for our customer journey).
We can see now that I have all of my subscription lists set up which matches the list of categories I use for my blog here.
Marketing Forms
Next, we need two different marketing forms created from within the Outbound Marketing area. If you’ve been using D365 Marketing for some time it’s likely you might already have these. One Marketing form is going to be created with the Form type of Subscription center, and the other with the Form type of Landing page. They will be very similar with just a few slight differences which I will point out. The landing page one will be prominent on your website and give people the ability to register and opt-in as a new Contact, so someone signing up to get your content for the first time. The subscription center one will be linked to from the bottom of each blog email that goes out and will give an existing Contact the option to manage their preferences and opt-out if required. Each form will include First Name, Last Name, and Email address. Then, all of the subscription lists created in the last step will need to be added to each form.
It should then look something like this on the form. You can rename the label for the subscription list boxes if you want, and add whatever text is appropriate for the forms.
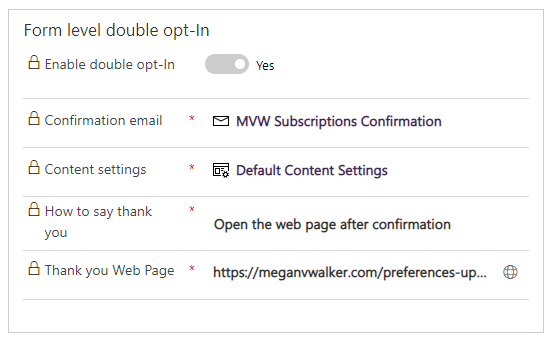
For this one, I would also suggest setting double opt-in. More on this in another blog (coming soon), but make an email that you can use as a confirmation email so that when someone fills out a form their preferences are not updated and set on their record until they have clicked the link to confirm they wanted to opt-in. This will make sure a cookie is set in their browser (which tracks email opens etc. against their Contact record) unless of course, they are blocking all cookies.
On the form that has the type of Subscription center you will also need to add the Do not email me form field, which maps to the Do not allow Bulk Emails field on a Contact record. This gives the Contact the ability to opt-out if they want to stop getting content from you. The Prefill fields on the Summary tab will be set to Yes. For this one
The landing page type form can be identical but does not need the do not email form and the text on the button can be worded slightly differently from the subscription center form. The prefill fields on the Summary tab will be set to No.
Finally, to get the forms live on your website, I suggest using form hosting and add the script that is provided. This is generated once you have made the form live, then clicked on the form hosting tab that appears. Click New Form page and save the record. Go into it by clicking on it’s name in the grid, then copy the code and add it to your website (or ask your site administrator for help!). For me, this is the best and fastest way for getting your marketing forms on your site all while keeping your branding consistent. Do this with both forms, adding to two separate pages and making note of the urls. I would suggest the one that is the subscription center form you add to a page that you then exclude from being found on your site search and block from being found on search engines. The other page you can link somewhere on your website to encourage people to sign up and subscribe to your content.
Event Triggers
Next, we need to create an event trigger in Real-time Marketing. In the Event triggers area, click on New event. This is where we will set up the trigger that will gather up information about a new blog post from an RSS feed that we can then use in a marketing email and a journey. Give the trigger a title and a description.
At the bottom of the screen is where we will add the attributes. These are going to be the fields where we store information from the new blog post in an RSS feed. What you can get from the feed depends on your own website, but for me, I am going to store the post title, description, category, and URL. Move on to the next screen.
For the next screen, just ignore this and click Next. We are not doing anything with code here.
Finally, mark it as ready to use. Until this is done it cannot be used anywhere else within the system. You are now done with the Event trigger.
Real-time Email
Now that the Event trigger is live, the next thing to create is an email in the Real-time Marketing area. Creating emails here is very similar to in Outbound Marketing but now when adding personalisation we get access to add in values from an event trigger. Set up your email and make sure you add in the Post Title, Post Description, and Post URL at a minimum. This is the email that will let someone know about your new blog post. Simply select from the Personalisation button like you would in Outbound Marketing, but look for the Event trigger section and then the new Event trigger you created.
After adding Post Title, you can highlight it, then click on the link option, and then look for the Post URL value from the trigger. This will mean the Contact can click on the post title and it will open up a browser to access it.
At the bottom, add in something like ‘Update or Manage your preferences’. Then highlight it and add in a URL, and put the URL from your website where you added your marketing form that is the type of Subscription Centre. The message designation (in Email Settings) has been set as transactional. I view this as I am sending it because someone has requested it, but you need to make your own decisions and check with laws in your area as to how you can handle this.
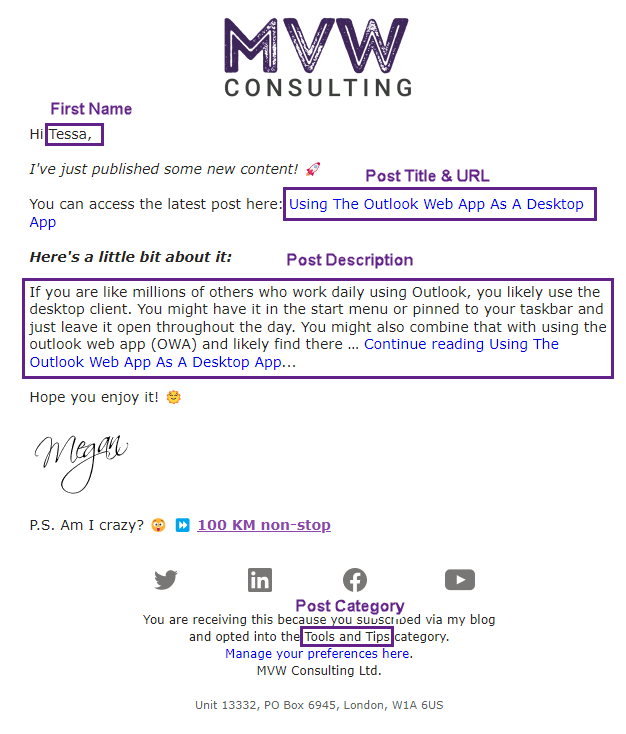
This is my final email template example. I’ve also included the category at the bottom of the email to make it clear to the email recipient why they are getting the email from you.
Power Automate Flow
In order to make the Event trigger run, we need to create a flow using Power Automate. The first initial step is a trigger from the RSS Feed connector when a feed item is published. Put in the URL for your RSS feed.
Next, I have three actions called Initialise Variable. This is to pass through values from the feed. I want to keep it all neat and clear. Give each variable a name and add the right value from the RSS feed step above. I’ve got Feed Title, Feed URL, and Feed Summary (which is the description in my email template). All three are the type of string.
Then I have two more Initialise Variable steps but this time I am not populating them with anything yet. One is for Category and the other for Marketing List. Both are the type of string.
Next, we need an Apply to each step. Add Feed categories into the output box. In theory, you could have more than one category on a blog post which is why this is needed. I only ever put one category on my blog posts which is why this whole process can work well. If you do more than one, sorry, you are on your own with the best/right approach! Now add an action called Set Variable. Pick the Category variable from the list, and then use Current item from the list of dynamics variables.
Remember when we set up the subscription lists? And we gave them the same name as categories in WordPress? Well, now we can do a List rows action to find the right marketing list that has the same name as the category on the new blog post from the RSS feed. Look for the table name of Marketing Lists and in the filter rows field, put (listname eq ”) and make sure you add your Category variable in between the single quotes.
In the next step, we are going to do another Apply to each. We want to put the marketing list id into the Marketing List variable. So look for value (which has come from the step above when you searched for the Marketing List), add that to the output box, then add a Set Variable action. Select Marketing List from the drop-down, and then put the Marketing List guid value that came from the step above. Now we can use this value in the next step without getting all tied up in Apply to each steps that confuse things.
Now we need another List rows action to find all of the Contacts who are a member of the Marketing List we found above. There are various ways you could set your query, and it doesn’t have to be exactly the same as below, but you need to use your Marketing List variable within it so you are only pulling Contacts who have subscribed to the Subscription List with the same name as the Category on the blog post in the RSS Feed.
Here is the FetchXML Query I used.
<fetch version="1.0" output-format="xml-platform" mapping="logical" distinct="true">
  <entity name="contact">
    <attribute name="fullname" />
    <attribute name="contactid" />
    <attribute name="emailaddress1" />
    <order attribute="fullname" descending="false" />
    <link-entity name="listmember" from="entityid" to="contactid" visible="false" intersect="true">
      <link-entity name="list" from="listid" to="listid" alias="ad">
        <filter type="and">
          <condition attribute="listid" operator="eq" value="{@{variables('Marketing List')}}" />
        </filter>
      </link-entity>
    </link-entity>
  </entity>
</fetch>
The final step will be another Apply to each, putting the value output from the last step above where you found the Contacts. For each contact we find, we are going to do a Perform an unbound action step. In the Action name, you should be able to find the name of the Event trigger you created earlier. This takes A WHILE for the list of actions to open, so be patient. Now you should be able to see where I have used the variables to populate the Category, Post description/summary, title and URL. For the signalingestiontimestamp and the signaltimestamp you can paste in @{utcNow()}. For the signaluserauthid and the profile id, search for Contact and use the value from the List rows step where you searched for the Contact records. Save the flow.
Real-time Journey
The last piece that needs setting up is actually the quickest and smallest bit to set up. In the Real-time Marketing area, create a new Journey. Give the journey a name and set it as Event-based. Then on the right side, pick the Event trigger that was created earlier. Make sure it is set to repeat immediately which means a Contact can go through it over and over again for each new blog post you publish that goes into the RSS Feed. Set the start date and click Create.
After it’s been created with the Event trigger as the starting point, it only needs one other step, and that’s to send an email. Pick the RSS Feed Subscribers email that was created from the Marketing Email step.
Final Email & Subscription Page
Now when a new blog is published, it hits the RSS Feed which in turn triggers the flow in Power Automate to begin. The flow then reaches the end of the flow where it performs an unbound action for each Contact who has subscribed to that particular blog category and that puts them into the Journey. The Contact is then sent an email that is customised with all of the details about the blog post. You can see below the first name, post title and URL, post description, and post category included in the email.
If the Contact clicks on the Manage your preferences here link, which will take them to the page on my website with the Marketing form of form type Subscription centre, the form will be pre-filled. Remember, this is only the case if they allow cookies on their browser. It will also show everything they are currently subscribed to. That way they can pick and choose to add/remove or unsubscribe altogether if they choose.
Phew! This was LONG! Lots of steps, but this creates a great process where your emails can be going out automatically, and your Contacts and add and remove themselves from the various subscription lists you have set up. Fantastic! Just how it should be.
You can watch a video on this here.
Check out the latest post:
Assign Records To A User Or A Team From Your Custom Page
This is just 1 of 571 articles. You can browse through all of them by going to the main blog page, or navigate through different categories to find more content you are interested in. You can also subscribe and get new blog posts emailed to you directly.


Thank you Megan for your awesome content! I have been learning to build my very first Real-Time Marketing trigger, and you blog posts and your A-Z for Real-Time Marketing have been super useful. I would have NEVER gotten this far without them. Thank you!
I have one question though concerning the “Perform an unbound action”-step. It seems to have a a new field called msdynmkt_bindingid at the very bottom of the list. Do you happen to know what we are supposed to put in that field or can it be left blank? I suspect you can leave it blank since it was so also in your example screenshot above, but just double-checking 🙂
Hi Tiina, you are very welcome! So happy my content has been useful and helped you learn and create more in the D365 Marketing App. For that field you can leave it blank. I will likely have a blog post in the future that shows what you could do with it, but for now you can take a look at this post within the Microsoft documentation. In brief, it allows you to start a trigger and pass the bindingid to make sure it stops the right journey that a Contact is going through. So consider someone going through a Journey about an Opportunity, and you have another trigger that fires when an Opportunity is closed? You could use that second Trigger as an Exit mechanism, and based on the binding ID being the same in a journey it would know to stop that instance of the Journey. Hope that makes sense! https://docs.microsoft.com/en-ca/dynamics365/marketing/real-time-marketing-correlate-triggers
This is really good and helpful!
How about if you want do send a confirmation-email with all the subscription lists (themes) the contact has chosen? For a new subscriber or when a contact make changes in the subscription center?
I can’t find a solution for this. I thought you might have a good answer 😉
Hi Marie, I don’t have a good answer in terms of a blog to direct you to. But you would need to add double opt in on your marketing form you use for your Subscription center. When you set that, you will then need to determine the confirmation email to use. The confirmation email will need to be a Confirmation request content type. You will need to include the personalisation of {{FormDoiSubmission.ConfirmationUrl}}. You can also use {{FormDoiSubmission.SubscriptionListNames}} which should then show a bulleted list of what was subscribed to. Here is the page in the Microsoft documentation that refers to this: https://docs.microsoft.com/en-us/dynamics365/marketing/form-double-opt-in Hope that helps!
Hi Megan
Is it possible to create an e-mail with more then one article in the mailing
So the mail woulde be
##RSS ITEM title ##
## RSS ITEM tekst ##
readmore
and then the next content block:
##RSS ITEM title ##
## RSS ITEM tekst ##
readmore
Hi Jet, I’ve not tried it, did you? I don’t know if it’s possible. Give it a go and share your results!