*** NOTE: ALL INFORMATION IS ACCURATE AT DATE OF PUBLISHING ***
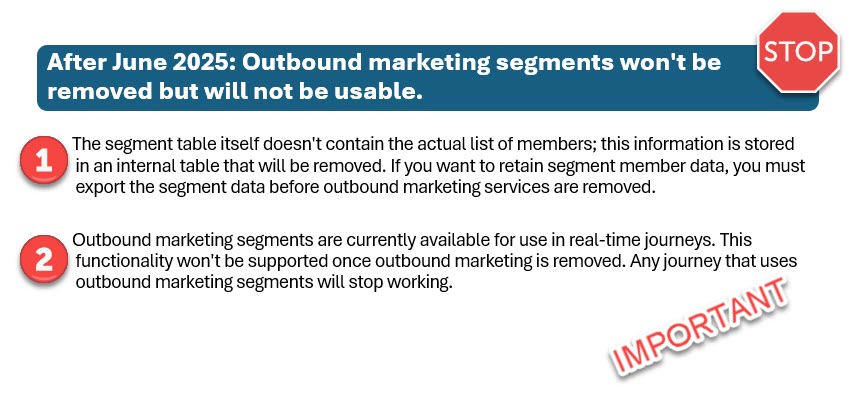
If you are using Customer Insights – Journeys and have used it in the D365 Marketing days, you MUST be aware that come June 2025, Outbound Marketing will cease to exist. This means no more Outbound Emails, Outbound Journeys and most important, no more Outbound Segments. This is particularly significant because you can currently access your Outbound Segments in Real-time AND can using them in a Real-time Journey. It’s easy to see that you could relax and forget about them. In an effort to help those that are not sure what Journeys might be using Outbound Segments, or you want to know if any of your users create or are using Outbound Segments in Real-time, this post will show you how you can create an email notification to let you know about them!
The information about the segments not being available after June 2025 comes direct from Microsoft, which you can find here in their Real-time journeys transition FAQ’s.
Understanding How Segments Work
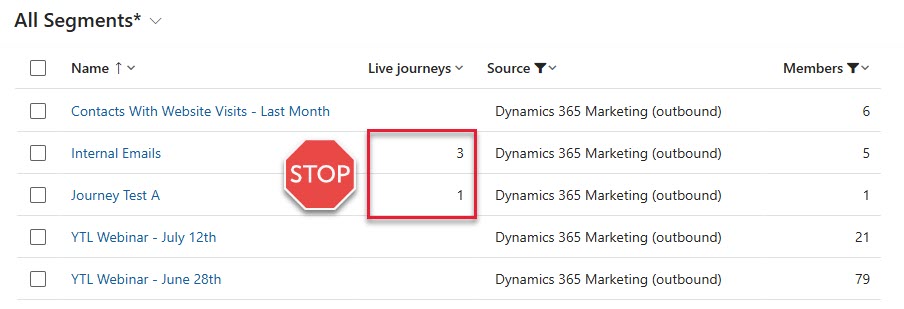
First let’s look at the structure of your Outbound Segments when you review them from the Outbound area. We can see the number of Live Journeys that are using the Segment, and also the Source will show as Dynamics 365 Marketing (outbound).
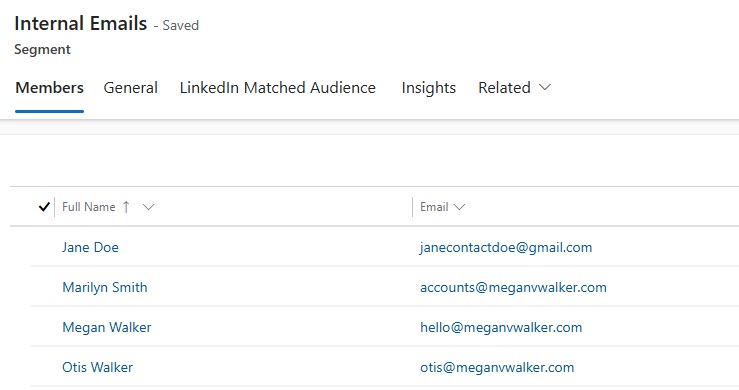
If you click on the name of the Segment you are taken to the segment overview where you could edit it and see the members. This uses the msdyncrm_segment table. If you did the same thing on one of your Real-time Segments and looked at the URL you would see that it uses the msdynmkt_segmentdefinition table.
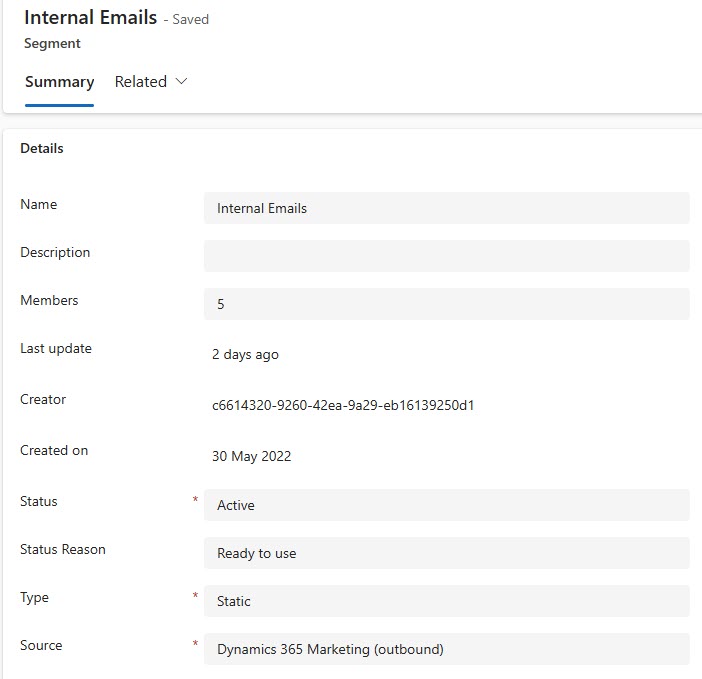
However, if you right click on the name of the Outbound Segment and open in a new tab, it takes you to this instead which is a record from the msdynmkt_virtualsegment table. Digging in to the fields used on the table, there is a msdynmkt_sourceentityid field which stores the GUID (unique id) of the Segment. So for each Segment we look at, regardless of it being Outbound or Realtime, there is a link between either the msdyncrm_segment table and the msdynmkt_virtualsegment table (OBM) or the msdynmkt_segmentdefinition and the msdynmkt_virtualsegment table (RTM).
Creating Your Flow
If you want to copy and paste the code I’ve shared, you MUST make sure you rename your steps in the same way I have, so if you are new to this, follow exactly. If you aren’t new to flows, you know what to do (I hope!). 😉
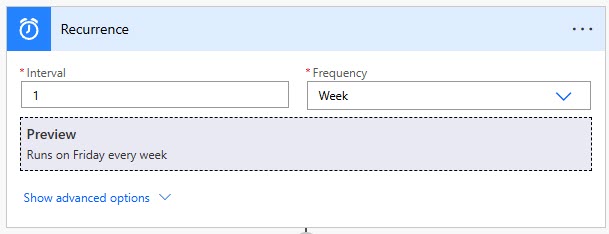
The first part you can decide how often you want to get notified. Suggest weekly as hopefully you won’t need to have this flow running for long as your users start to get used to the change and build their Outbound Segments again using Real-time. Mine will go on a Friday morning at 10 AM
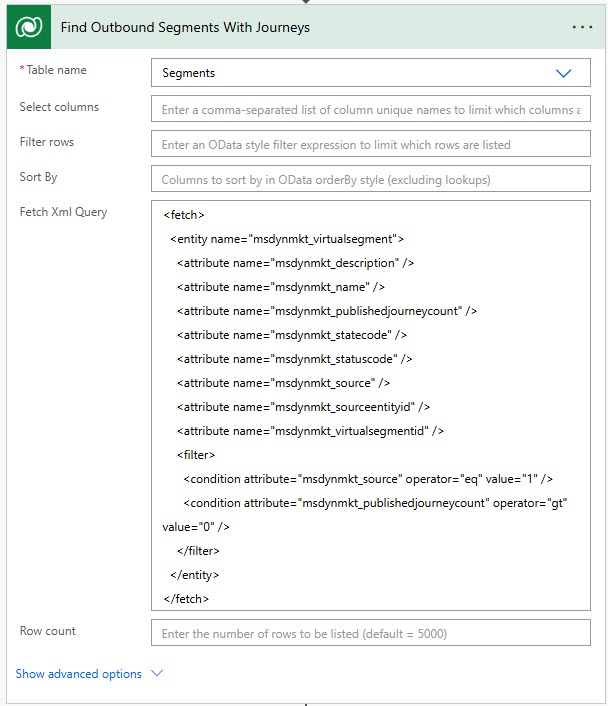
The first action is a List rows step to find any Segments where the Source is 1 (meaning it was created in Outbound) and the Published Journeys count is greater than zero. Make sure when adding the table you pick the right one as there are 4 names Segments. You can click the three dots menu and click Peek code to make sure it is the msdynmkt_virtualsegment table. Mine was the last one in the list if that helps!
<fetch>
  <entity name="msdynmkt_virtualsegment">
    <attribute name="msdynmkt_description" />
    <attribute name="msdynmkt_name" />
    <attribute name="msdynmkt_publishedjourneycount" />
    <attribute name="msdynmkt_statecode" />
    <attribute name="msdynmkt_statuscode" />
    <attribute name="msdynmkt_source" />
    <attribute name="msdynmkt_sourceentityid" />
    <attribute name="msdynmkt_virtualsegmentid" />
    <filter>
      <condition attribute="msdynmkt_source" operator="eq" value="1" />
      <condition attribute="msdynmkt_publishedjourneycount" operator="gt" value="0" />
    </filter>
  </entity>
</fetch>
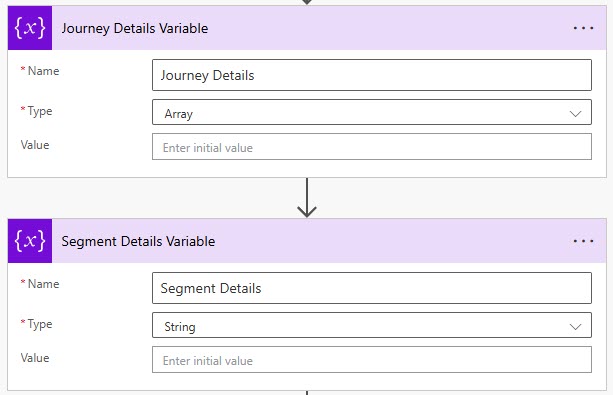
We also need two variables (use Initialise variable step) so that we can put together a table for each segment clearly showing what Journeys are using them. Create the first one for the Journey Details which will be an Array, and the second one for the Segment Detail which will be a String.
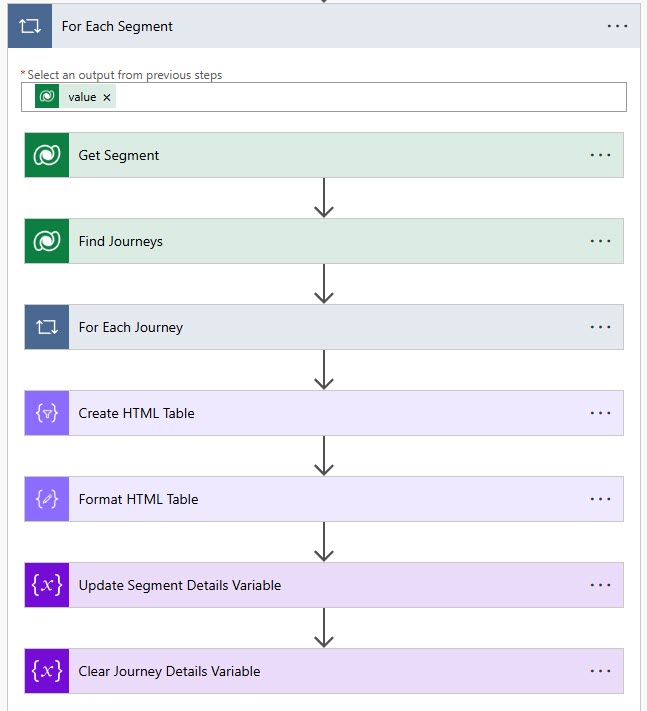
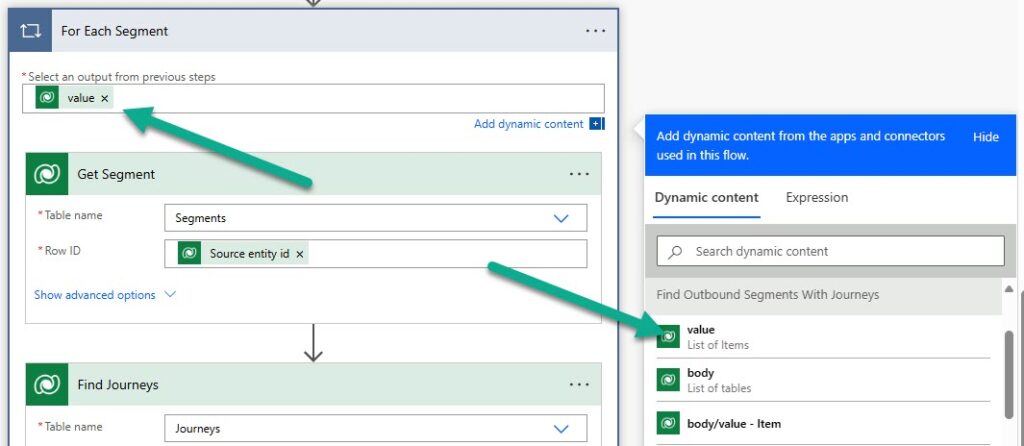
Now add an Apply to each step. The steps within it will run for each Segment found in the initial List rows step.
The start of the Apply to each needs the value (list of items) from the List rows step added as the output.
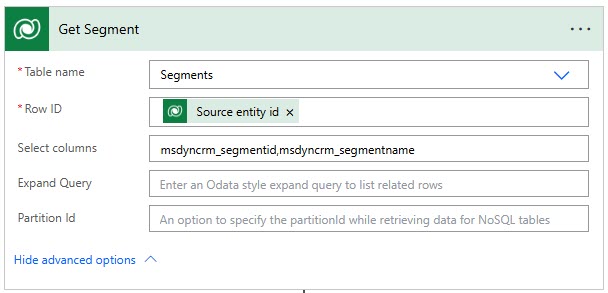
The next step is a Get row by id action. We are doing this so that later on we can create a hyperlink to add to the email so you can click on the link and go direct to the Segment referenced. The table is also Segments but this one we need the msdyncrm_segment table as we need to find information about the Outbound Marketing segment being used in the Journeys. Use the Select columns option to only return the following fields: msdyncrm_segmentid,msdyncrm_segmentname. We will use these later on.
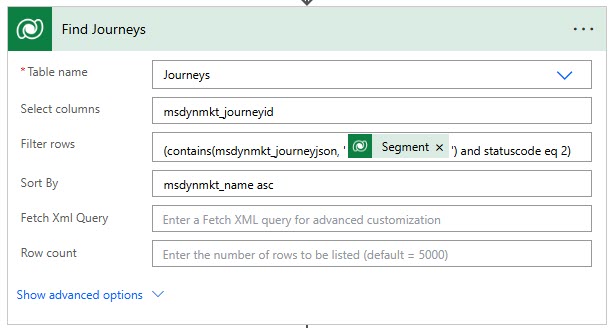
Now for the Segment we need to find what Journeys are using it. To do this we have another List rows step on the Journeys table. For now, just add msdynmkt_journeyid to the Selected columns so we can make sure the GUID of the Journey is returned. The Filter rows logic is below, and you can sort it by the name of the Journey using msdynmkt_name asc in the Sort By option. The filtering is searching something stored on each Journey when you create it, the Journey JSON. There are many places a Segment can be used, so we are just searching to see if the id of the segment is used anywhere in the Journey.
(contains(msdynmkt_journeyjson, '@{items('For_Each_Segment')?['msdynmkt_virtualsegmentid']}') and statuscode eq 2)
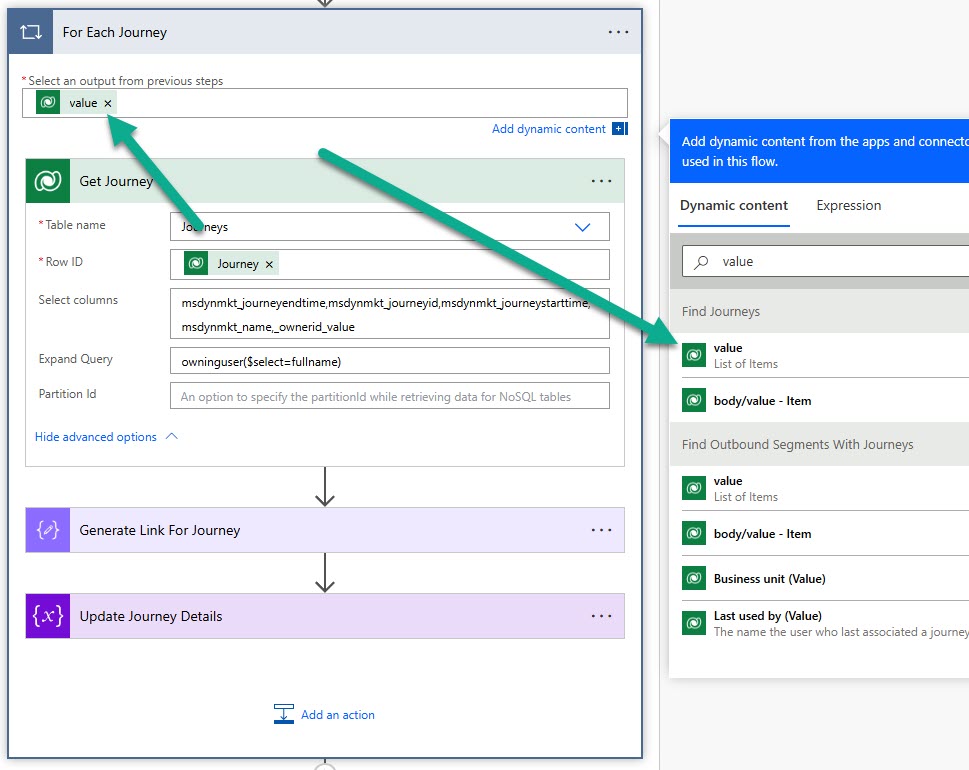
Now within the Apply to each for the Segment, we need to do an Apply to each for the various Journeys that might be using that Segment. So add another Apply to each and select the value output from the Find Journeys step. The first action will be Get row by ID which is getting the Journeys record. So add the Journey identifier from your Find Journeys action as the Row ID. We only got the ID in the List rows step rather than all of the other fields we want to show in the email, and that’s so we can create a unique URL to click on the name of the Journey to get to it from our email. Doing that from a Get row by ID step is a whole lot easier. It’s up to you what you want to add to your email but I am going to show the name (and hyperlink) of the Journey, start time, end time and owner. To do this, add the following to the Select columns: msdynmkt_journeyendtime,msdynmkt_journeyid,msdynmkt_journeystarttime,msdynmkt_name,_ownerid_value – and this in Expand Query to get the full name of the Journey Owner: owninguser($select=fullname)
The next step will allow us to compose a URL that we can use in the email so you can click on the name of the Journey and open it directly in D365. It’s built dynamically so you can move it between environments without having to edit the flow each time. We also need to wrap some HTML around it so the link isn’t broken when we start building our table for the email. So using contact in our expression will take care of that for us. We are getting the link from to the environment from the Get Journey step, then adding in part of the URL that sets the correct entity name, then passing through the GUID of the Journey. Using HTML to create a hyperlink, we are using the Journey Name from the Get Journey step which is what oyu will be able to click on. Add this to a Compose step.
concat(
    '<a href="https://',
    uriHost(outputs('Get_Journey')?['body/@odata.id']),
    '/main.aspx?pagetype=entityrecord&etn=msdynmkt_journey&id=',
    outputs('Get_Journey')?['body/msdynmkt_journeyid'],
    '">',
    outputs('Get_Journey')?['body/msdynmkt_name'],
    '</a>'
)
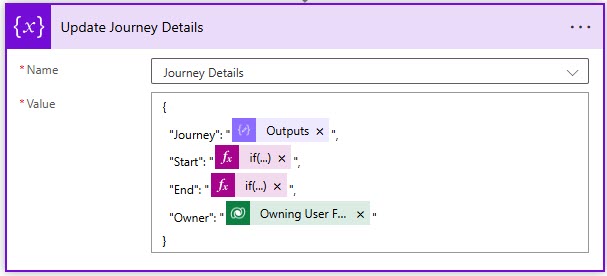
This one is our last step in the Journey Apply to each action. This is where our Journey Details variable comes in. We need an Append to array variable step. We are essentially building the header and rows in our Journey table.
- Journey – this uses the Output from the Compose step above
- Start – this is the start date/time of the Journey we are getting from the Get Journey step, then formatting it to show the date, time and AM or PM
- End – this is the start date/time of the Journey we are getting from the Get Journey step, then formatting it to show the date, time and AM or PM. If empty, it will show N/A
- Owner – the name of the Owning User from the Get Journey step
{
  "Journey": "@{outputs('Generate_Link_For_Journey')}",
  "Start": "@{if(empty(outputs('Get_Journey')?['body/msdynmkt_journeystarttime']), 'N/A', formatDateTime(outputs('Get_Journey')?['body/msdynmkt_journeystarttime'], 'yyyy-MM-dd hh:mm tt'))}",
  "End": "@{if(empty(outputs('Get_Journey')?['body/msdynmkt_journeyendtime']), 'N/A', formatDateTime(outputs('Get_Journey')?['body/msdynmkt_journeyendtime'], 'yyyy-MM-dd hh:mm tt'))}",
  "Owner": "@{outputs('Get_Journey')?['body/owninguser/fullname']}"
}
Now we are outside of the Journey Apply to each, but still inside the Segment Apply to each. We need to take the details that were added to the Journey Detail variable above and use it to create a table. There is an action named Create HTML table. Add that and then add the Journey Details variable to the From value. You can leave Columns as Automatic.
Now we can do a bit of formatting by adding the html table output and some CSS to another Compose step. Not going to go in to that here, but be sure to check out a post from my good friend Ryan Maclean where he explains it all. Essentially you are setting your styling at the top of your compose step, then adding the Output from your HTML table below it which will style the table with some nice colours and formatting.
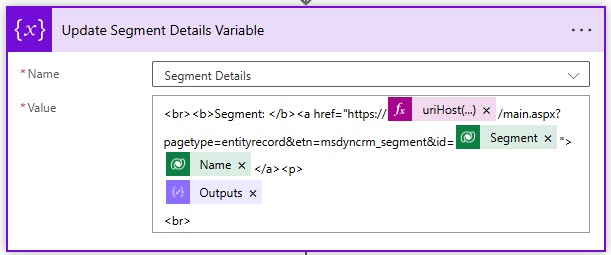
Now we need to put the details for the Segment together with the table for its related Journeys. This action is the Append to string variable where we update the Segment Details variable. Here I am adding a combination of an expression, some HTML for styling and line breaks, and the output of the Compose step above where we formatted the table. You can see the creation of a URL with a link to the Segment that will be accessed when clicking on the name.
<br><b>Segment: </b><a href="https://@{uriHost(outputs('Get_Segment')?['body/@odata.id'])}/main.aspx?pagetype=entityrecord&etn=msdyncrm_segment&id=@{outputs('Get_Segment')?['body/msdyncrm_segmentid']}">@{outputs('Get_Segment')?['body/msdyncrm_segmentname']}</a><p>
@{outputs('Format_HTML_Table')}
<br>
The final step of the Apply to each for the Segment is very important. We need to clear out the Journey Details variable. If you don’t, this will keep getting Journeys added to it as the flow goes through all of your Segments which will result in an email showing each Segment with an increasing number of Journeys. We don’t need to clear out the Segments variable because that only gets used once each time the flow runs. So add an action called Set variable, pick the Journey Details variable and then an expression of null for the value.
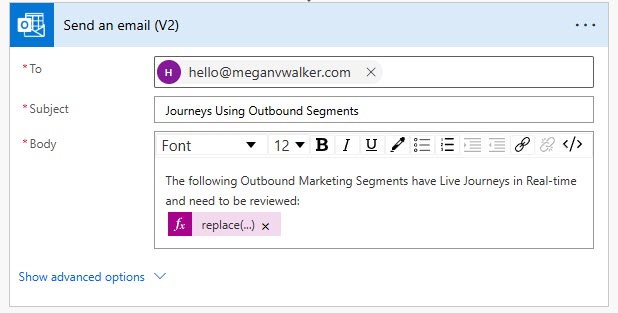
This last step is OUTSIDE of the Apply to each right at the end of your flow. Add an action from the Outlook connector for Send an email. Put the to address where you want it to go and add a subject. In the Body, add whatever you want to say before the list of Segments with their Journeys. Then rather than just adding the Segment Details variable directly, we need to make sure we clean up something that can happen when we do the Append to array variable that relates to the links for each Segment. Because we are then putting it in to an HTML table, it can do funky things, so we are making sure we remove anything that has had strange characters instead of the correct encoding. Use this as an expression below the text you want in the body of the email.
replace(replace(replace(variables('Segment Details'), '<', '<'), '>', '>'), '"', '"')
The Final Email
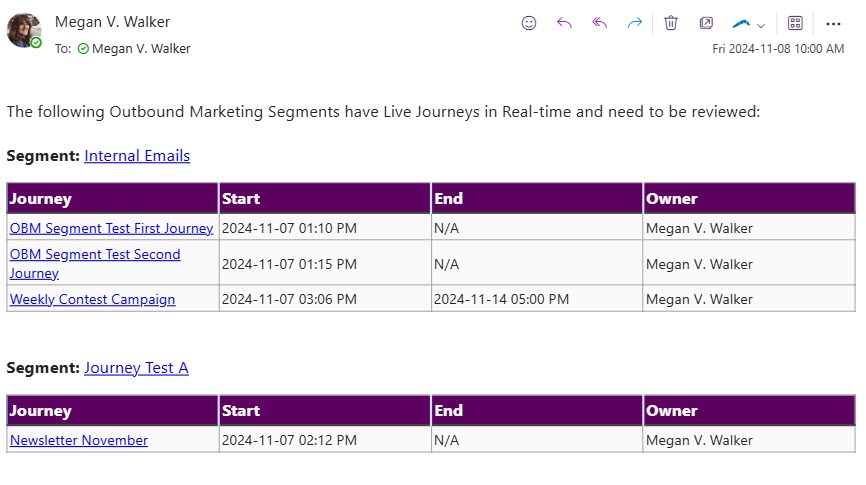
Here is the final email. We can see each Segment listed with the name of it being a hyperlink which opens the correct record in D365. Below each Segment we have a table of all the Journeys where it is used. The name of each Journey is a hyperlink which opens the correct record in D365. I really need to have a word with that Megan V. Walker! It’s time to STOP USING OUTBOUND SEGMENTS!!!
Check out the latest post:
Setting Up reCAPTCHA v2 For Your Realtime Marketing Forms
This is just 1 of 571 articles. You can browse through all of them by going to the main blog page, or navigate through different categories to find more content you are interested in. You can also subscribe and get new blog posts emailed to you directly.

