*** NOTE: ALL INFORMATION IS ACCURATE AT DATE OF PUBLISHING ***
Back at the start of 2022, when Realtime Journeys and Triggers were just getting started, I wrote a post all about D365 Real-time Marketing, RSS Feeds & Subscription Centres. It gave you a way to create a Journey that would send an email out when you posted a new blog on your website to all those people who had subscribed and were included in a Subscription List. Moving on from that, we no longer use Subscription Lists with Real-time, and this time it’s all about Purposes and Topics and people Opting In or Opting Out. So how can you send out emails when you have a new blog post published? This post will show you how.
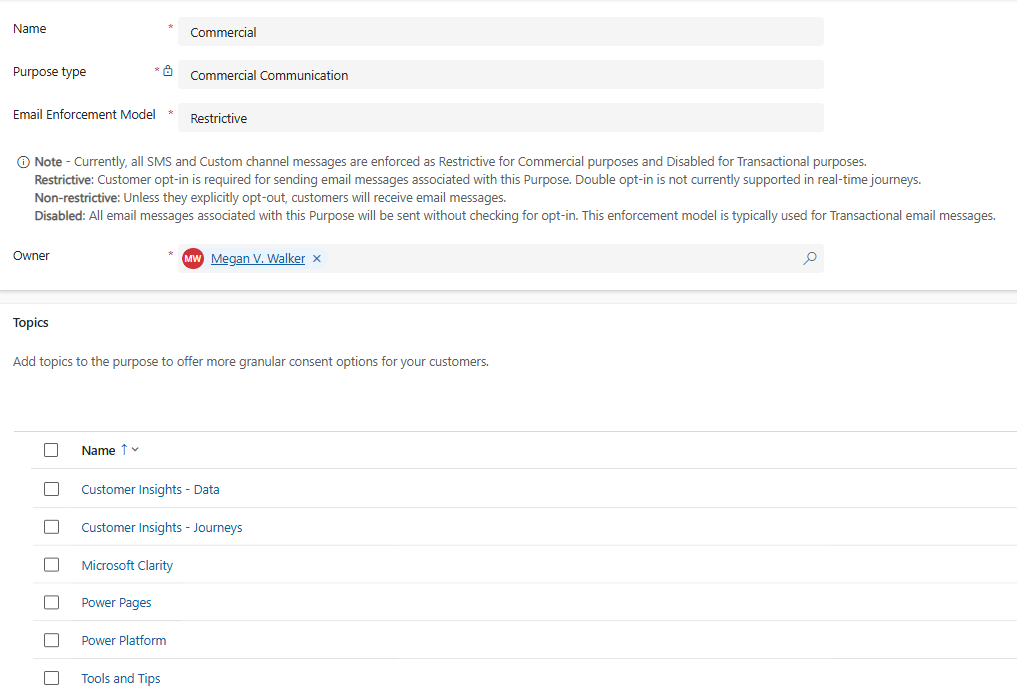
First, set up your Compliance Profile. I’ve written a ton of content about Compliance Profiles, but this is a good one to start with which is part of a series of 5 posts on the subject. There are various ways you can set it up, and you can also have multiple Compliance Profiles. I’ve added a new one specifically for blog subscriptions and added a new Topic that matches the categories I use on my website when I publish a new post. I can then use these Topics and add them to a marketing form and provide people with a way to initially subscribe via my website. Make sure you also add each of these Topics to the Preference Centre related to your Compliance Profile so people have a way to opt out of different topics again later should they choose.
Notice that I have also set the enforcement model to restrictive. You don’t have to do the same, but I want to make sure it’s only people that have explicitly Opted In who are going to get the blog posts sent to them via email. You would also need to make sure people are opted in to the overall Commercial Purpose too in order for them to still get your emails. Non-restrictive wouldn’t enforce that so opting in to only a Topic would still allow the emails to go through. Check with your legal team if you are unsure which enforcement model is right for you!
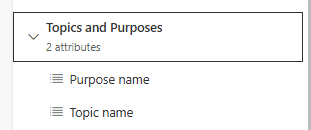
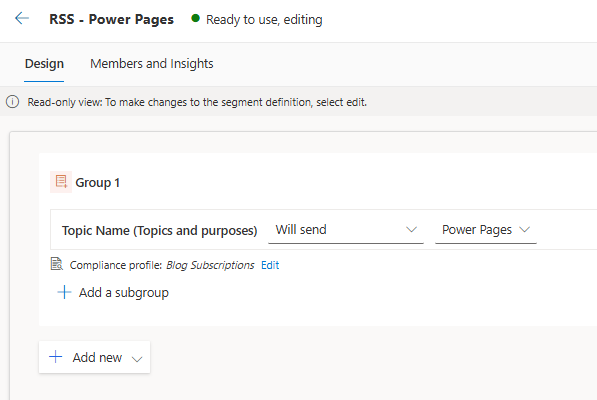
Next we are going to create 1 Segment per Topic. Create a new segment in Real-time and make sure the segment name includes the name of the category that will be on your blog post. Without the match, there will be no way to figure out which Segment of people we need to use to send out the blog post to. I’ve included the word RSS in mine just so I can group them all together, but when I search for them later, I will still only be using the Category name to find the right one. Look for the Topics and Purposes table on the right and then click on Topic name.
Select the new Compliance Profile you added, and then pick the correct Topic from the list that appears. We want the Segment to only include the people we will be able to send emails related to this Topic to. And because we’ve set things as Restrictive, we will only ever get the people who are still Opted In. If you have a few of these to create for each Topic, just make the first one live, then do Create a copy from the top of your live segment. Be sure to change the name of it, and then set the different Topic to use.
Ok so the next thing we need to is create a Trigger that we will use and fire when there is a new post added to the RSS feed of our website. In the Event triggers area, click on New event. This is where we will set up the trigger that will gather up information about a new blog post from an RSS feed that we can then use in a marketing email and a journey. Give the trigger a title and a description.

At the bottom of the screen is where we will add the attributes. These are going to be the fields where we store information from the new blog post in an RSS feed. What you can get from the feed depends on your own website, but for me, I am going to store the post title, description, category, and URL. Move on to the next screen.

For the next screen, just ignore this and click Next. We are not doing anything with code here.

Finally, mark it as ready to use. Until this is done it cannot be used anywhere else within the system. You are now done with the custom trigger.

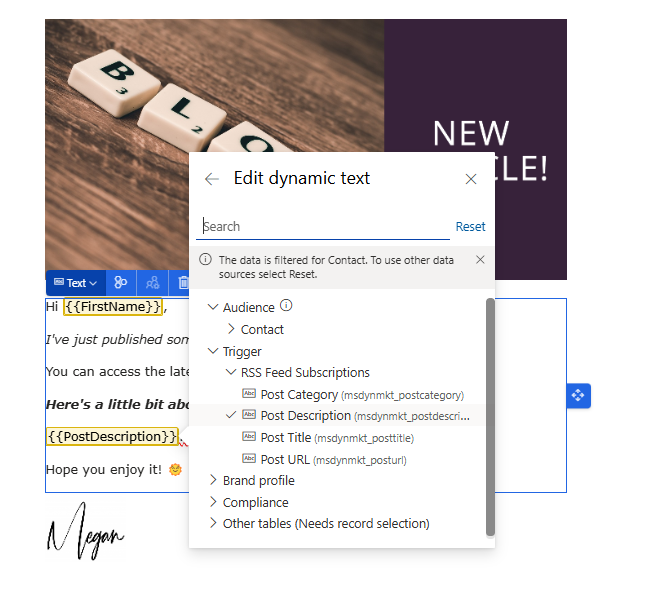
Now that the trigger is live, the next thing to create is an email in the Real-time Marketing area. We can get access to add in values from the custom trigger. Set up your email and make sure you add in the Post Title, Post Description, and Post URL at a minimum. This is the email that will let someone know about your new blog post. Simply select from the Personalisation button like you would for any other attribute, but look for the trigger section and then the new trigger you created. For the Post Title, after adding it, you can highlight it, then click on the link option, and then look for the Post URL value from the trigger. This will mean the Contact can click on the post title and it will open up a browser to access it.
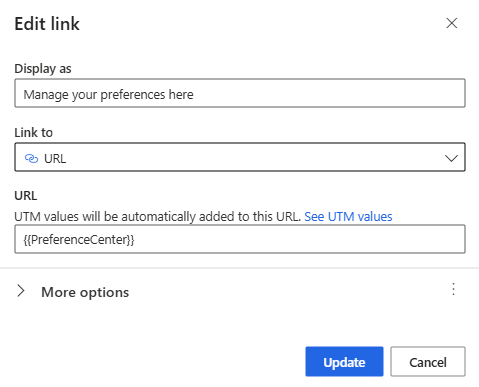
At the bottom, add in something like ‘Update or Manage your preferences’. Then highlight it and add a hyperlink. Make sure that you set the link dynamically and link it to the Preference Centre that is tied to the Compliance Profile linked to your email.
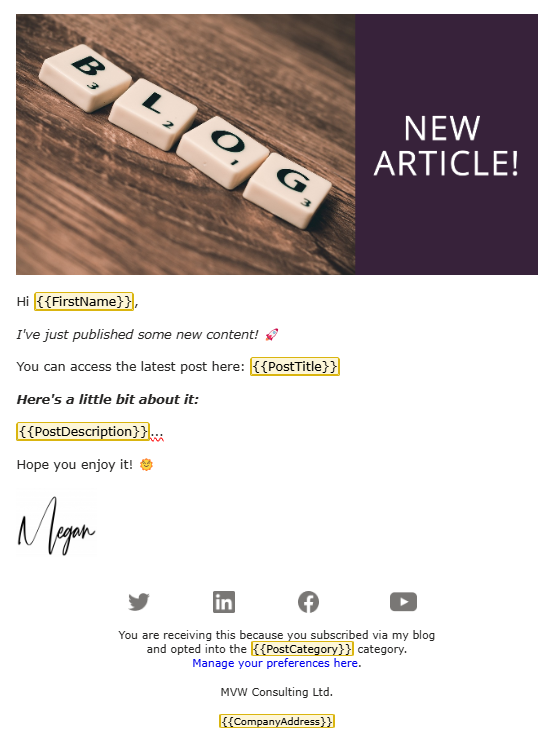
This is my final email template example. I’ve also included the category at the bottom of the email to make it clear to the email recipient why they are getting the email.
Now that we have the trigger and the email, we can put these together and create a very simple Journey that fires from the Trigger.
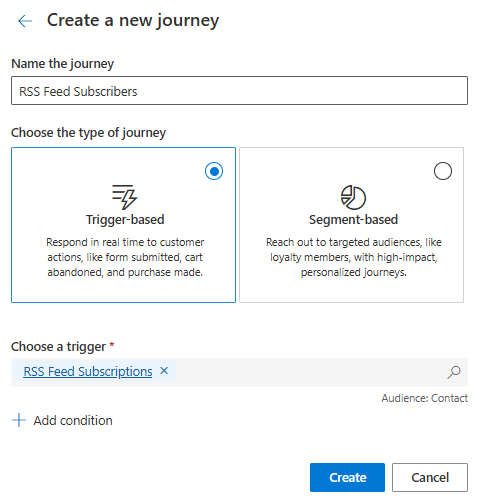
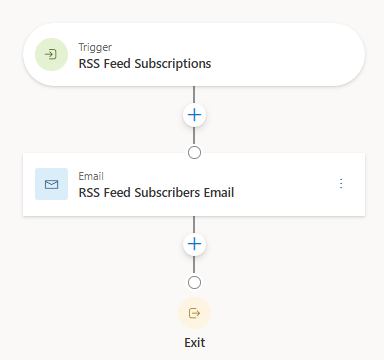
Your journey is then as simple as this. Just set the email. You might want to leave quiet times on if for example you post blogs at random times and over weekends, and wouldn’t want the emails to go unless it is one a week day. You might also want to turn off Frequency Caps for this Journey too.
So now in order to make the trigger run, we need to create a flow in Power Automate. The first initial step is a trigger from the RSS Feed connector when a feed item is published. Put in the URL for your RSS feed.

Now this next part isn’t immediately obvious, we need to find all of the people from our Segment. If it was an old Outbound Marketing Segment, no worries at all, we can find them via a marketing list. The Realtime Segments are different with no way to do that in Dataverse using a List rows step. After searching a bit, I found this article – Create a Customer Insights – Journeys segment using the Web API – Dynamics 365 Customer Insights. I set about reading it, and then thought, I wonder if my good friend Amey Holden has used this before, and praise be, she had and I found this post from her – Use interaction data from Dynamics 365 Marketing emails in Power Automate — Amey Holden. Makes it much easier to follow along when someone else has done the heavy lifting already!
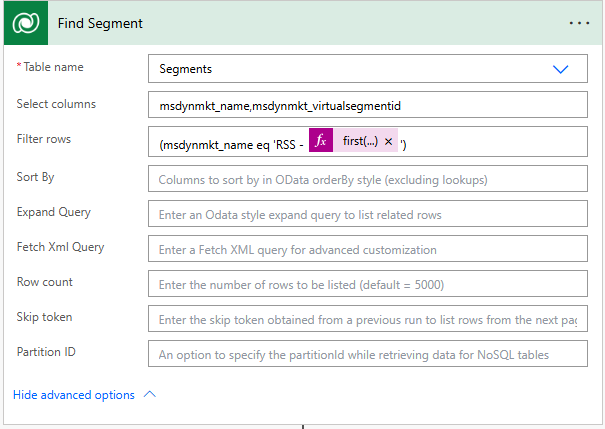
So based on her post, I knew that I needed to get the msdynmkt_virtualsegmentid to then be able to find the right related segment. In my scenario, the segment I am looking for also includes the name of the category that is pushed through via the RSS feed. I am going to use an action of List rows from the Dataverse connector and the table name of Segments. HOWEVER…. make sure you pick the correct one (you can confirm by selecting the table and then clicking peak code from the ellipsis menu). You need to make sure the Segments table you pick is in fact the msdynmkt_virtualsegments table for it to work.
This is the expression I am using, where I am getting the name of the first (and only in my case) category used on the blog post found in the RSS Feed via the trigger step. I don’t need all of the data from that table, so I am just selecting these two columns to be returned: msdynmkt_name,msdynmkt_virtualsegmentid
(msdynmkt_name eq 'RSS - @{first(triggerOutputs()?['body']?['categories'])}')
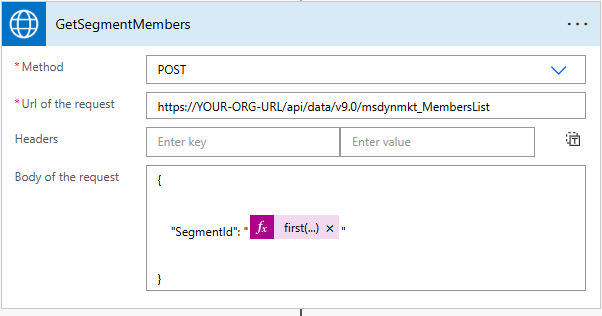
Again, from Amey’s post, we need an action step of Invoke an HTTP request – HTTP with Microsoft Entra ID (preauthorized). Check out Amey’s post if you are unsure or want more info on connecting to it. For the body of the request, you will need to use the following, and replace Find Segment if you named your step above different to mine. We are going to get the virtual segment id from the segment that we found that matched the category of the blog post in the RSS Feed.
{

    "SegmentId": "@{first(body('Find_Segment')?['value'])?['msdynmkt_virtualsegmentid']}"

}
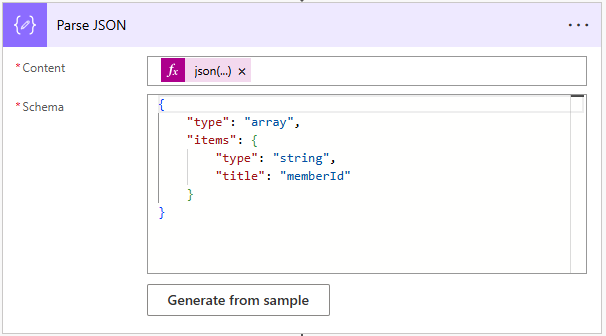
Now add an action of Parse JSON. For the Content value, use the expression below. This means we are just getting the values (GUIDs) of the members in that segment.
@{ json(body('GetSegmentMembers')?['ResultText'])?['members']}
Then use this as the Schema.
{
    "type": "array",
    "items": {
        "type": "string",
        "title": "memberId"
    }
}
Now we need to take each Contact found in the step above, and add them to your Journey. Add in an Apply to each step, and use the Body value from the Parse JSON step.
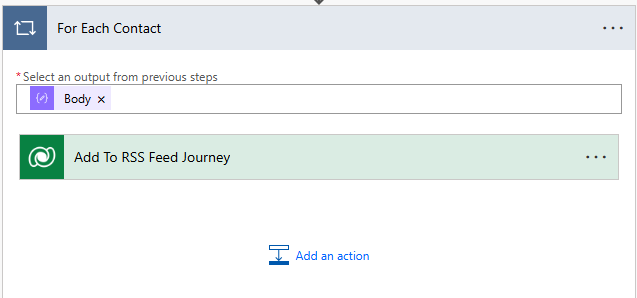
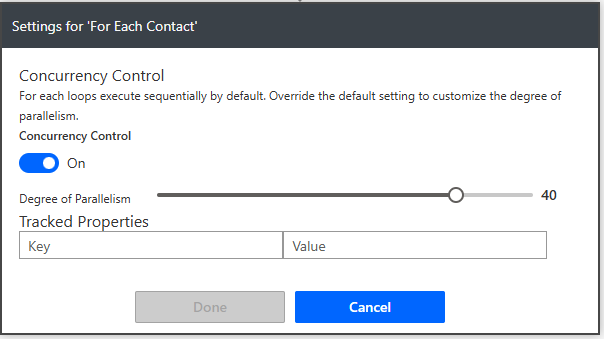
One thing you might want to do is turn on the concurrency control (click the ellipsis on the Apply to each then Settings) which means you can run this part with multiple Contacts being added at the same time. This will make it run faster rather than one Contact at a time.
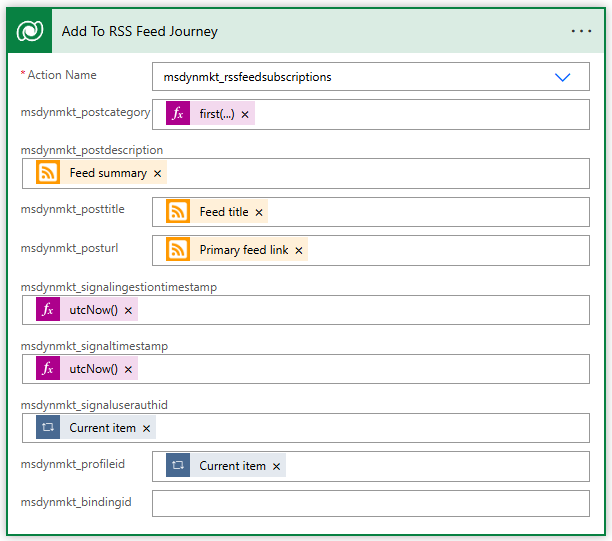
The final action is to add Perform an unbound action from the Dataverse connector. In the Action Name field, start typing in msdynmkt_ which will filter the list. Note that this list can take a while to load so be patient. You should be able to find the custom trigger you create and made live earlier. If you don’t find it, make sure you did actually make it live! Now we need to set the values to pass through to the trigger and add each Contact from the segment in to the Journey. These are the items added and where to get them from:
- Post Category – Use the following expression – @{first(triggerOutputs()?[‘body’]?[‘categories’])}
- Post Description – you can get this from the initial RSS Feed trigger
- Post Title – you can get this from the initial RSS Feed trigger
- Post URL – you can get this from the initial RSS Feed trigger
- Signal Ingestion Timestamp – @{utcNow()}
- Signal Timestamp – @{utcNow()}
- Signal User Auth ID – @{items(‘For_Each_Contact’)}
- Profile ID – @{items(‘For_Each_Contact’)}
Now save your flow and make sure it’s turned on. You should be able to trigger it to fire and assuming you’ve posted a blog recently, it should find it in the feed and run your flow. Here we can see the email sent with all of the populated values that have come from the RSS Feed.

Finally, the person receiving the email can then update which categories they are interested in at any time by clicking on the link to manage their preferences. Hooray!

Check out the latest post:
Assign Records To A User Or A Team From Your Custom Page
This is just 1 of 571 articles. You can browse through all of them by going to the main blog page, or navigate through different categories to find more content you are interested in. You can also subscribe and get new blog posts emailed to you directly.
Hi Megan, thanks for your post. I have created segments based on a topic like you mention in one of the first steps, also using the restrictive model.
But, what I discovered is that the segment also contains member who are opted-out for the purpose above it (although you’ve selected a topic from a restrictive model). This means that the segment itself doesn’t show the correct number and people who will be receiving your email.
Hi Suzanne,
I guess that really depends on how you are managing your ability for someone to opt in or opt out. If you’ve set up the Preference Centre with options to opt in and out of the Topics and then the box for the Purpose, then opting out of the Purpose should opt out of all the related Topics. However, if someone has manually changed and set someone as Opted Out of the Purpose but not adjusted the Topics then I can see how you could see that happening. In that instance, I would suggest setting up your Segment using additional logic like this.
This is so cool. I’m looking to implement this but realised something. Is there a limit to the apply to each power automate step? I’m just thinking how long this flow could potentially run if the segment blows out to a large volumn.
Hi Michael, yeah tricky for larger numbers. You could run it for 5,000 initially but then would need some kind of logic to run using Do Until to get more than that. The other option (although I haven’t blogged it) could be to have a custom table that stores values from the new blog post and updates them (using a flow) then sends a Journey to a segment. I am just not sure of how much that could be automated. However, it’s something I am thinking about and trying to figure out a good approach (so stay tuned!).