*** NOTE: ALL INFORMATION IS ACCURATE AT DATE OF PUBLISHING ***
It always surprised me exactly what content resonates with people the most. I write about lots of different topics, things that interest me and what I think might be helpful. One of the categories of post I started last year was about Microsoft Bookings. It’s a tool providing organisations with a way to book and manage appointments. If you want to know more, you can check out my What Is Microsoft Bookings article which also talks about which plans include Bookings and how to get started. In this post, I’m going to look at how you can create new tasks in Microsoft Planner and assign to the Staff Member who has been selected for the Booking. This concept could in theory be applied to other task management apps, providing there is a connector in Power Automate available (or you are prepared to create your own custom connector). Let’s take a look!
First, we need to go to Microsoft Planner and create a new plan. You can add to an existing group, or create a new one. I’ve selected the same group that is tied to my Microsoft Bookings calendar, but it isn’t a requirement.
The group itself is accessible in the Microsoft 365 admin center under the Active teams & groups area. We can see that there are currently two members of the group. Clicking on View all and manage members gives the ability to add new members to the group.
You can also add new members directly from Planner at the top right of the Plan.
Regardless of where the new members are added, they will end up showing up in both places. You might want to have a couple of buckets depending on your requirements, but at minimum one for To Do tasks and one for Completed tasks.
Now we get into the flow that will allow us to automatically create tasks when a new Booking is scheduled. To do that, we must use Power Automate. The trigger for the flow will be when a new event is added. For each step in my flow, I always rename it to something more logical, but you can see I’ve added a note to show the actual name of the trigger or action. The first thing to do is add a new connection. By default it will connect to the account you are logged in to Power Automate with. However, we need to log in to the user account linked to the Bookings Calendar. This gets created automatically when a new Bookings Calendar is set up. The user is unlicensed, but if you open up the user in Microsoft 365 Admin center, you can reset the password. Once you have this, you can simply create your new connection and log in to this account. Simple!
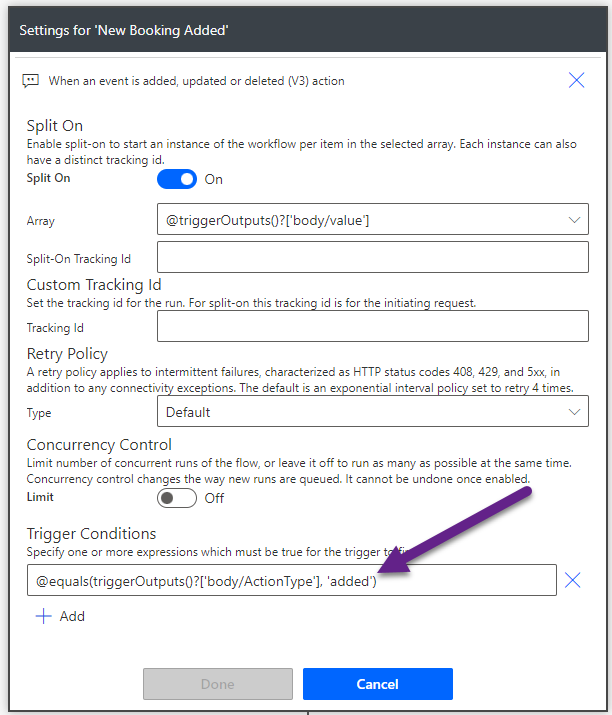
Once the connection is correct, click on the ellipsis (three dots) from the top right of the trigger, and then click Settings.
We only want the flow to run when a new booking has been added, not updated, and not deleted. To do this, we can use the trigger conditions to indicate it should only run when the ActionType field on the booking is added. Paste the code below in to the Trigger Conditions field and then click Done.
@equals(triggerOutputs()?['body/ActionType'], 'added')
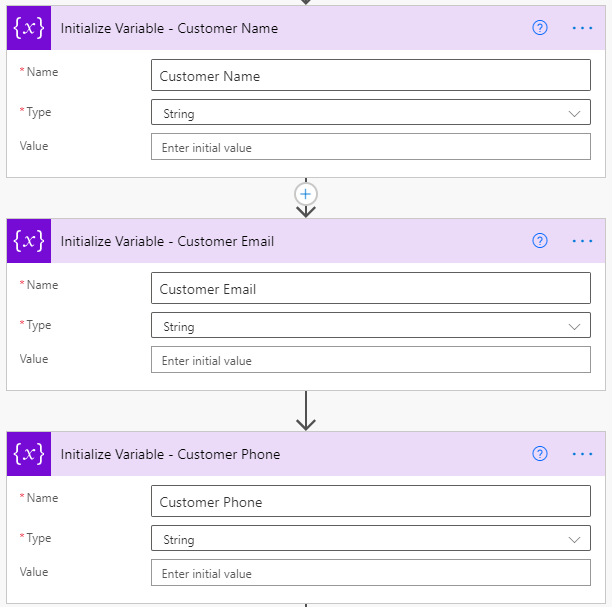
We then need to use the initialize variable action 5 times. We must add these near the start of the flow so we can use them to actually set the variables later on. We will add three string variables to be able to set some values about our customer, who is the person that made the online booking.
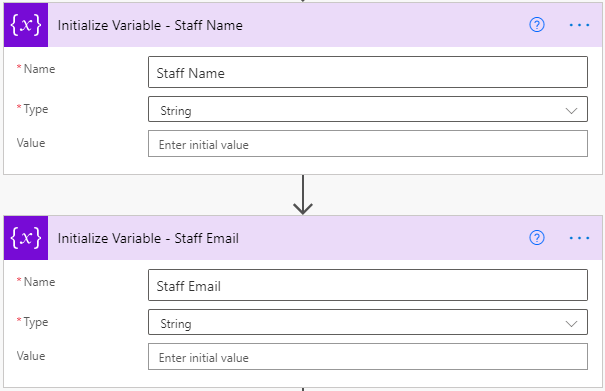
Then we want two more for the Staff Name and Staff Email address. These should also be string variables.
Now we want to get the booking using the ID from the trigger. We are going to use this to then extract details from it to use in later actions of the flow. To do this, we use the Get event action, then pick the calendar from the drop-down, and then use the Id dynamic variable from the trigger step at the beginning.
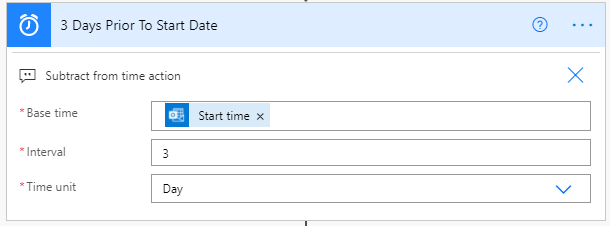
This next step depends on your requirements. You might want to give the Staff Member a certain amount of time to complete their tasks. This step using the Subtract from time action is going to allow us to get the date of 3 days before the start date of the beginning and use it to set the start date on the task. We can get the dynamic value of the Start time from the step above, then set the interval to 3 and the time unit to Day.
Now we are going to use the HTML to text action to take the contents from the Body of the calendar appointment (the booking itself). This means we can then extract certain parts from the body and figure out the customers name, phone number, and email address. To understand more about this and the formatting, review this post here where I explain everything in full detail.
For each of the three Customer related variables we created, the Set variable action will be used. The Name field should provide a drop-down of all of the variables initialised at the beginning. Each one needs a slightly different expression.
The Customer Name expression is below. This looks for the text that comes after the ‘Name:’ text in the body of the appointment, and grabs everything after that until it meets the word ‘Email:’
last(split(first(split(outputs('Email_Body_To_Text')?['body'], 'Email')), 'Name: '))
The Customer Email expression is below. This looks for the text that comes after the ‘Email:’ text in the body of the appointment, and grabs everything after that until it meets the word ‘Phone’.
last(split(first(split(outputs('Email_Body_To_Text')?['body'], 'Phone')), 'Email: '))
The Customer Phone expression is below. This looks for the text that comes after the ‘Phone:’ text in the body of the appointment, and grabs everything after that until it meets the words ‘Booking Info’. Now keep in mind, if you are doing appointments with multiple bookings on them (more than one person can book) this will not work. Also, if you have added custom fields to the booking form, you will need to review and understand the breaking points in the text so that you know how to split up the Body of the appointment and get the right information.
last(split(first(split(outputs('Email_Body_To_Text')?['body'], 'Booking Info')), 'Phone Number: '))
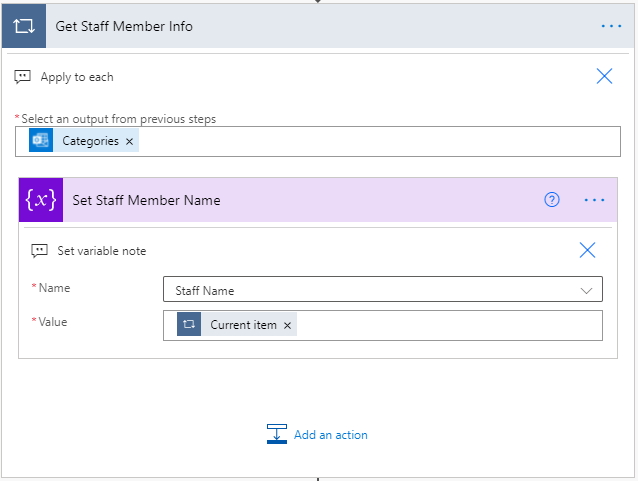
Next, we need to add an Apply to each action. This step will allow us to find the Staff Members’ name. Add in an action within the Apply to each step using the Set variable action. This time pick the Staff Name variable, and add Categories Item as dynamic content from the Get The Booking step above. Search for Current item and add that in to the value on the variable as you see below.
Now we need to use that value we added to the Staff Name variable to search for the person in Office 365. Look for the Search for users action from the Office 365 connector. The search term will be the Staff Name variable from the step above.
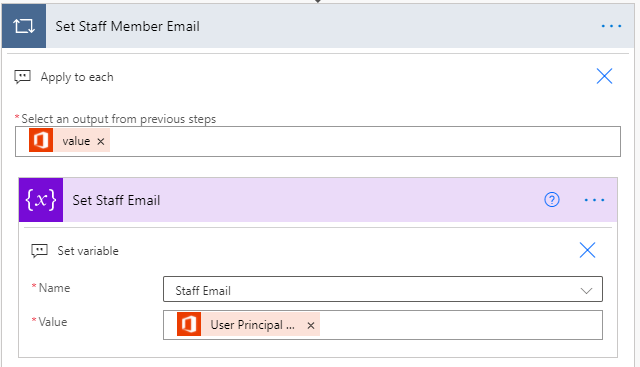
The step above in theory could return multiple people, so the next step is also an Apply to each action. If you have people with the exact same name in your organisation…. then…. sorry, not sure what to suggest there! 🧐 I can’t do everything for you. 😉 Add the dynamic content of value from the Office 365 step above, and then add an action of Set variable, selecting the Staff Email variable. For the value, add the User Principal Name, or whatever field in your environment contains the email address.
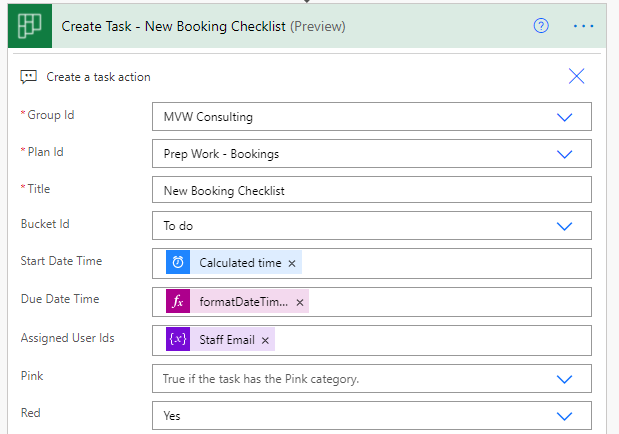
Now we get to the part where we can create our tasks in Planner. I have an example for one task below, but you could repeat the next two steps over and over again for all the different tasks you want to create. We need the Create a task action (the Preview one) from the Planner connector. The Group Id is the name of the group where you added your new Plan to. Then the Plan Id is the name of the Plan itself. These will appear in drop-down lists for you to select. The title is the name you want to give to the task. Then select which bucket you want it added to. For the Start Date Time, this is up to your requirements, but this is where I have used the Calculated time I created earlier in the flow that will be 3 days before the date of the booking. The Due Date can be whatever date you want, but likely the Start Date of the Booking is a good idea. Finally, the Assigned User Ids should be the Staff Email variable so it gets assigned to the same person that is on the Booking. You can set a colour to the task (of which there are MANY options) by finding the colour you want and picking Yes.
You can even set the priority of the task. Currently, Planner interprets values 0 and 1 as “urgent”, 2 and 3 and 4 as “important”, 5, 6, and 7 as “medium”, and 8, 9, and 10 as “low”.
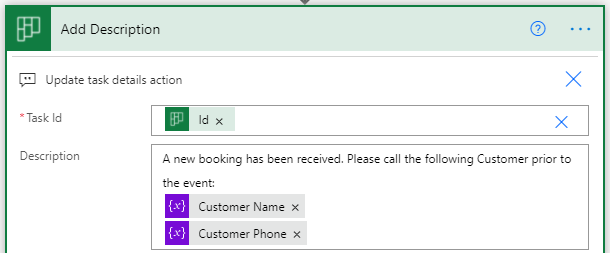
Although we can create the task in this way, the person who is assigned it would have no clue what it’s for. For this we need to add another action step from the Planner connector, this time it’s the Update taks details. We can set the Task Id from the task we just made, and then add something in to the description field.
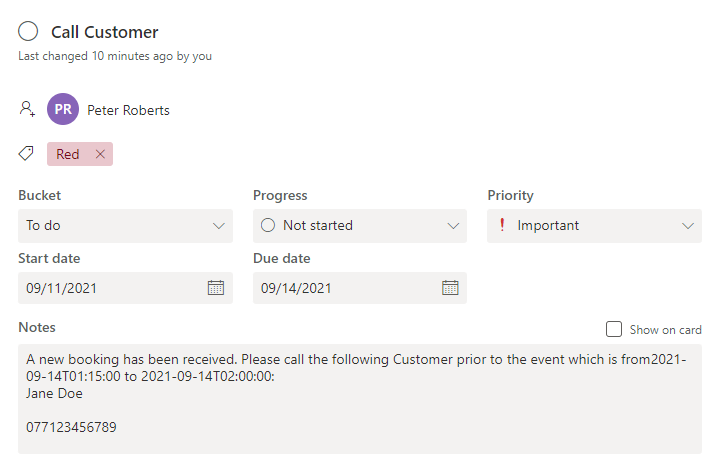
And this is how it looks in Planner!
That’s great, and we can go on and create additional tasks in the same way. However, there is a different approach for these last two steps. This time we could use the Create a task step, and give it the title of New Booking Checklist instead. Everything else can be set the same as before.
This time when we add the Update task details action, we can scroll down past the Task Id and Description field and add additional items.
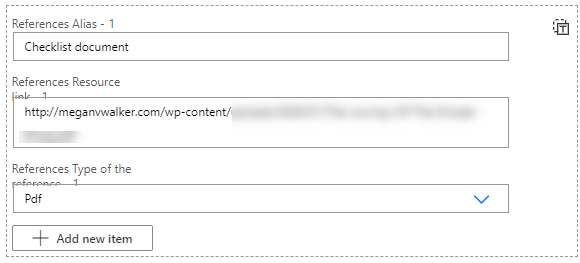
First we have References. We can use this to add documents to the task. We use the alias to give it a title, then provide a link to where the document is stored online. Finally we set what kind of document it is.
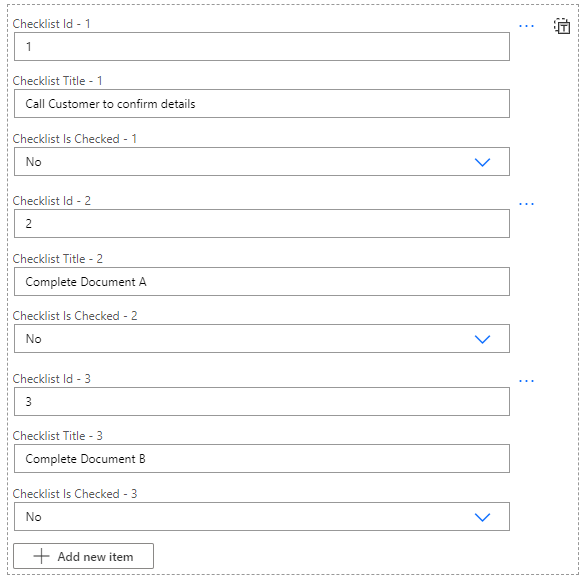
Then we can set up a checklist with multiple pieces of work for someone to complete. We have three items below that will be included in one task in Planner, rather than having lots of tasks for the same Booking.
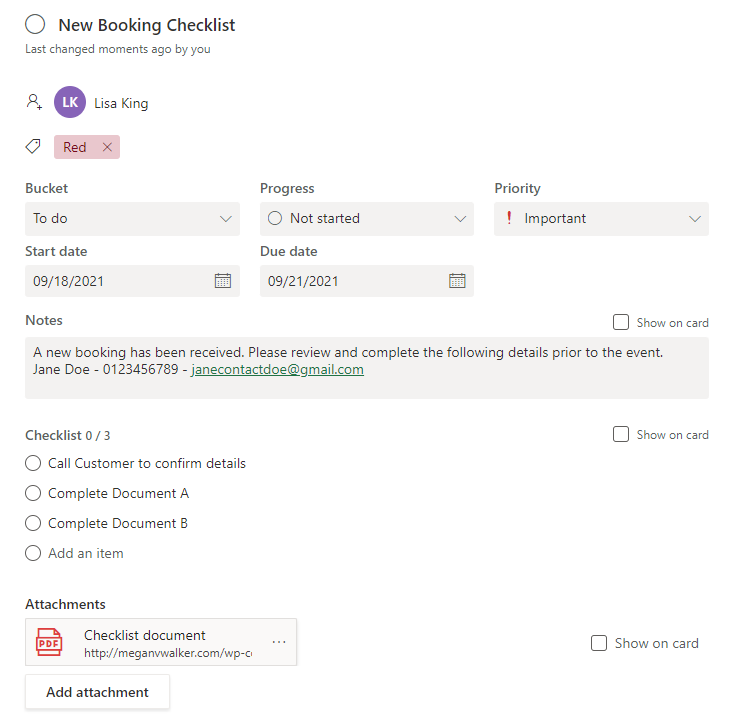
Now our task has a checklist and a linked document available for the owner of the task to complete.
Check out the latest post:
Setting Up reCAPTCHA v2 For Your Realtime Marketing Forms
This is just 1 of 571 articles. You can browse through all of them by going to the main blog page, or navigate through different categories to find more content you are interested in. You can also subscribe and get new blog posts emailed to you directly.









Thank you for this wonderful set of instructions! I am running into an issue where my flow is timing out because it is not recognizing the trigger. After testing, I realize that when I manually entered an item into the calendar of the account used to create the flow, it was triggered. But, when I filled out the form in Bookings, it didn’t trigger. I suspect I missed a step in connecting the Bookings calendar to the flow. I do not have Office 365 admin credentials so I was unable to complete that step early in the instructions. Is that the piece that may be causing this issue? (Note I am running the flow with a generic office account rather than my personal account). Thank you.
Yes, I think that would likely cause issues. There has also since been a Microsoft Bookings connector added to Power Automate, so that might work better for you. I’ve not used it so can’t offer any advice on it though. It’s also still in Preview – https://docs.microsoft.com/en-gb/connectors/microsoftbookings/