*** NOTE: ALL INFORMATION IS ACCURATE AT DATE OF PUBLISHING ***
Perhaps an under used or even underrated feature for Realtime emails in Customer Insights – Journeys are Lists. This gives the ability to share information about one or more related records. Think information about Contacts linked to an Account, information about Speakers linked to an Event, or Products linked to a Quote or Order. If you have ever looked through the Microsoft provided email templates, you might have seen the order confirmation ones. Yes, they look like they might be useful, but everything is static and will not show information about YOUR products, but it’s good inspiration for what you COULD do. So let’s look at how to create beautiful quote and order emails for your organisation.
First, here is the inspiration, the standard out of the box order confirmation email template.

The first thing we will need is a new Dataverse trigger. I am using the Quote table but you can replace and do Order or even Invoice depending on what your requirement is and what you would like to email out to your customers. This trigger will fire when the Status changes. For Quotes, when someone Activates the record, it is locked and read only, so a good time to send it out to the customer. We will need to add a filter to the Journey when we build it so that the email only goes out ONCE and not also when the Quote is marked as Won which would also change the Status again at that point. Make sure you make the trigger live so we can then use it to pull values from in to our email template.

For my email, I want to include the image of the products added to the quote. Just a small addition with a new lookup field to the File table. Make sure you pick the msdyncrm_file table rather than the other one. When we add fields here, these will be stored in the marketing asset library and make them accessible to the outside world rather than trying to use the entity image from a product.

Make it easier to use by adding the Image Select Button Control component to your new field when you add it to the Product form.

Now when on a Product, we can click the magnifying glass which opens up this control. From here we can upload and select the image to add to the Product.

Now let’s get started with the new template. I would suggest creating as a template rather than directly to an email. Reason being, if you do as an email and then want to change any of the personalisation later on, you will need to start all over again. So save yourself the headache and make a template instead. First thing I am doing is adding in to the top of the email doing the First Name for the Contact that is getting the email. Then I want to include the Quote ID at the top. To do this, I add new personalisation then pick the new trigger I created, then get the Quote ID from the Quote table.

This is what the top section will look like when we send out an email. Looking good so far!

Now here is where our list comes in. Click on the personalise section from the right side of the template, then click on Add list. For the list components, go in to the new trigger you created, then from the Quote look for the products. This will allow us to build a list of all products that have been added to the quote.

Next we need to add in all of the fields (or columns) that we want to add to the email. Make sure you set the order by to the Name (or whatever makes logical sense to you for sorting), and set the max number. Note that you can only go up to 100 so if your quotes/orders typically are longer than this, this might not be a feasible option for you! ☹️

Once you are finished with your list, save it and get the code. Copy and paste it in to notepad or somewhere you can access it.

We don’t need to paste it in to the email in the same format as it was provided above. Notice the way I have laid everything out below. I have 3 sections here. The top and bottom ones contain the for each sections. This means, the section in the middle will be repeated for every single product found. The middle section will show the name of the product, then the image, and other details about that product including the quantity requested, price per unit and final amount for the number requested.

One thing I don’t want is to see the grey parts inbetween each product. So for that, we can click on the section, then go in to the responsive design and simply untick the boxes for show on desktop and show on mobile. This way they will always be hidden. They are purely being used to start the list and end the list.

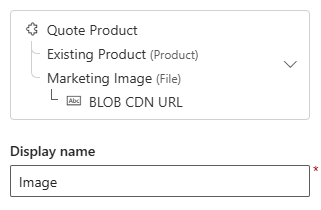
For the image, use the insert from URL option, then set it as whatever you named it in the list.

The mapping for an image you are adding from a File lookup would be something like this. In my case, I am going from the Product through to the Existing Product value, then to my new field that I called Marketing Image. Finally, we need the Blob CDN URL value. This will allow use to use the url for that image in the asset library.
Another thing I am using in my for each item section is the currency for the Quote so I can include that before each of the currency values. This way it’s clear which currency this is for. For that, you can go from your trigger in to the Quote, then in to the Currency lookup then pick the Currency Symbol.

Now the quote details section looks pretty good. Thanks ChatGPT for the product details and Microsoft Designer for the product images. 🚀

Now on to the bottom summary of the quote where we can see some totals. I want to show the subtotal, shipping and any discounts, then the total. However, sometimes you might not charge shipping and more often than not, there might not be any discount, so how can we make sure we adjust for those scenarios? For each item, I have a section including a label on left and the dynamic value (and currency symbol) on the right. If there is no value for shipping, I want it to say FREE, otherwise show the shipping amount. On the section, click on the conditional content icon.

My default shows the word FREE, that means, I need to add a condition for when there IS shipping to show. I give the condition a name, then use my logic of Freight Amount (shipping) is greater than 0. Then on that version of the section I can include the currency symbol and freight amount.

For the discount, my default has no values for the text components, but we have conditional content to show information when there is a discount.

The condition I have used is that With Discount is if either the Quote Discount % or Quote Discount Amount is greater than 0.

Here we can see where there are shipping costs AND a discount.

Here we can see where there is no shipping BUT INCLUDES a discount.

Here we can see where there is NO discount, but there ARE shipping costs.

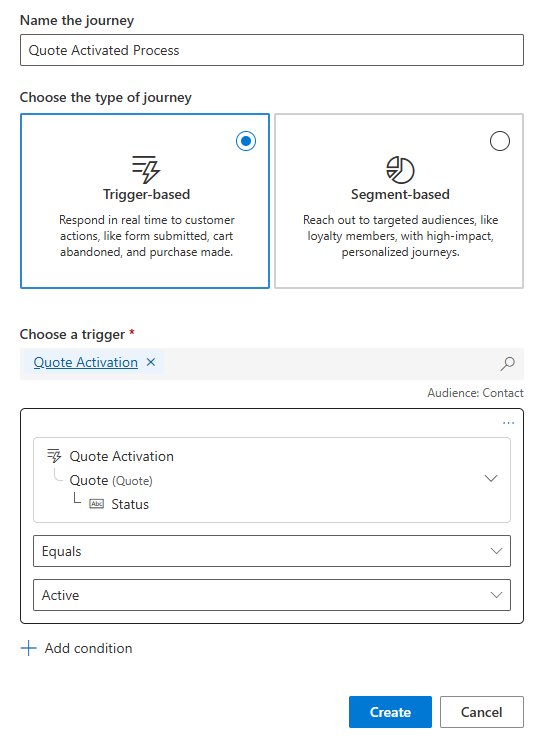
Once the template is finished, create your email using it and make it live. Now on our Journey we select the trigger, but make sure we add in a condition for the Status of the Quote to equal Active. This makes sure it doesn’t send the email for every change to the status.
Now when users make a Quote active, off the email goes to the Contact linked to the Quote. Hooray! Looks professional, and dynamically pulls in everything we want it to. Perfection! 🙌🏼

Check out the latest post:
Create Hierarchy Overview Of Compliance Setup In Customer Insights - Journeys
This is just 1 of 566 articles. You can browse through all of them by going to the main blog page, or navigate through different categories to find more content you are interested in. You can also subscribe and get new blog posts emailed to you directly.
Hello Megan,
Many thanks for this wonderfull article. It really touchs my need.
I do all what you described here in article.
e-mail configured and works properly in test mode. But my journey wasn’t triggered when I activate the quote.
I have made my own research to figure out why an journey not triggered
Not success up to now.
I will apprciate if you recommend
Hi Hakan, great that your email works when you test it. That’s good! If the journey is not triggered, then something is wrong with the trigger. I would check there again and if you are sure it is all correct, you would need to contact Microsoft support to find out why. Just make sure you don’t have two tables named the same way and have perhaps picked the wrong one on your trigger.
Hi Megan,
This is wonderful! Espacially for those of us who have wanted to improve how our quote are sent to our customers.
Would you have a suggestion on how to send it only to certain customers? Some in our sales team prefer sending quotes themselves, so we’d need to be able to let sales trigger this manually.
Another question, some customers like having a PDF of there quote, which is often necessary if they have to forward to a purchasing department. Would there be a way to add a “download PDF” button?
Thanks!
Hi Vince, you could add a new field to the Quote table for Email Quote (Yes/No). Either set it to be default Yes or No depending on if you want the trigger to fire it the majority of the time. You can then allow users to determine if they want Quotes to be sent using the Journey. Just make sure your Journey has conditions on the trigger to use your new field. Adding a PDF to a button COULD be possible, but you would need a way of generating the PDF from the Quote (could use Word Document Templates but they wouldn’t look as pretty), then you would need to store it somewhere accessible (could use the Marketing Asset Library but would need an automated process to do it). Then you would need somewhere to store the link back on the Quote so that it can be added to the button dynamically. So quite a few steps!!!