*** NOTE: ALL INFORMATION IS ACCURATE AT DATE OF PUBLISHING ***
Adding conditional content to marketing emails in the Dynamics 365 Marketing App is not necessarily a new thing, I have written about it before. However, that was HARD for people to use! It involved adding bits of code and trying to figure out where it should go, not to mention looking at the email itself was enough to give you a headache. If you needed to use one of three possible images, all three would be displayed which meant challenges figuring out exactly what a recipient would see when the email was finally sent to them. All this has changed!!! Check out conditional content in Real-time marketing emails. It’s wonderful! Please note that this is still in preview so subject to change as with anything preview.
First, make sure you are up to date with the latest version. If you are not sure, check out this post to see how to check and get updated. Next, navigate to the settings area in the D365 Marketing App and then scroll to the bottom to the Feature switches. Turn on the one for Conditional content in email editor then click Save from the top right.
Now we can build an email as usual. Adding an image first, you can now see some new icons, with one that looks like two people. Clicking on that allows Conditional content to be applied.
After clicking this, you will see the usual properties area for the image which is where you would have added it from, but now we also have a Variations tab. Click on the tab.
From here we can add a new condition.
A condition can be set up as one of two types. A condition can be based on an attribute, or based on a Contact being either in a specific segment or NOT within a specific segment.
Even better, if we click the option to make the condition on an attribute, it’s not just attributes from a Contact (or Lead) or their related records, but can also be set based on a value from a specific Trigger. Awesome! So you could have someone start on a Journey from a Trigger, where the Trigger itself passed back specific information for you to use.
For now, I will go with a custom field called Support Tier and set the condition to equal Gold in order to be met.
Now this shows that we have two possible images for this conditional content. The one that is currently selected will show up with a pink border around it. Clicking on the new variant then allows us to edit the image.
Clicking back on the Properties tab, the image can then be changed.
So now we have an image with conditional content enabled, where there is a Default image and an Option B image that would be shown instead when the Contact Support Tier equals Gold.
Clicking on the Edit sample data from the top of the email, we can then look at the Conditional content section. This shows the two email variations we have set up. Switching between the two means we can get a visualisation of what each variation of the email looks like.
We can also add conditional content to a whole section. Let’s take this section here. Clicking on the column, you can then swap to the parent section instead.
After doing this, you can then see the conditional content icon here.
After clicking on the conditional content icon you can now add your variations. Any conditions previously used in the email can be selected, or a brand new condition can be added. Now you can click on that condition and make your adjustments within the Section, even deleting items if you need to so that each variation is slightly different.
When you add different variations in different areas of the email, you can get something like this. It combines the variations to show all possible variations there are which might seem a little confusing at first.
However, you can rename these variations so it should make more sense. This way it makes it more obvious to any other user viewing the email, and can also be helpful when looking at analytics later on.
If an area where conditional content has been applied is no longer needed or was added in error, it can easily be removed. Simply click on the conditional content icon and the screen below will be displayed. Clicking remove will take all variations away, leaving only the default.
After your email has been sent, you can click on it from within the Journey and then click on the Delivery and interaction details link.
From here we can now see exactly which variation of the email was sent to a Contact. We also have a link from here to click and see what the variation looked like.
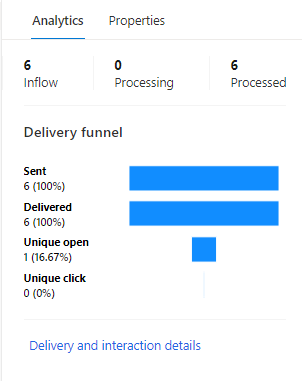
Clicking on the Variations tab will show statistics on the number of people a variation was sent to, the unique opens and the unique clicks.
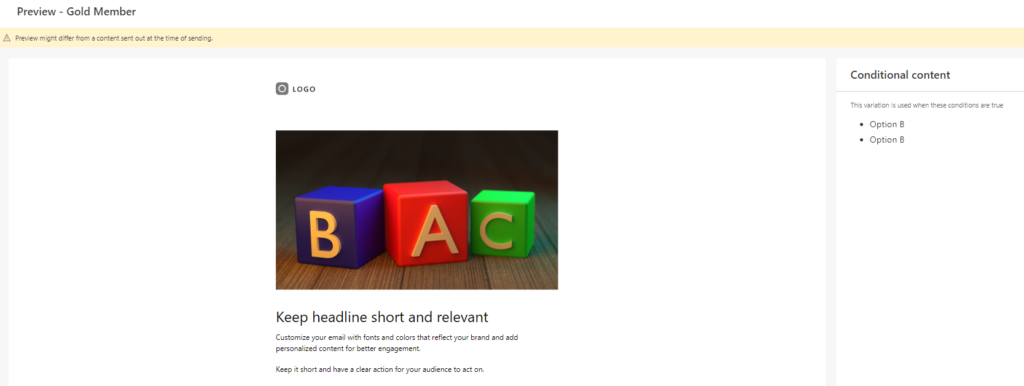
Finally, clicking on the variation email link will then show what the email would have looked like.
I think this is fantastic functionality and something that can be used by any marketer (in my opinion). The analytics are useful, and it’s going to help a lot of people create emails that can have conditional content based on the data on a Contacts record. Nice!
You can watch a video on how to do this here.
Check out the latest post:
Set A Business Process Flow Stage With Custom Page
This is just 1 of 572 articles. You can browse through all of them by going to the main blog page, or navigate through different categories to find more content you are interested in. You can also subscribe and get new blog posts emailed to you directly.


I have a client who wants to provide conditional content if the email is opened on a mobile device. It doesn’t appear this will help with that request. Am I missing something or should I be looking elsewhere? Can you add custom html/javascript to a real-time email template?
You would need to click on the HTML option from the marketing email (or template) and then add in your CSS to determine when specific sections of the email would be hidden or displayed. It would mean heavy customisations. If you’ve not seen it before, this page from the Microsoft Documentation might be of interest. https://learn.microsoft.com/en-us/dynamics365/marketing/custom-template-attributes
Hi Megan,
Firstly, huge fan of your content!
Secondly, have you done an article where you show how to add show/hide conditional logic in real-time marketing forms? Customer Voice does this really easily right out of the box.
Hi Lauren, I’ve not written a blog post, although I have done this for clients for various scenarios. What is your business use case? What are you hoping to achieve, then I could potentially write that in as a blog article.