*** NOTE: ALL INFORMATION IS ACCURATE AT DATE OF PUBLISHING ***
Along with Dynamics 365, a license provides access to several other Microsoft tools, including Microsoft Flow. If your organisation also uses Microsoft Teams you can use the power of all three applications to post notifications of Won Opportunities in D365 to Teams using Flow. This is a great way to keep the entire company up to date on those new deals and encourage open dialog and conversation.
First, head to Microsoft Flow. Go to My Flows, then Create from blank. Click Create from blank again on the next screen.

To get started add a trigger and search for dynamics. Then select the trigger of ‘When a record is updated’ in Dynamics 365.

Select your organisation name (you may be prompted to log in), then select Opportunities from the list of Entities.

Next, add a Condition by clicking the plus button under your trigger. Select the Status Reason Label from the Dynamic content list.
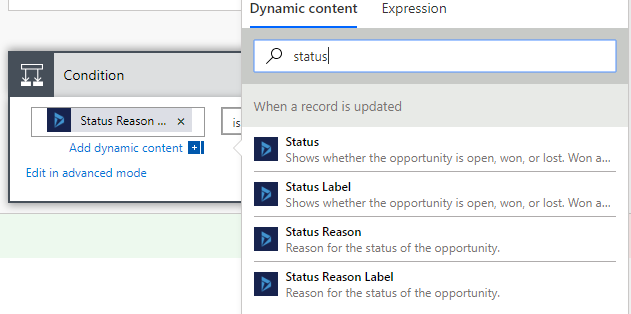
Then state, is equal to, and type ‘Won’ in the last box.

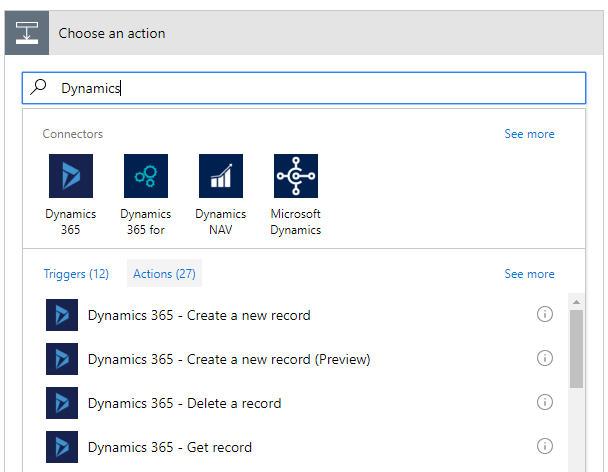
Now you will have two sections. One for If yes (when the condition above is met) and one for If no (when the condition is not met). We are only going to add items to the Yes side. Click the plus button on the Yes side to add a new action. Search for Dynamics in the list, then select Get record.

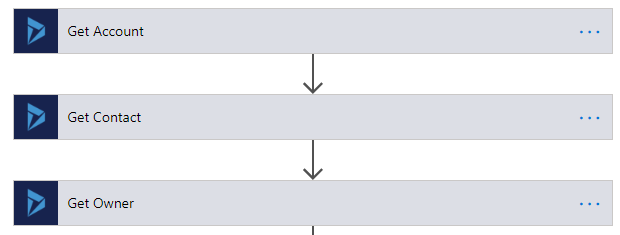
In order to display the details of the Opportunity on an update in Teams, we need to pull in data from related Entities. For example, if we try and display the Account and pull it in directly from the Opportunities entity, we will only see the GUID (long string of numbers etc.) rather than the Account Name itself. So the next few steps will help us get the necessary record names and display correctly. Pick Accounts from the Entity Name, then select the Account record from the dynamic content options on the right and add to the Item identifier field. Then do the same thing again for Contacts, then again for Users. The users entity will allow us to get the name of the Owner of the Opportunity. Make sure you click on the elipsis to the right of each action and rename it, otherwise you will just see Get record, Get record 2 and Get record 3, making it much more challenging during the next part of the flow.

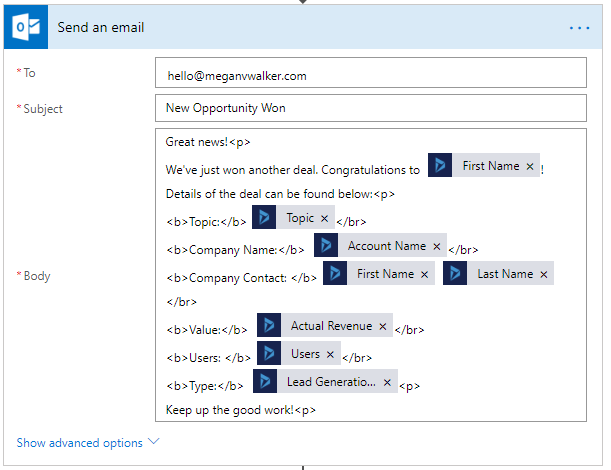
If required, you could add in a step next to ‘Send an email’. This could be used to send an update to the finance team for example, or project managers, to provide details needed to start a specific process. Once you have chosen the option, add your To, and a Subject. Using the Dynamic Content options, you can easily add in fields to display specific data from the Opportunity.
To add information from related records (the Company Name, Contact Name and Owner), search for the name of the field. Below you can see that it shows ‘Get Owner’ above the fields. This lets you know that you are going to add a field from the entity added in the ‘Get Owner’ step on the flow above. So, if you are adding the Account Name, make sure it shows ‘Get Account’ above that section (or whatever you named that step in the flow).
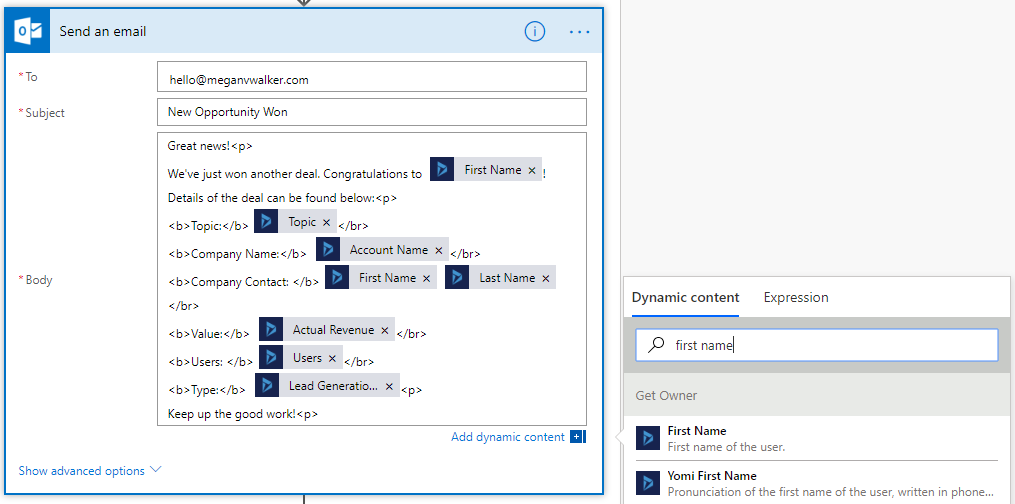
Clicking on the ‘Show advanced options’ will give you an option to set the Importance of the email, and also indicate if it is HTML. Setting the email as HTML allows you to format the email as you see above. Even though you may have used paragraphs and line breaks in the email, this will just show as a bunch of text all running together without a few tags. To indicate a paragraph break, use <p>. For a line break (carriage return) use </br>. If you want to indicate text as bold, use <b> at the start of the text, then </b> to indicate where the text should stop being bold.

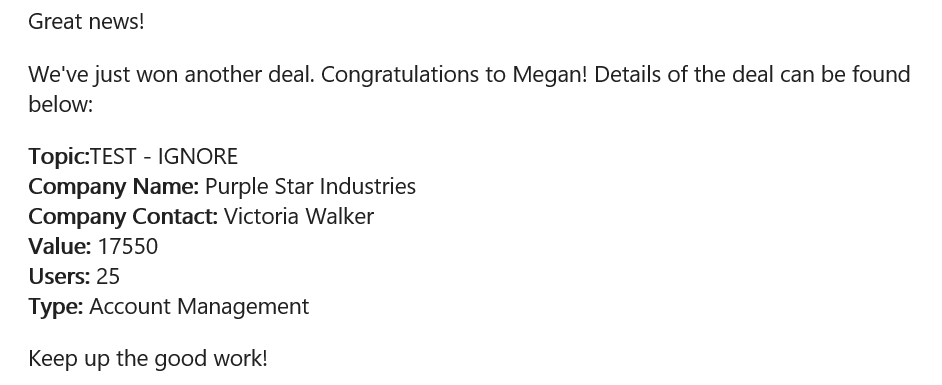
Here you can see the email that is sent.
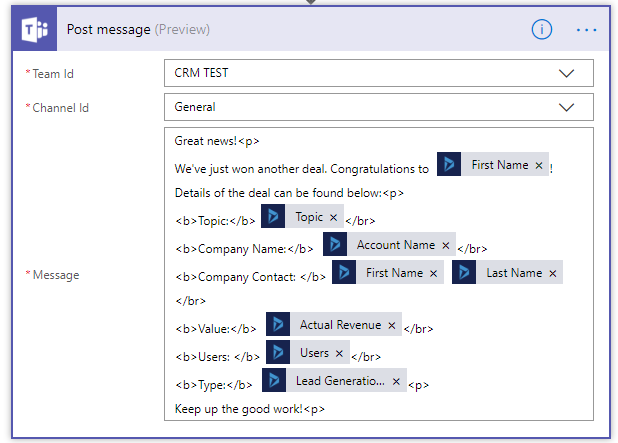
To post it to Teams, use the Teams connector and the Post message option. Pick the Team, and then the Channel to send the notification to. You can use the same steps as used in the Outlook message approach above.
Once an Opportunity is updated and changed to a Won status, your message will post to the Team Channel selected.
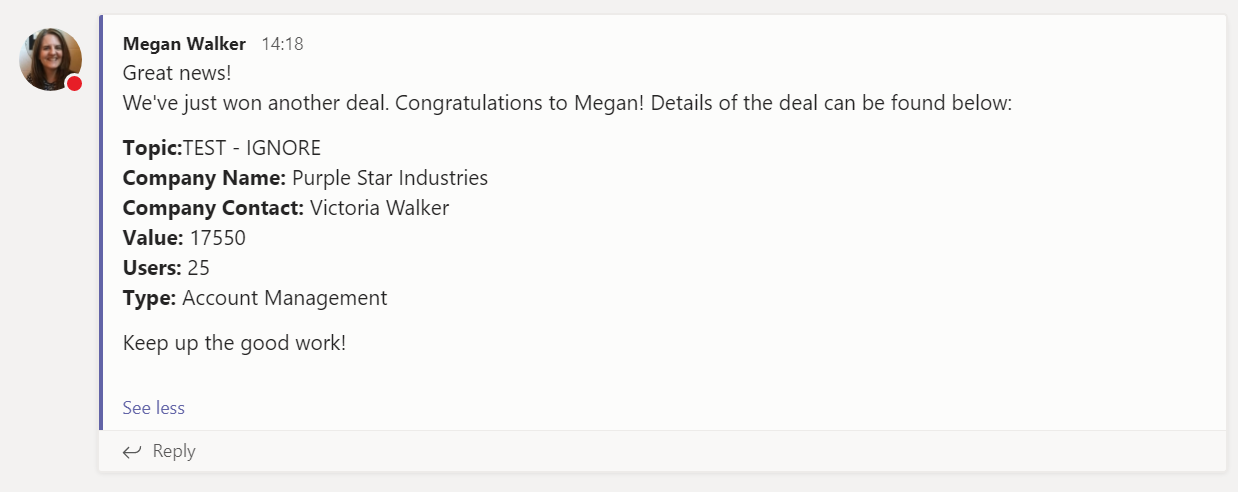
Hmmm, well, that’s great, really cool, BUT, I don’t want to be the one to share this with my name every time. It should probably go out from a generic user in some way right? Well, good news, we can achieve exactly that! Go to the Team Channel, then click the ellipsis at the top, then on Connectors.
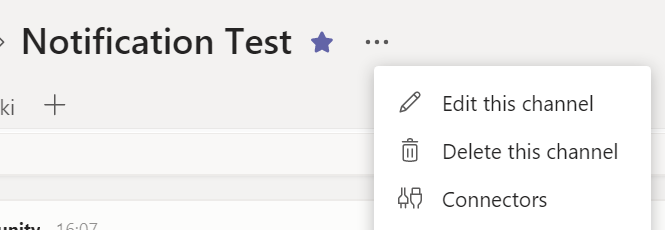
We can configure an Incoming Webhook to send data in to the Team. Click Configure.

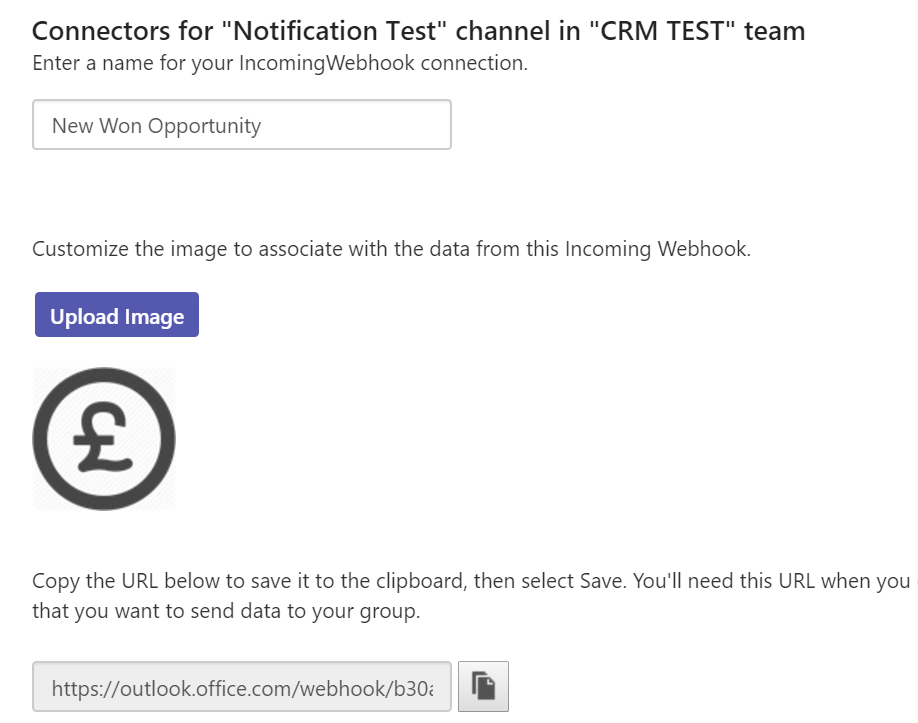
Add a name for the connection. You can then upload an image, which will appear next to the message in Teams (in place of where the user photo usually is). Finally you will see a URL populate. Copy this and paste it in to Notepad or somewhere to refer back to shortly.
Instead of using the Post message option to Teams, we can remove that and add a different option – HTTP. Select the Method as Post. In the URL field, past in the URL you took from the step where you created the Incoming Webhook connection. In the Headers line, add Content Type, then application/json. Finally, the Body is where you will determine how you want the notification in Teams to look.
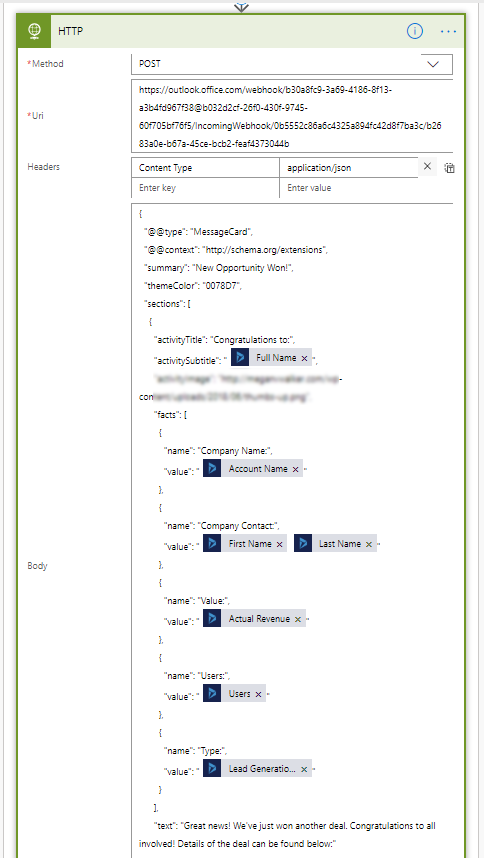
To hopefully make it a little easier for some reading this, I have pasted the code below that I used. For each place where there is a value, delete the text and instead, add in your dynamic content fields instead. For the activityImage, I have used a green thumbs up image, but you will need to upload an image somewhere accessible online, then use the full URL path in the code.
{
"@@type": "MessageCard",
"@@context": "http://schema.org/extensions",
"summary": "New Opportunity Won!",
"themeColor": "0078D7",
"sections": [
{
"activityTitle": "Congratulations to:",
"activitySubtitle": "Owner First Name",
"activityImage": "http://yourdomain.com/images/thumbs-up.png",
"facts": [
{
"name": "Company Name:",
"value": "Account Name"
},
{
"name": "Company Contact:",
"value": "Contact First Name Contact Last Name"
},
{
"name": "Value:",
"value": "Actual Revenue"
},
{
"name": "Users:",
"value": "Number of Users"
},
{
"name": "Type:",
"value": "Type of Opportunity"
}
],
"text": "Great news! We've just won another deal. Congratulations to all involved! Details of the deal can be found below:"
}
],
"title": "New Deal Won: \"Account Name\""
}
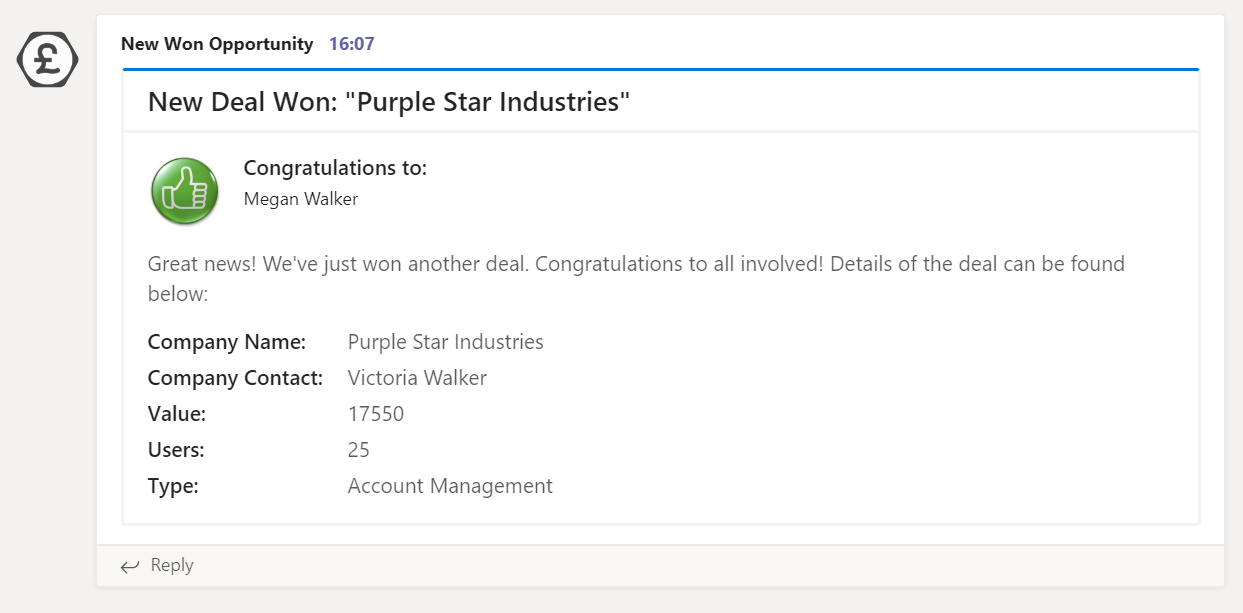
To test it, either wait till someone wins a new deal, or go and create a test Opportunity and close it as Won. Here is the finished Team notification! This is LOADS better than having it go out from a specific user. Now when this gets posted in to the Team Channel, everyone can be notified, make comments, congratulate the sales person and share in the achievement as a company!
Check out the latest post:
Set A Business Process Flow Stage With Custom Page
This is just 1 of 572 articles. You can browse through all of them by going to the main blog page, or navigate through different categories to find more content you are interested in. You can also subscribe and get new blog posts emailed to you directly.

Can we add the products (opportunity Line) to the email notifications.
Hi Innawan, thanks for the comment. You could do a List Records step, and list the Opportunity Line entity, and use the Opportunity ID in an ODATA query to get all of the lines for that Opportunity. There is a Create HTML table action that you can then use, and insert the value from the List of Items created from your List Records step. Then when you create your email notification, you can add the Output from the Create HTML table step. Hope that helps!