*** NOTE: ALL INFORMATION IS ACCURATE AT DATE OF PUBLISHING ***
In a previous article, I wrote about creating a simple auto responder journey when someone submits an Outbound Marketing form… but what about Real-time Marketing forms? Well, first thing, make sure the new forms are right for your needs and organisation (check the documentation), but they are out of preview so good to start looking at them! In this post I will walk through reviewing your consent model, creating a simple form, then a journey all in Real-time Marketing in Dynamics 365.
First things first, if you don’t already have at least one Compliance setting records created for Real-time Marketing, that should be first on your list to understand how it works! Navigate to Settings then under Customer engagement, click on Compliance. This blog is not about that, so instead, I’m just going to refer to the part to be aware of. You have two options for your consent model. One is Restrictive and one is Non-restrictive. I’m not going to advise which one to use, but I will show you what you would need to do in the form for each approach. You can see the explanation of how each one works below.

Once you are aware of your consent model, navigate to real-time marketing, and then underneath channels, click on Forms. If you don’t see this option, your marketing environment is likely not up to date. Check that first before continuing. When this feature was in preview, there was a feature switch for it. Now out of preview, it should be there if you are up to date.

Create a new form and give it a name. You will then need to select the type of record the form pertains to. Currently you cannot create a form in Real-time Marketing that will create/update both a Lead and a Contact, so you have to pick one. Click on the Create button to continue.

This next part is important. Currently there is no way to add a section to the form for Consent. If your Consent model is Non-Restrictive, this means the Contact or Lead will not need to ‘opt-in’ to receive any email from you. If it is Restrictive the Contact or Lead will need to have ‘opted in’ and have a related Contact point consent record for you to send them anything. So if you are creating a Journey that sends someone an email when they fill out a marketing form, you need to make sure you can actually send them stuff. So, or Non-Restrictive you can skip this part when selecting a template and build out your own form. For Restrictive, you will need to pick the Newsletter Signup option (as there is currently no way to add in the Consent stuff outside of this template).

Once you’ve decided if you need a template, you can then add fields. You can search for the fields on your Lead or Contact in the panel on the right of the form, then click to add them directly to the form.

After adding a field then clicking on it from the form, you can edit it by changing the label, placeholder text and making it required. You can also make it hidden, or set a default value if you need to.

If you have a Restrictive consent model, and you picked the Newsletter template, you should see a block like this at the bottom of the form. I don’t want all the text above it, and I am only going to ask the person to consent to commercial communication. You can leave both consent blocks, and use one for the purpose of tracking, and one for commercial communication depending on your requirements.

With one of the Consent blocks selected, make sure you set it’s purpose, and if you want to make sure the person can only submit the form if they tick that box, make it required. I am also only going to update it for Email because I don’t send texts.

Once I’ve edited those settings, I am going to change the wording in place of ‘I agree to…’.

If you didn’t pick a form template, you will finally need to add a Submit button from the Elements section.

Set the text for the button, the font and colour and you are done.

From the top right, you can save, check the content for errors and then publish it.

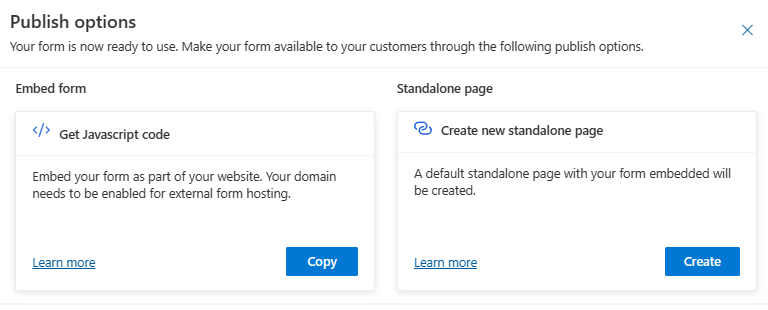
After publishing, you will see your options. I prefer to embed the form in to a page on my website, so I just click the Copy button to get the necessary Javascript code. Then I add that to my website.
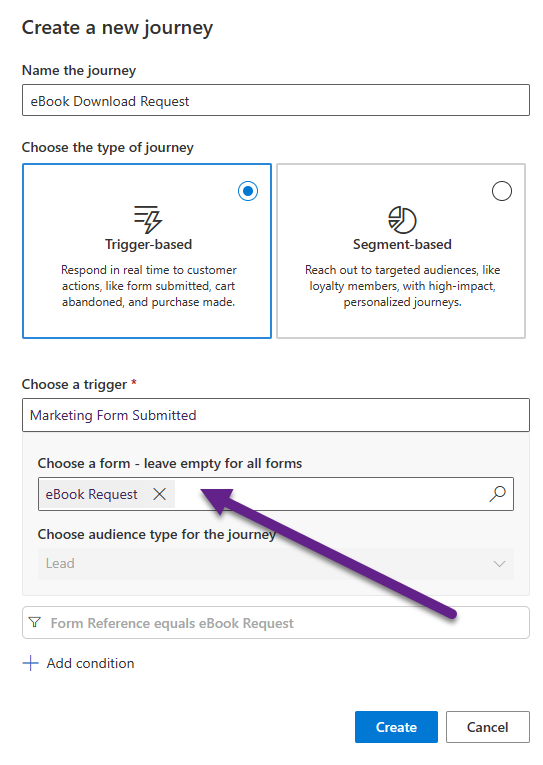
I then create the email I want to send when someone fills out the form. Next, I create my Journey. This is going to be trigger-based and will begin when someone submits the marketing form. There is an out of the box trigger called ‘Marketing Form Submitted’. Make sure you pick that one, and not the one with the words ‘Outbound marketing’ in it. You will then be asked what audience type the Journey is for. You can also add in conditions to determine when this will be triggered. For this, I am setting a condition to make sure that the Form ID equals the ID of the form I created. You can get the ID by opening the form in D365, and going to the very end of the URL you are on and copying the ID string. This means only people who submit that form will go through this Journey.

UPDATE: 07/07/2023 – there is a lovely new lookup field now which means no more going to get the GUID! Hooray!
Then it’s a simple Journey with just one email in it. Easy!

One thing to keep in mind, if you are using this form in multiple places or think people could submit the form multiple times and you want to make sure they will always go through this Journey, be sure to change the setting for frequency capping. Otherwise, the person submitting a form might not get your email if they fill it out multiple times in a day or week.

Save and publish your Journey! Once the form is filled out, if you added the Consent section, a Contact Point Consent record will be created for them, showing they Opted In. They will then go through the Journey and be sent your email. Want to try it out? Fill out my test form here (there isn’t an eBook, just a simple test with a simple email.) and you should receive an email.

Check out the latest post:
Use Custom Event Registration Questions To Branch Your Journeys In Customer Insights
This is just 1 of 603 articles. You can browse through all of them by going to the main blog page, or navigate through different categories to find more content you are interested in. You can also subscribe and get new blog posts emailed to you directly.
Hi Megan, another great blog, thank you.
Do you have any blog on embedding the form to a website using real-time marketing forms? Is domain authentication a requirement for embedding real-time forms or is it optional?
Thanks,
Seán
Hi Sean, you still would need to have authenticated your Domain(s) to allow for embedding forms, regardless of if it is for OBM or RTM. Then with either type of form, you can just get the Javascript and add it to a page on your website. I don’t have a specific blog on embedding forms because there isn’t much to it, but this post has a screenshot of how to get the Javascript code if you scroll down through towards the middle of the article: https://meganvwalker.com/real-time-marketing-subscription-forms/
Hi Megan,
Do you have a blog on how to build if/then logic in realtime marketing forms? I want to update a contact field only when someone opts-in via the form. Do you have an idea how I can achieve this? (Clickdimensions has an Update field action node in their Campaign automations, for example).
Hi Lauren, the only way I know to update a Contact field from the FORM would be to have the field hidden on the form and set it when they submit it. If you are asking how you could update a field on the Contact form AFTER it was submitted (meaning the if/then logic isn’t in the form itself), you would need to use a workflow of some kind (Power Automate suggested). There is currently no out of the box option for this.
Hi Megan, a slightly detailed question regarding to that topic. When using “marketing form submitted” as a trigger to start a journey: does Real-time include past submissions for that form, or only those that occur after the journey has been set to live? From what I remember, Outbound included past submissions, but I believe Real-time does not.
Hi Maximilian, triggers are for things that happen immediately, so on a journey when you start using it, would be from that point moving forwards. It would not have looked back at past submissions on Outbound forms if you were using a trigger. It’s just not possible.