*** NOTE: ALL INFORMATION IS ACCURATE AT DATE OF PUBLISHING ***
One of the most common requirements when using the D365 Marketing App is to have an email sent to the submitter when they fill out a marketing form. Consider someone submitting an Outbound Marketing form to request a Case Study or White Paper asset. You can provide a link to the document once they submit the form, but what if they close their browser and then lose their access to the download? Let’s look at how to create a simple trigger (no code required), an email and a journey to send them a follow up thank you email with a link back to the eBook (or whatever they requested).
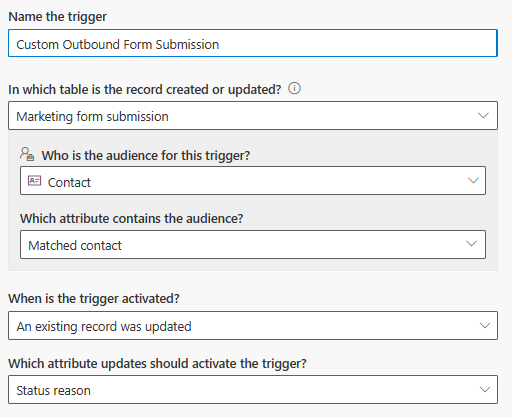
First thing, we will create a new trigger in Real-time Marketing. We are going to have the trigger run when a form submission is updated. There are two out of the box triggers, but we want to be a bit more specific about when the trigger runs, hence the need for a custom one. Give the trigger a name, leave the top option selected for what action will activate the trigger, then click Create.

Now pick the Marketing form submission table, and Contact as the audience member. Choose the matched contact as the attribute containing the audience. Note that we are using Outbound Marketing forms, and NOT the new (still currently in preview at the time of writing this) Real-time Marketing forms. The setting for when the trigger is activated is important and should be when an existing record was updated. Finally, pick Status reason as the attribute that should activate the trigger. We use this to determine if a Contact should be sent through a Journey so we can make sure the status reason of a form submission is Success. The Form submission record is created initially, then a process runs to check if a Contact and/or Lead should be created, or if an existing one is found and updated. So rather than running when a new record is created, using Status reason is a good approach.
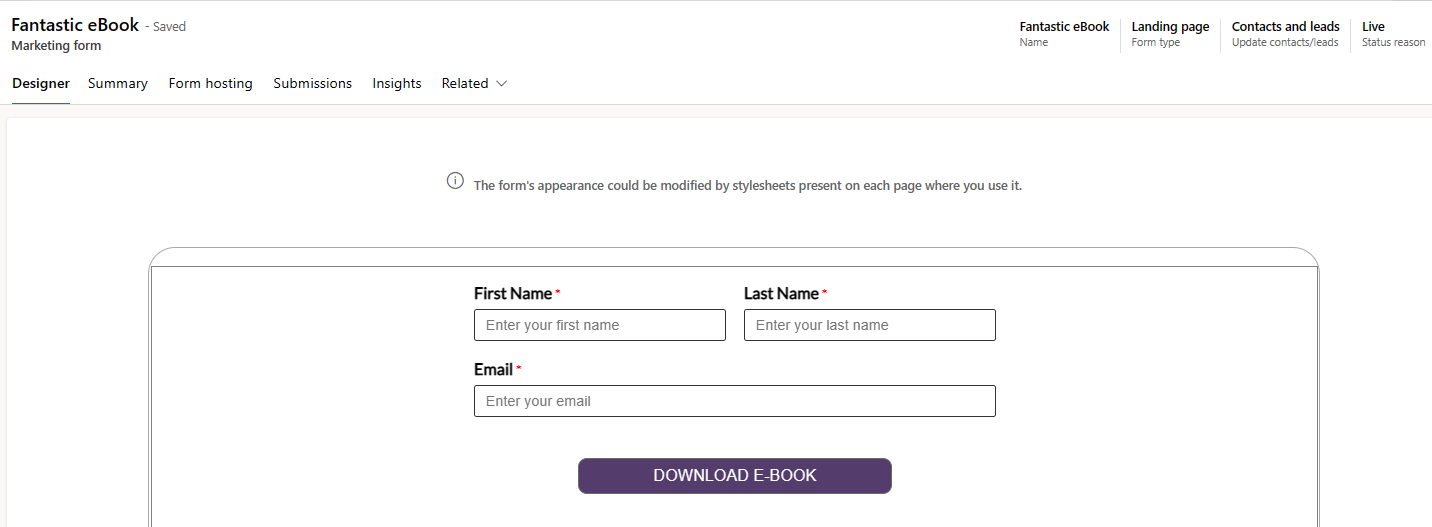
Once you’ve finished selecting all of the values, press the blue Ready to use button make it live. You can leave the trigger at this point and go and create your Marketing form. Add your fields and make sure you give your marketing form something logical as we will use this to customise the auto responder email that goes to the person who submitted the form. The only other thing needed for this is on the Summary tab, make sure you include the redirect URL that will be used to take the person back to the thank you or landing page where you have stored the eBook download itself. Make your form live, generate your form page record from the Form hosting tab, and add the code to your website.
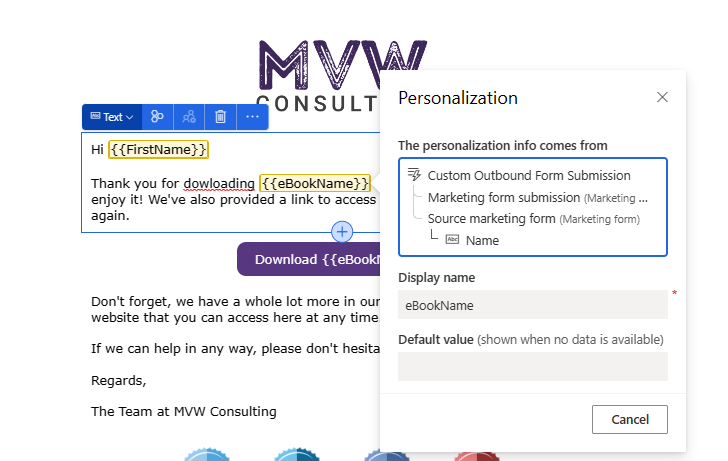
Now get started on creating your email in Real-time Marketing. Start building out the content, adding in the First Name as personalisation. We are also going to get the name of the eBook and the redirect link to take them back to using personalisation.

Instead of picking the Contact to add new personalisation from, go to the Triggers section and find the new trigger you added. From there, select the Marketing form submission table, then scroll to the Source marketing form field. This will then take you in to where you can access all of the fields from a marketing form. Click on the Name field. You can change the display name, so for this I have called it eBookName. This means no matter which marketing form was submitted, I can still use the name of the form to customise the email, rather than having to do one email for each form.
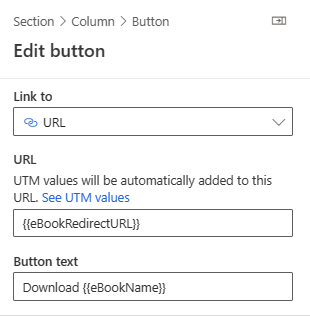
I’m then going to add a button and use the eBookName as part of the button text, but also pull in the Redirect URL value to use as the URL link of the button by accessing it from the custom trigger like you see below.
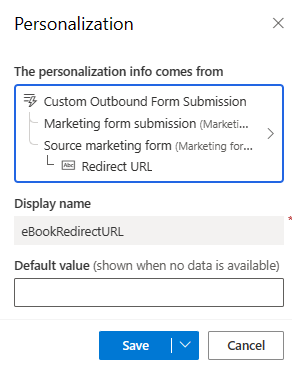
The button links to a URL and has both the URL and the Button text set dynamically using values from the custom trigger. Save and make your email live so it’s ready to use.
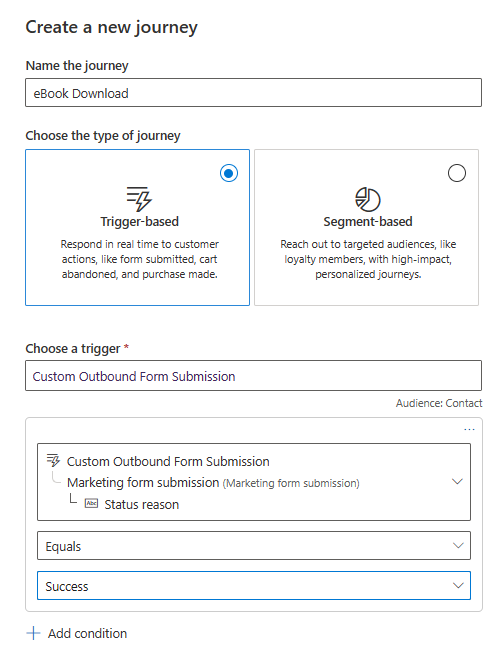
Now on to your Journey! Give it a name and pick the trigger you created earlier. The first thing to do is add a condition to make sure the status reason of the marketing form submission equals Success. That means as it updates and gets to the point where it is successfully created and all aspects of the form have been checked, it’s finished and you can be sure you can send the email to the Contact.
We can then add a second condition to the trigger. On the condition, access the marketing form submission and state that it must equal whatever the name of your marketing form is. That is one way to do it, and then this Journey would only ever run for any submissions where the form name is an exact match.
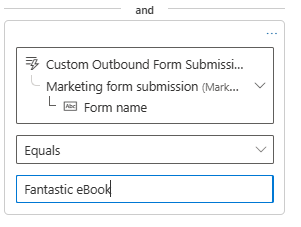
Another option would be to use a good naming convention of your forms, and then use Contains logic to only run the Journey for form submissions where the form name contains eBook for example.

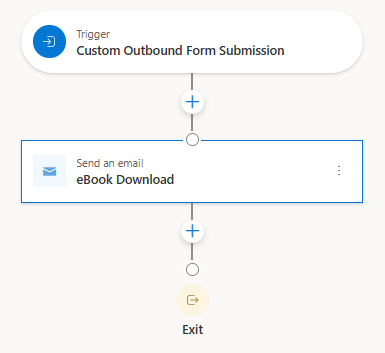
Then simply add in a send an email step to your Journey and pick the new email you created. Make it live and fill out your form!
The email received is now populated with the dynamic text with the name of the marketing form, and the button has a dynamically set URL which is the redirect URL from the marketing form. I hope this helps!

Check out the latest post:
Use Custom Event Registration Questions To Branch Your Journeys In Customer Insights
This is just 1 of 603 articles. You can browse through all of them by going to the main blog page, or navigate through different categories to find more content you are interested in. You can also subscribe and get new blog posts emailed to you directly.
Great approach, thank you! Can you think of an easy way to approach this with multiple links to multiple contents (e.g. Videos) that are not stored at the same “thank you page” (maybe the user can select contents from a list)?
Hi Johannes, so do you mean if someone fills out ONE form, then you would want to send them links to MULTIPLE places? If so, you would need to customise either the Marketing Form, or some other related entity and add new fields to store the links. For some of my customers we have added custom fields to store the link to a document download for example. Hope that helps!
Hi Megan,
have you tried to set up a Journey that triggers from a RTM form.?
I haven’t found any documentation for this. And can’t get it to work. Why use the RTM form if I can’t use the submitted data…..🙄
I did manage to create a solution in Power Automate where i did the following steps to get the submitting contact into a segment.
trigger on msdynmkt_marketingformsubmission, find form from msdynmkt_marketingforms, find contact from msdynmkt_createdentitylinks[recordId], and then a unbound action to add contact to a static segment. but it takes up to 30 minutes before the journey will trigger from the static segment.
Hi Lars, are you referring to the out of the box trigger named ‘Marketing Form Submitted’ and not the one that has the words Outbound marketing included in the name? I just tested it and it works (will write a blog on it). A couple of things to note. If your Compliance record is set up as Restrictive meaning, the customer opt-in is required to send out commercial communication, but you do not have an opt in field on the form, then the Contact or Lead being created will not have a compliance record. Therefore, they wouldn’t be able to get any communications sent to them.
You can check this out. If you fill out the form, you should be sent an email: https://meganvwalker.com/rtm-contact-form/
Here you go Lars – I wrote a blog post on it. Hope it helps! https://meganvwalker.com/triggering-journeys-real-time-marketing-form/
Hi, that is exactly the trigger i’m using. ‘Marketing Form Submitted’.
And i got your test email, so you proved that it is posible. But I dont see how i can filter which rtm form was submitted.
I see it now, i need to use the GUID. why do they make this so difficult…..
Next time i need to set up a RTM form i’ll use the trigger instead of my Power Automate flow.
Thank you for the new blog. that’s great.
Hi Lars, yes, a little frustrating and not easy to see that it’s the approach to take!