*** NOTE: ALL INFORMATION IS ACCURATE AT DATE OF PUBLISHING ***
Lead scoring models for Customer Insights – Journeys (D365 Marketing Real-time) has been around for a while now, but when it was first released it had a few ‘issues’ or ‘quirks’ shall we say. It’s taken me a while to write about it while waiting for those teething problems to work themselves out. Now, I will say I think it’s a valuable piece of functionality for those using Leads in Dynamics 365. It’s hard to manage and keep on top of all your leads and know which ones are most engaged or interested in your marketing communication, so assigning points to different ‘things’ they have done will help to build up a big picture of the leads. Let’s take a look at how to set it all up.
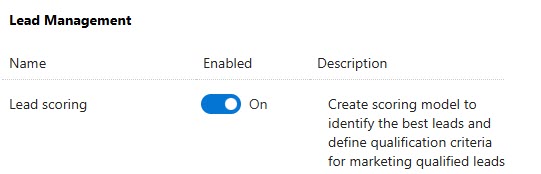
First, make sure you have the following feature switch turned on in the settings area. The scoring model will initially target only lead entities. In the future, the feature will expand to support other entities as well.
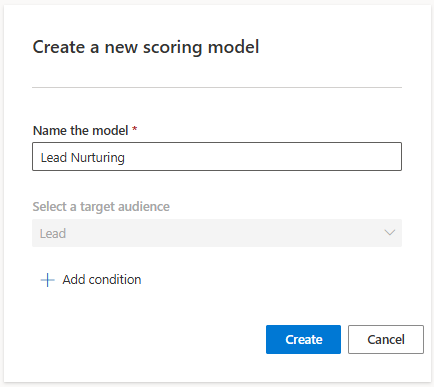
After that, go in to the Real-time marketing area and create a new scoring model.
Attribute Scoring
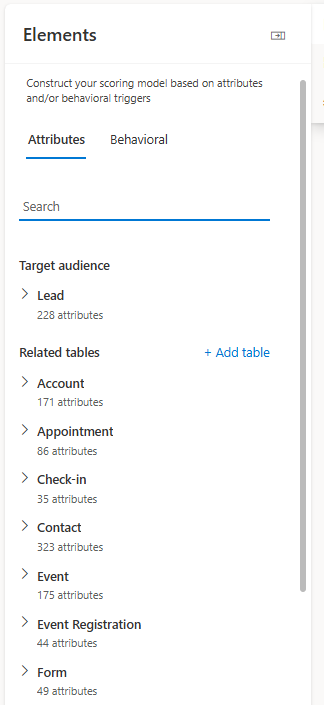
You’ll immediately see that it looks very like the segment creation or form creation experience, with a list of attributes down the right hand side. From here we can search for attributes to use as part of the scoring model.
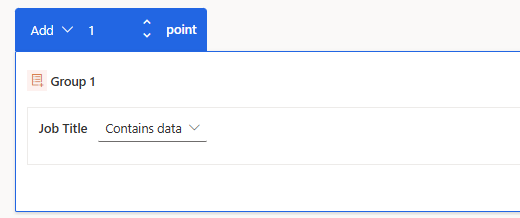
For example, searching for the attribute of Job Title, you can assign a point if that field contains data. Notice that the attribute is added to a Group, and that Group gets a certain number of points if the condition is met on a Lead.
We can then add in another attribute. Adding to an existing group will mean the Lead must meet ALL of those conditions to get the points, so we will put this in a new group. For this condition, I am looking at the Country/Region field on a Lead.
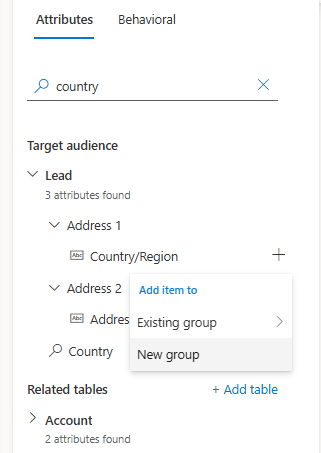
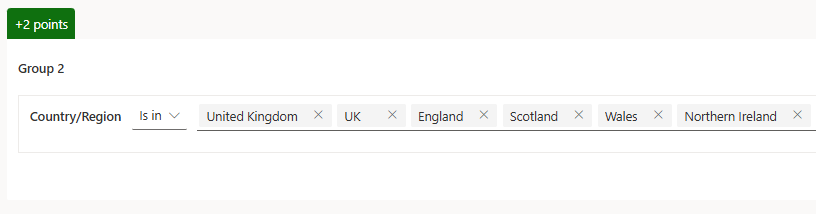
For this, I want to give 2 points if the Country field on the Lead is one of the following, so using Is in will check for all of these. You can continue adding attribute groups as needed. You can add up to 40 groups per scoring model.
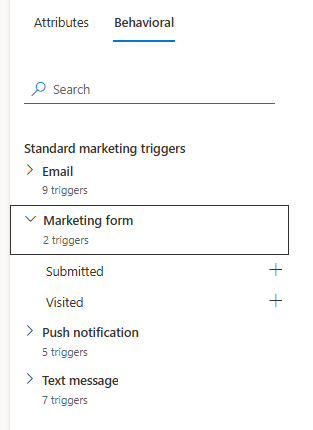
Marketing Form Scoring
In addition to using Attributes, we can look at behavioural interactions, similar to doing this when creating segments. Let’s give points when a marketing form is submitted. Clicking Submitted will add that to a new group.
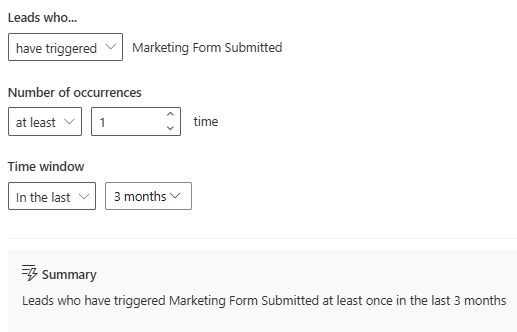
By default, it will add logic for Leads who have submitted a marketing form in the last 28 days. However, this can be adjusted to show in the last x days, months or even years.
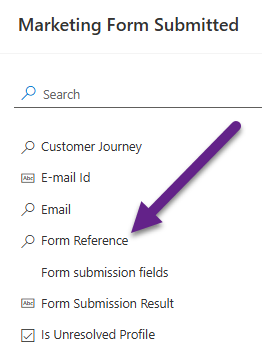
We can also add in the Form Reference as part of the filtering criteria.
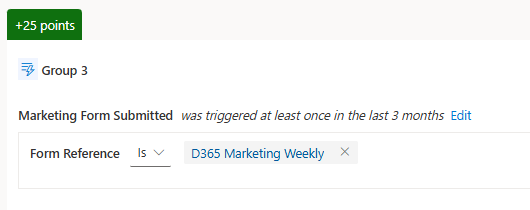
This will allow you to then pick a specific form (or multiple forms) to give more/less points for that form. In this example, submitting the D365 Marketing Weekly form would allocate 25 points to a Lead.
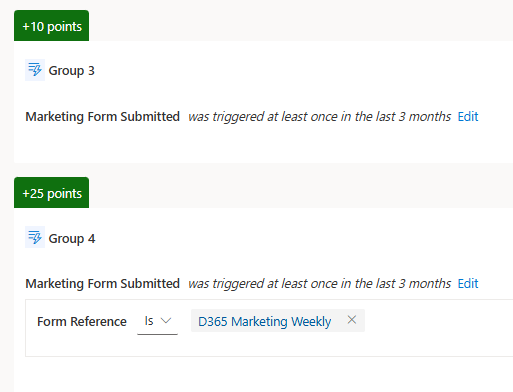
It’s not a good idea to try and give different points for every single form, but instead consider how many points someone should get overall for submitting a form, then only adding additional logic for ‘special’ or ‘significant’ forms you value higher. In the example below, someone submitting the D365 Marketing Weekly form would be giving 35 points for this submission. Someone submitting a white paper or other generic form would be given 10 points.
Email Interaction Scoring
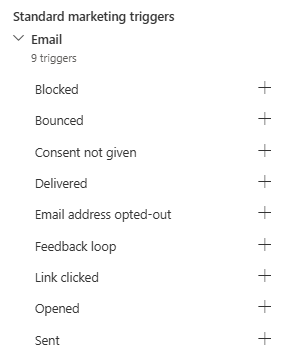
The email triggers are available to use in Lead scoring. Consider using this for things like emails clicked or opened.
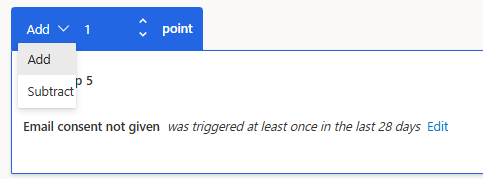
However, we can also use email interactions (or anything really) to determine if points should be taken away from a Leads overall score. If we use the interaction of ‘Email consent not given’, we can change the score from Add to Subtract.
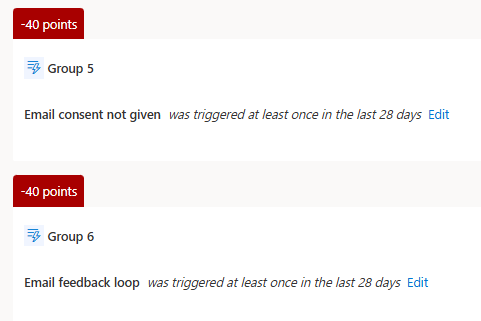
In the examples below, if Email consent was not given but the Lead was included in a Journey to send them an email in the past 28 days, 40 points will be subtracted. If an Email feedback loop was triggered (meaning the Lead marked the email as spam), 40 points will be subtracted.
Event Scoring
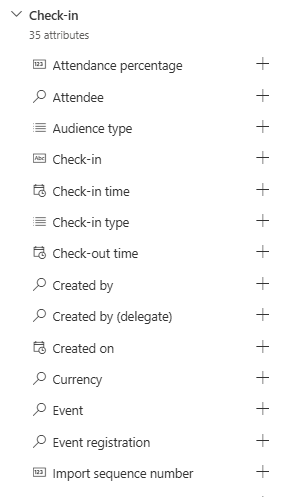
Events are an important part of marketing. You can’t use the behavioural interactions for this as they do not exist, but you CAN add different tables to use (same way as you would in the Segments) to allocate points. Although you can add the Event Registration table to find people who have registered for your events and give points, for me, using the Check-in table can sometimes make more sense. Anyone can register, but actually attending shows they are more interested and engaged in your products and services. Click to Add table, then find the Check-in table.
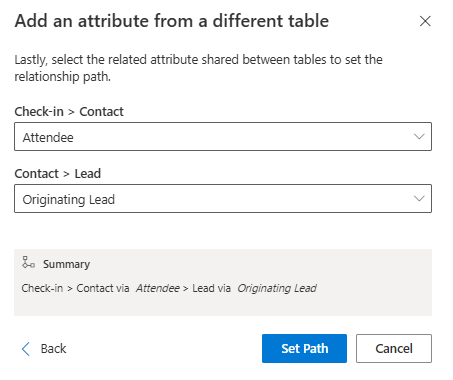
After adding it, click on the Event field which is a lookup field. After doing this, you will need to set the path that goes from the Check-in record back to the Lead. The path has Contact in the middle. You can’t register a Lead directly, so there will always be a Contact linking through to the Check-in.
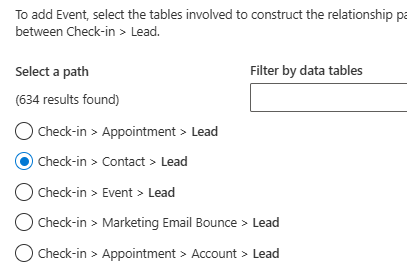
You will then need to make the connection and set the path between the records. This is the standard path with Check-in to Contact via the Attendee field, and Contact to the Lead via the Originating Lead field. If you have a heavily customised system you might have other options you need to use. Once you’ve added this, you can then use any field on the Check-in table (including the lookup for a specific Event) to filter and determine when the points should be applied.
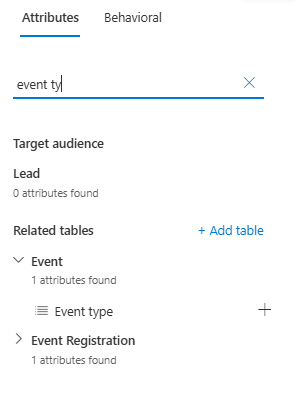
Another option is to add the Event table, and use the Event type field.
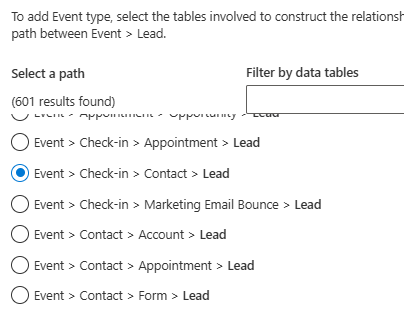
Again, we map the path from the Event back to the Lead. In this case, I am going from the Event to the Check-in record, then to the Contact, and finally to the Lead.
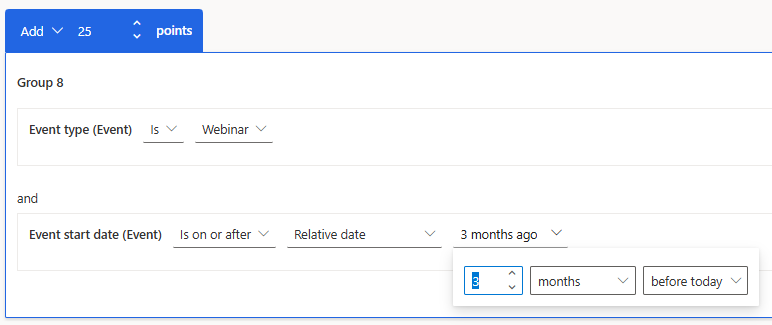
Using the Event type field from the Event table means I can then give a specific number of points for anyone that actually checked in to the event that was a Webinar, and then use the Event start date to only look for those that were within the past 3 months and allocate 25 points if this occurs.
Additional Settings
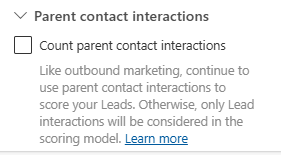
On the right hand side, we have a settings option that allows you to set a box to look at any Parent Contact interactions. If you are still using Outbound (not for much longer!) this might make sense if you are always creating a Contact for your Leads. This means you can also count the emails/forms etc that the Contact related to your Leads has. Again, even if you use this, Outbound will be gone in June 2025… so wean yourself off this quickly!
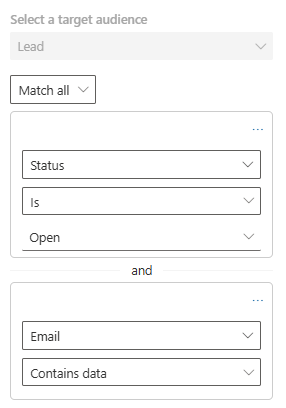
You can also add extra filtering to the logic of which Leads get scored. It might make sense to only score those that are Open (neither Qualified nor Disqualified) and also that contain an Email address (otherwise how will you get in touch with them?).
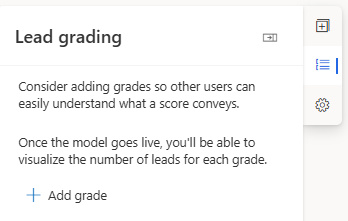
You can also add Lead grading. This is the ability to allocate a grade or name to your groups of Leads based on them falling within a specific score range.
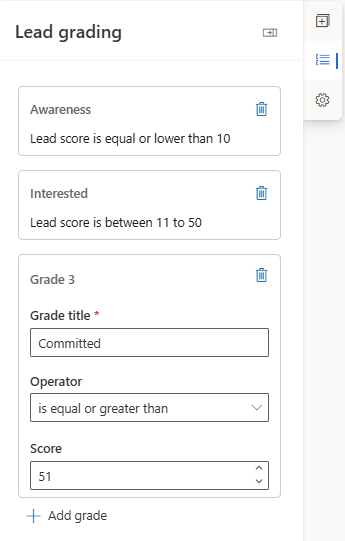
Below is an example of grading that could be used based on the score range. Once you’ve set all of this up, go ahead and make your soring model live. Depending on the size of your database, it could take hours for it to finish. I would suggest checking on it at the end of the day, or even the next day to see the results.
Viewing Score Information
Once it has all finished populating, you’ll get some insights from the scoring model itself. You can see the number of Leads that are scored overall, along with the number within specific ranges, and any grades you might have set up. It will show the following:
- Total number of leads scored
- Score for top 20% of leads
- Score distribution among all leads
- Volume of leads per grade
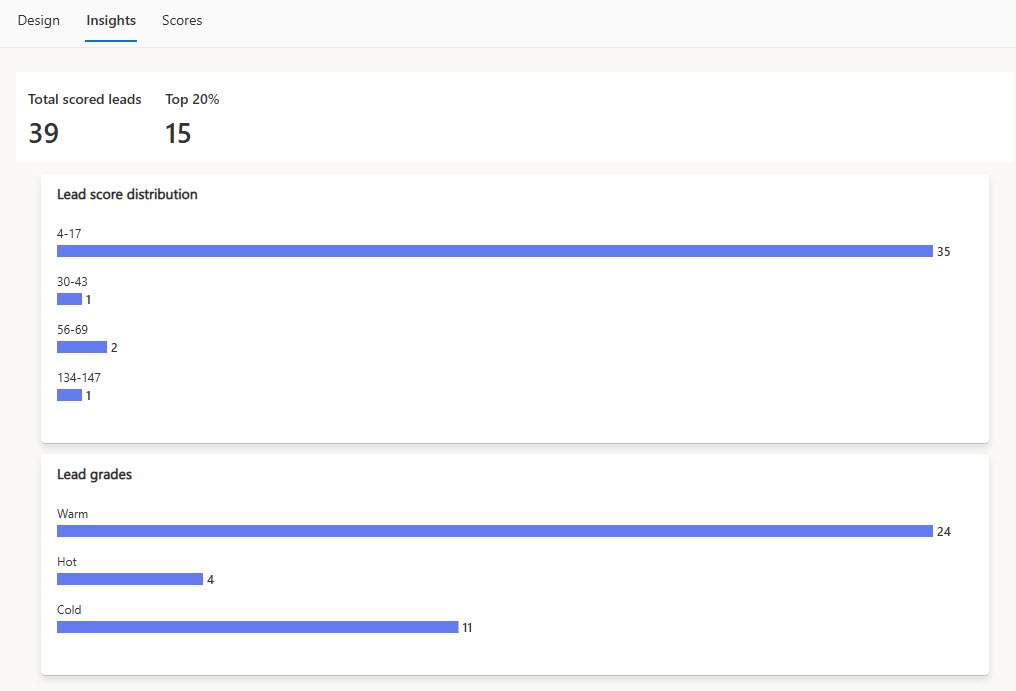
The scores tab shows you all of the Leads that have been allocated a score, along with the grade (if you set these up).
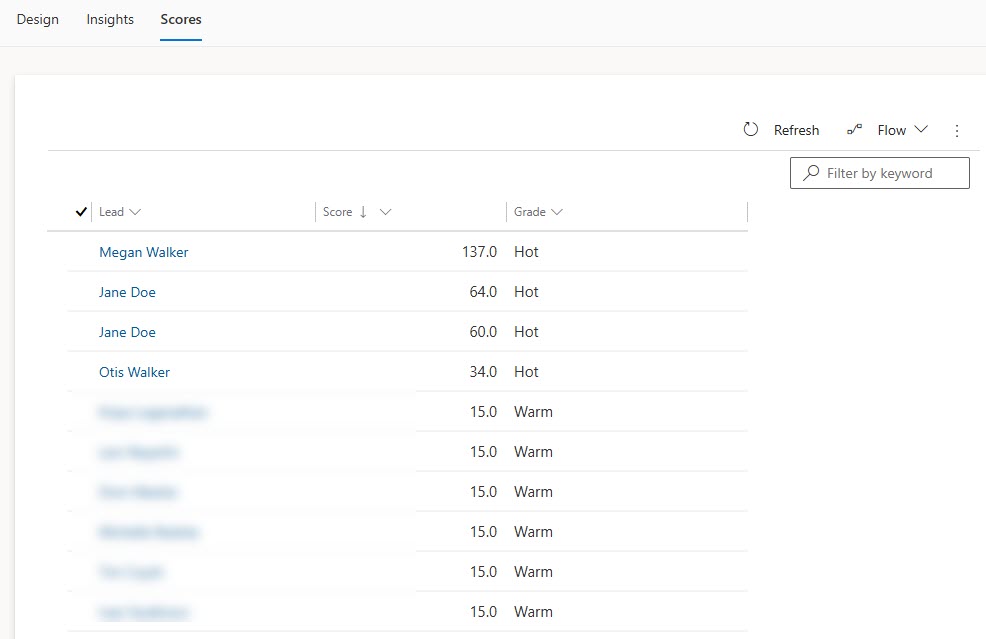
Navigating to one of your Leads, if you haven’t removed it from the standard form, you should see a Lead scores tab. A Lead can exist in multiple scoring models so you may see multiple rows listed here.

Tips and Information
Here are a few things to consider and be aware of when using Lead scoring:
- There is no ‘overall score’ for a Lead that can be added to a view at this time. I’ve added this as an Idea, so up votes would be great to hopefully get this added as a future update to make this feature more valuable.
- Leads with a score are linked to a Lead score record
- You can stop and edit your scoring model, then publish it again. This makes the original scoring model inactive and creates a brand new active one. This updates all of the Leads again. However, what it also does is creates a new Lead score record for each lead, leaving the old one still Active which can be a bit messy behind the scenes
- You can add up to 40 groups per scoring model
- It can take up to a day to calculate for the first time. After that, scores are kept up to date for each Lead as an when they meet the conditions
- Make sure you check security roles. Out of the box there are two security roles: Lead Score Modeler and Lead Score Viewer. More information on those here.
- The scoring approach I’ve used in this post are just suggestions. You can set up your own model in whatever way makes sense for your own organisation and requirements.
- You are able to add or subtract points which means a Lead can end up with a negative score
- There is currently no way to ‘reset’ a score back to zero. Using the timeframe for behavioural interactions is a good idea to make sure you aren’t giving a Lead high score for form or email interactions they had over 6 months ago
Check out the latest post:
Use Custom Event Registration Questions To Branch Your Journeys In Customer Insights
This is just 1 of 603 articles. You can browse through all of them by going to the main blog page, or navigate through different categories to find more content you are interested in. You can also subscribe and get new blog posts emailed to you directly.
Since we went over to rtm the lead scoring have been everything but smooth.
First we had a bug with ms turning on business unit for lead scoring without us enable this feature in the settings area.
Then we have the actual time for the lead scoring to come in. At first it took up to 4 hours but is now down to up to one hour…
Still not near outbound.
We now have 2 tickets that has ended up as fixes for coming releases.
The first one is email link clicked and when you select each time the link is clicked. That doesn’t work.
The latest issue and the most critical for us is a bug regarding the behavioral part of the lead scoring for forms.
We produce a lot of material and have different types of forms for our downloads. So we need a scoring model that is behavioral -> form submission -> form field result and with the condition each time.
This one will also be fixed within a month, but haven’t worked since we went over to rtm in may…
Hi Sebastian, yes, I would agree, it was not a smooth process at all. Good to know about the issues you experienced and that there are fixes coming for them. I think it’s soooo much better now than it was but still quite a way to go.
Hi Megan, I think your last bullet point already answers my question, but just to be sure: am I right that points are ‘disappearing’ (being subtracted) after the time frame of the behavioral interaction? For example, if you’re giving 10 points for a form submission in the last 28 days, are these points being subtracted from the score after 29 days?
Hi Mirjam, yes correct. That shouldn’t put something in to a negative score though, it should just be like those points never existed in the first place if that makes sense.
What happens when a Lead’s Lead Score meets the Qualification threshold and is updated to Marketing Qualified and Sales Ready, but then the Lead’s Score declines (such as due to the example of time-based scoring values like form filled in last 28 days)? Does the Lead become “un-marketing qualified” or is it a one and done thing where once it becomes Marketing Qualified / Sales Ready it cannot go backwards?
Hi Scott, no, there is nothing that ‘goes back’ in terms of changing any fields when the score declines. Anything other than the standard offering from Microsoft would need to be managed using Power Automate.
Hey, would you happen to know what the schema names of those tables are? We originally had removed them from the app because we were not going to use them but wanted to test them. However we’re unable to add them back (via the app edit or from the toggle on/off)
Hi Tim, these are the two tables related to Lead scoring. I was just able to select them and add to a custom app BUT I couldn’t get the form to load.
I removed the two main forms on the Lead scoring model table from the custom app, and then things worked for me without any errors or issues.
In outbound marketing, you had the option to add ‘frequency’. Is there a setting to do this in RTM?
For example, if a lead opened an email twice, (and you set the scoring model to attribute 25 points to a lead EACH time an email is opened) the lead score would be 50.
Hi Tara, it doesn’t currently exist! Might be a good one to look for on the Microsoft Ideas site. If it already exists, give it a vote, otherwise you could add it. Happy for you to link it back here for others to vote for also! https://experience.dynamics.com/ideas/categories/list/?view=New&viewId=6724a172-35a9-e911-a991-000d3a4f3343&forum=dfa5b83d-9e4c-e811-a956-000d3a1bef07&category=fab685e9-9663-e811-a963-000d3a1bec70&mf=#tabNew
Hey Megan,
First of all, very well explained article. I was wondering if there is a way to ship/migrate settings and configurations to another environment?
Thanks Saqib! I’ve never tried it, I don’t believe so in terms of just exporting/importing. Perhaps with a migration tool it might be possible.
Hi Megan,
while working on the transition to real-time marketing with a customer we realised point to be added to your “Tips and information” list 🙂
In the past you were able to give each condition a display name inside your model. Now you only have Group 1, 2, 3….
My customer already said that this makes it really hard to keep track of the parts beeing considered for the points, when you have a bigger model.
So far I couldn’t find anything on the roadmap or as an idea (until now :-)). Might be worth to know/share for others: https://experience.dynamics.com/ideas/idea/?ideaid=a8d1b828-a208-f011-a4dd-6045bdbef22b
Oh 100% agree with you Jan and I raised this when the feature first came out. It’s very annoying. Voting for this too!!!
Hi Megan, is there a way to include purpose/topics into a scoring model? I would like to include Purpose/Topics in my scoring model (increase score if someone has Purpose Commercial = Allow), but I get an error message when I try to add it in related tables.
Thank you!
Hi Max, unfortunately there is no direct link from a Contact Point Consent (or Purpose or Topic) and a Contact or a Lead. It is linked via an email address. You could potentially use the behavioural interactions and perhaps reduce the score if there is an Email address opted out behaviour instead?
Hi Megan, thanks for your quick responste!
Mhm, I want leads with consent = opted in to be scored from “marketing generated” to be “marketing qualified” -> as the indicator to be marketing qualified is consent to reach out. I guess this won’t work with interaction data / minus scores for opt-outs.. :/
Not with the Lead scoring as it currently exists. I guess the only way would be to do something using Power Automate that triggers when a Contact Point Consent record is created or modified. Not straight forward but doable.
Hi Megan,
Thanks for the article. A quick question, how come there’s no way to use website interactions (visits & clicks) in the lead scoring model. Do you know of a way to do that or if it’s going to be added in the future?
Hi Moe, it’s not there because Microsoft haven’t added it yet. Hopefully that is on the way, but I don’t have a time frame for you.
For Event Check-In, I can’t use Check-In table, it will return error, so I use Event > Check-In > Contact > Lead but no scores being recorded?
Hi Esmond, both options for tracking Event (Check-ins) that I showed should be available to you. These are standard tables so the relationships between them should be the same in all environments (unless someone did something HORRIBLE in the database). One thing when tracking Event stuff, it will only score if the Contacts who have a Check-in are linked to a Lead and that Lead matches your criteria on the scoring model. If the Contacts who attend your events are NOT linked to a Lead, then no, there would be no scores.
Hi Megan,
Thanks for your article, your blog is very helpfull !
I was wondering if there was a way to overcome Microsoft’s lack of lead scoring/website tracking development by creating a power automate that could increase the scoring with website visits ? Maybe with dataverse triggered website visit and then using perform a related action ?
Hi Maxime, hmmmm, not sure to be honest. The website visits are not stored directly in Dataverse, so you would need to connect through to where they are stored and then somehow do something that triggers an update from Power Automate. I don’t know how feasible it would be. This might help in terms of where the data is stored: https://learn.microsoft.com/en-us/dynamics365/customer-insights/journeys/fabric-integration