*** NOTE: ALL INFORMATION IS ACCURATE AT DATE OF PUBLISHING ***
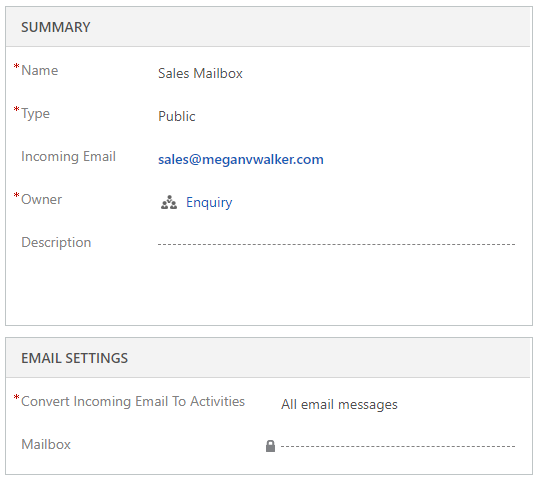
I’ve talked about using Queues previously, either to use to create a case or to send emails automatically from them. This post is about creating a lead record as needed from emails coming in to a group sales mailbox. First, get your queue set up. Follow the link above for the creation of a case to see how to get started and approve and test the mailbox etc. Make sure that All email messages is set in the Convert Incoming Email To Activities option.

Now you would think the next step is to set up a record creation rule to create a Lead. That was the assumption I made too. However, when considering how this works, we need to rethink how we will create the Lead. A mailbox could get emails from all kinds of people, some of them already set up as Leads, some as Contacts, some we don’t have as a record yet in CRM. Using a record creation rule will create the record and link it to any existing record based on the email address of the sender. If the sender doesn’t exist yet in CRM, a Contact record will be created. Hmmm, that doesn’t really work in terms of needing a Lead for unknown senders, but the system will create a Contact for us. A bit messy! So instead, let’s look at using a workflow to decide how and when to create a Lead, and when to let the Owner of an existing Contact know an email to that inbox has been received. Ready?
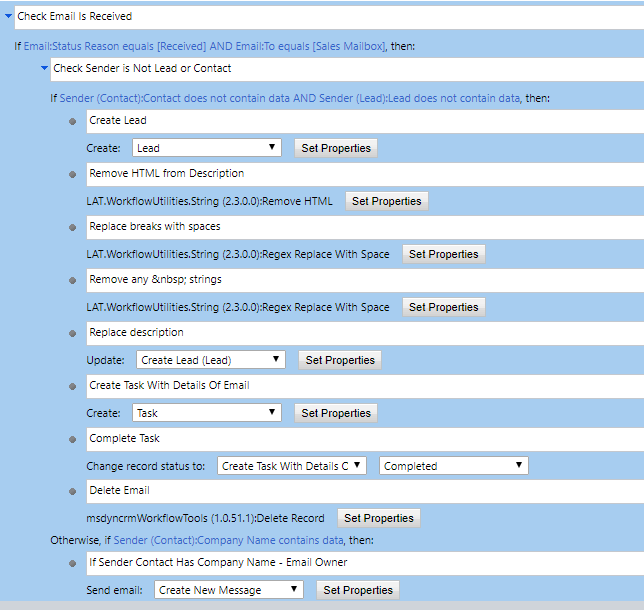
So here is the workflow in full. Run it against the Email entity and run it when the Email is created. I’ll break each part down beneath:

First – Check Email Is Received: Add in your condition to make sure the email was received, and that it was sent TO the Queue you are using
A – Check Sender Is Not Lead or Contact – make sure the Sender (Contact) AND Sender (Lead) don’t contain data. In otherwords, make sure the sender isn’t already linked to one of those two types of records.
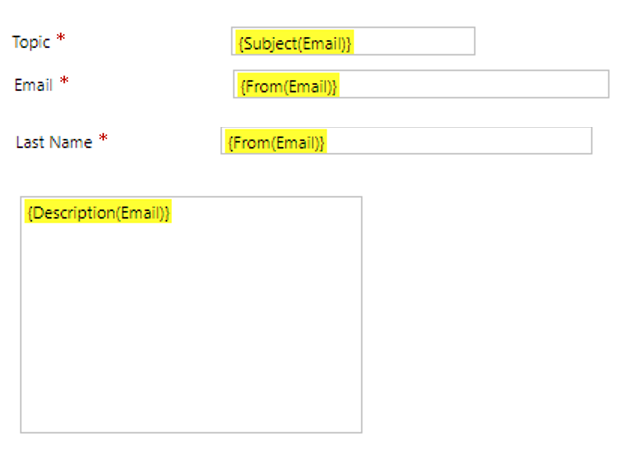
1. Create Lead – create the Lead record (scroll down for which fields to use from the email to do this)
2. Remove HTML from Description – use this article to review how and why to do this
3. Replace breaks with spaces – this ties in to the article above. We are basically stripping out as much of the crap from the email message as we can
4. Remove any strings – this is something else that can end up in the email body and might need removing
5. Replace Description – we now need to update the Lead record we created and replace the description with the final string created in the last step
6. Create Task With Details Of Email – we aren’t going to be keeping the Email in this situation. It’s not linked to a Contact or a Lead at this point. While we could change the status of the email and set the new Lead in the Regarding field, there is no way to link the FROM field to the new Lead. If someone were to click on the record link in the To field they would be prompted to link it to a record, which would create a manual step and could be confusing to the user. So instead of using the Email, we’ll document the details of the email in a task so it’s not lost. (scroll down for which fields to use from the email to do this)
7. Complete Task – change the status of the task you have created to Completed
8. Delete Email – finally we are going to delete the original email so it’s not just hanging around. This was doing using the Delete Record option from Demian Rasko’s Workflow Tools solution.
B – If Sender Contact Has Company Name – Email Owner – this could have a slight variation depending on what is important to you, but basically if the email received is from a Contact who works for a Company, send an email to the Owner letting them know there is an email to review.
When creating the Lead, use these fields (or whatever makes sense in your environment).

When creating your task, use these fields (or whatever makes sense in your environment). Make sure in the Description you use the last string you created in step 4.

Any further emails sent from the email address where a Lead has been created will now be linked in to the Lead record. So, can you use the record creation rules? Yes, of course, but to me there were just too many challenges and reasons not to.
Check out the latest post:
Exit Customer Voice Survey Respondent From Journey When Using Other Regarding Records
This is just 1 of 489 articles. You can browse through all of them by going to the main blog page, or navigate through different categories to find more content you are interested in. You can also subscribe and get new blog posts emailed to you directly.

Hi Megan,
Thank you for this very usefull post 😉
I have followed it but no prospects are created :
– when an email is sent to the configured mailbox, it is well retreived in the queue mailbox : so far, so good !
– then the workflow is triggered, and it ends with no errors, but no prospect is created.
The thing is : MS Dyn automatically creates a contact when an email is received, so the workflow condition “Check Sender Is Not Lead or Contact” is always false (I guess the contact is created before the workflow is triggered), and the workflow ends there.
I work on Microsoft Dynamics 365 version 1710 (9.1.0.3043) online.
The used email address is a generic one : no MS Dyn user is related to it, only the queue, so I cannot deactivate the record creation in “my personnal settings” like we can see on this post : https://community.dynamics.com/crm/f/117/t/278790
Do you have a solution to this problem ?
Do you know how to deactivate record creation for this specific queue ?
Thank you.
Best regards,
Philippe.
Hi again,
I found a solution for this issue : deactivate the record creation in the owner of the queue personnal settings, email tab.
Best regards,
Philippe.
Excellent! Glad you found the solution, nice work!