*** NOTE: ALL INFORMATION IS ACCURATE AT DATE OF PUBLISHING ***
In a previous post I talked about how to set up a user with Administrator rights to be able to access and edit a Microsoft Dynamics Portal. There are different ways a Contact can get access to a portal, which all depends on your own internal preference and policies. A Contact could register on the portal, but then you need to manage those who have registered and determine if they really SHOULD have access. You could also send out invitations, but that’s a little more time consuming. In this post we will look at how to provide contacts with access to a portal via a workflow.
Keep in mind that the following workflow will most likely need to be amended slightly so it works for an organisation rather than copying exactly what I have suggested. This post also assumes you already have your portal set up, and any web roles created that you need. Set the scope of the workflow to Organisation, and make it an On-Demand process.
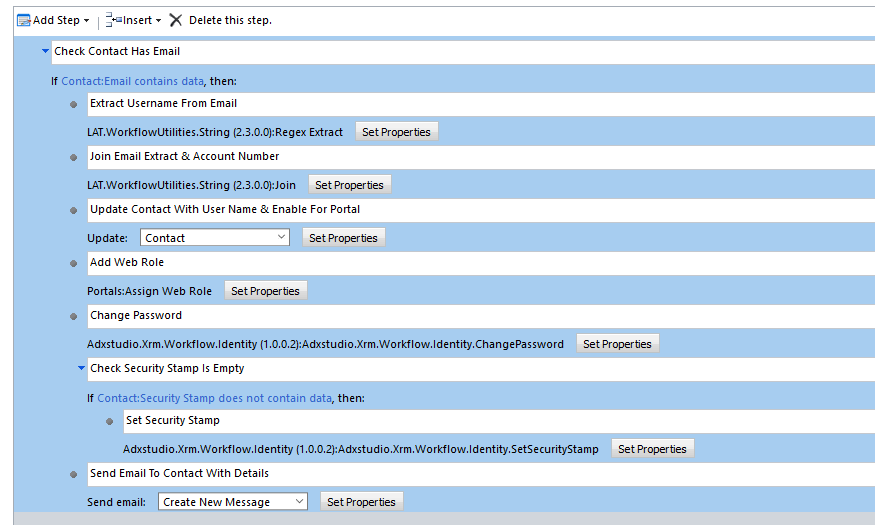
Here is the workflow in it’s entirety, although I am going to break it down step by step. You will need to make sure you have Jason Latimer’s CRM String Workflow Utilities solution installed first as it’s needed for a couple of steps.
The first step in this example is to create something unique which can be used for the username and password for the Contact. I’m going to use the email address on the Contact, so I have a condition to check and make sure the Contact record has an email address. Then using the Regex Extract option from the CRM String Workflow Utilities solution. Set the properties to search the Email field on the Contact, and the Pattern to be ^[^@]+ (special thanks to Ryan Maclean for his help with the expression!). This will extract everything that exists BEFORE the @ symbol in the email address.
In the next step, we are going to join the extracted part from the email address, and join it to the Account Number on their related Account record. This is what I mean by, don’t copy this exactly if you don’t use the Account Number field! 🙂 – use something that will create a unique string for each person. Leave the joiner field empty.
Next, we are going to add the string we just created in to the User Name field on the Contact record. This field is added in when you set up the portal. Also, set the Login Enabled field to Yes.
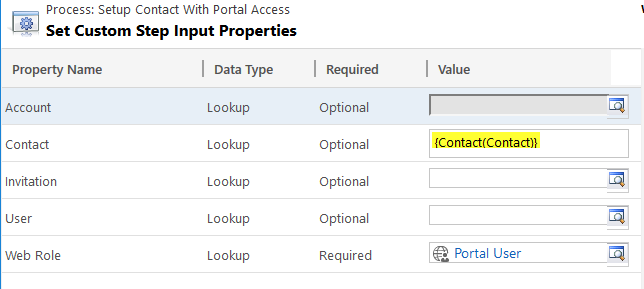
Next, we need to assign a Web Role to the Contact. This determines what kind of access they will have. If you just have one Web Role, you will only need one step. If you have more than one, you will need to add in some kind of condition to check fields, or values on the Contact to determine which Web Role they should be given. Set the Contact Lookup field to the Contact field. Then pick the Web Role using the Lookup control.
Next, we will use the same string we created with the extracted email part, plus the Account Number and use that to add to the Password field. Leave the Password Hash Attribute Name field empty.
Then add another condition to check to see if the Security Stamp field on the Contact is empty. If it is, use the Adxstudio.XRM.Workflow option and select Set Security Stamp. Leave the Properties empty.
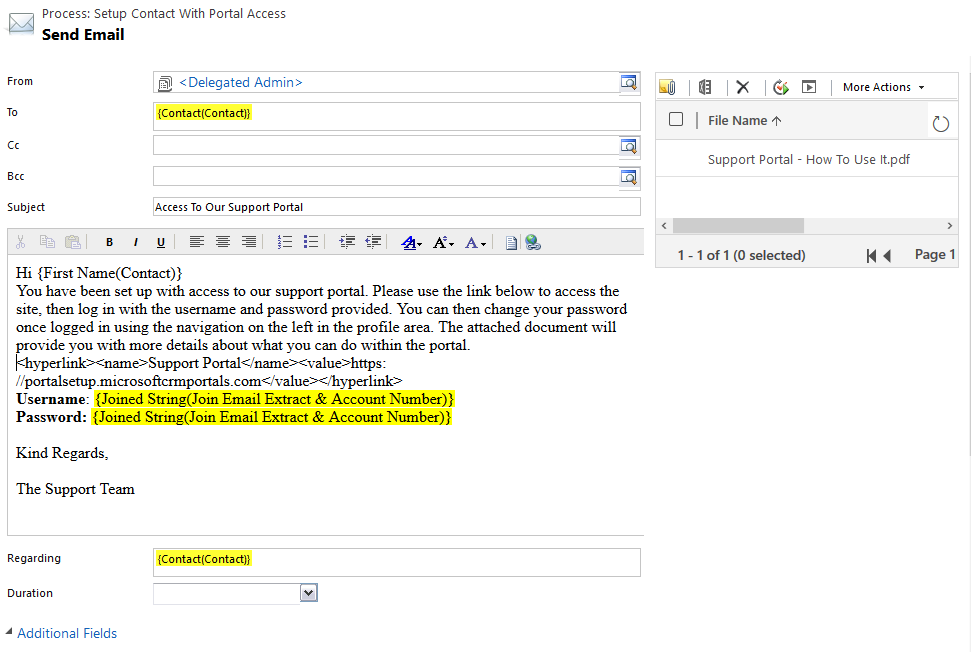
Finally, do your Send Email step. You can even create a document that gives them details about the portal and send that out too. Pull in the fields or strings you used for the Username and Password, and don’t forget to provide a link to the portal they are going to be logging in to!
The last step after publishing the workflow, is to use it! You can do this on an individual Contact record, or even better, run it on multiple Contacts from a view instead. Great if you have just set up a new Customer and want to give access to everyone that works there at one time!
Check out the latest post:
Set A Business Process Flow Stage With Custom Page
This is just 1 of 572 articles. You can browse through all of them by going to the main blog page, or navigate through different categories to find more content you are interested in. You can also subscribe and get new blog posts emailed to you directly.


