*** NOTE: ALL INFORMATION IS ACCURATE AT DATE OF PUBLISHING ***
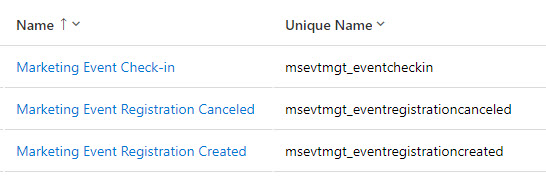
There are three out of the box standard triggers that relate to Events in Customer Insights Journeys (D365 Marketing). One for an Event Registration Created, one for Event Registration Cancelled and one for an Event Check-In. When building your Journeys to cover an Event, all three can be used in a combination of ways and in different places. This post will walk through when they can be used to enter or exit a journey, on if/then branches, set wait time frames or to create custom goals. Let’s take a look!
1.Event Registration Created – If/Then Branch
First let’s consider a Journey run to your existing customers who are Contacts in a Segment. You send out an email but then you want to send a reminder a few weeks later to anyone who hasn’t registered. After the first email you can add in the step of ‘respond to an action’ which creates an if/then branch.
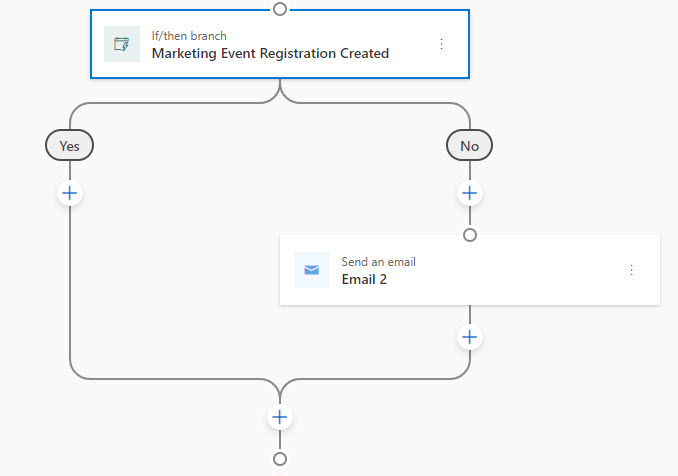
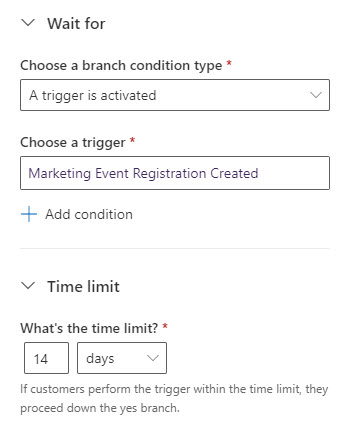
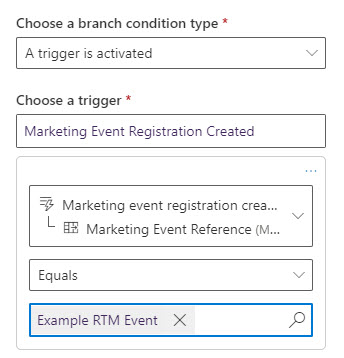
On the if then branch, do it based on a trigger being activated and search for the Marketing Event Registration Created trigger. The time limit can be set to 14 days to give someone time to register. Based on the branching logic above, if the trigger doesn’t fire that means they didn’t register so we can send them a reminder in 14 days.
However, what if you have more than one webinar you are running at once? We only want to trigger this if they register for the same event. To do this, click on the Add condition option below where you set the trigger on the branch condition above. Then click on the Marketing Event Reference relationship.
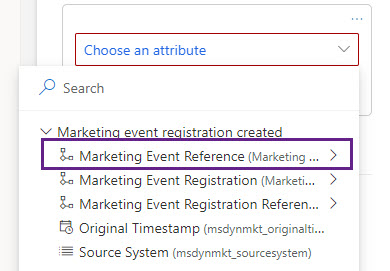
Then click on the very top item that shows in blue to condition on the Marketing Event Reference.

When we do this, the lookup option shows so you can set the specific Event without needing to mess about finding the ID of the Event or anything else. Brilliant! So now, if someone registers for the Event that we emailed our customers about and they do it within 14 days of getting the first email, we won’t email them a reminder, otherwise the customer will get a second email about the event.
2. Event Registration Created – Journey Trigger
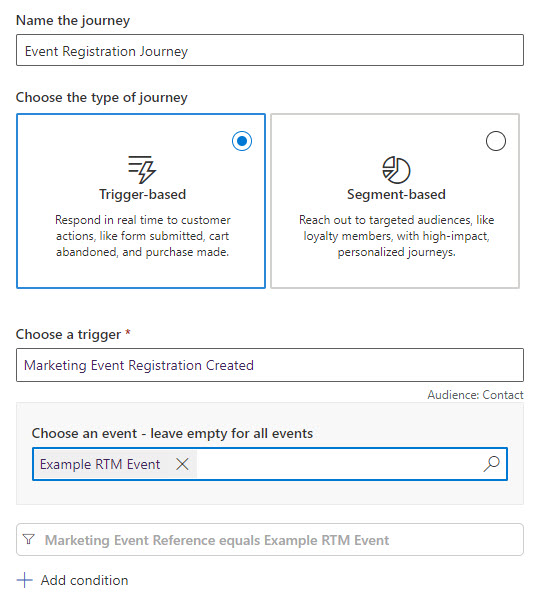
This is the simplest and most common use for a trigger, as the starting point of a Journey. In this example, we can have someone go through our Event Registration Journey if an Event Registration record is created. If we leave the Marketing Event Reference empty, the journey would run for every single Event Registration record created rather than a specific Journey such as the Example RTM Event set below. Simple!
3. Event Registration Created – Custom Goal
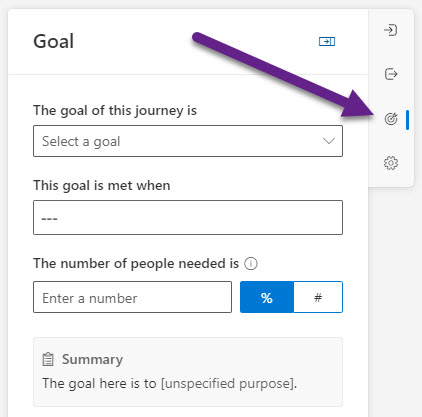
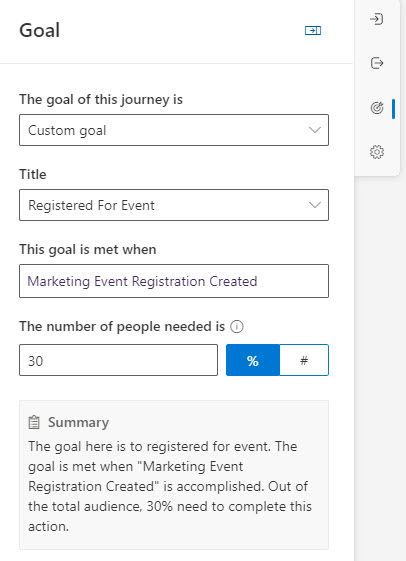
We can also use triggers to create custom goals on a Journey. So consider setting a goal for your initial Journey where you send an invitation to your current customers for your upcoming webinar, say 20 or 30% of those people registering. Click on the Goal icon from the right side of the Journey to get started.
Select custom goal from the first dropdown. In the second one, it’s not so obvious, but click in the space at the bottom and type in the name of your goal, then click the plus button next to it.
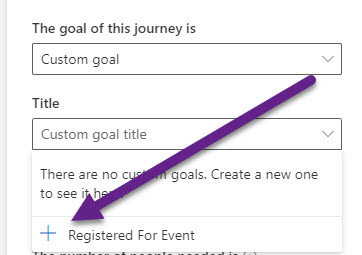
Now we can pick the Marketing Event Registration Created trigger to say that the goal is met when this trigger is fired for a Contact going through the Journey. You can then set the percentage or number of people that are needed to meet the goal. You will then see how far the journey is along in meeting the goal and can view under the Analytics section when looking at Journey reports.
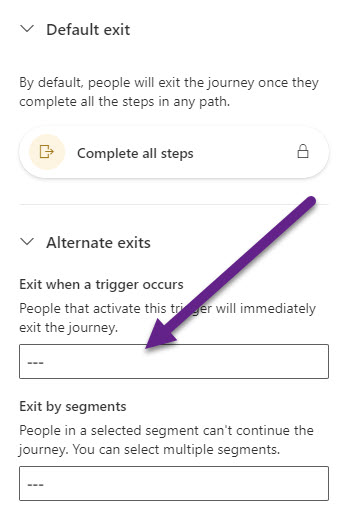
4. Event Registration Cancelled – Exit Trigger
Another option for triggers is to use them as alternate exists. The default exit for a Contact going through an Event related Journey would be for them to get through all of the steps laid out. However, we can also make them exit the Journey if a trigger occurs.
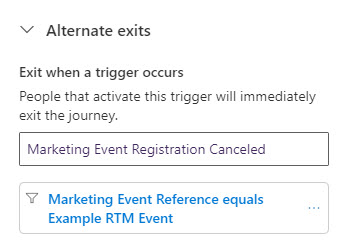
In this example on a Journey that is running after someone registers for an Event, we can exit them if the Marketing Event Registration Cancelled trigger is fired, and use the Marketing Event Reference relationship in the condition to set it to be specific for the same Event being used for the Journey. That way if someone cancels their registration, the Contact will no longer get any of the additional emails from the Journey.
5. Event Registration Check-in – If/Then Branch
In this scenario we can add to the end of a Journey that is triggered when someone registers. We can wait until an Event Check-in record is created, then send a follow up email after the event has finished to say thank you to them for attending!
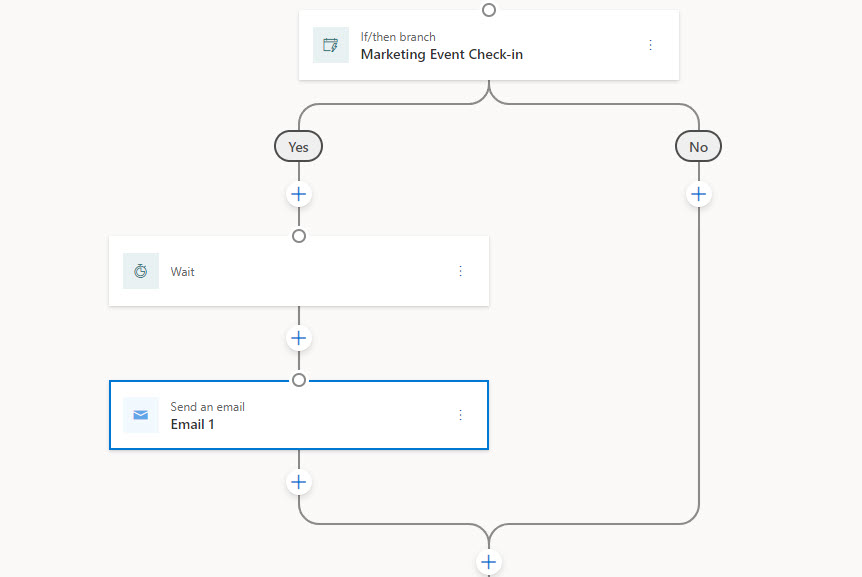
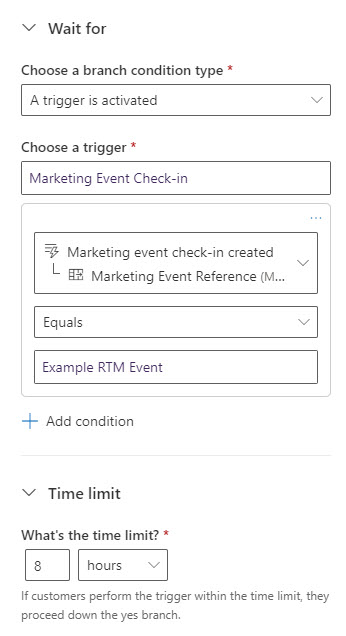
On the top of the if/then branch, select the option to branch based on a trigger being activated, then pick the trigger of Marketing Event Check-in. You can then add in the condition using the Marketing Event Reference at the top level to use a lookup to find the same Event! Set the time limit for long you want to give the Contact to check-in. So if it’s an all day event, maybe you give them a day or 8 hours, vs maybe you give an hour or 2 for an online webinar.
6. Event Registration Check-in – Custom Goal
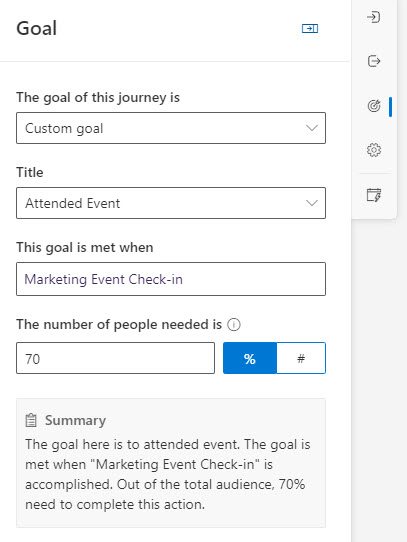
Similar to the Custom Goal for if someone registered for the event, we can add a custom goal to a Journey that is for the entire Event that triggers when someone registers. Our goal could be that 70% of the people who registered actually Check-in for the Event. We can add the custom goal, give it a name, then use the Marketing Event Check-in and set the percentage to be met to achieve our overall goal.
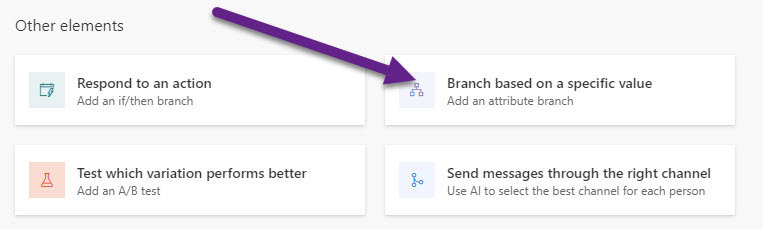
7. Event Triggers – Branch On Attributes
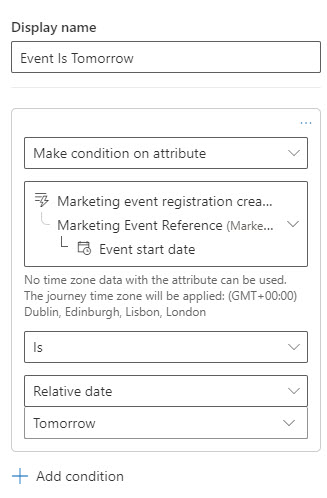
In this last example, we can add in a branch based on a specific value. Using the Event Start Date we can determine if the Event Start Date is tomorrow, then send an email if it is.
We can rename the top level of the branch to indicate the purpose, then rename each branch (or the one branch in my example), then decide what to do on each branch.
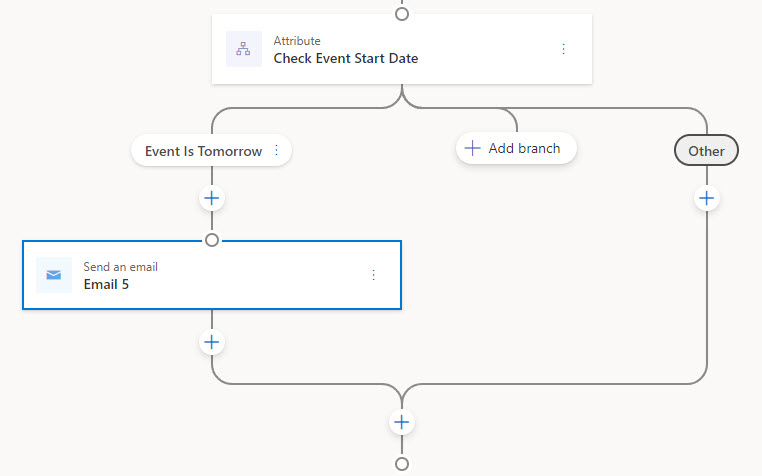
For the branch of ‘Event Is Tomorrow’ the condition is on an attribute, but we can pick that attribute from the trigger itself. Here we can see the Marketing Event Registration Created trigger is used to then go through to the Marketing Event Reference relationship and select the Event Start Date and see if it is Tomorrow.
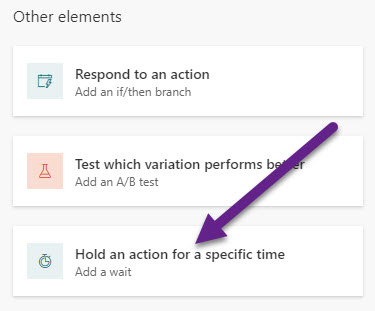
8. Event Triggers – Wait Times
If you scroll back up to example 5 above, I have a wait time added in after an Event Check-in trigger is fired. This is an example of how you can use it. We may want to send a follow up thank you email to people who attended the event and therefore had a check-in, BUT we don’t want to send them that thank you until AFTER the event has finished. So let’s use a trigger to set how long to wait until the email goes out.
On the wait time, use the option for ‘until a time specified by a trigger’. From there, pick the Marketing event registration created trigger, then go through the Marketing Event Reference, and then pick the Event end date. From there, we can set that people will move on to the next step (the one where they are sent an email) 1 hour AFTER the Event end date. Perfect!

Any other suggestions?
Am I missing anything? Are you using the Event related triggers in any other way? I would love to hear about it in the comments below!
Check out the latest post:
Use Custom Event Registration Questions To Branch Your Journeys In Customer Insights
This is just 1 of 603 articles. You can browse through all of them by going to the main blog page, or navigate through different categories to find more content you are interested in. You can also subscribe and get new blog posts emailed to you directly.
Hello Megan,
Thank you for this article; it was very interesting as always! I am delving into D365 Real-time Marketing, and I would like to create a standard journey for all my events.
The journey would be relatively simple. Here are the key steps:
– When someone registers for an event –> Send a confirmation email
– Send a reminder email 7 days before the event
– If the person attends the event –> Send a thank-you email
– If the person doesn’t attend the event –> Send another email
Hi Quentin, you should be able to achieve that using the different standard triggers from this blog post. Like you said, relatively simple. I’ve also written other posts about events that should give you different examples. Good luck!
Hi Megan ,
Thank you for your reply.
Maybe my question was not clear. I want to create a unique journey that meets these conditions. I do not want to create a journey for each event I manage. Do you think this is possible ?
I am having trouble because it means that I need to implement dynamic conditions in the journey.
Hi Quentin – you would likely need to create a custom trigger to use in your emails and journeys. These might help:
https://meganvwalker.com/event-registrations-real-time-marketing-journeys/
https://meganvwalker.com/reminder-emails-events-using-real-time-marketing/
Hi Megan, thank you for this article. I wounder how do you make sure that the event registered (contacts) have the ability to cancel their registration?
Hi Madelein, there is no way currently to do this out of the box. You would have to set up a custom trigger or workflow that if someone filled out a form or something and submitted it, you then find their event registration and cancel it. It’s not something that would be easy, and would definitely need some customisation.
Hia Megan,
I want to make sure I understand the registration and cancellation trigger.
Suppose I have one customer journey for all event registrations where I send a +7 days and +1 day reminder email. I also use the “Exit when a trigger occurs” exit on the journey with the event cancellation trigger.
If a contact signsup up for two events, A and B and after a few day cancels B, then will the journey understand that contact has triggered the exit for Journey B?
To be clear, I have not specified the events for this journey, I am leaving it blank as I want it to cover all events.
Hi Stian, if you want it to cover all events, then using the event cancellation trigger to exit them would indeed exit them no matter what event (due to the lack of definition). In that instance, you would need to do some kind of custom trigger and use the binding id to make sure if your custom trigger fires for the event specified in the trigger they are taken out. So not using the out of the box triggers, but making something different that would work for your ALL EVENTS scenario. https://learn.microsoft.com/en-us/dynamics365/customer-insights/journeys/real-time-marketing-correlate-triggers
Hi Megan,
I’m setting a journey for an event that has two different workshops.
I created an event in Dynamics with two different sessions (the workshops) and I made a form with checkboxes that allow attendees to choose which workshop they would like to attend within the event (they can tick both workshops if they wish).
I would like the attendees to receive customized emails to confirm their registration and reminders with content related to the specific workshop that they are attending, but I can’t seem to manage to create a journey whit two different branches that allow for that.
Do you have any suggestions? Should I create two different events and journeys instead? (one for each workshop).
Hi Antonia, if you do a branch, then if someone picks both, they will only go down the first branch for the first workshop and not the other. Instead, I would suggest doing some kind of check on attribute, or trigger, then if the condition is met, send the email about the session. Then the next step could be another check to see if the other session was selected, and then send an email about the session. That way they get the email about the session. You might also find some inspiration from this post I did about sending session reminders, although this is sent after someone checks in. You could take the same approach and send after someone registers – https://meganvwalker.com/send-session-reminder-email-after-check-in/
Hi Megan,
My Journey triggers on Event Registration and send Week Before and Day Before emails to the registered audience.
I want to exclude the contacts for whom registration is cancelled and so I have used Journey Exit condition.
End of the Event, I want to send Emails to 2 different groups:
1. “Thank You” email to the audience who has attended the event and for that I have used the Check-in If/Then branch.
2. “Missed Out” email to the audience who has previously registered and then cancelled their registration. I’m not sure whether I should create another journey or somehow I can accommodate this scenario in my existing journey.
Can you please provide some guidance?
Thanks in advance.
Hi Mohit,
You can add a wait that uses the Start Date of the meeting. I typically would set this for waiting until 1 hour before the event so you are holding everyone there. Then add in an if/then branch based on a trigger being activated and use the Marketing Event Check-in trigger. Give people time to check in. For full day events, give all day, for things like webinars you could give the full length of time of the webinar as people could check in right at the end.
Then on your Yes path for the Check In trigger firing, add in another Wait step. You can then use the End date of the event to wait until. This is so that you don’t send a “Thank You” email to someone the moment they check in for the event. It doesn’t make sense to send until AFTER the event. You can then add in your “Thank You” email below that wait.
On the No path, you just need to add in your “Missed Out” email. People who don’t check in within the time frame you added in the if/then branch will go down this path.
Hi Megan,
I set up a journey for an event invitation. After 1 week I wanted to send a reminder to the contacts not already registered. I used the If/then branch with the standard trigger ‘marketing event registration created’ and I selected the right event. But all of the contacts went through the NO branch even there where contacts registered. Maybe I did something wrong with the time limit field…? Do you know what could have gone wrong? Regards, Anja
Hi Anja, how long did you set in the time limit to wait to see if a Marketing Event Registration record was created on the trigger?