*** NOTE: ALL INFORMATION IS ACCURATE AT DATE OF PUBLISHING ***
I wrote a post about how you can create just 1 Trigger, 1 Email and 1 Journey and have an email sent out when someone registers for an event, and have that email include a link to an ICS (Calendar invite) file that is unique and personalised to them. I just had 1 email in the journey for simplicity to show you how it would work. In this blog post, let’s expand on that by adding in more emails and make sure those emails are sent out in relation to the event start and end date and times, and also have follow up emails depending on if someone actually attended, or in fact missed the webinar. This is all while just creating one set of emails, not one for each event.
First, go ahead and create your emails. I would suggest using the concepts from the one I walked through in the last post and doing a save as. Then just edit your text and adjust any thing else you might want different. Make sure the name of each makes sense so they are easier to find when you create your Journey. These are the 6 email examples I have that I will walk through and add to a Journey.
- Email 1 – Thank You For Registering
- Email 2 – 1 Week Reminder
- Email 3 – Next Day Reminder
- Email 4 – 1 Hour Reminder
- Email 5 – Thanks For Attending
- Email 6 – Sorry You Missed It
First, go back to the initial flow in Power Automate and open the last step where you have the Perform and unbound action. The last field that was left empty previously, we can use that to make sure we set something called the BindingID. This can be used to make sure we tie the Event Registration that occurs to any Event Check-in that might occur in the future. We can link triggers together in this way. First we need to add the table name and then the Event Registration identifier. So it will be msevtmgt_eventregistrations/ then search for the Event registration from the start of the flow.
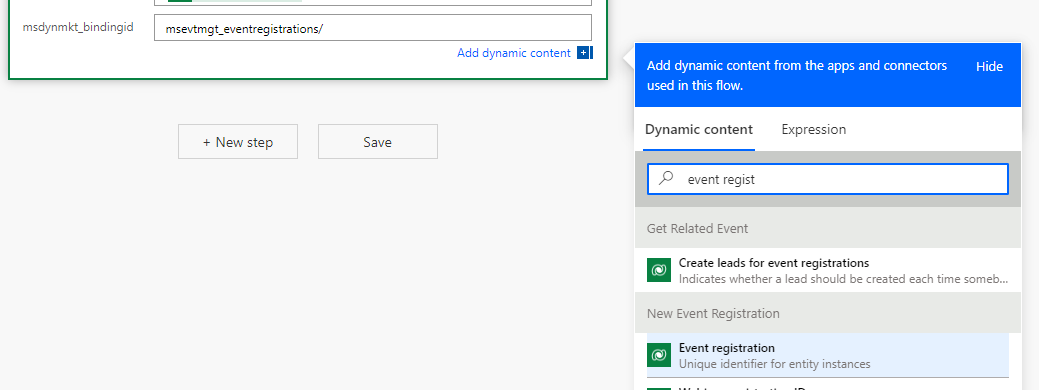
It should look like this. That’s it, save your initial flow. That’s still your trigger for your journey when someone registers for an event. More on the bindingid later.

We are then going to create a new Trigger with just a couple of values. I’ve added Event and Event Registration both as Text Data types.
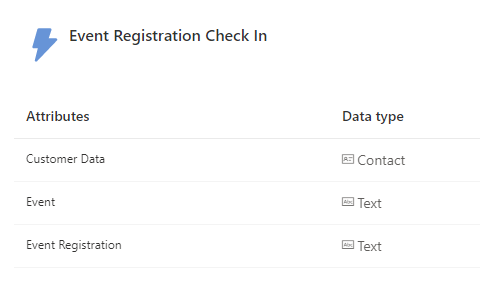
Now I’m creating a new flow in Power Automate. This one will run when a Check-ins record is added. This record gets created when someone joins an online event that they registered for using a unique link (that was added to the ICS file in the last post here).

This flow only needs one other step, and that’s to perform an unbound action this time using the Trigger just created above for the Event Registration Check-in. Pass through the value of the Event and the value for the Event Registration. Add utcNow as the signal ingestion timestamp and the signal timestamp, and use the Attendee value for the Signal User Auth ID and the Profile ID. Finally, at the bottom add in the same binding ID that was added at the bottom of the flow created based on the Event Registration that was created (in the post I have referenced a few times above). Save it and make sure it’s turned on.

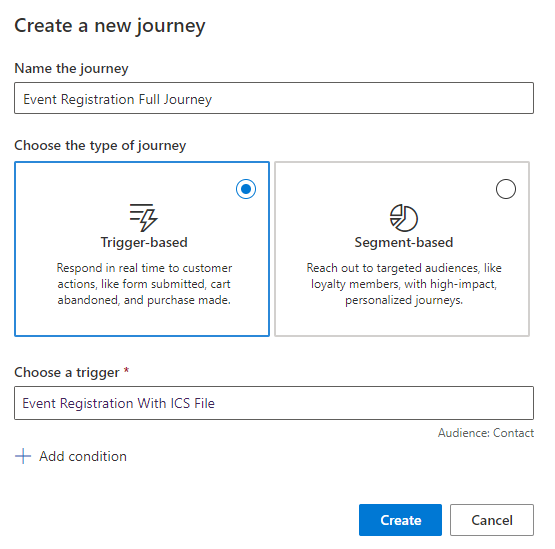
Now we build our journey. This is going to start when the Event Registration With ICS File triggers.
The first step is the initial email to say thanks for registering, which includes the button with a link to download a generated ICS file.

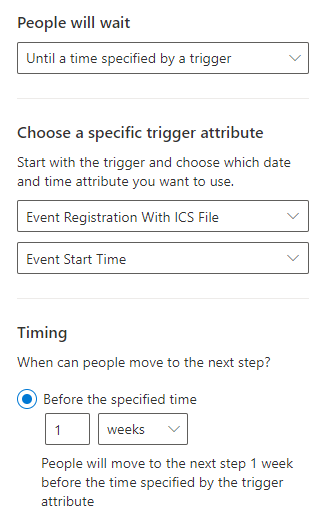
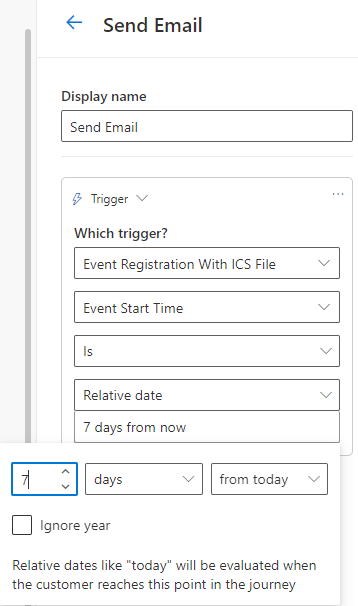
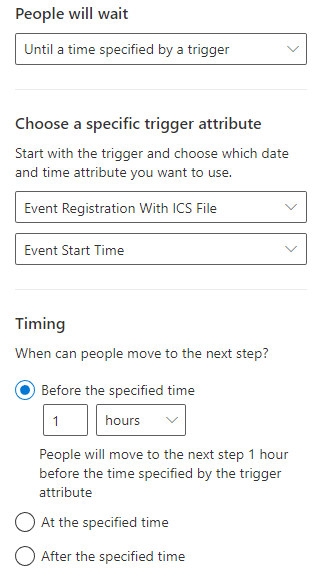
Next, we need to add a wait time, to hold an action for a specific time. People will wait until a time coming from the start trigger. Using Date as a data type in a Trigger means we can then use that in the wait time. Here we can make people wait until 1 week before the start time of the event.
Now we are going to start building out some branches based on a specified attribute.
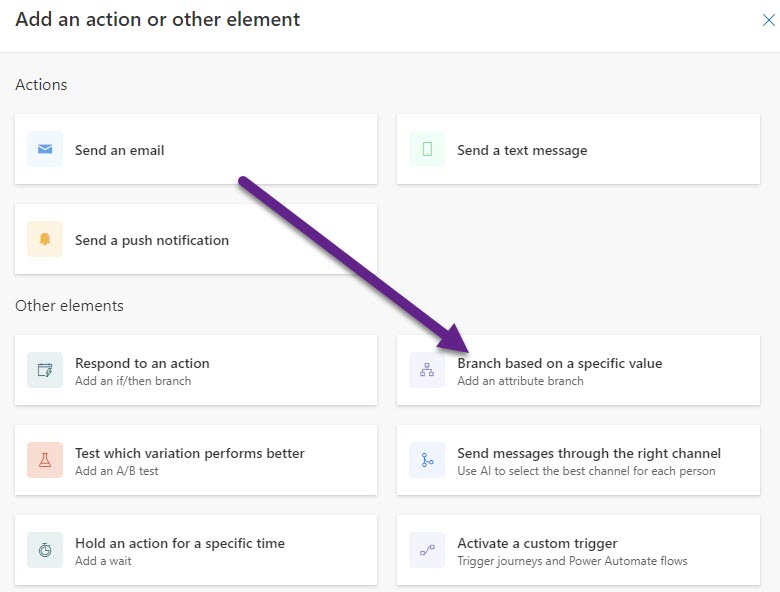
Give this step a name that makes sense. Notice that there will already be a branch added. We need to click on the branch to set the conditions.
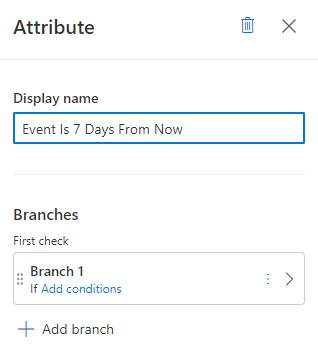
Now we can give Branch 1 a name and set the logic that needs to be met to then take a Contact down this path. So here if todays date is 7 days from now, we will add another step to send them an Email. Based on the step above being a wait condition until a week before the start date, if someone goes down this path it must mean they registered earlier than a week. If someone registers and it’s 6 or less days before the event, we don’t want to send them an email telling them it’s a week to go, so they would not go down this branch.
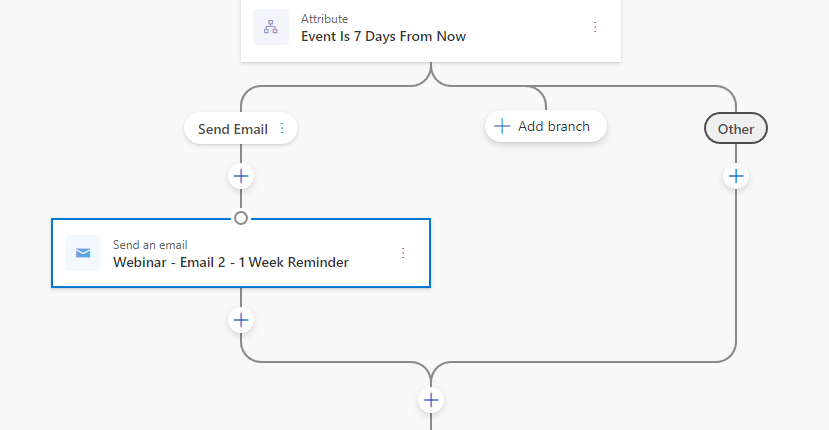
We then end up with this. A Contact either goes down the Send Email branch and they get the 1 Week Reminder email, or they go down the Other branch which has nothing in it.
Now we can move on and do another wait condition waiting until the Start Date and Time is tomorrow. Using the branch based on a specific value we can then use the Start Date and Time to see if it is tomorrow. If yes, the Contact will go down the Send Email path and be sent the Next Day Reminder email. If that condition is not met, it will go down the Other path, meaning nothing will be sent. This means if someone registers for the event 5 hours before for example, they won’t be getting an email reminding them the event is tomorrow.
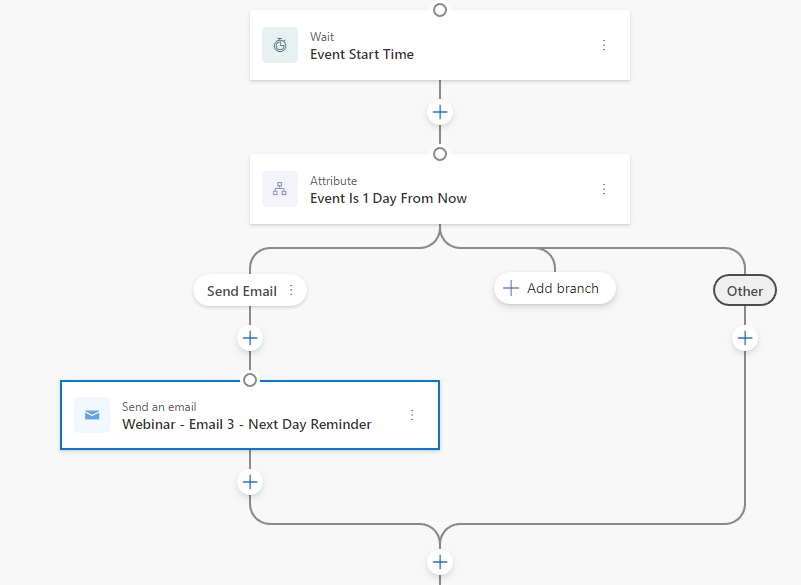
You can add whatever reminders you choose, but the last few steps are going to be based on doing some follow up after the event has concluded. I’m adding in a wait time, and waiting for 1 hour before the Event Start Time. I want to make sure that if someone checks in early we still get their check in recorded and used as part of this journey.
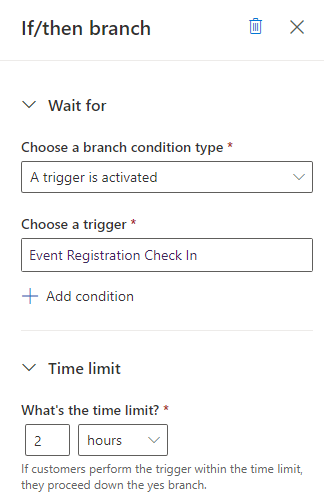
Then we need a respond to an action step.
Now we are going to use the condition type of a trigger is activated and then choose the trigger created earlier in this blog post. The time limit to wait for how long someone could possibly log in is up to you. The logic I used is this. Someone could click the link to join the event early, which we are accounting for above by waiting for one hour before the event starts where someone could click etc. Then I am factoring in the length of the event, which in this case is 1 hour. I am allowing that someone could join late. So I am going to allow someone to click the link which would create the Event Check-in record any time within the next 2 hours. This is also where that Binding ID comes in handy. You could possibly have more than one event going on, so making sure the related Event Registration ID is passed through the trigger will mean it will only trigger if it matches the one found on the Event Registration related to the Journey that the Contact is currently on.
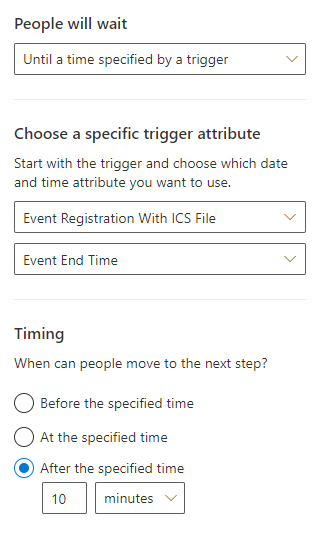
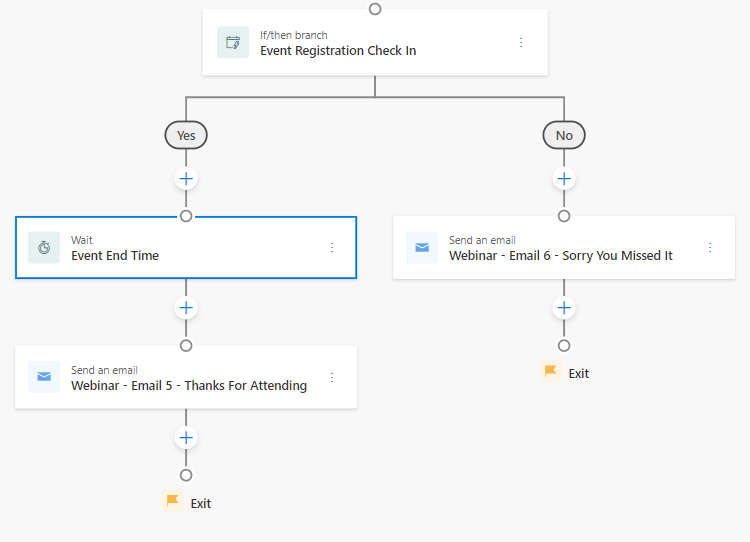
Now I need a wait time. I don’t want someone to check-in and then immediately get an email to say thanks for attending. So I am going to add a wait time on the Yes branch so that if someone checks in, they still won’t continue until 10 minutes after the Event End Time from the original trigger that started them on the journey.
So the end of the journey now looks like this. I can add a send email step for if someone registers to thank them for attending, or send an email step if they missed it, all based on if a Check-in record is created.
Check out the latest post:
Use Custom Event Registration Questions To Branch Your Journeys In Customer Insights
This is just 1 of 603 articles. You can browse through all of them by going to the main blog page, or navigate through different categories to find more content you are interested in. You can also subscribe and get new blog posts emailed to you directly.
Hi Megan – just wondering if you know how best to handle when event date/time changes as these journeys use the event date/time that is passed in with the trigger.
Currently we have to turn off the journey then create multiple separate journeys:
1 to handle new registrations (trigger),
1 to send a 1 week reminder to everyone who has registered (batch),
1 to send a 1 day reminder to everyone who has registered (batch) etc etc.
What makes it more painful is we can’t even use the existing emails as they use the event registered trigger type for personalisation. So we have to create new emails for each new journey as well.
I’m hoping there’s a better way to manage when this happens
Hi Jon, ah that’s frustrating, I can see why that is a pain indeed! Unfortunately any time you use a trigger that passes all of the values at the start, the data is set at that time and not updated. If you don’t need to pass anything custom through, consider just using the out of the box triggers for Events that you can review here: https://meganvwalker.com/use-standard-event-based-triggers-journeys/
It might be that you can get away with using those, in which case you can do checks to see what the date is throughout the journey.
Hi Megan,
How do you handle email 4 in this scenario? I see you didn’t go into details for the branch. I’m having trouble understanding if someone that registers to the event 30 minutes before would always receive the “registration confirmation” email and the “1 hour reminder” email. I am not seeing a way to have them skip the 1 hour reminder as it seems attributes can only be set to check by day, month, year?
Hi Edgar, yes you are correct, they would always get anything that was less than 1 day if you have reminders like that. I would say if someone registers for something right before it is going to start, getting 2 emails would be acceptable and make sense to someone. It’s if someone registers a couple of days before and then gets every single reminder you’ve got set up all at once that it would seem strange!