*** NOTE: ALL INFORMATION IS ACCURATE AT DATE OF PUBLISHING ***
In the previous post in this series, we looked at adding the JavaScript for a Realtime Event Registration Form to a Web Page in a Power Portal. Although this approach wasn’t wrong, it meant that for each Event you would need a new Web Page… AND it’s likely that the people on your team who work in Marketing are likely not the same people comfortable with editing the portal. In this post we will look at creating a Web Template using Liquid and HTML to display an individual Event record. Let’s take a look!
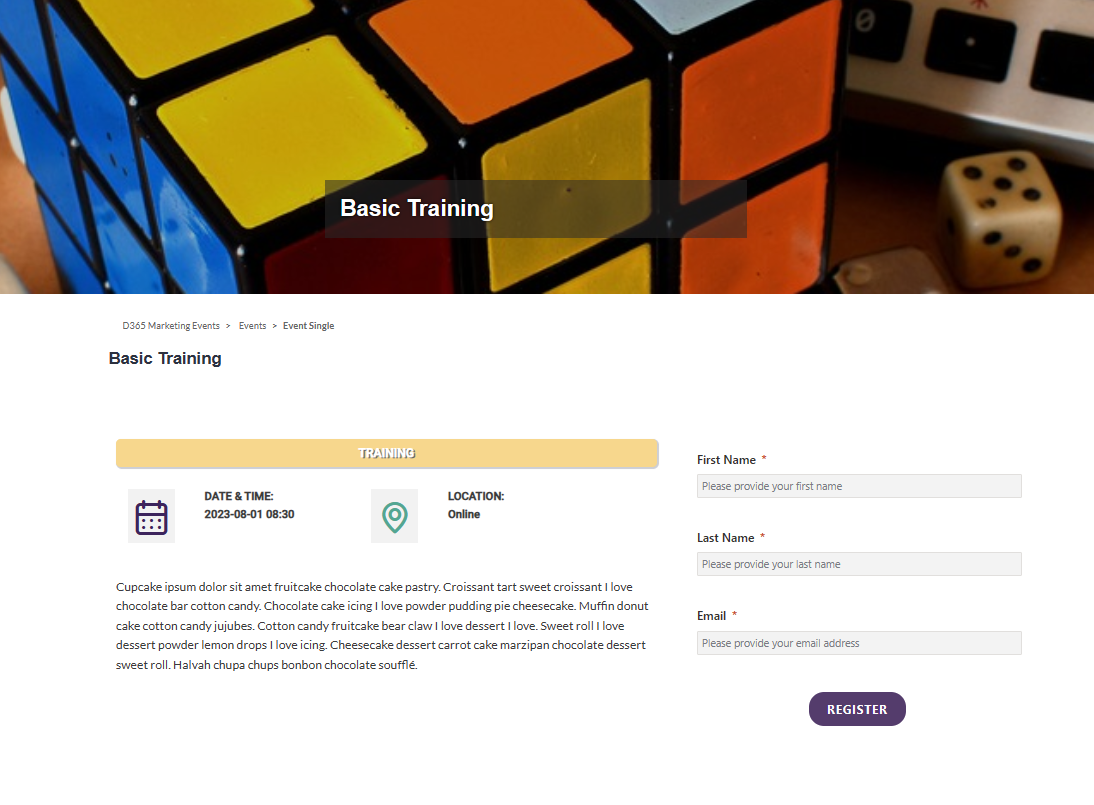
The outcome we are looking for is a page that displays some information about the Event along with the registration form. In my example I am also using an image as a hero image at the top of the page which is pulling from the Event record in D365 Marketing too.
The Event Image field is an out of the box one on the Event record, but depending on when you are reading this, could be hidden from your Event record so you might need to edit the form slightly. After adding the field to your form, go in to the Components section and add the Image Select Button Control. Save and publish the form.
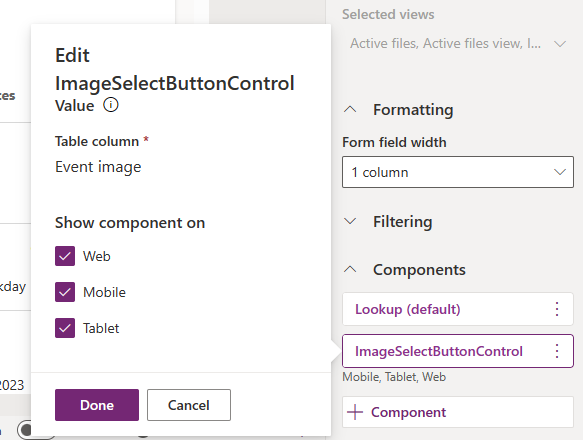
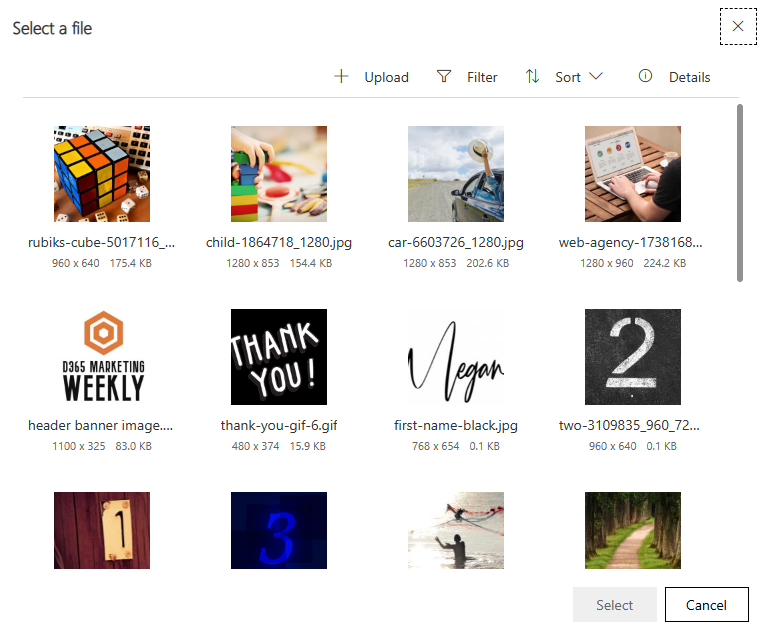
When clicking on the field now, a pop up control appears and you can access images from D365 Marketing or add new ones. Much nicer than without the control. Now you can create events and add an image to them that you can use in your emails, and also display on the Event page in the portal.
Ok now let’s move on to creating the Web Template. If you’ve never created one before or used Liquid, it might be worth reading through some other blogs as this post isn’t going to teach you all of that. Check out these three posts from Portal legend, Nick Doelman.
- Liquid Markup in Dynamics 365 Portals – Part 1: “Hello World
- More Liquid Markup in Dynamics 365 Retrieving Entity Record Data (Part 2)
- Liquid Part 3 – Displaying a List of Dynamics 365 Records
Then a couple from my own blog here:
Make sure you have added a record under Table Permissions in D365. If you don’t include this, no one will be able to see the events. Add the record, call it Events and link to the Event table. Link it to your website and set the privileges as Read only. Once you have saved it. go to the Web Roles section on your new Table Permission record and make sure at least the Anonymous User role has access. This means anyone visiting the site and see the Events without the need to log in.

Now on to building your Web Template. I’ll break it down bit by bit, then provide the full code for the Web Template I created. CSS is a big part of this so definitely something you will need to be comfortable to make sure everything is laid out and formatted in the right way for your own portal requirements. If you remember from the first post on the Events Portal, I walked through a suggestion on how to generate a valid URL to get to each Event page. The URL would look something like this, with the Event GUID as the id, and the ReadableEventID at the end.
YOUR-PORTAL-URL/individual-event/?id=EVENTGUID&readableEventId=ReadableEventID
We can start the web template off by getting the id from the URL at the top of the web page when the person is viewing the Event like this:
{% assign requestid = request.params['id'] %}
Now we are going to add a FetchXML Query to the template. If you have ever created a view, this is what the query for that with all the fields and filtering looks like. We are looking for event records and bringing back the Name, Event ID, Readable Event ID, Start Date and description. We are then filtering to only find the Event where the GUID equals the id found in the URL using the request id we assigned above. After that we are getting a linked record which is the msdyncrm_file table and finding the file that has been added as the event image. It’s the msdyncrm_blobcdcuri field that contains the URL for the image that we will use to display on the portal page.
{% fetchxml event %}
<fetch version="1.0" output-format="xml-platform" mapping="logical" distinct="true" >
  <entity name="msevtmgt_event">
    <attribute name="msevtmgt_name" />
    <attribute name="msevtmgt_eventid" />
    <attribute name="msevtmgt_readableeventid" />
    <attribute name="msevtmgt_eventstartdate" />
    <attribute name="msevtmgt_description" />
<attribute name="msevtmgt_eventtype" />
    <filter>
      <condition attribute="msevtmgt_eventid" operator="eq" value="{{requestid}}" />
    </filter>
<link-entity name="msdyncrm_file" from="msdyncrm_fileid" to="msevtmgt_eventimage" alias="image">
      <attribute name="msdyncrm_blobcdnuri" />
    </link-entity>
  </entity>
</fetch>
{% endfetchxml %}
To use the image on the page, we need to call the value like this, where we add the name of the table (msevetmgt_event), then the name of the alias we added to the msdyncrm_file table (image) and then finally the name of the Blob CRN URI field (msdyncrm_blobcdnurl).
{% for msevtmgt_event in event.results.entities %}
{{ msevtmgt_event['image.msdyncrm_blobcdnuri'] }}
{% endfor %}
It’s likely your code would be different depending on how you want it laid out, but here is how I am using mine, setting the Hero image in the header using the url to the event image, and including the event name overlaid on top of the image.
{% for msevtmgt_event in event.results.entities %}
<div class="entry-hero"  style="min-height: 418px!important;background: url('{{ msevtmgt_event['image.msdyncrm_blobcdnuri'] }}')no-repeat 0 44%!important;
    background-size: cover!important;">
	<div class="entry-hero-wrapper">
<h1 class="entry-title">{{ msevtmgt_event.msevtmgt_name }}</h1>
</div>
</div>
{% endfor %}
The next block of code in the Web Template is to display the details of the Event. I’m showing the Event Type value, the date and time, and the description of the event.
{% for msevtmgt_event in event.results.entities %}
<div class="column left">
<div class="event_type_single">{{ msevtmgt_event.msevtmgt_eventtype.label }}</div>
<div class="column left_details"><i class="uil uil-calendar-alt"></i></div>
<div class="column right_details">DATE & TIME:<br>{{ msevtmgt_event.msevtmgt_eventstartdate | date: "yyyy-MM-dd HH:mm" }}</div>
<div class="column left_details"><i class="uil uil-map-marker"></i></div>
<div class="column right_details">LOCATION:<br>Online</div>
<div class="event_single_description">{{ msevtmgt_event.msevtmgt_description }}</div>
</div>
I’m also using an icon font to display a calendar icon next to the date, and a map icon next to the location. There are several options out there, but IconScout is the one I used: https://iconscout.com/unicons. There are several options of icons but I went with the Line icons (can choose from Line, Solid, Monochrome and Thin Line) which as a lot of free options. Simply add the following line to the top of the Web Template, find the icons you want to use and then you can add them easily like this – <i class=”uil uil-calendar-alt”></i>. They can then be styled using CSS to change the colour or size of the font.
<link rel="stylesheet" href="https://unicons.iconscout.com/release/v4.0.8/css/line.css">
Now we’ve got the actual script for the Marketing Form. Get this from the form itself, and not from the code provided when you are on an Event. This code is generic and not linked to a specific Event which is what we want. The ReadableEventId will be passed from the URL in to the code. When someone fills out the form and registers, the Event Registration record will be linked to the correct Event without you needing to create one Event Form per Event.
<!-- Marketing Form Script -->
<div data-form-id='7e76bbe0-8e21-ee11-9966-0022481b5dcb' data-form-api-url='https://public-gbr.mkt.dynamics.com/api/v1.0/orgs/7e1cce80-df82-4656-a02f-9ac1442e28e1/eventmanagement'data-cached-form-url='https://assets-gbr.mkt.dynamics.com/7e1cce80-df82-4656-a02f-9ac1442e28e1/digitalassets/forms/7e76bbe0-8e21-ee11-9966-0022481b5dcb' >
</div>
<script src = 'https://cxppusa1formui01cdnsa01-endpoint.azureedge.net/global/FormLoader/FormLoader.bundle.js' ></script>
<!-- End Marketing Form Script -->
That’s pretty much it! Make sure you add a Page Template record with the type of Web Template, and link back to the Web Template you created. You can then create your Web Page using your new Page Template for an individual event record. Each Event will then have its own unique landing page, no need to mess around with the JavaScript code for the event form for each event at this point. Simply create a new Event, add all the details and your image and make it live. In the next blog we will look at how to create your Events Overview page and generate the correct link each time so it takes the visitor to the right landing page.
If you would like the full Web Template code I created you can copy it from below. Keep in mind that anywhere with a div class, you will need to make sure that’s included in your CSS and set up the elements you need for your own Portal. I’ve also included some logic to check the type of event and set a colour coded background to differentiate between things like Webinar, Training or Demonstrations.
<link rel="stylesheet" href="https://unicons.iconscout.com/release/v4.0.8/css/line.css">
{% assign requestid = request.params['id'] %}
{% fetchxml event %}
<fetch version="1.0" output-format="xml-platform" mapping="logical" distinct="true" >
  <entity name="msevtmgt_event">
    <attribute name="msevtmgt_name" />
    <attribute name="msevtmgt_eventid" />
    <attribute name="msevtmgt_readableeventid" />
    <attribute name="msevtmgt_eventstartdate" />
    <attribute name="msevtmgt_description" />
<attribute name="msevtmgt_eventtype" />
    <filter>
      <condition attribute="msevtmgt_eventid" operator="eq" value="{{requestid}}" />
    </filter>
<link-entity name="msdyncrm_file" from="msdyncrm_fileid" to="msevtmgt_eventimage" alias="image">
      <attribute name="msdyncrm_blobcdnuri" />
    </link-entity>
  </entity>
</fetch>
{% endfetchxml %}
{% for msevtmgt_event in event.results.entities %}
<div class="entry-hero"  style="min-height: 418px!important;background: url('{{ msevtmgt_event['image.msdyncrm_blobcdnuri'] }}')no-repeat 0 44%!important;
    background-size: cover!important;">
	<div class="entry-hero-wrapper">
<h1 class="entry-title">{{ msevtmgt_event.msevtmgt_name }}</h1>
</div>
</div>

<div class="container">
  <div class="page-heading">
    {% block breadcrumbs %}
      {% include 'Breadcrumbs' %}
    {% endblock %}
  {% block title %}
<h2>{{ msevtmgt_event.msevtmgt_name }}</h2>

  {% endblock %}
{% endfor %}
 </div>
 <div class="row">
  <div class="col-md-12">
    <div id="mainContent">
    {% block main %}
    {% include 'Page Copy' %}
    {% for msevtmgt_event in event.results.entities %}

<div class="column left">
{% if msevtmgt_event.msevtmgt_eventtype.label == "Training" %}
<div class="event_type_single" style="background:#f7d78d">{{ msevtmgt_event.msevtmgt_eventtype.label }}</div>
{% elseif msevtmgt_event.msevtmgt_eventtype.label == "Webinar" %}
<div class="event_type_single" style="background:#fc8dbe">{{ msevtmgt_event.msevtmgt_eventtype.label }}</div>
{% elseif msevtmgt_event.msevtmgt_eventtype.label == "Demonstration" %}
<div class="event_type_single" style="background:#c2fcf8">{{ msevtmgt_event.msevtmgt_eventtype.label }}</div>
{% else %}
<div class="event_type_single" style="background:#ffffe0">{{ msevtmgt_event.msevtmgt_eventtype.label }}</div>
{% endif %}
<div class="column left_details"><i class="uil uil-calendar-alt"></i></div>
<div class="column right_details">DATE & TIME:<br>{{ msevtmgt_event.msevtmgt_eventstartdate | date: "yyyy-MM-dd HH:mm" }}</div>
<div class="column left_details"><i class="uil uil-map-marker"></i></div>
<div class="column right_details">LOCATION:<br>Online</div>
<div class="event_single_description">{{ msevtmgt_event.msevtmgt_description }}</div>
</div>
<div class="column right">
<!-- Marketing Form Script -->
<div data-form-id='7e76bbe0-8e21-ee11-9966-0022481b5dcb' data-form-api-url='https://public-gbr.mkt.dynamics.com/api/v1.0/orgs/7e1cce80-df82-4656-a02f-9ac1442e28e1/eventmanagement'data-cached-form-url='https://assets-gbr.mkt.dynamics.com/7e1cce80-df82-4656-a02f-9ac1442e28e1/digitalassets/forms/7e76bbe0-8e21-ee11-9966-0022481b5dcb' >
</div>
<script src = 'https://cxppusa1formui01cdnsa01-endpoint.azureedge.net/global/FormLoader/FormLoader.bundle.js' ></script>
<!-- End Marketing Form Script -->
</div>
</div>
{% endfor %}
   {% endblock %}
  </div>
  </div>
 </div>
</div>
Check out the latest post:
Create A Segment Using Unmapped Fields On Marketing Forms in Customer Insights Journeys
This is just 1 of 601 articles. You can browse through all of them by going to the main blog page, or navigate through different categories to find more content you are interested in. You can also subscribe and get new blog posts emailed to you directly.
Fantastic guide! Liquid Web templates are a game changer for event pages. Excited to try this out.
Ah thank you! Good luck, hope you have fun. I love doing custom web templates.
Hi Megan,
Where I can create web template in real time journey that you mentioned above?
Hi Denis, did you click on any of the links that I shared about creating Web Templates? If you’ve never created a portal before, I suggest reading up on that first. It’s not something to just jump in to and would require quite a few different skill sets by someone who is familiar with Liquid, HTML, CSS and web sites in general. It is not something you are creating in the Customer Insights – Journeys app.