*** NOTE: ALL INFORMATION IS ACCURATE AT DATE OF PUBLISHING ***
There can be challenges when capturing a mobile phone number from a Realtime Marketing form in Customer Insights – Journeys (D365 Marketing). Some of these issues you might not even be aware of. Jake Chen detailed the problems in a recent blog post walking through what happens when turning off the built in validation on the mobile phone field, which can then prevent Contact Point Consent records being created or updated. In this post I will look at what happens even when you keep that validation on, what it looks like for the person filling out the form, and what happens when a Contact Point Consent record for a mobile phone number is created. All things to be aware of and then decide the approach that is right for you!
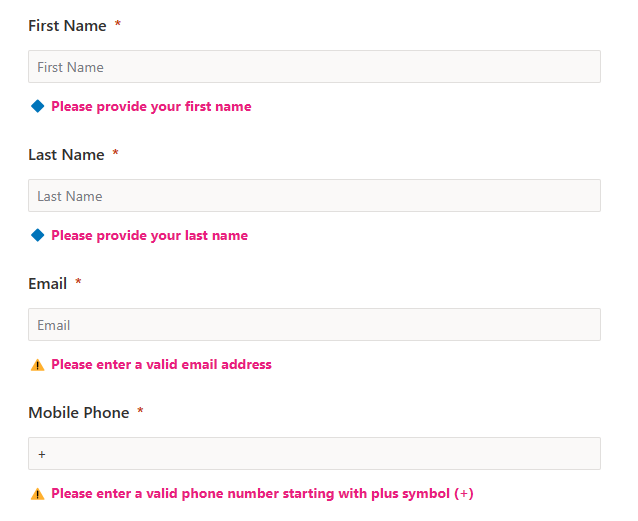
First thing, let’s look at what happens out of the box with the standard validation on a mobile phone number field. Someone filling out your form may end up with this pretty crap message. Please match the requested format. Mobile Phone. OK but WHAT IS the requested format??? How on earth would anyone know?
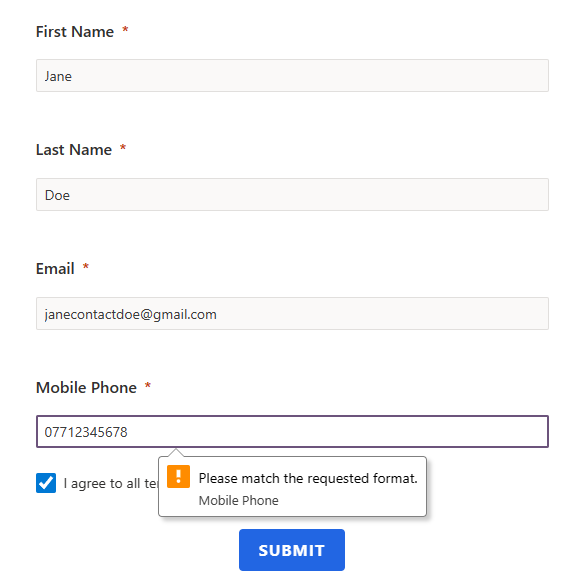
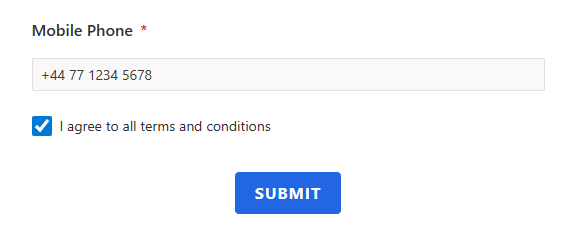
For our sake, I can tell you that all that is needed is a plus symbol added right before the phone number. Once that exists, the person can submit the form. Great! More on providing a more informative message later on. Notice that the number below has a bunch of spaces in it… that’s important for understanding this next part.
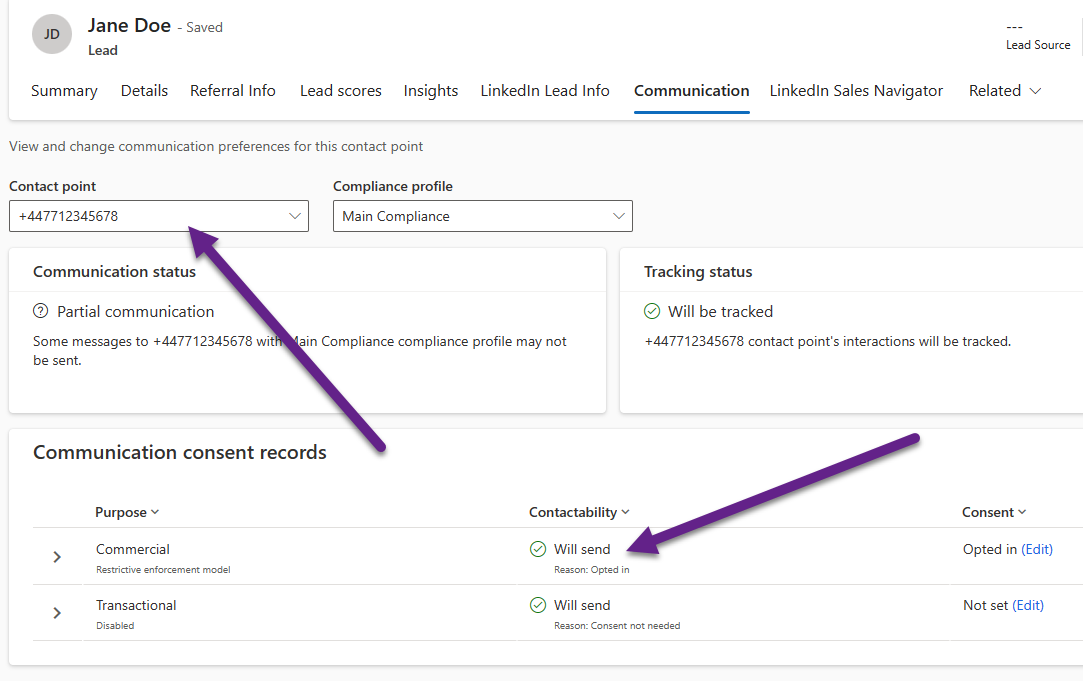
So once the form is submitted, because the standard validation of the mobile phone number field was met, it allowed the submission, the Lead was created and a Contact Point Consent record was created. Happy Days! However, if you review the Lead (or Contact) and go to the Communication tab, and filter on the same Compliance profile that you have on your form, we can see that the Contact point record for phone field has all of the spaces still. Even though the person submitted for form and agreed to the terms and conditions, it shows that they didn’t opt in. What’s up with that?
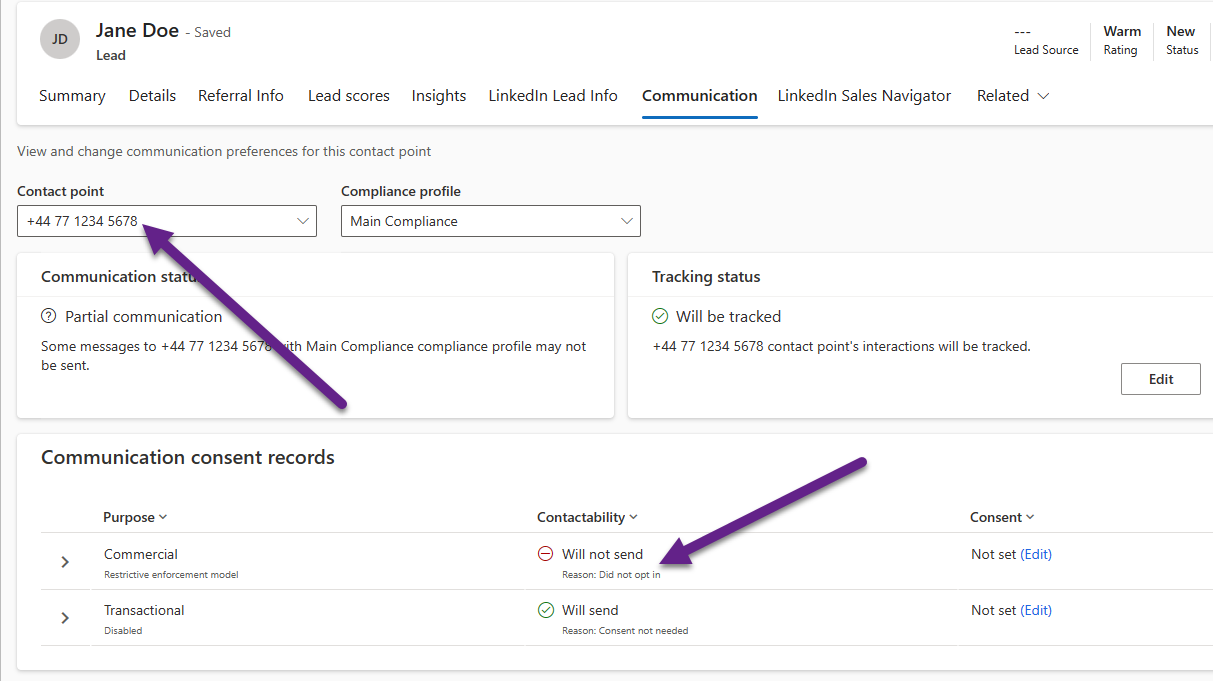
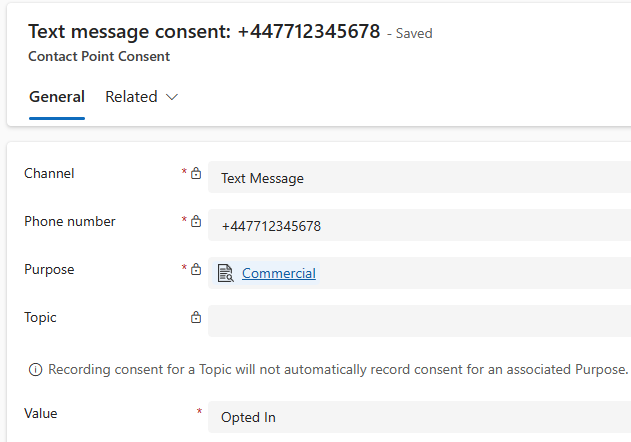
If you go to the Consent Centre, and look for it, you will see that the Contact Point Consent record DOES exist… BUT it stripped out all of the spaces. Ugh, so that means there is now a disconnect between the number on the Lead, and the number saved on the Contact Point Consent record. That’s really annoying.
To prove that’s the issue, I can update the number on the Lead and remove all of the spaces, then look at the Communication tab again. Now it shows that text messages can be sent because the person shows as having Opted In. So now we are getting somewhere.
Ultimately what we need is the ability to let the submitter know there needs to be a plus, AND make sure there are no spaces between any of the numbers. Luckily we can still do that with a few changes.
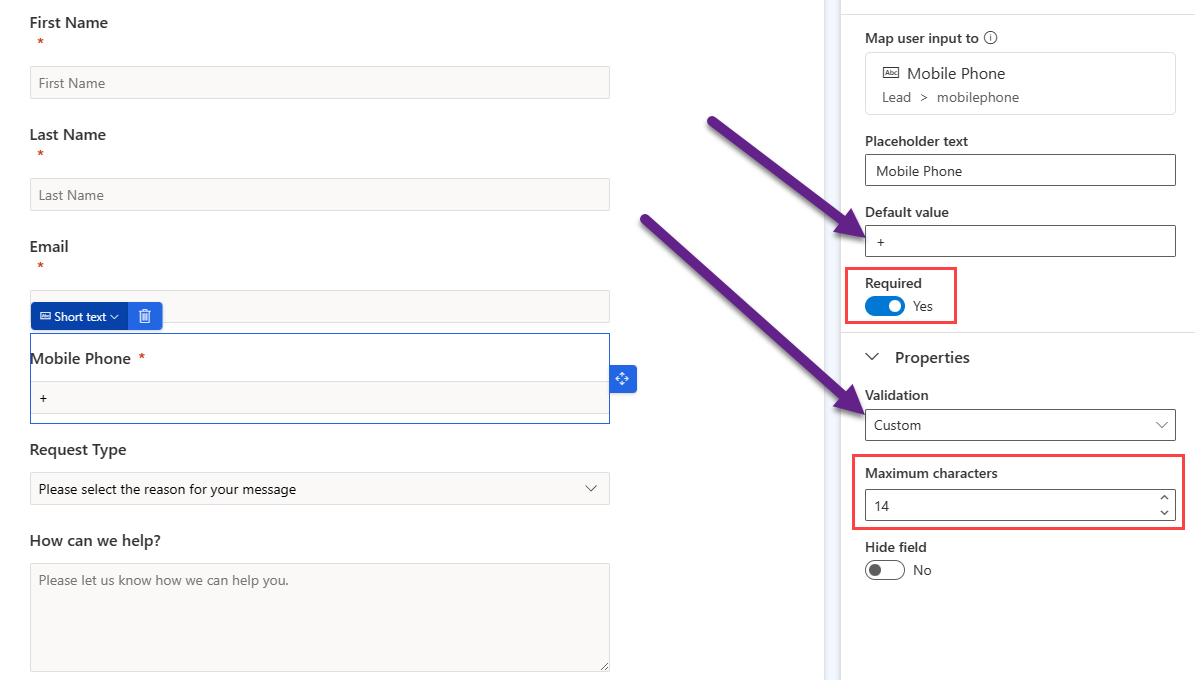
First, add your mobile phone number field to your form. Take advantage of the Default value and just put a plus there. This means the submitter doesn’t even need to type it. Next, you can make it required if you want to (as per your own requirements). The validation we are going to make custom which we will come to next. You also have the option to set a max number of characters. That really depends on the country you are in and how mobile numbers are formatted. If you do this, make sure you allow for the plus character, and then possibly the country code… so for the UK I have allowed up to 14 characters.
When you click on the validation and select custom, you will see this pop up. Use the regular expression I provided below and use that instead. This will use the expression that is the standard one, but also make sure any spaces are stripped out.
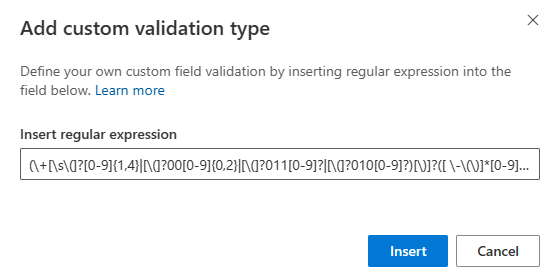
(\+[\s\(]?[0-9]{1,4}|[\(]?00[0-9]{0,2}|[\(]?011[0-9]?|[\(]?010[0-9]?)[\)]?([ \-\(\)]*[0-9][ \-\(\)]*){3,16}
Once you’ve done all that, open up the HTML. In the top style section, add the following. This will be used for some custom validation messages that will be used on the form. I am using pink as the colour so make sure you adjust for your own needs.
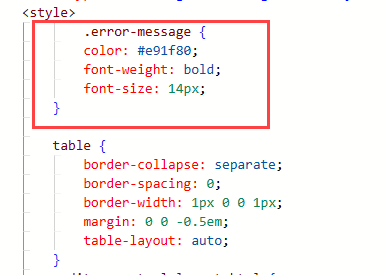
            .error-message {
            color: #e91f80;
            font-weight: bold;
            font-size: 14px;
        }
Then scroll to the bottom of the style section and add the provided script right below it.
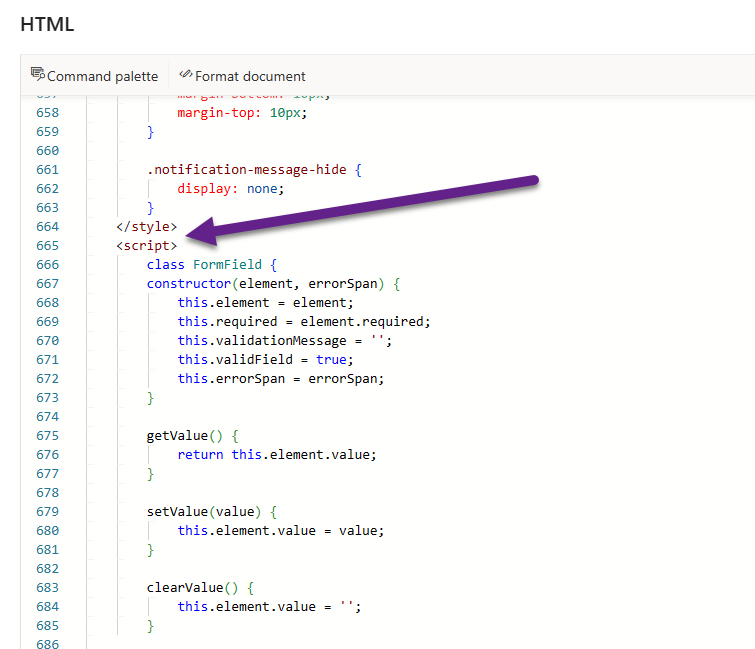
It should be pretty easy to see the different validation messages I have included, but basically the script is checking all of the required fields, and depending on if a specific field is found, a custom validation message is displayed. Otherwise, a generic validation message will be shown.
   <script>
        class FormField {
        constructor(element, errorSpan) {
            this.element = element;
            this.required = element.required;
            this.validationMessage = '';
            this.validField = true;
            this.errorSpan = errorSpan;
        }

        getValue() {
            return this.element.value;
        }

        setValue(value) {
            this.element.value = value;
        }

        clearValue() {
            this.element.value = '';
        }

showError() {
    this.element.classList.add('errorField');
    this.errorSpan.textContent = this.validationMessage;
    this.errorSpan.classList.add('error-message'); // Add the error message style class
    this.errorSpan.style.display = 'block';
}
        hideError() {
            this.element.classList.remove('errorField');
            this.errorSpan.textContent = '';
            this.errorSpan.style.display = 'none';
        }

        validate() {
            if (this.required && this.element.type === "checkbox") {
                if (!this.element.checked) {
                    this.showError();
                    console.log(this.element.name + " checkbox not checked");
                    return false;
                } else {
                    this.hideError();
                    return true;
                }
            } else {
                if ((this.required && !this.element.value) || !this.element.validity.valid) {
                    this.showError();
                    console.log(this.element.name + " value is not valid");
                    return false;
                } else if (this.element.name === "mobilephone") {
                    // Remove spaces from mobilephone field
                    const mobilephoneValue = this.element.value.replace(/\s/g, '');
                    this.setValue(mobilephoneValue);

                    // Additional validation for mobilephone
                    if (!/^(\+\d{1,3})?\d{7,}$/i.test(mobilephoneValue)) {
                        this.showError();
                        console.log(this.element.name + " value is not valid");
                        return false;
                    }
                }


                this.hideError();
                return true;
            }
        }
    }

    const form = document.querySelector('.marketingForm');
    const allFormFields = form.querySelectorAll('form input, form select, form textarea, form checkbox');
    const formAllFieldArray = [];

    allFormFields.forEach((field) => {
        const span = document.createElement('span');
        var errorSpan;
        if (field.type === "checkbox") {
            errorSpan = field.parentNode.insertAdjacentElement('afterend', span);
            field.addEventListener('click', () => {
                formField.validate();
            });
        } else {
            errorSpan = field.parentNode.insertBefore(span, field.nextSibling);
            field.addEventListener('input', () => {
                formField.validate();
            });
        }

        const formField = new FormField(field, errorSpan);
        if (field.name === "firstname") formField.validationMessage = '🔷 Please provide your first name';
        else if (field.name === "lastname") formField.validationMessage = '🔷 Please provide your last name';
        else if (field.name === "emailaddress1") formField.validationMessage = '⚠️ Please enter a valid email address';
        else if (field.name === "mobilephone") formField.validationMessage = '⚠️ Please enter a valid phone number starting with plus symbol (+)';
        else formField.validationMessage = '🔷 Please provide the required information';

        formAllFieldArray.push(formField);
    });

    form.setAttribute('novalidate', true);

    form.addEventListener('d365mkt-formsubmit', (event) => {
        let isFormValid = true;
        formAllFieldArray.forEach((field) => {
            if (!field.validate()) {
                isFormValid = false;
            }
        });

        if (!isFormValid) {
            event.preventDefault();
            console.log("Form submission is not valid");
        }
    });
    </script>
This means you can make sure if someone tries to submit the form with anything missing OR tries to remove the plus from the mobile phone field, the messages will show like this.
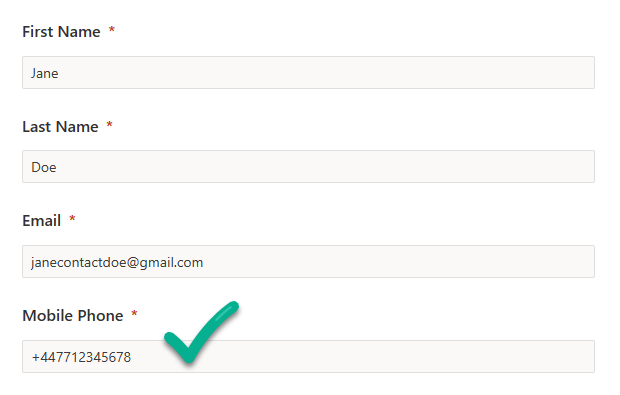
Now when someone fills out their phone number, the plus is already there AND no matter if they add spaces, they will be stripped out. This means it will be saved on to the Lead or Contact record without spaces, so will match what is added to the Contact Point Consent record! Phew!!!
Check out the latest post:
Send Unique Event Registration Response With QR Code Using No Code
This is just 1 of 449 articles. You can browse through all of them by going to the main blog page, or navigate through different categories to find more content you are interested in. You can also subscribe and get new blog posts emailed to you directly.
Hi Megan, thanks for another informative post! I’ve been struggling with the same issue a while ago, and I submitted an idea to easily change the error message. Can you maybe give it a vote? https://experience.dynamics.com/ideas/idea/?ideaid=7ae99991-dfda-ee11-a73d-6045bd7ce06d. In the mean time, I’ll use your manual above to adjust the error message in the HTML :-).
Hi Mirjam, I just voted for it! Believe me, I have raised this whole thing a few times directly with Microsoft. It’s a bit of a mess really!
Thank you SO much for writing this article. I was scratching my head on what was going on with the creation of the contact point consent for the mobile number!
It’s such a bad user experience for everyone involved. Took me a while to figure out for sure Deb!
Hi Megan,
Do you also have issues with the script after the latest update? It is moved to the body and as safe-script, also removing script parts in the html.
Raised a request already but not solved yet.
Regards, Eline
Hi Eline, I wasn’t aware of an issue but just checked one of my forms and see the same thing. Will see if I can find anything out as to what has caused it. Guessing a bug in the last update, but this is frustrating for sure!