*** NOTE: ALL INFORMATION IS ACCURATE AT DATE OF PUBLISHING ***
NOTE: I have since written a more robust and fuller blog post about this, which covers all scenarios and re-formatting of the values that are returned in a form submission.
Please read this blog post instead to compare and see the extended details.
One of the common requests for processes when a submission from a D365 Marketing Form is received is an email notification. Strangely this isn’t something that exists out of the box, but we can create a process using Power Automate to do this. In this post, I will walk through an example of a flow that could be used. Keep in mind this is just an idea, and you can use it to help with your own more specific requirements. In my screenshots, you will see that I always rename each step in the flow to be something more logical but will state which trigger or action to use for each connector.
Beginning Flow Logic
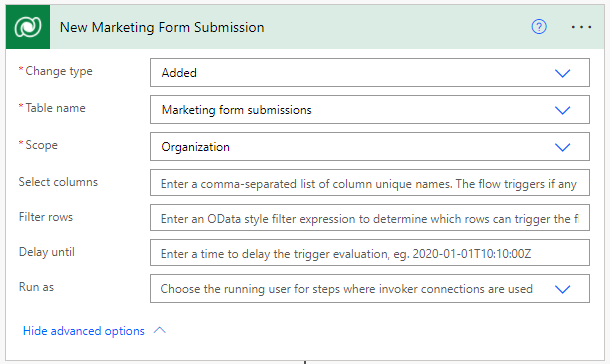
When a marketing form created in Dynamics 365 Marketing is filled out by someone online, it creates a Marketing form submission record in Dataverse. We can use that as our trigger at the start of the flow. The Change type is Added, the table name is Marketing form submissions and the Scope is Organization. You could go further and add the following to the Filter rows value to make sure the flow only triggers when a submission from a specific form is received, where the value equals that from the form, which you can get from the end of the URL when you are viewing the form directly within D365:
(_msdyncrm_marketingformid_value eq c510633e-2afd-eb11-94ef-0022481b4fb6)
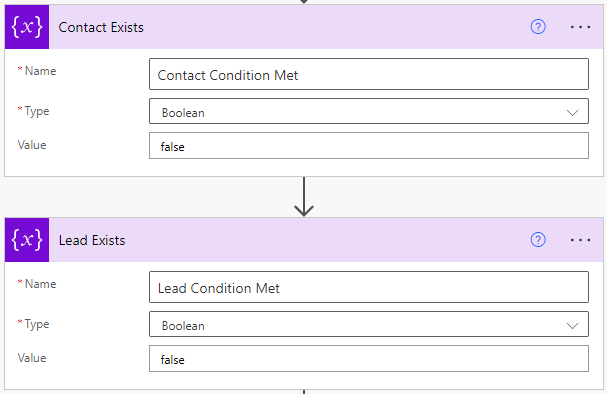
Next, we need to use the Initialize variable action. Add two that have the Type of Boolean and add in the value of false. We are going to use these, later on, to wait and check to make sure a Contact or Lead has been linked to the Form submission so these will be important further down in the flow.
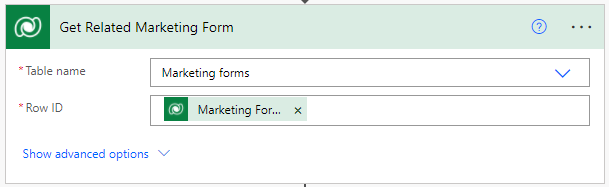
Then we are going to use the Get a row by ID action and find the Marketing form related to the marketing form submission using the Marketing Form Id value. We are going to use this to see if the next sections are even required to check and see if the form has been set to update Contacts and Leads, update only Contacts or update only Leads. This will determine if a Contact and/or Lead will be found and matched as an existing record or potentially create a new one, so we want to wait until that has happened before proceeding.
Something to keep in mind for the next steps. When a Form Submission is received, it doesn’t link it to a Contact and/or Lead at the same time that it is created. Processes then run to look for existing records(s) first, and then try to link, or create new records. So, we can’t just run our flow and send out an email all in one go, believe me, I tried. We need to wait until the records are found and matched or created and matched.
Contact Related Steps
This next section will check to see IF a Contact will be matched and linked to the form submission. Add a Condition step, and add two rows. Make sure you change the operator from And to Or, and add the Update contacts/leads field into both rows from the Marketing form action step added above. Then set them both to ‘is equal to’ and then have one row with 0 and one row with 1. 0 is the value for Contacts and Leads, and 1 is the value for Only contacts.
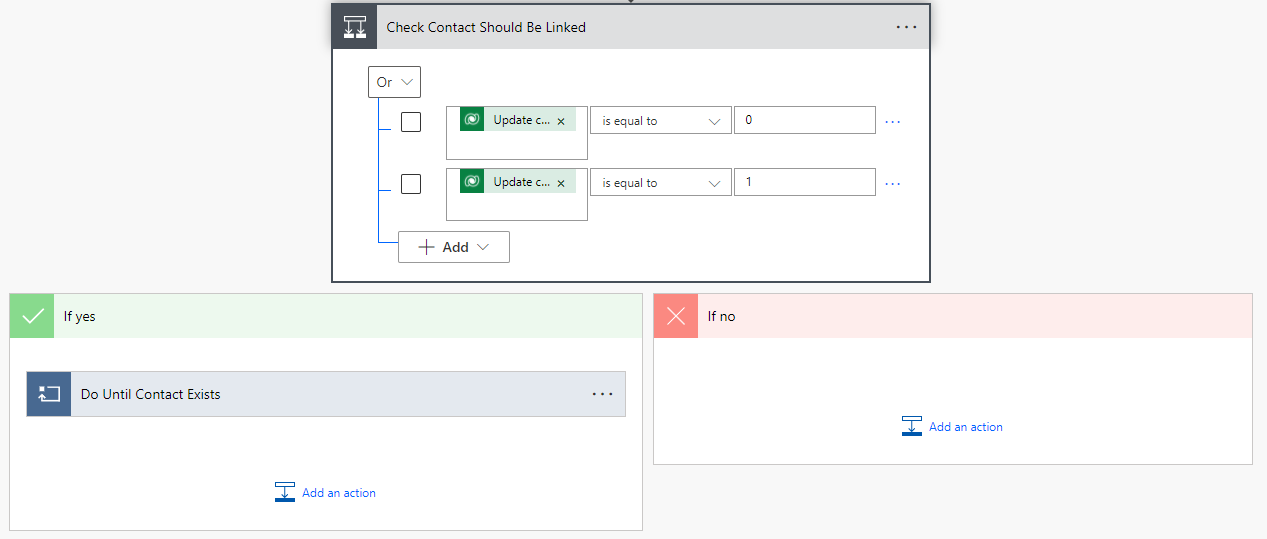
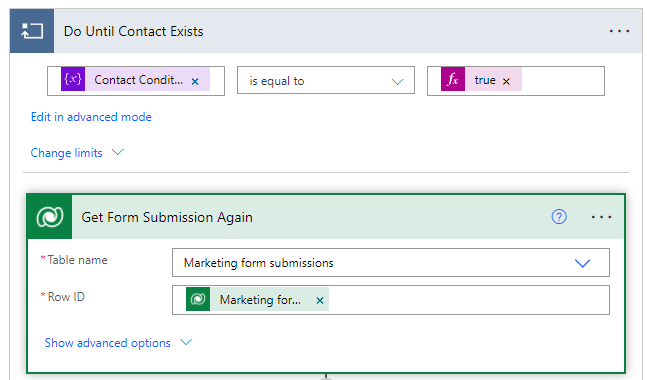
If a form submission is going to potentially update or create a Contact record, we will carry on down the Yes path, otherwise, we will bypass the rest of this section and move on to the Lead-related steps. Search for and add a Do until Control. Remember the variables added near the top of the flow? We will now set the condition to be that the Contact related variable is equal to true. This means we will continue through (based on the limits of how many times it will run through set by clicking change limits) and do the next group of steps over and over until the Condition is met, or the limits have been met. We need to get the Marketing form submission record again using the Get record by ID action step again. This is because we need to check what is on the record at this point in time and see if a Contact has been found or created and matched yet.
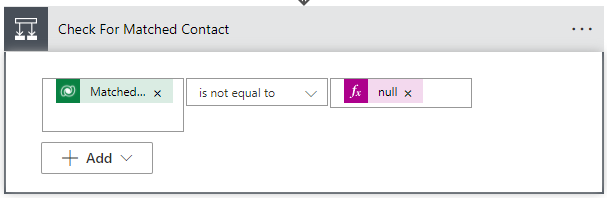
We have a condition now to check the Matched Contact value is not equal to null. Yes, you can do is equal to null but depending on which way you create the condition, that determines if the flow continues down a Yes path or a No path, and I like mine to go down Yes in the affirmative, but as long as you understand which path to use, it doesn’t matter. I am saying that the Matched Contact value field must be empty for nothing to happen (the No path) and must not be empty for some other actions to occur (the Yes path).
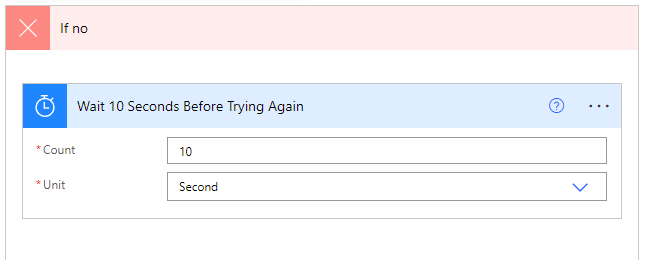
If the No path is followed, we are going to wait 10 seconds (using the Delay action) and then try again and see if the Matched Contact value has something in it, meaning a Contact was found or created and linked to the Marketing form Submission.
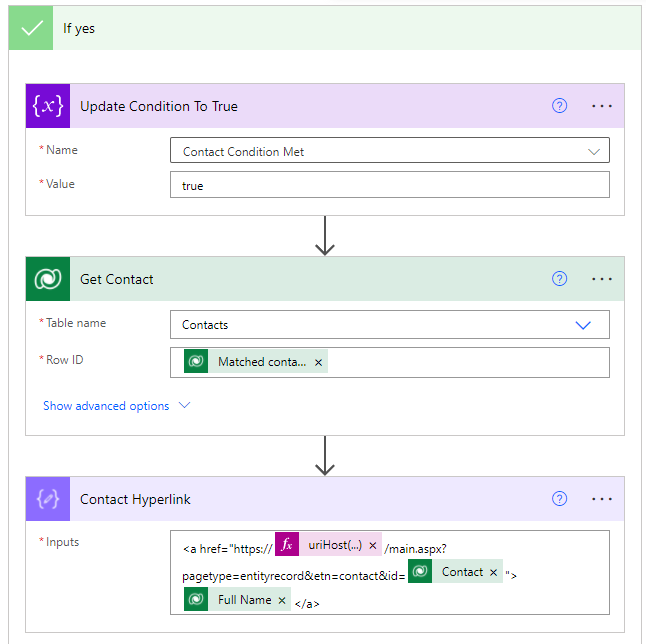
If the Yes path is followed, we are going to use a Set variable action step to update the Contact Condition Met variable to true, so that the Do Until for the Contact part is stopped and doesn’t continue to run through it again. We are then using the value from the Matched contact value in a Get record by ID step to get the Contact record. Make sure you use the correct Matched contact value which needs to be from the Get Form Submission Again step you added rather than the original Marketing form submission trigger, as this field will still be empty.
Then the last action in this section is a Compose step. We need to build up a hyperlink to the Contact record so we can add a direct link to the record in the final email notification. Assuming you have renamed your steps in your flow, you should be able to copy the code below and paste it in to your Compose step. It is generating a hyperlink that will open up in the correct environment in the last app someone has used (Sales Hub, Marketing App etc) and includes the contact id, and uses their Full Name as the pretty link name.
<a href="https://@{uriHost(outputs('Get_Contact')?['body/@odata.id'])}/main.aspx?pagetype=entityrecord&etn=contact&id=@{outputs('Get_Contact')?['body/contactid']}">@{outputs('Get_Contact')?['body/fullname']}</a>
Lead Related Steps
This next section will check to see IF a Lead will be matched and linked to the form submission. Add a Condition step, and add two rows. Make sure you change the operator from And to Or, and add the Update contacts/leads field into both rows from the Marketing form action step added above. Then set them both to ‘is equal to’ and then have one row with 0 and one row with 2. 0 is the value for Contacts and Leads, and 2 is the value for Only leads.

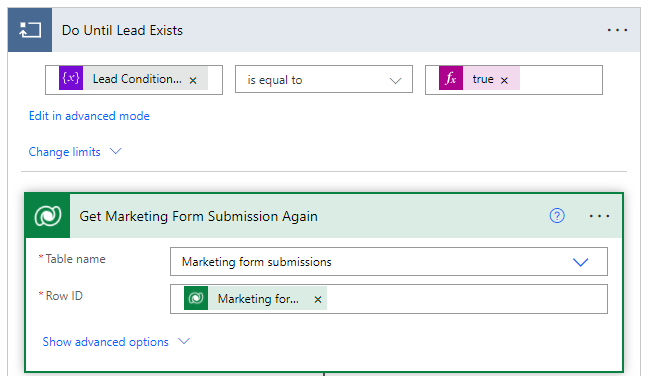
If a form submission is going to potentially update or create a Lead record, we will carry on down the Yes path, otherwise, we will bypass the rest of this section and move on to the next part and get the values of the fields submitted as part of the form. Search for and add a Do until Control. In this part, we will use the Lead related variable and set that as the condition of is equal to true. This means we will continue through (based on the limits of how many times it will run through set by clicking change limits) and do the next group of steps over and over until the Condition is met, or the limits have been met. We need to get the Marketing form submission record again using the Get record by ID action step again. This is because we need to check what is on the record at this point in time and see if a Lead has been found or created and matched yet.
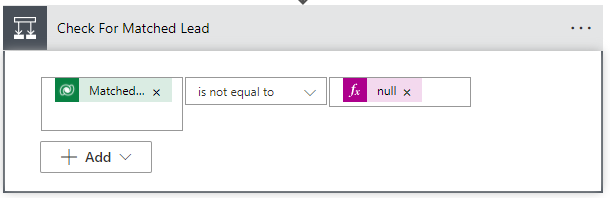
Just as we did with the Contact, we have a condition now to check the Matched Lead value is not equal to null. The Matched Lead value field must be empty for nothing to happen (the No path) and must not be empty for some other actions to occur (the Yes path).
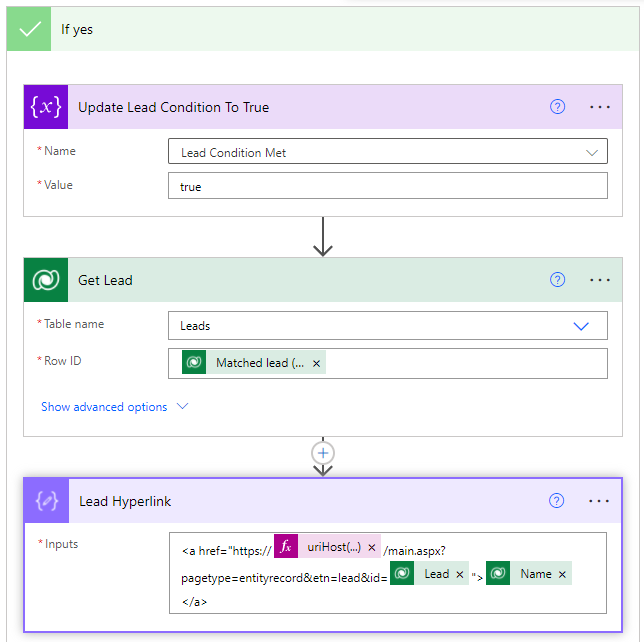
For the No path, we add a Delay action and wait 10 seconds to then check again to see if the Lead exists. For the Yes path we do exactly the same as we did for the Contact, but this time we will update the Lead Condition Met variable to true, then use the Get a record by ID step to get the Lead using the Matched lead value from the correct ‘Get marketing Form Submission Again’ action step (not the original one in the trigger and not the one from the Contact). Finally, we will generate a hyperlink to the Lead using the lead Name field as the pretty link text.
<a href="https://@{uriHost(outputs('Get_Contact')?['body/@odata.id'])}/main.aspx?pagetype=entityrecord&etn=lead&id=@{outputs('Get_Lead')?['body/leadid']}">@{outputs('Get_Lead')?['body/fullname']}</a>
Form Submission Field Values
Just as the Matched Contact & Matched Lead are not linked right away, the actual individual fields with data that was submitted on the form are also not linked right away. By this point in the flow, the values should now exist, but the first thing we will do is just get the Marketing form submission again. This means we have the latest record where everything should be linked accordingly. Although you might see things work OK without doing this and just using the original trigger, there could be times data comes in a bit slower, so you could miss info, so just makes sense to do this step here.

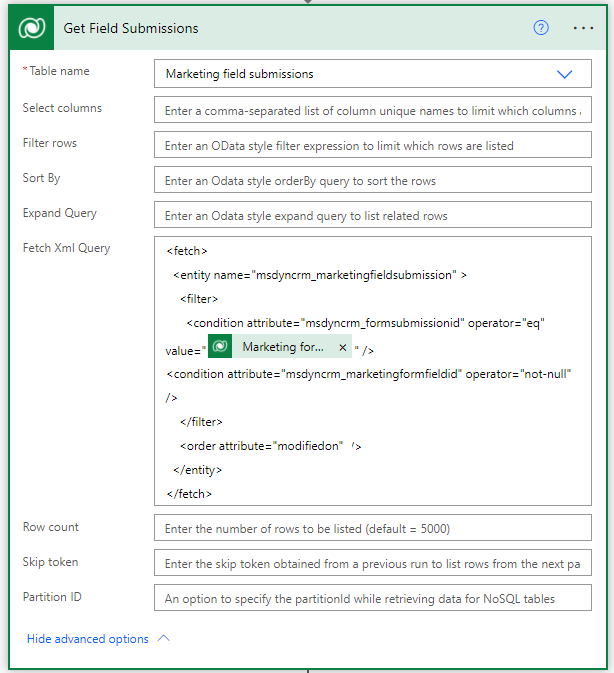
Now we need a List rows step and pull from the Marketing field submissions table. You should be able to use the Fetch Xml Query below which will find all field submission records linked to the Marketing form submission the flow is running on. I have them sorted by modified on date, which seems to put them in the same order they are on the form (can’t guarantee that will be the case every single time but did in my testing!). I am also making sure that the Form Field ID value for a field submission is not empty. The submit button also comes through as a field submission. Unfortunately, custom registration fields also come through without a Form Field ID, and also show a GUID instead of the question text, which makes it challenging to get that information. This query will make sure only marketing form field values are captured.
<fetch>
  <entity name="msdyncrm_marketingfieldsubmission" >
    <filter>
      <condition attribute="msdyncrm_formsubmissionid" operator="eq" value="@{outputs('Get_Form_Submission_Again_For_Fields')?['body/msdyncrm_marketingformsubmissionid']}" />
<condition attribute="msdyncrm_marketingformfieldid" operator="not-null" />
    </filter>
    <order attribute="modifiedon" />
  </entity>
</fetch>
Now we need a Select action. This will let us gather and pair the questions (field name) with the answers (field value) and put them together in a way which we can then use to display in the email notification. In the From value, look for the value from the Get Field Submissions step above, and the one that has ‘list of items‘ below it. It should be at the top of all the dynamic content in that section. Then in the Map section, type the word Question, then use the Field name value from the dynamic content from the Get Field Submissions, and then on the next line type the word Answer then get the Field value. Note that I also added a : character after the field name value (although this is not needed, it’s more for aesthetics later).

Adding the Create HTML table action lets us use the Output from the step above and put it into a table format to use in the email. Leave the columns as Automatic.

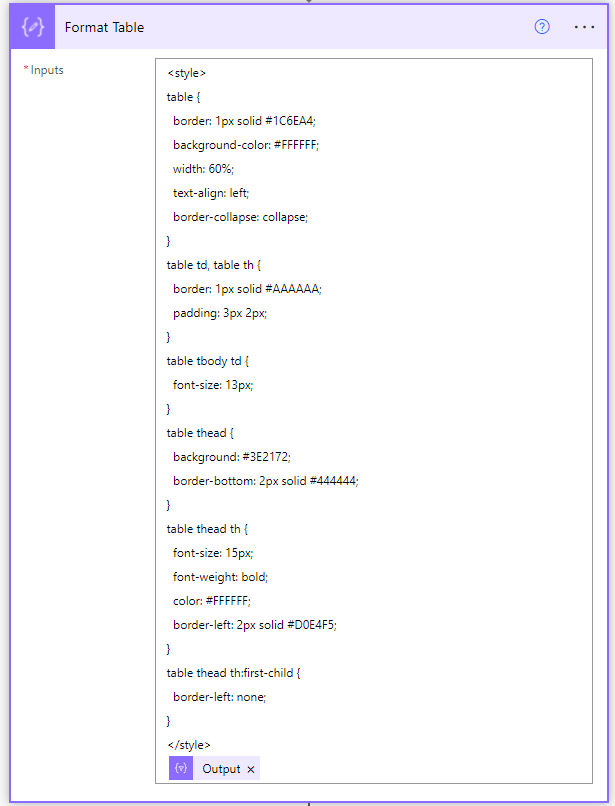
Now because I want the HTML table to look pretty and be styled a little bit, I add a new Compose action and include some CSS. This is not needed, but the results are worth it in my opinion. If you want to see how to do this, check out this post from my friend Ryan Maclean.
The Notification Email
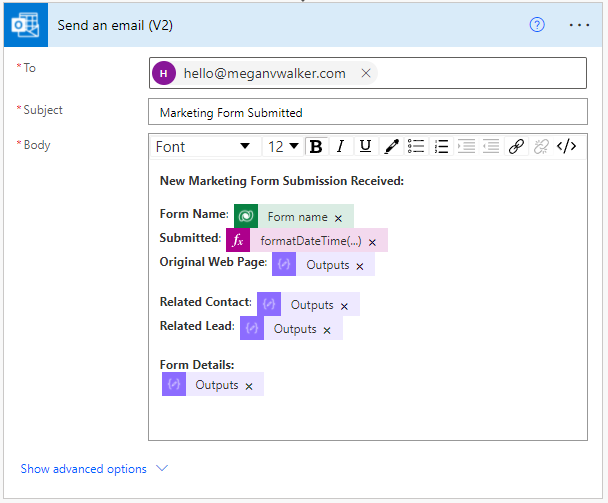
Now we can build the final email. Before doing that, I want to display the URL of the page that the submitted marketing form came from. This is captured in D365 Marketing so we can put it in the email, but it would be nice to have that a hyperlink. Adding in another Compose step, I can then just make a pretty link with a bit of HTML using the page url value as both the link itself and the text that shows.
<a href="@{triggerOutputs()?['body/msdyncrm_pageurl']}">@{triggerOutputs()?['body/msdyncrm_pageurl']}</a>

What you display in the notification email is up to you, but here is what I have. The Form name is pulled from the original trigger step. The submitted date and time have been formatted using the expression below. The Original Web Page, Related Contact, and Related Lead are all outputs from the various steps we included further up the flow. The Form Details is the Output from the Format Table step where the CSS styling was added. If you decide not to format the table including the field values, you would need to get the Output from the Create HTML table step instead.
formatDateTime(triggerOutputs()?['body/createdon'], 'dd/MM/yyyy h:mm tt')
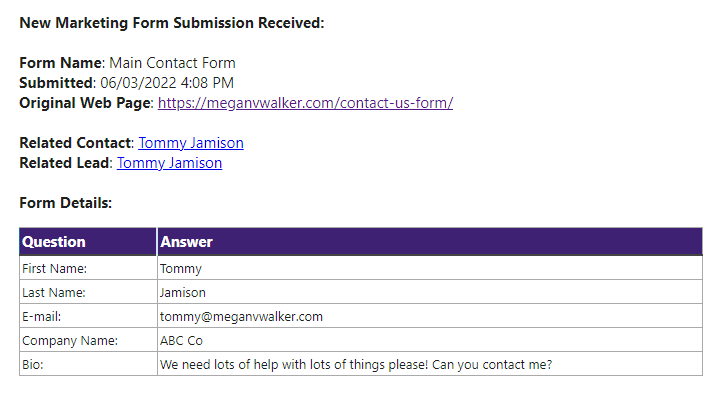
Here is the finished received email notification which includes a nicely formatted date and time, a link to the original web page where the form was found, links to the Contact and/or Lead record in Dynamics 365, and the questions that were filled out and submitted via the form.
Check out the latest post:
Send Unique Event Registration Response With QR Code Using No Code
This is just 1 of 449 articles. You can browse through all of them by going to the main blog page, or navigate through different categories to find more content you are interested in. You can also subscribe and get new blog posts emailed to you directly.
Great Post. You are confirming many of my observations as I try to implement something similar. I ended up using “when a row is added, modified or deleted” but then I included the select columns: statuscode and filter rows: (statuscode eq 192350002) or (statuscode eq 192350003).
Basically the flow will run when the form submission is doing all the matching and processing.
Hi Bill, yup, definitely a good way to go!
Hello Megan, very good article. I have a doubt, with the trigger based real time marketing journey in place will it be an option to use that over the power automate option. What will be the best way moving forward you think?
Hi Kailash! If you want to send something to the person that submitted the form, yes. However, if you want to replace what I walked through in this blog post and have an email notification go to someone internally, then no. You would still need something in Power Automate to go through and send an email to someone that isn’t the Contact.
I know this is old… but could you share an image of your full flow visualization? for some reason my flow is sending 5 emails… hmmm
Hi Bob, I wrote a more efficient post after this one. Take a look at this and see if it helps – https://meganvwalker.com/internal-notification-email-for-form-submissions/
Hi Megan,
Thank you for the detailed blog! Would it be possible to trigger on say 3 marketing forms and send the same confirmation email?
Kind regards,
Jackie
Hi Jackie, not sure I understand the business requirement. The internal email notification goes out based on the form that was submitted. Can you explain further what you mean about sending the same email for 3 different forms?