*** NOTE: ALL INFORMATION IS ACCURATE AT DATE OF PUBLISHING ***
One of the things I love about Power Automate and Dataverse combined, is how every day is a school day. We create new processes or flows that work great for the time in which they were created, then you learn more, or things change and new functionality is released, and now it’s time to learn again! It can also make you cringe when you look back at an old flow and see how you built it and know you would do it better or different given the chance again. Well in this post I have done exactly that. I wrote previously about creating an email notification for each D365 Marketing Form that was submitted. However, I had it running for every single submission for every single form, and I hadn’t thought about making sure all of the values from yes/no fields, option sets, multi select option sets or lookup fields were formatted nicely. Now in this blog post I have one flow to rule them all! Plus, the option to determine which Marketing forms should send out a notification AND what email address the notification should go to. Enjoy!
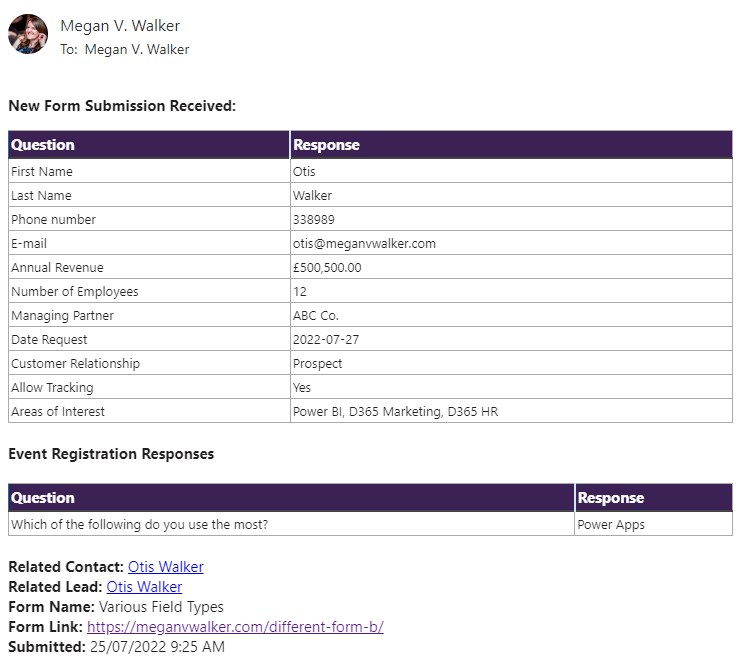
Final Notification To Include
- Ability to select which Marketing Form should send internal notifications
- Dynamic links back to the Contact and/or Lead linked to the form
- Dynamic link back to the web page where the marketing form is hosted
- Formatting of all text fields
- Displaying Yes or No for response to two option fields
- Display name of a record from lookup fields
- Display label from single choice option set fields
- Display the labels from multi select choice option set fields
- Format currency fields with the related Contact or Leads currency symbol
- Including registration responses for Event related forms
- Formatting in a pretty table
- All from one flow in Power Automate – no need to specify the fields or process for each form
Add New Fields To Marketing Form & Form Submissions
Before starting on a flow in Power Automate, there are a couple of fields to add. Without this step, you will end up with an email notification for every marketing form (which might not be needed) and also have no way of determining WHO the email should go to. So, on the Marketing form table (msdyncrm_marketingform) add two new fields. Internal Notifications is a Yes/No field, and Notification Email is a single text field with the type of Email.

Add both fields to the main form.

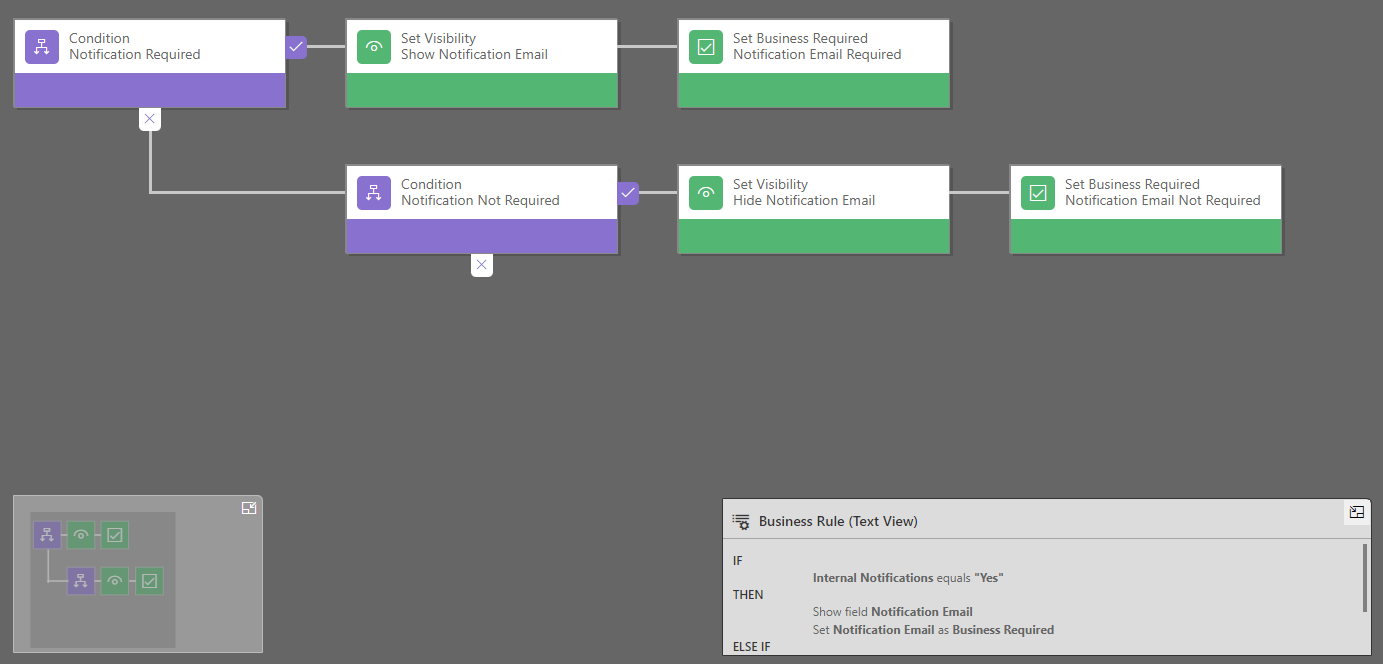
To keep things neat, I’ve added a business rule too. This will make the Notification Email field visible and required if the Internal Notifications field is set to Yes.
Now we will add another field to the Marketing Form Submission table (msdyncrm_marketingformsubmission). The purpose of this is so we can make sure the flow only triggers for new form submissions that need an internal notification to be sent. We can only trigger using fields from the Marketing Form Submission table, so need to pass the Internal Notifications value through in this way. Add a new Yes/No field called Internal Notifications and make it a calculated field.

Then set the logic to make the field value Yes if it’s Yes on the related Marketing Form, otherwise make it No. This means when someone fills out a form, we can trigger the flow if the Internal Notifications field equals Yes on the submission.

What Happens When Marketing Forms Are Submitted?
You’ve created a Marketing Form and added your Form Fields to it. When someone submits the form it creates one Marketing Form Submission record, with a number of Marketing Field Submission records attached (one for each of the questions that were on the form). There is a setting on the Marketing Form for ‘Store all form submissions’ that determines if all these records should be kept in Dataverse. Even if you have this set to No, the submission can be used to trigger a flow. The records are kept for long enough to be able to use the details to send out in an email.
A number of processes will run when the submission is created. These include waiting for all of the field submission records, and finding and/or creating a related Contact and/or Lead. The status reason of the form submission changes to Finished once this is all complete, which is what we will use as the trigger to start the flow in Power Automate.
Creating Your Flow In Power Automate
Now let’s move on to the flow. The trigger is from the Dataverse connector using the When a row is added, modified or deleted option. As mentioned previously, the Marketing Form Submission record will be created and then several processes will run before it’s actually finished, so the Change type should be Modified. Pick the table name of Marketing form submissions and the scope of Organisation. In the Select columns section add statuscode. This means it will only trigger when the Status Reason field changes. We also want to make sure it only triggers if that field equals Finished which has a value of 192350003. In addition, we can use the new field added for making sure the Internal Notifications on that form submission equals Yes. So for the Filter rows, it should be something like (statuscode eq 192350003 and yourprefix_internalnotifications eq true).

Now we will use the Get row by id action from the Dataverse connector and use the marketing form id from the trigger step to get the related Marketing Form.

Next we need a few actions that are the same, using Initialize variable. We will have 5 of them that should use the type of String. You can call them whatever you like but mine are Contact Details, Lead Details, Currency Symbol, Option Set Entity and Multi Select Options. These will be used later on in the flow to pass through values as required.

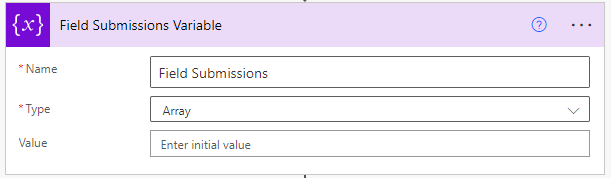
We need one more variable, but this one will be an Array. We will be using this to compile all of the questions and responses from the form submission and then put them in to a formatted table to add to the email notification.
Now a List rows action from the Dataverse connector is used to get all of the related marketing field submissions tied to the submission of the form. You can copy and paste the contents of the Fetch Xml Query below and use that to get the correct records.
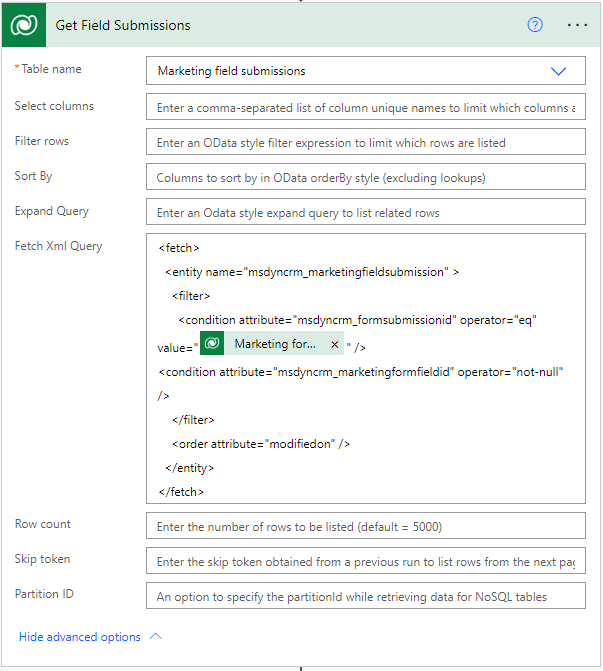
<fetch>
  <entity name="msdyncrm_marketingfieldsubmission" >
    <filter>
      <condition attribute="msdyncrm_formsubmissionid" operator="eq" value="@{triggerOutputs()?['body/msdyncrm_marketingformsubmissionid']}" />
<condition attribute="msdyncrm_marketingformfieldid" operator="not-null" />
    </filter>
    <order attribute="modifiedon" />
  </entity>
</fetch>
Check For Contact, Lead or Both
A Marketing Form has a field to indicate what should happen when a form is submitted in relation to Contacts and Leads. The field (msdyncrm_entityupdatebehavioronsubmit) will update only Contacts, only Leads or both Contacts and Leads. This field will be used to determine a few things. First, it will be used to determine if we need to provide a link to one or the other or both records, and to set the currency information from the right record so that the correct currency symbol can be set for any currency related form fields. This last part for the currency isn’t needed, but can provide a little extra information within the body of the email notification. Add in a Switch control, and add the Update contacts/leads field as the On value.

First we will look at the Contact Only path. The flow will go down this path if the value of the Update contacts/leads field equals 1. Add in a Get a row by id action to find a record from the Contacts table. Use the Matched contact (Value) dynamic content from the original trigger step. Then use the Set variable action and pick the Contact Details variable you added near the start of the flow. We are going to create a link that we can then add in to the email notification. This will provide a dynamic link back to the record in D365 that can be clicked on to get to the Contact quickly. You can set this up based on your own requirements, but I have used a bit of HTML to make a pretty hyperlink from the Contact’s Full Name. Assuming you rename the action steps within your own flow, and call the step above Get Contact, you should be able to copy and paste the code I provide below and add that as the Value in your Set variable step.
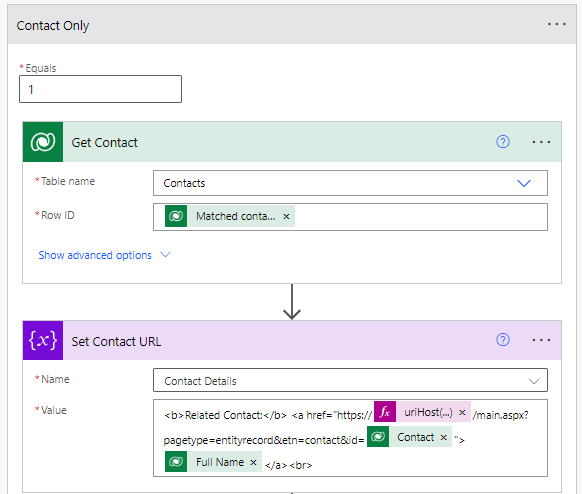
<b>Related Contact:</b> <a href="https://@{uriHost(outputs('Get_Contact')?['body/@odata.id'])}/main.aspx?pagetype=entityrecord&etn=contact&id=@{outputs('Get_Contact')?['body/contactid']}">@{outputs('Get_Contact')?['body/fullname']}</a><br>
Next add in a List rows action step. Choose the table name of Currencies. If you use a field on a form that maps back to a Currency field, there is no way of knowing what type of currency that is. Although not an exact science, you could assume that the currency symbol of the one related to the Contact (or Lead) could make sense. In order to figure out what that is, we will get the currency that is linked to the matched contact. If you are renaming your steps the same as mine, you should be able to just copy and paste the Fetch Xml Query I have below and use that to filter and find the correct Currency record.
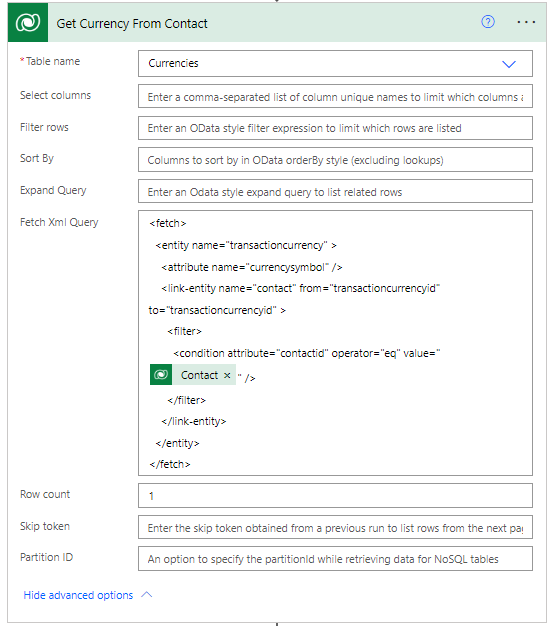
<fetch>
  <entity name="transactioncurrency" >
    <attribute name="currencysymbol" />
    <link-entity name="contact" from="transactioncurrencyid" to="transactioncurrencyid" >
      <filter>
        <condition attribute="contactid" operator="eq" value="@{outputs('Get_Contact')?['body/contactid']}" />
      </filter>
    </link-entity>
  </entity>
</fetch>
Using the Set variable action, the Currency Symbol variable can be provided. An expression can be used to get the first record that was returned in the List rows step. There will only ever be one found, so we are safe in this approach knowing we will get the right one. If you have renamed your steps like I have, you can copy and paste the expression below. This will get the currency record found and put the currency symbol in to this variable.

first(body('Get_Currency_From_Contact')?['value'])?['currencysymbol']
The next path of the Switch statement includes steps to follow if the Update contacts/leads field equals 2 which is the value for Only leads. We have the same steps, but this time they are as follows:
- Get a row by id – using the Matched lead (Value) find the related record from the Lead table
- Set variable – set the Lead Details variable to include the link to the Lead that was linked
- List rows – search for the currency linked to the Lead record found
- Set variable – set the Currency Symbol from the Currency record found
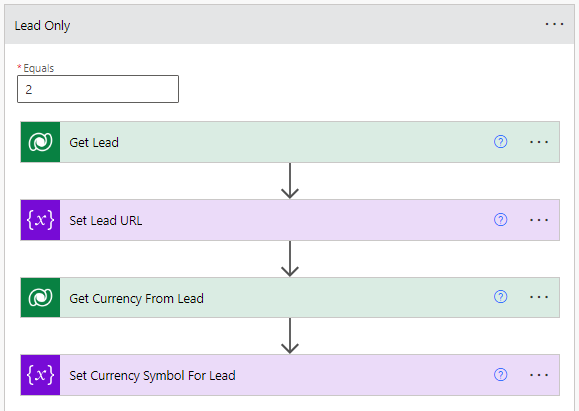
You can use the snippets below and just copy and paste (assuming you have renamed the steps in your flow the same as mine) in to each action.
Set Lead URL:
<b>Related Lead:</b> <a href="https://@{uriHost(outputs('Get_Lead')?['body/@odata.id'])}/main.aspx?pagetype=entityrecord&etn=lead&id=@{outputs('Get_Lead')?['body/leadid']}">@{outputs('Get_Lead')?['body/fullname']}</a><br>
Get Currency From Lead:
<fetch>
  <entity name="transactioncurrency" >
    <attribute name="currencysymbol" />
    <link-entity name="lead" from="transactioncurrencyid" to="transactioncurrencyid" >
      <filter>
        <condition attribute="leadid" operator="eq" value="@{outputs('Get_Lead')?['body/leadid']}" />
      </filter>
    </link-entity>
  </entity>
</fetch>
Set Currency Symbol For Lead:
first(body('Get_Currency_From_Lead')?['value'])?['currencysymbol']
The last path in the Switch statement is the Default one. This will be the path that is used if the Marketing form is going to update both a Contact AND a Lead. This will repeat several of the steps used in the previous paths. We will get the Contact and then get the Lead using the Get a row by ID action steps and using the Matched contact (Value) and the Match lead (Value) respectively. We can then use the Set variable action to set the Contact URL and then the Lead URL (using the same snippets provided above). For checking the Currency, you might choose differently, but I have opted to get the Currency from the Contact rather than the Lead using a Get a row by ID step from the Currency table, and then a Set variable step to set the currency symbol from the record found.

Format Responses Based On Field Type
When you create a form field to add to a Marketing form, there are 11 different types you could create. The value submitted comes through in to the Field value field on the Marketing field submission record. For most of the field types this is fine (single line of text, multiple lines of text, whole number, floating point number, decimal number, date and time) as they are captured as readable text that can be understood within an email notification. However, there are a few pesky ones that need a bit of love and care to reformat to be ‘readable’. These are the following field types: two options, option set, multi-select option set, lookup and currency.
For the next section of the flow, I have added a Scope control. It’s not needed but keeps all of this together in a neat way so anyone editing the flow can see exactly what the point of this area is. Next we will add an Apply to each step. Search for the word value in the dynamic text, and put that in to the Select an output from previous steps. This is the value from the Get Field Submissions List rows action, which means the next steps will run for each field that was submitted on the form. We need to get the related form field to know what type it is. Add in an action step of Get a row by ID and use the Marketing form field as the Row ID.
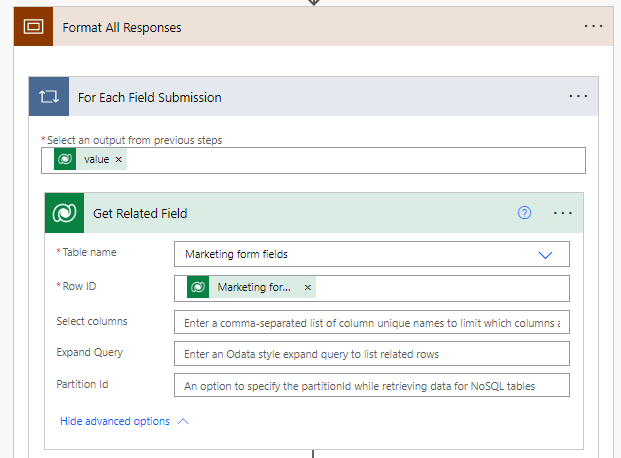
Still within the Apply to each step, we will add in another Switch control. Use the Field type field from the step above (the one I named Get Related Field) as the value the Switch will run on. Now for each field that was included in the form submission, the flow will run through and determine how to handle the field based on the type. After assessing each field, we are then going to append the question and the response to the Field Submissions Array variable that was created at the start of the flow. This will allow us to combine them all together to then include in a formatted table that can be included in the email notification.

Two Options Field Type
When a two options field type (Yes/No) is mapped, the values that come back through are either true or false. With this one an assumption has been made that a checkbox control has been used, which means someone either ticks the box or leaves it empty. So for this, you might need to make a slight modification on what wording should show in the notification email, but I have gone with if the value is true, show the word Yes, and if the value is false, show the word No.
To do this, we first set the value to equal 4 (which comes from the Field type Choice field on a form field). Then an Append to array variable action is used. As there was only one array variable added, that should be the only one that appears in the drop down list to select from. We are then creating an item in the array and including the name of the field, and then the response given. We are formatting the response with an if equals expression. If you have renamed the steps of your flow the same as mine, you can copy and past the value expression from below the screenshot.

{
  "Question": "@{items('For_Each_Field_Submission')?['msdyncrm_fieldname']}",
  "Response": "@{if(equals(item()?['msdyncrm_fieldvalue'], 'false'), 'No', 'Yes')}"
}
Option Set Field Type
When a Choice field is mapped to an Option set field type, the values that come back are the value from the item chosen rather than the Label. For example, rather than seeing the word Prospect for Customer Relationship, the value of 916780004 would be shown instead. This isn’t helpful for anyone receiving the notification email, so we need to get the label somehow instead. For this section, a MASSIVE thanks to Amey Holden for writing this blog post that gave me a BIG head start on figuring all of this out. Amey also writes about D365 Marketing so make sure you follow her on Twitter! Amey’s post explains that using an Invoke an HTTP request step gives us the ability to get access to the metadata of Choice fields in D365, and this is exactly what we need!
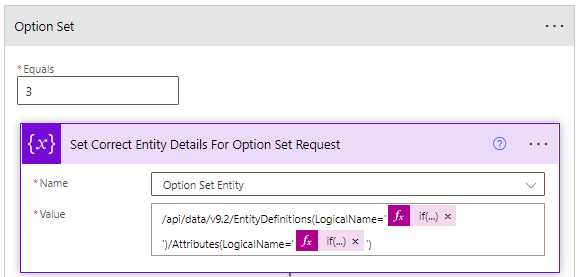
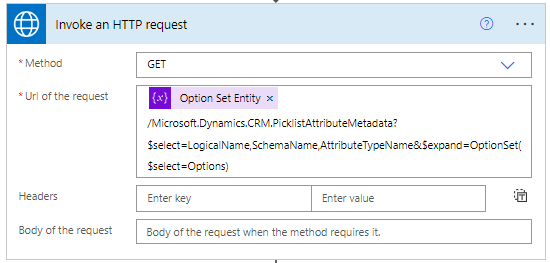
Add a new scope path and set the Equals value to 3 (which is the form field type of Option set). In order to use the Invoke an HTPP request, we need to pass through a URL for the request… BUT as part of this we need to define the logical name of the table. This is why we have the Option Set Entity variable that we are now going to add using a Set variable action. As you know, you could have a marketing form that creates/updates only Contacts, only Leads or Both. Therefore we need to define that within our request and use either the word lead or contact to match the Entity Definition Logical Name. We are also going to filter the Option set that gets returned and only show the one that matches the field mapped for Contact or the field mapped for Lead and then use that to make sure we only get that Option set list back. Again, assuming you have renamed all of your steps the same as mine, you will be able to copy and paste the snippet below. Note that in cases where both a Lead AND a Contact are created or updated, I have gone with the Contact as the field mapping to use.
/api/data/v9.2/EntityDefinitions(LogicalName='@{if(equals(outputs('Get_Related_Marketing_Form')?['body/msdyncrm_entityupdatebehavioronsubmit'], 2),'lead','contact')
}')/Attributes(LogicalName='@{if(equals(outputs('Get_Related_Marketing_Form')?['body/msdyncrm_entityupdatebehavioronsubmit'], 2),outputs('Get_Related_Field')?['body/msdyncrm_leadmapping'],outputs('Get_Related_Field')?['body/msdyncrm_contactmapping'])}')
Your step should look something like this. We are basically defining the first part of a URL that will add more to in the next step.
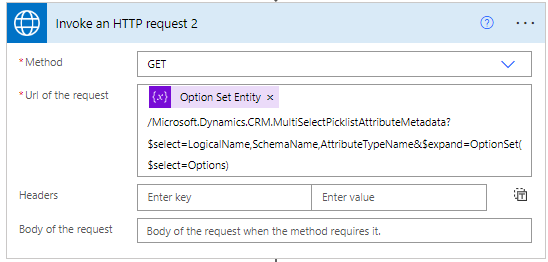
Search for the Invoice an HTTP request action. You will be prompted with a screen that looks a little scary… but all you need to do is add your D365 URL in to the Base Resource URL field and the Azure AD Resource URL field and then click Sign In. Pretty easy! Then you will get the screen below where you can set the Method as GET. The URL of the request is now going to be made up of the Option Set Entity variable we just set above, and then the remaining part of the string is what determines that we are going to get the Options from the related Optionset that gets found. Add this part AFTER the Option Set Entity variable:
/Microsoft.Dynamics.CRM.PicklistAttributeMetadata?$select=LogicalName,SchemaName,AttributeTypeName&$expand=OptionSet($select=Options)
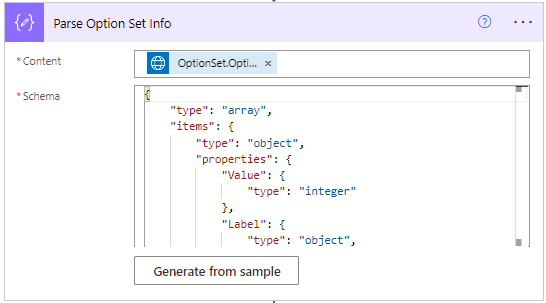
Now add in a Parse JSON step. You won’t be able to find this in the dynamic list of values, but just paste this string below in to the Content value in the Parse JSON step.
@{body('Invoke_an_HTTP_request')?['OptionSet']?['Options']}
It will then show up as OptionSet.Options. For the Schema, we want to just pull back the Labels from the option set. Copy and paste the snippet below in to the Schema (do not Generate from sample, there is no need).
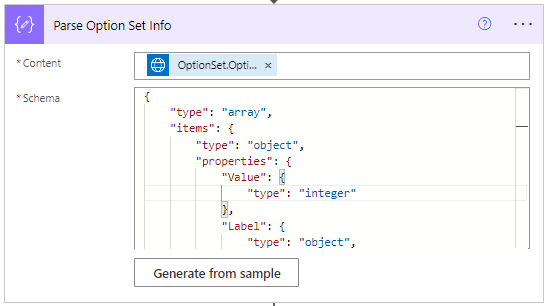
{
    "type": "array",
    "items": {
        "type": "object",
        "properties": {
            "Value": {
                "type": "integer"
            },
            "Label": {
                "type": "object",
                "properties": {
                    "UserLocalizedLabel": {
                        "type": "object",
                        "properties": {
                            "Label": {
                                "type": "string"
                            }
                        }
                    }
                }
            }
        },
        "required": []
    }
}
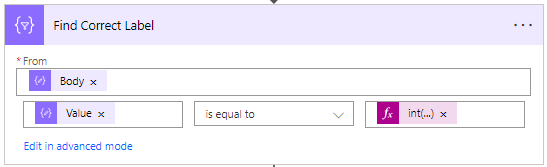
Now add in a Filter array step. Even though we have already filtered to only bring back the Option set values for the field that was mapped to on the Form field, we now need to filter again and find the Label that exists for the value that was passed through the form submission. So instead of getting 916780004 we want to get the Label of Prospect (or whatever the correct one is. Our Filter array step below uses the Value from the array where it is equal to the Field value from the field submission record we are currently evaluating. Note that the value that was returned actually comes back as a string of text rather than a number, so we need to use an expression to turn it in to an integer. Assuming you are renaming your steps the same way I am, you should be able to copy and paste the expression below in to the last box to set the value.
int(items('For_Each_Field_Submission')?['msdyncrm_fieldvalue'])
Now we have our Append to array step again which allows us to add the Question and Response for the Option set field type. Using the Append option means we are just adding to any fields that have already been added to this variable, giving us a full list of all the field question and responses at the end of the successful run of the flow. We create the object in the array using the Field name for the Question, and then pulling in the Label for the Response. The expression used for the Response is getting the first item (it should always be the only item found) filtered from the array, and then using the Label object, then from there going to the User Localized Label section and then pulling that Label text.
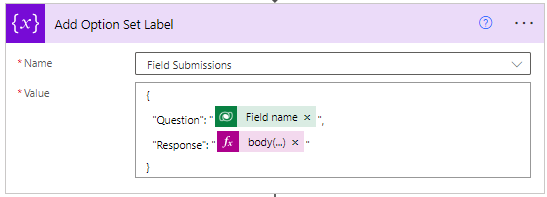
{
  "Question": "@{items('For_Each_Field_Submission')?['msdyncrm_fieldname']}",
  "Response": "@{body('Find_Correct_Label')?[0]?['Label']?['UserLocalizedLabel']?['Label']}"
}
Finally, the last step of this path of the scope is to simply clear out the Option Set Entity variable so it’s empty. Just add in null as the expression to do this. It’s then empty for the next time this path of the Scope might be run through for another field submitted on this form submission.
Multi Select Option Set Field Type
Just when we resolve the issue for Option set form field types, we then come up against Multi Select option set types which can be mapped to Choices fields on either a Contact or a Lead record. This has the value of 10 for this path of the scope. The first step here is the same as the first step used above in the Option set path.

There is a small difference in the next step which is the Invoke an HTTP request action. Notice instead of using PicklistAttributeMetadata like we did in the Option set field type, for this we are adding in an extra bit to identify this is for multi select – MultiSelectPicklistAttributeMetadata.
/Microsoft.Dynamics.CRM.MultiSelectPicklistAttributeMetadata?$select=LogicalName,SchemaName,AttributeTypeName&$expand=OptionSet($select=Options)
Our Parse JSON step is exactly the same, so you can use the same schema that I shared above in the Option set section.
Now we need to do something a bit different. The person filling out the form could have selected any number of values from the multi select field, so we need to parse through the values that are included in the Field value field from this specific field submission that is being evaluated. To do that, we need another Parse JSON step. The Content should be the Field value field from the For each field submission step. The schema is simple, just copy and paste from below.
{
    "type": "array",
    "items": {
        "type": "string"
    }
}

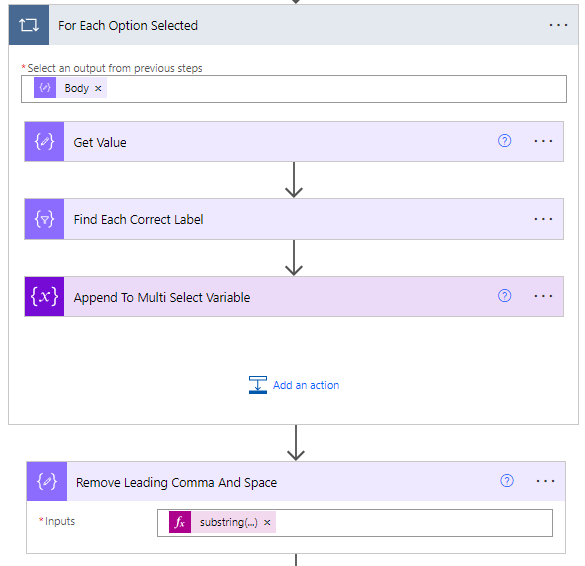
We now need to go through each potential value that was selected from the multi select option set field on the form. We know there could be more than one, so we need to have an Apply to each step. The output to select is the Body from the Parse JSON step above. Then add in a Compose action and search for Current item from the Apply to each step you are currently in. This is giving us the number of the option selected, for example 916780004.
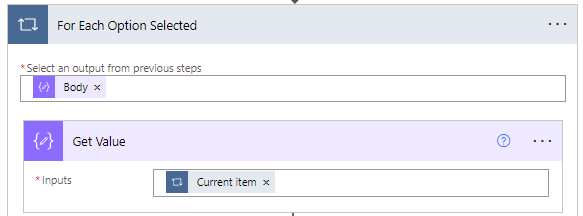
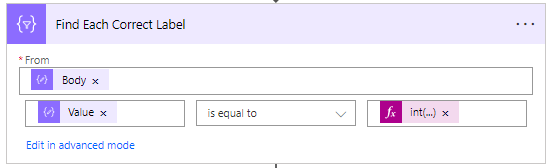
Just as we had with the Option set field, we now need to add in a Filter array step. Use the Body from the Parse JSON step where you are parsing the Option Set Options (the first Parse JSON step within this path). Then search for Value and pull that in from the same Parse JSON step. Finally, set the operator to is equal to the output from the step above, remembering to turn it in to an integer.
@int(outputs('Get_Value'))
This is where one of our other variables we added at the start is used. For each value that was selected, where we have then filtered to access the label for each one, we will add it to a string separated by commas. I’ve put a comma first, then a space, then the following expression. I am adding the comma and the space at the start and will then clean it up and remove them from the beginning in the next step. If you’ve renamed your steps you should be able to copy and paste from below in to your variable. This is the end of this Apply to each section.
@{body('Find_Each_Correct_Label')?[0]?['Label']?['UserLocalizedLabel']?['Label']}
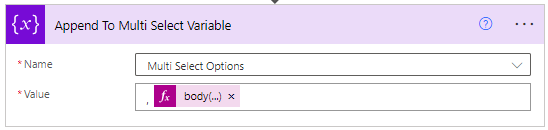
Now I just want to clean up the string of labels and remove the leading comma and space using a Compose action step. We do that OUTSIDE of the Apply to each section. The expression below will look at the first two characters and then remove them leaving us with a nice list of comma separated labels pulled from the multi select option set values that were selected on the form.
@{substring(variables('Multi Select Options'),2,sub(length(variables('Multi Select Options')),2))}
Now we append to the Field Submissions array, continuing to build up our list of field questions and responses. For this we are using the field name and then the Output of the last compose step above.
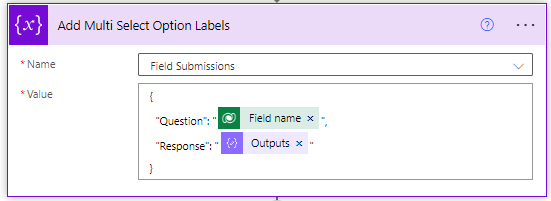
{
  "Question": "@{items('For_Each_Field_Submission')?['msdyncrm_fieldname']}",
  "Response": "@{outputs('Remove_Leading_Comma_And_Space')}"
}
Just as we did for the Option set Scope path, we are going to add one more step on this path for the Multi Select Option set path and set the value of the Option Set Entity variable to null.
Also, because we used the multi select options variable in this step, we will need to clear out this variable just in case there are more than one multi select field used on the form.
Lookup Field Type
If you use a Lookup type field, you can display a form field that allows the submitter to select from a list of records in D365. The challenge here is that the value submitted is the GUID (long ID) of the record and the logical name of the record. For example if the lookup was to the Account table, the submission value for that field might look something like this:
{“Id”:”ba47c1ff-72f0-ec11-bb3c-0022481b8a79″,”LogicalName”:”account”}
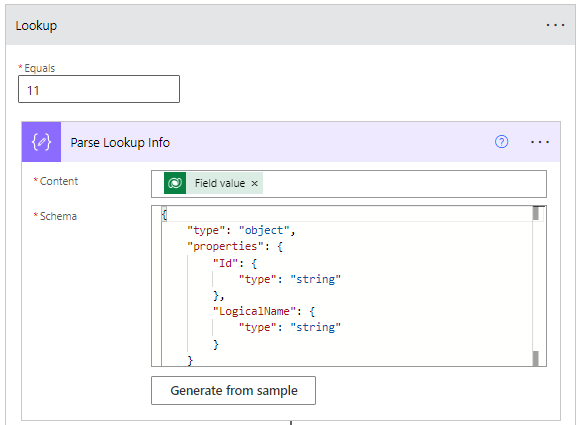
The good news is, we can use that to get the name of the Account (or whatever table it is) and ad that to the email notification instead. First thing we need to do is add a Parse JSON step. The Content should be the Field value field. The Schema is pretty simple and includes the ability to split out the ID from the Logical Name.
{
    "type": "object",
    "properties": {
        "Id": {
            "type": "string"
        },
        "LogicalName": {
            "type": "string"
        }
    }
}
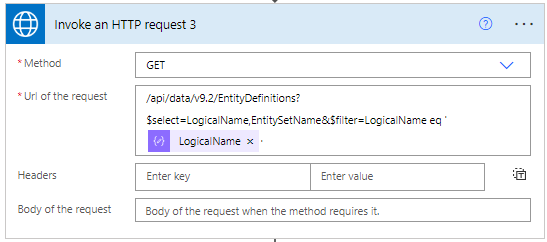
We now use our trusty action of the Invoke an HTTP request, using the GET method. The request is to use the Logical Name (account in our example) as the filter and get the Entity Set Name which is the plural of the table (accounts in our example). It would be nice if we could always assume there is just an s on the end of the table name to set the plural but anyone who has tried to set lookups in Power Automate knows that is NOT THE CASE and sometimes there are strange and creative plural names used in the Entity Set Name so assuming can not be done! 😉 We need the Entity Set Name to find the correct record to pull the name from.
/api/data/v9.2/EntityDefinitions?$select=LogicalName,EntitySetName&$filter=LogicalName eq '@{body('Parse_Lookup_Info')?['LogicalName']}'
We are then going to parse the data that was brought back from the HTTP request above. Use the Body from the HTTP request in the Content field below. You can copy and paste the Schema from below.
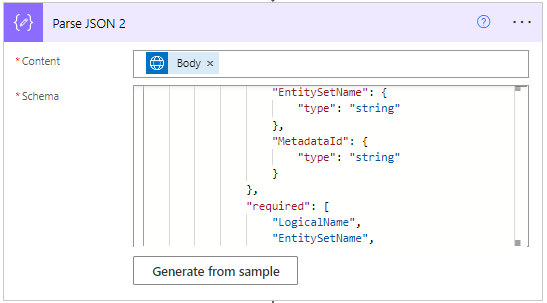
{
    "type": "object",
    "properties": {
        "value": {
            "type": "array",
            "items": {
                "type": "object",
                "properties": {
                    "LogicalName": {
                        "type": "string"
                    },
                    "EntitySetName": {
                        "type": "string"
                    },
                    "MetadataId": {
                        "type": "string"
                    }
                },
                "required": [
                    "LogicalName",
                    "EntitySetName",
                    "MetadataId"
                ]
            }
        }
    }
}
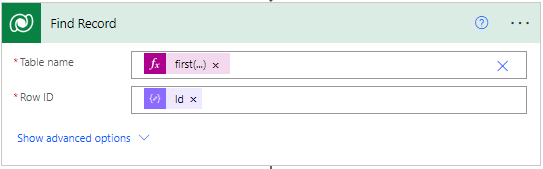
Now that we have both the ID AND the Entity Set Name, we can add a Get a row by ID step to find the right record WITHOUT needing to know what table it’s on. Click on the Table name drop down and scroll to the bottom and click on Enter custom value. There should only be one record returned so we are going to pick the first record, and add in the Entity Set Name value. Use the Id from the Parse JSON step you added first in this path of the Scope control.
@first(body('Parse_JSON_2')?['value'])?['EntitySetName']
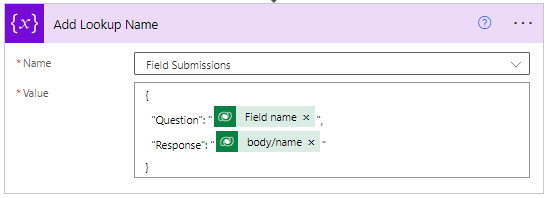
Finally we are going to append to our Field Submissions array variable and add in the Question and the Response from the Lookup field. You will need to use an expression to set the Name of the field as you have nowhere to pull it from based on the table being set dynamically. Again, if you have been renaming your steps the same as mine, you should be able to copy and paste and use the expression below in your array variable.
{
  "Question": "@{items('For_Each_Field_Submission')?['msdyncrm_fieldname']}",
  "Response": "@{outputs('Find_Record')?['body/name']}"
}
Currency Field Type
The field type of currency has the number 9. Although this is not required, it’s kind of nice to include. The number comes through just as a text string so even though it’s mapped to a currency field of £500,000, it would show as 500000 o the email notification. This gives you the option to format the number and set the currency symbol. Keep in mind the symbol itself was already set way up near the start of the flow, so this would just be to make sure it gets added to reformat how this will look. The first action in this path is a Compose step to format the text as a number (interger).
@{int(items('For_Each_Field_Submission')?['msdyncrm_fieldvalue'])}
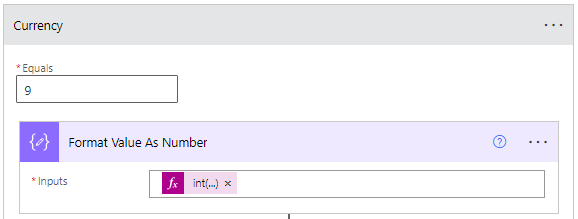
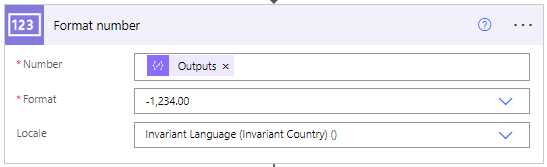
The next step is an action called Format number. You can use the outputs from the step above in the Number field, then pick the format. I’ve gone for the second option and left the Locale option empty.
The last step in this path of the Scope control is to append to the Field Submissions variable. This is where we can set the question from the field name, and the response is a combination of the Currency Symbol variable and the body from the Format number output above.
{
  "Question": "@{items('For_Each_Field_Submission')?['msdyncrm_fieldname']}",
  "Response": "@{variables('Currency Symbol')}@{body('Format_number')}"
}

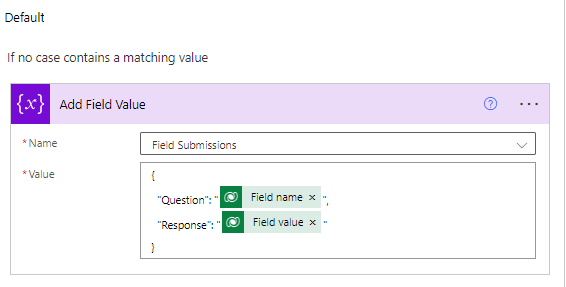
All Other Field Types
The Default path of the Switch control will be used for all other field types. The only action required is the Append to array variable for the Field Submissions array and add in the Question and Response using the field name and the field value.
{
  "Question": "@{items('For_Each_Field_Submission')?['msdyncrm_fieldname']}",
  "Response": "@{items('For_Each_Field_Submission')?['msdyncrm_fieldvalue']}"
}
Check For Event Registration Form
This next part might not be needed in your flow, it really depends if you are using the marketing forms for event registration forms. If you are, and you are also adding Custom Registration Fields to the form, this part is for you. Without it, you will not get those field responses on your email notification. Add a condition and set the logic to Form type is equal to 3. This means the Form type is set as Event registration. The no path will stay blank, but in the yes path, add a List rows step and use Registration Responses as the table. You should be able to copy and paste the Fetch XML Query below and use that within the List rows step.

<fetch>
  <entity name="msevtmgt_registrationresponse" >
    <attribute name="msevtmgt_customregistrationfield" />
    <attribute name="msevtmgt_eventregistration" />
    <attribute name="msevtmgt_response" />
<link-entity name="msevtmgt_eventregistration" from="msevtmgt_eventregistrationid" to="msevtmgt_eventregistration" >
      <attribute name="msevtmgt_contactid" />
      <filter>
        <condition attribute="msevtmgt_contactid" operator="eq" value="@{triggerOutputs()?['body/_msdyncrm_matchedcontactid_value']}" />
      </filter>
    </link-entity>
    <link-entity name="msevtmgt_eventregistration" from="msevtmgt_eventregistrationid" to="msevtmgt_eventregistration" >
      <link-entity name="msevtmgt_event" from="msevtmgt_eventid" to="msevtmgt_eventid" >
        <attribute name="msevtmgt_eventid" />
        <attribute name="msdyncrm_marketingformid" />
        <link-entity name="msdyncrm_marketingform" from="msdyncrm_marketingformid" to="msdyncrm_marketingformid" >
          <link-entity name="msdyncrm_marketingformsubmission" from="msdyncrm_marketingformid" to="msdyncrm_marketingformid" >
            <filter>
              <condition attribute="msdyncrm_marketingformsubmissionid" operator="eq" value="@{triggerOutputs()?['body/msdyncrm_marketingformsubmissionid']}" />
            </filter>
          </link-entity>
        </link-entity>
      </link-entity>
    </link-entity>
  </entity>
</fetch>
Now add a condition which will be used to check the number of records returned. For this we use length, and then use the name of the List rows step and make sure it’s greater than 0. If not, meaning there are no related Registration Responses, this part of the flow will do nothing further about the Event form, otherwise it will move through the Yes path.
length(body('Get_Event_Registration_Responses')?['value'])
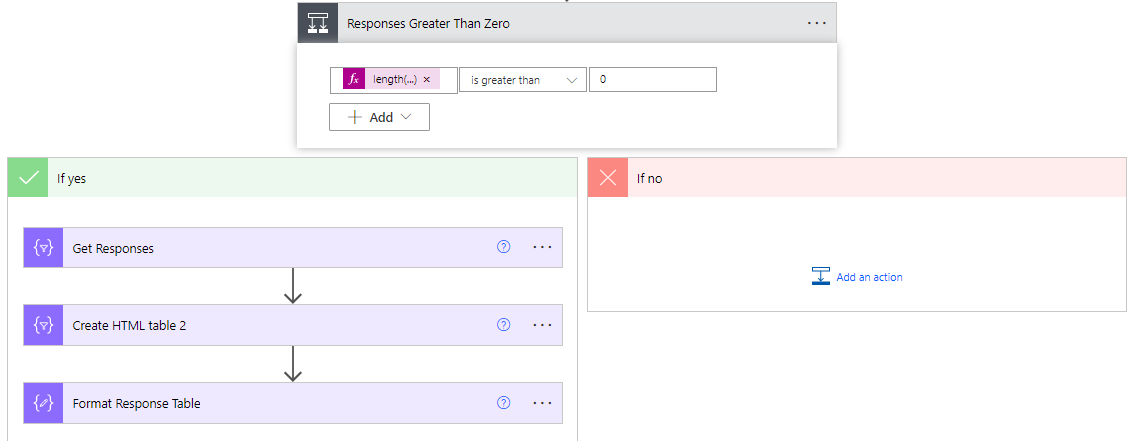
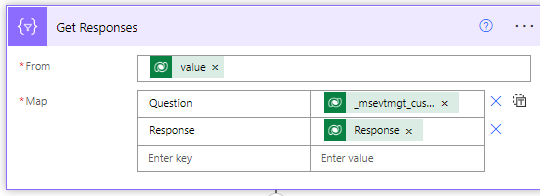
First we add a Select action. Use the value option from the List rows step as the From value. Then type in the word Question, and select the Custom Registration field in the second column as the dynamic content. A new row will appear so you can type the word Response, and then find the Response field as the dynamic content there.
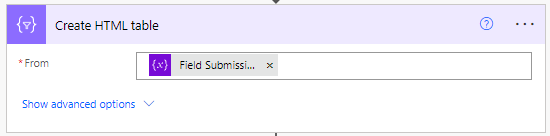
Add in a step for Create HTML table. Use the Output from the Select step above.
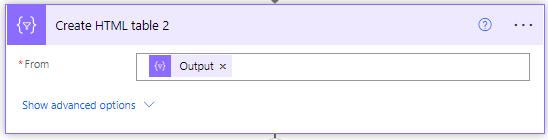
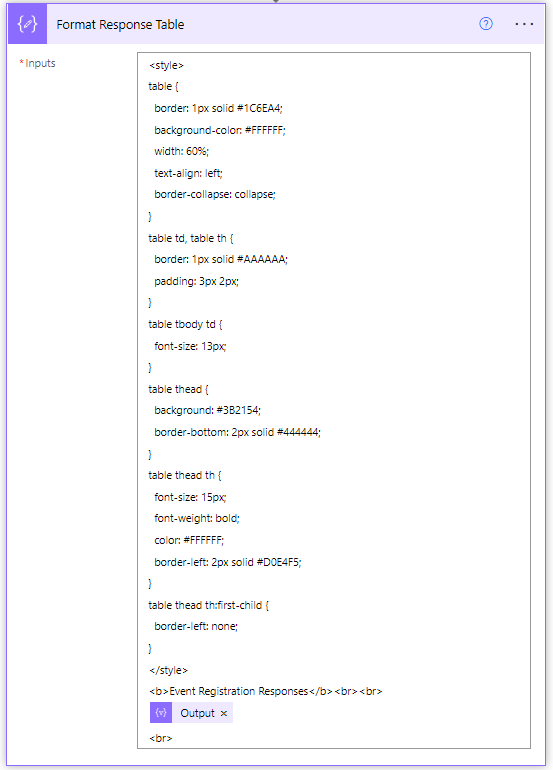
This next step is not needed, but it just means you can format the HTML table a little nicer by adding in a Compose step and then including the Output from the Create HTML table step. For more information on this, check out one of my all time go to resources from my good friend Ryan Maclean, all about styling HTML tables using Power Automate. I’ve also added in a header to display the title Event Registration Responses and made it bold. Just means that we only show the header when there are actually responses included. Makes the final email more user friendly.
Putting It All Together In The Notification Email
Now we get to fit it all together. In each step of the Scope control, we have added the question and response to the Field Submissions array variable. This means we can now take that array and parse it out, and use it to create an HTML table, similar to the approach done in the section above for the Event Registration Responses. Then, as with above, you can do a Compose step and add in some CSS and the Output from the Create HTML table step.
Another useful, but not necessary, step is to create a hyperlink to the web page where the marketing form was submitted from. Might be helpful for someone to know which page on the website the submitter was viewing prior to submitting the form.

Now the last piece of the entire flow, actually creating the email notification using the Outlook connector (or SendGrid or whatever email connector you want to use). The To field will be the Notification Email field from the related marketing form. The Subject can be whatever you wish, but I am including the name of the related marketing form here. Then we just build it out as needed. I have the outputs from the final HTML table step above (use the Compose where you formatted the table if you chose to add CSS), and the Event Registration Response table output. Then I have the Contact Details and Lead Details variables that will contain a link to one or both of those related records. At the bottom I have the name of the marketing form, the link to the marketing form (using the Output from the step where you created the web page link), and the formatted date and time of when the form was submitted.
formatDateTime(triggerOutputs()?['body/createdon'], 'dd/MM/yyyy h:mm tt')

Here we have it, the final email notification! Phew!!! It took a LOT to get here… but here’s the good news… it’s just one flow and it runs and pulls all of the right data in every single time. There is no needing to create new one off flows for each Marketing form you set up.
Check out the latest post:
Use Custom Event Registration Questions To Branch Your Journeys In Customer Insights
This is just 1 of 603 articles. You can browse through all of them by going to the main blog page, or navigate through different categories to find more content you are interested in. You can also subscribe and get new blog posts emailed to you directly.
Hi, Thanks for your awesome work, so useful. I’m having a wee problem with the look up value step. I’ve faithfully deleted and redone the ‘input’ steps to see if I can track down the issue but to no avail. The error I get upon saving the flow occurs after the Get a row by ID step of the Look Up part, and the error is “Flow save failed with code ‘DynamicOperationRequestClientFailure’ and message ‘The dynamic operation request to API ‘commondataserviceforapps’ operation ‘GetMetadataForGetEntity’ failed with status code ‘BadRequest’. This may indicate invalid input parameters. Error response: {“error”:{“code”:”XrmApiRequestFailed”,”message”:”Request to XRM API failed with error: ‘Message: Syntax error at position 48 in ‘EntitySetName eq ‘@first(body(‘Parse_JSON_2’)?[‘value’])?[‘EntitySetName’]’ or LogicalName eq ‘@first(body(‘Parse_JSON_2’)?[‘value’])?[‘EntitySetName’]”.\nCode: 0x0\nInnerError: ‘.”,”extendedData”:{“code”:”0x0″,”message”:”Syntax error at position 48 in ‘EntitySetName eq ‘@first(body(‘Parse_JSON_2’)?[‘value’])?[‘EntitySetName’]’ or LogicalName eq ‘@first(body(‘Parse_JSON_2’)?[‘value’])?[‘EntitySetName’]”.”}}}’.”
I’ve squinted at it for ages and am not getting anywhere – I’m wondering if you could please help me pinpoint what is going wrong. I have checked my steps are named the same as yours / matching the code.
Thanks in advance!
Hi Jo. What is the name of your Parse JSON step? Is it Pars2 JSON 2, or something else? If you have it named something different, then the expression to use needs to use your step name with each word separated with an underscore. Does that help?
@first(body(‘YOUR_PARSE_JSON_STEP_NAME’)?[‘value’])?[‘EntitySetName’]
This has been such a super useful resource, thank you. One thing I can’t figure out though – my landing page form has the option for the form-filler to choose whether they want to add themselves to a marketing list. This is OOB. However I can’t see their response/preference coming through in the question-response pairs generated in this flow. Does it live in a different table? Any idea which? Thanks.
Hi UmbJo, ah, that is a whole other level of changes unfortunately. Check out this post from my friend Amey Holden – https://www.ameyholden.com/articles/trigger-flow-marketing-list-subscription-list-updated
It involves using the Plugin Registration Tool. Not low code at all.
Hi Megan, do you also have this kind of solution for realtime marketing forms? Or is there a simple way to extend / adjust the solution in a way it also fits realtime forms? Thanks!
Hi Mirjam, I am literally working on this as a solution today! The Outbound solution will not work for Realtime, there are quite a few differences. Overall the solution has less steps but does have a few things to look out for. The blog will likely be published in a few weeks.
Hi Megan,
I’ve tried implementing this but the email is repeating the first form submission. I.E. if the first field is “first name” and there are five other fields, the email returns first name and the first name value five times. Any thoughts on how I can resolve?
The only thing I can think Billy is that the email is in a section it shouldn’t be, so either in the Switch or an Apply To Each step rather than completely outside of all those steps.
Hello Megan,
Instead of sending an internal notification email I would like to send a Marketing Email with the submitted values to the person who filled out the form. Is this also possible?
Eg. a person submits a contact form from a webpage with the fields /First Name/, /Last Name/, /Email/, /Message/.
I would then like to send this contact/lead an email with the values that have been submitted.
Eg.
/Thank your for your inquiry, You have submitted the following: ……/
But the email must also be a marketing email with subscription center link – so not just a regular email like in your example. Unless it is possible to insert the subscription center link in a regular email.
I hope my question is not too confusing.
Thanks!
Thanks!
Hi Megan, sounds like a good blog post… 😉
Yes you could do it, using something similar to this in terms of the approach: https://meganvwalker.com/email-confirmation-subscription-form-submitted/
You would need a custom trigger. You could start the flow off like I did in this post to get all of the values they had submitted. Then right at the end where I create the email notification, you would do an action for ‘Perform an unbound action’ to pass the values through to your trigger. So you would still create an HTML table, but you would push that through the trigger which you can then use in your marketing email like I did in the other blog I shared above.
Hope that makes sense!
Oh and you might want to look at this post which is all about the Realtime Marketing form submissions. They work differently: https://meganvwalker.com/notification-emails-for-realtime-marketing-forms/
Hi Megan,
Is it also possible to use the Invoke an HTTP request action using a Service Principal?
Thanks,
Mirjam
Hi Mirjam, I don’t know either way, never needed to use that approach. Only way to find out, just test it! 😊