*** NOTE: ALL INFORMATION IS ACCURATE AT DATE OF PUBLISHING ***
If you are using Realtime Marketing forms in D365 then this might be a blog post for you! You can follow one approach for sending notification email when someone submits an Outbound marketing form, but you’ll need to create a different process for Realtime. In this article I will walk through how to create a flow in Power Automate and provide details about how the records are linked together for Realtime Marketing submissions.
First let’s look at the different types of records.
- Form – msdynmkt_marketingform – this is the Realtime Marketing form record
- Form Submission – msdynmkt_marketingformsubmission – when someone submits your form, a form submission record is created
- Linked Entity – msdynmkt_createdentitylink – this is the Lead or Contact linked to a form submission
- Field Submission – msdynmkt_marketingfieldsubmission – for each field on the form, there will be a field submission record linked to the form submission. These records store the responses given to each question
Now we know this, we can then dig further in to the field submission and review the different types of questions you might add to a form. There are two fields on a field submission that contain information about the response given. One is the field value and one is the field localised value. The type of field will determine which value we want to use in our email notification.
| Type of field | Field Value | Field Localised Value |
|---|---|---|
| Text | Text submitted | Text submitted |
| Two Options | 1 or 0 | True or False |
| Choice | Value of option selected | Label of option selected |
| Multi Choice | Array of values selected | Array of labels selected |
| Lookup | Array with GUID and record type | Name of record selected |
| Currency | Amount (unformatted) | Microsoft.Xm.Sdk.Money |
| Number | Number submitted | Number submitted |
As you can see, it’s not something where we can ALWAYS pick the field value or ALWAYS pick the field localised value, so we will need to take this in to consideration when creating the flow. One other thing to note before we start looking at the steps, the form table isn’t something we can currently customise which just means you will need to think about when it should run. Do you need a notification for every single form submission, or only for specific forms for example?
Ok now that’s out the way, let’s start the flow. Your first step is a trigger from the Dataverse connector to run when a row has been modified. Select the Form Submissions table, scope as Organisation and add statuscode in to the Select columns. Adding this means the flow will only trigger when that field changes and not any other fields. In the Filter rows, we need to make sure that it only triggers when the statuscode equals 575440002 which means it completed successfully. The last part is up to you if you want to make sure it only runs for a certain form. Just get the form guid by opening the form in D365 Marketing, then going to the end of the URL and getting the long string of letters and numbers after this: msdynmkt_marketingform&id=
(statuscode eq 575440002 and _msdynmkt_marketingformid_value eq YOUR-FORM-GUID)

Next we add an action and search for initialise variable. We will be checking all of the field submissions and then adding them to an array. Make the name of the variable something logical, then set the type as array. We will use this again later.

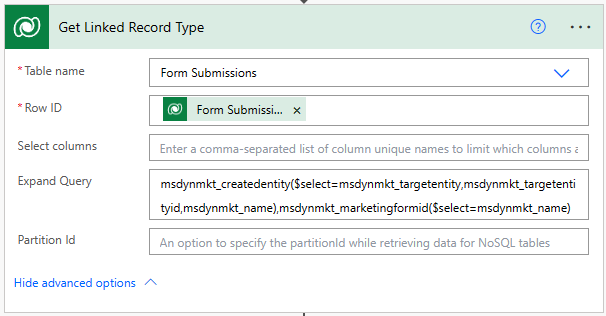
I want to make it easy for someone to get to the new record that was created so to do this we are going to get a few details directly from the form submission record using the Get a row by ID action from the Dataverse connector. Pick the Form Submissions table and use the Form Submission id field from the trigger step to find the right one. I’m using this step to get the related information about the linked created entity and the name from the related form. So for this we use the expand query box and add in the following. I am getting the target entity, target entity id and the name of the person from the created entity table, and the name from the marketing form table.
msdynmkt_createdentity($select=msdynmkt_targetentity,msdynmkt_targetentityid,msdynmkt_name),msdynmkt_marketingformid($select=msdynmkt_name)
In my next step we have a Compose action, and I am creating a nice URL link and pulling in the linked record details. This will use the type (Lead or Contact) to determine what entity to add to the url, then pull the id in. The name of the record will be used to make the link a little prettier so I can click on John Smith instead of a long ugly URL.

<b>Related Record:</b> <a href="https://@{uriHost(body('Get_Linked_Record_Type')['@odata.context'])}/main.aspx?pagetype=entityrecord&etn=@{outputs('Get_Linked_Record_Type')?['body/msdynmkt_createdentity/msdynmkt_targetentity']}&id=@{outputs('Get_Linked_Record_Type')?['body/msdynmkt_createdentity/msdynmkt_targetentityid']}">@{outputs('Get_Linked_Record_Type')?['body/msdynmkt_createdentity/msdynmkt_name']}</a><br>
Now we need a List rows step from the Dataverse connector. This is where we are going to find all of the Field Submission records linked to the Form Submission in the original trigger step. I am also only bringing back those that include a value, meaning the person submitting the form actually provided a response to the question. I’m also only including the attributes that I want to use later on in the flow. I’m also sorting the field submissions based on created date which means they should show up in the same order in your email notification as they do on the form the person filled out. You can copy and paste from the code below and add it to the Fetch XML Query section on your List rows step.

<fetch>
  <entity name="msdynmkt_marketingfieldsubmission">
    <attribute name="createdon" />
    <attribute name="msdynmkt_fieldvalue" />
    <attribute name="msdynmkt_localizedfieldname" />
    <attribute name="msdynmkt_localizedfieldvalue" />
    <attribute name="msdynmkt_marketingformsubmissionid" />
    <attribute name="msdynmkt_name" />
    <filter>
      <condition attribute="msdynmkt_marketingformsubmissionid" operator="eq" value="@{triggerOutputs()?['body/msdynmkt_marketingformsubmissionid']}"  />
<condition attribute="msdynmkt_fieldvalue" operator="not-null" />
    </filter>
    <order attribute="createdon" />
  </entity>
</fetch>
Now we have an Apply to each step, where the value is used as the output from the step above. Then add in a Switch action. You could use a condition to check, BUT who knows if things will change in the future with more things to check, so I went with a Switch (more than one way to do things sometimes!).

We are going to use the Field Localised Value to check and see what needs to happen to the response provided for each question. Luckily there are not too many options to check through. After adding the Switch and setting it to run on the Field Localised Value field, we will have one case to check. We are going to add Microsoft.Xrm.Sdk.Money to the equals box. If the localised value is this, then that means the field on the form was a currency field such as budget amount, or price etc. We want to get the actual value added, so if the field submission has this, as per the table I provided earlier, we will use the localised label instead.
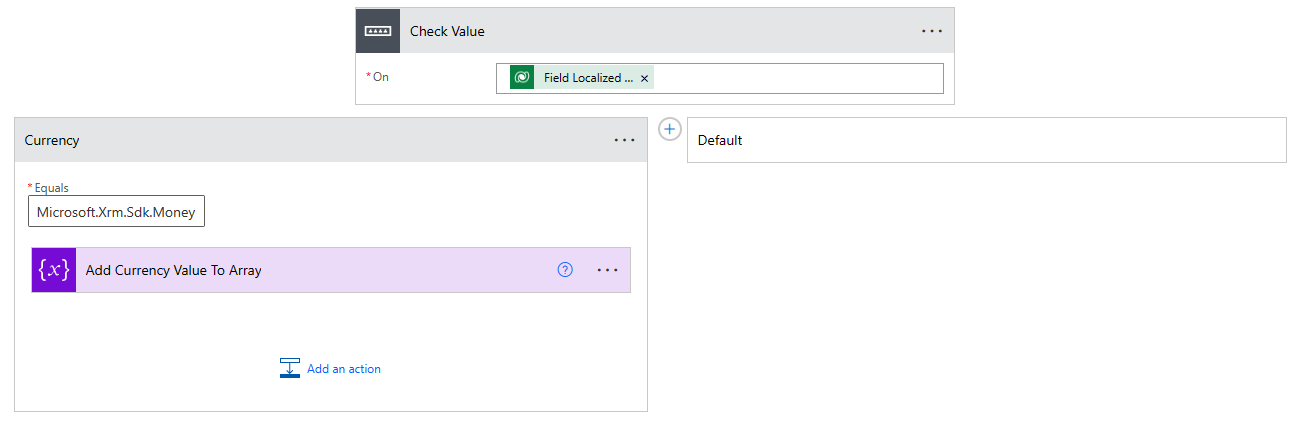
Add in an append to array variable action and pick your variable from the list (you should only have one). Then we will set the value which is going to create two columns – one for the name of the field and one for the response given. The field name will be the Field Localised Name value. The response will be formatted slightly so that if someone adds 50000 for example, the value in the email will be 50,000 with a comma in the right place.

{
  "Field": "@{items('For_Each_Field_Submission')?['msdynmkt_localizedfieldname']}",
  "Response": "@{formatNumber(float(items('For_Each_Field_Submission')?['msdynmkt_fieldvalue']), '#,##0')}"
}
The next scenario we need to try and resolve is for any multi select choice fields that you might have. For my example I had a multi select field with the days of the week. This will come through as an array with the values selected separated with quotes and commas. We don’t want to send it like that in the email so let’s do something about it.

We are now going down the Default path. However, we will need to check the Field Localised Value first to see if it contains “,”. For this we have a Condition step. Is yes, we are going to add the Field Localised Name and then format the response by removing the unnecessary characters.

{
  "Field": "@{items('For_Each_Field_Submission')?['msdynmkt_localizedfieldname']}",
  "Response": "@{replace(replace(replace(items('For_Each_Field_Submission')?['msdynmkt_localizedfieldvalue'], '[',''),']',''),'"','')}"
}
The No path of the Condition check should mean that all remaining fields that are not a currency field or a multi choice field will go down here. For this it is simple and just going to be the field localised name and the field localised value.

{
  "Field": "@{items('For_Each_Field_Submission')?['msdynmkt_localizedfieldname']}",
  "Response": "@{items('For_Each_Field_Submission')?['msdynmkt_localizedfieldvalue']}"
}
Note that currently there isn’t anything we can do to get the label of the two option fields. So if you have a field with On or Off or Yes or No, you will only ever get True or False returned on the field submission. We’re now finished with the steps in the Apply to each section so make sure you add your next action below it. Search for Create HTML table and add the action. In the From, add your Field Submissions variable that you have just been updating. Leave the columns to set as automatic.

If you want to format the table, you can add a Compose action step and add in some styling first, then the Output from the Create HTML table step. If you’ve never done this before, I encourage you to check out this blog from my friend Ryan Maclean which will help you!

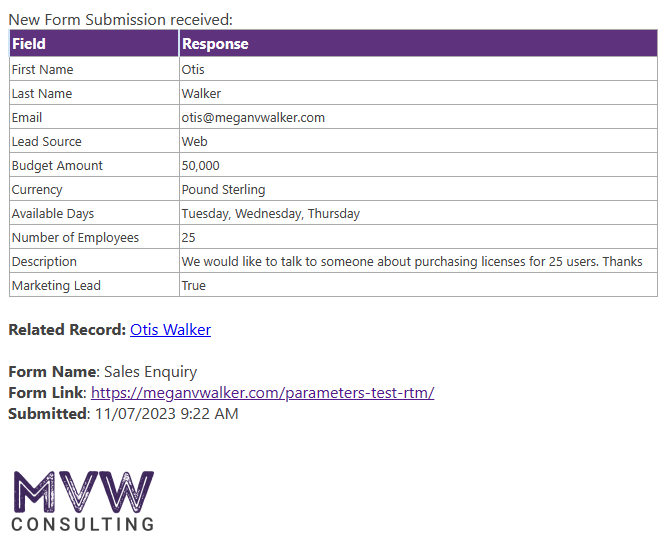
The final step will be an Outlook send email step. Add in the email address where you want to send the notification. The subject can be whatever you like, but I am pulling in the form name from the Get Linked Record type step near the top of the flow. Then just format the body of the email however you need to. You have all of the information that you need. If you want to start making hyperlinks you will need to click the option to view the HTML and then format it that way. I am showing the output from the final formatted field submission table, then the formatted record link url. I am showing the name of the form, a link to the form that was submitted, the date and time it was submitted and then using an image link to display my company logo.

One thing to keep in mind, the form link I am showing above will include any utm parameters so could be quite long and ugly. I’ve used the formula below to strip out everything after the initial link so you are left with just the direct link to where the form is on your website.
@{split(triggerOutputs()?['body/msdynmkt_pageurl'], '?')[0]}
That’s it. Now you can go ahead and fill out the form and test the flow. The email notification should be sent and a link directly to the related record should be included. Excellent!
Check out the latest post:
Use Custom Event Registration Questions To Branch Your Journeys In Customer Insights
This is just 1 of 603 articles. You can browse through all of them by going to the main blog page, or navigate through different categories to find more content you are interested in. You can also subscribe and get new blog posts emailed to you directly.
Hi Megan,
Thank you for this post. Have you come across a way to send internal emails based on a form submission but to specific email addresses based on information submitted in the form? We are trying to target a specific sales person’s email addresses based on zip code and a particular category dropdown field (multiple sales people may sell in the same zip code but to different customers) chosen in a form. Hopefully I explained that well enough!
Hi Christine, not saying it’s not possible but that sounds like you would almost need another table set up to do all of the mapping to set up who belongs to which category and zip code. Managing it in CE as a table would mean someone could edit things and change stuff around easier rather than needing to edit a flow in Power Automate each time. But it certainly wouldn’t be a ‘simple’ requirement to fulfil.
Hello Megan,
Im trying to get msdynmkt_marketingformsubmission table from power automate but i only get msdyncrm_marketingformsubmission. I know the diference. My dataverse is in spanish, but i don´t think thats the problem. What could I do to get msdynmkt_marketingformsubmission ?
Hi Matias, no, I wouldn’t expect that to be the problem. Unfortunately it’s not something I can help with in terms of figuring out why you don’t see that table. Perhaps open a ticket with Microsoft to see why?
Hi Megan,
This is great, thanks. I have two questions regarding these steps:
1. If my forms doesn’t have Multi-select nor currency questions/values, can I skip the Check Array steps. Then, instead of a yes / no path, I just continue after apply to each?
2. My Outlook mailbox hasn’t been provisioned (since I’m am external consultant) – is there an alternative step to send an email/notification to an external email address.
Hi Lauren, if you are sure you only have the other type of fields, then it would be better to do an Apply to each step rather than a Switch step so the process just cycles through all of the field submissions. If you don’t have Outlook, you would need to use a different connector such as the Mail one – https://learn.microsoft.com/en-us/connectors/sendmail/
Hi Megan, thank you so much for this blog post! Quick question – do you know how to then add the updated/new contact to a marketing list?
Hi Katelynn, are you using marketing lists rather than segments? I have done something in the past with a custom trigger that you could fire in a Journey after the form is submitted and pass through the marketing list GUID. That trigger could then be used to run a flow in Power Automate that puts someone in to the marketing list. The flow is just two steps. Mine says subscription list but that’s really just a Marketing List with the Subscription field set to Yes. This would be a rough idea of the journey:
And this would be your flow in Power Automate:
Hope this helps!
Hi Meghan,
I pretty much finished the flow but this error shows up in the flow checker:
” Correct to include a valid reference to ‘Get_Linked_Record_Type’ for the input parameter(s) of action ‘Compose’.”
Do you have any idea what I might be doing wrong?
Thank you,
For the step that I named Get Linked Record Type, did you name it the same thing? Sounds like maybe it’s named something else in your flow, so the step that is trying to get a value from this is failing Joao.