*** NOTE: ALL INFORMATION IS ACCURATE AT DATE OF PUBLISHING ***
*UPDATE – 2020/05/12*
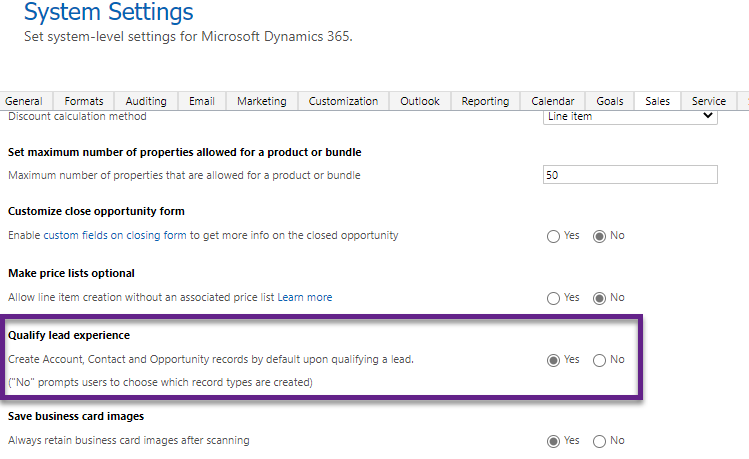
This blog was written in 2018 and was a way to get around functionality that was standard, with no way to achieve the same thing out of the box. Since then, Microsoft has introduced new functionality that allows you to change the qualify lead experience. Reviewing System Settings, then the Sales tab will show you an option to change the qualify lead experience. So, review this first to see if it will meet your needs.
If you’ve already reviewed this, and still want to make changes, check out this post from Scott Durow. He updated the Smart Buttons tool for the Unified Interface, and in it includes an example of how to set a value on a form, which will give you what you need.
*END UPDATE – 2020/05/12*
The standard Lead to Opportunity business process in Dynamics 365/CRM is perfect for many organisations. A lead comes in and if qualified it becomes an Opportunity for someone to work through and hopefully win. Qualifying a lead runs a process which creates an Account, a Contact and an Opportunity. However, this process doesn’t make sense for every company, especially if you have multiple layers of business development and sales. It can be helpful to see how many Contacts at a company are going on a journey with you which is very difficult with multiple leads not linked in any way. So, how do you go about qualifying leads without creating opportunities and just creating an Account and a Contact instead?
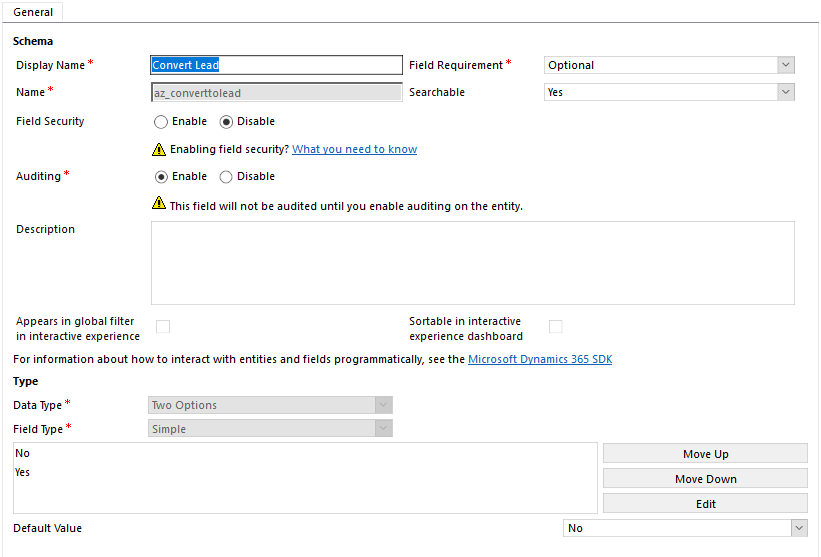
We can’t modify the existing process, but we can hide the ability to run that, and create a new process instead. First, make sure you remove the existing Business Process Flow which you can do by following the steps here. Now let’s create a new field on the lead entity called ‘Convert Lead’ using two options of Yes and No, with No being the default value. Add it to your Lead form just so you can use it for testing. You won’t need it on there once you’ve finished as it’s just going to be used as a trigger for some workflows. Make sure you have a section on the form to display the Account record and the Contact record that will be created once the Lead is Qualified.
Next, we are going to create two workflows, both of them real time so the user sees an immediate change. The first will allow a user to qualify the lead. The workflow will start when the Convert Lead field changes so our condition checks to make sure it is Yes. Our next step is to add an Action. Select QualifyLead from the list, then the Entity should be Leads. Click on Set Properties next.
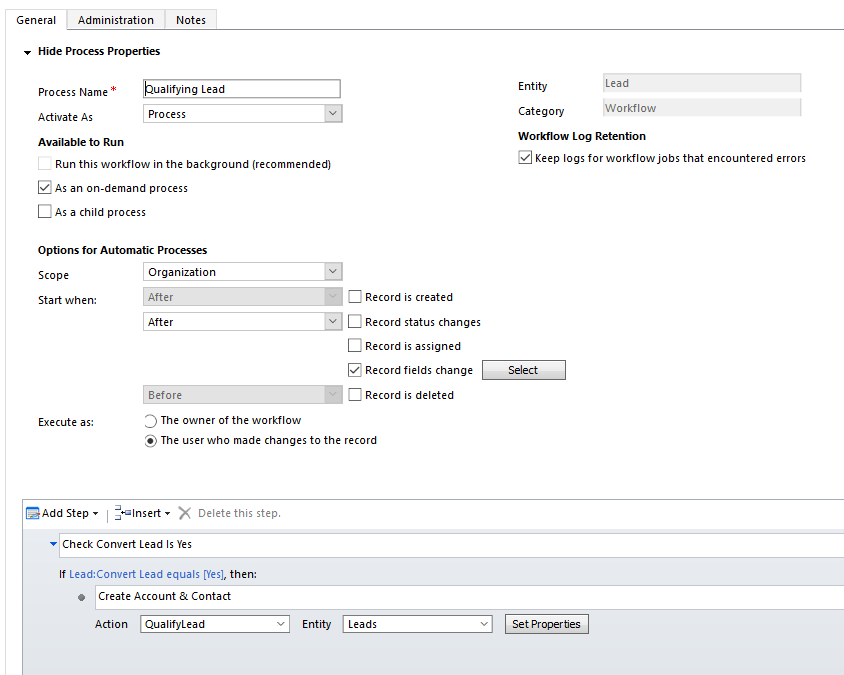
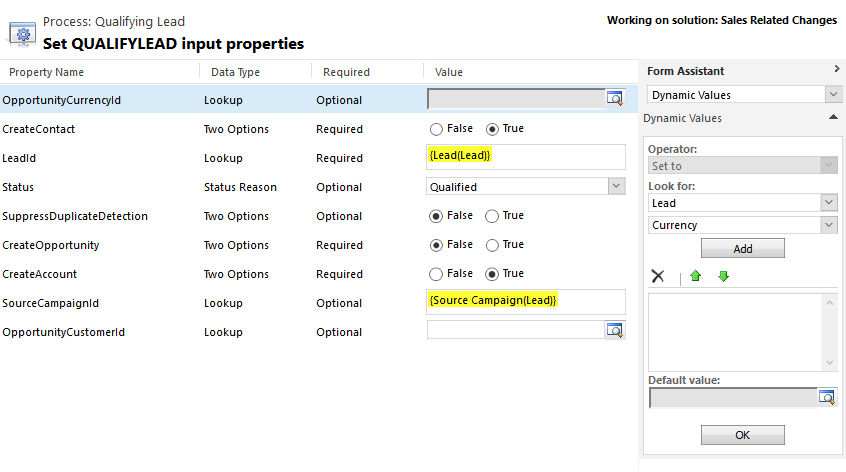
Here is where we can define what happens when the Lead gets qualified. We want to make sure the CreateOpportunity property is set to False, and the CreateContact and CreateAccount are set to True. Save and Activate the workflow.
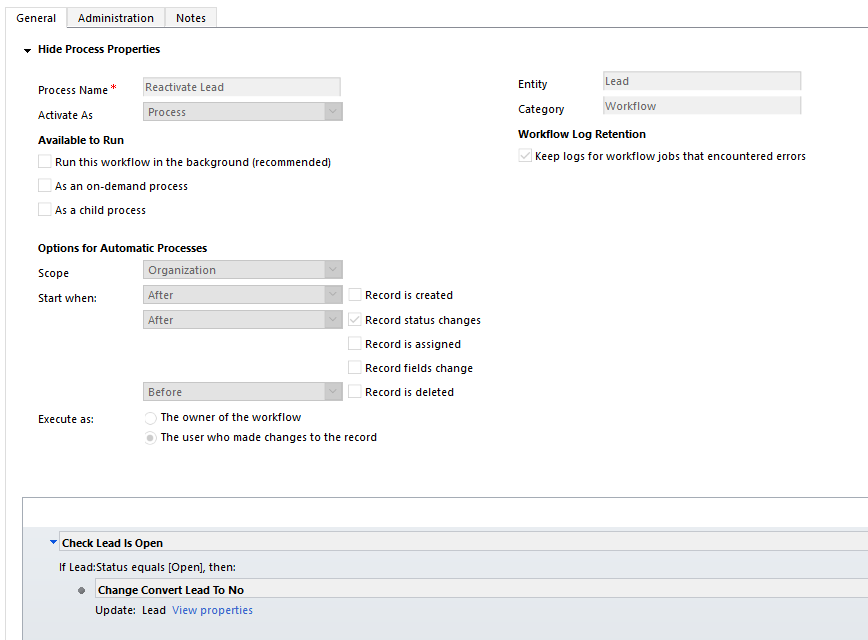
The second workflow will be used to change the Convert Lead field if a user reactivates the Lead record. This will have a simple condition which starts when the record status changes and checks to make sure the Lead is Open. If it is, the Convert Lead field will be changed back to No.
While users could run the first work flow on demand, we want them to have the same kind of experience they currently have when qualifying a lead and allow them to click a button. This means we need to use the Ribbon Workbench to make some changes. If you haven’t used it before, don’t be intimidated, but be sure to do this in your test environment first rather than jumping straight in! Good news, making the necessary changes needed is relatively straight forward. You can download the Ribbon Workbench from here and download the smart buttons you will need from here. Both of these solutions will need to be imported in to your D365 instance. I prefer to use the Ribbon Workbench directly within the XrmToolBox which you can download here. Please note, even if you use the XrmToolBox you will still need to import the smart buttons solution. Oh, and thanks to the lovely MVP Sarah Critchley for writing this post so that I could find it and even know about smart buttons. ???? * SEE UPDATE AT START OF BLOG FOR INFORMATION ABOUT UNIFIED INTERFACE AND SMART BUTTONS *
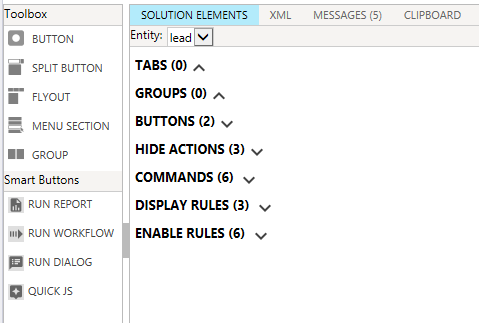
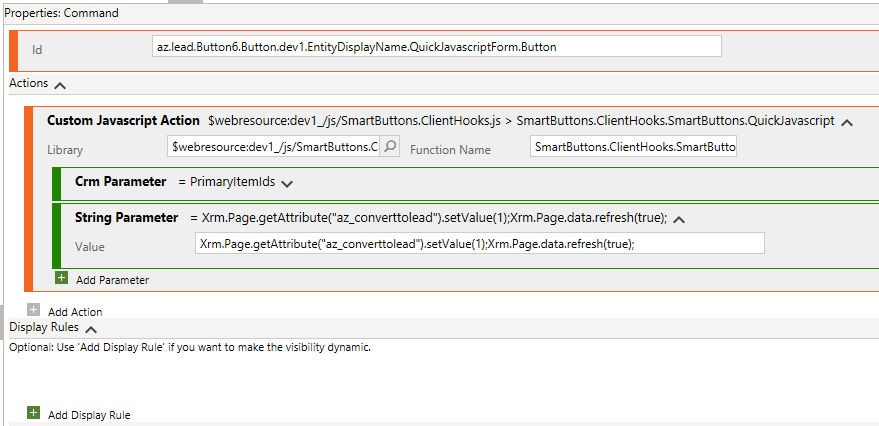
Now that you have that sorted, create a solution in your D365 instance which contains the Lead entity, and two icons to use for your new button. Open the solution in the Ribbon Workbench. Once open, you should see the Smart Button options available to add to the ribbon. Drag the Quick JS on to the Form area next to the default Qualify button.
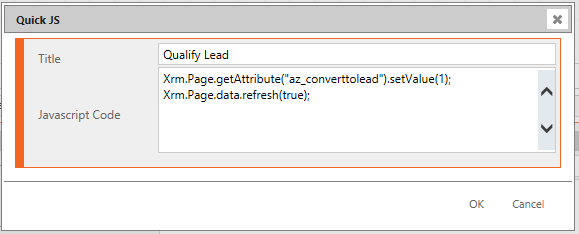
Once you have dragged this over, the following window will open. Add in the following javascript, making sure to replace the attribute name with your own attribute name. When a user clicks on the button, it will set the Convert Lead button to Yes (value is 1). It will then save the form. Once the form saves, the first real time workflow will kick in to qualify the lead.
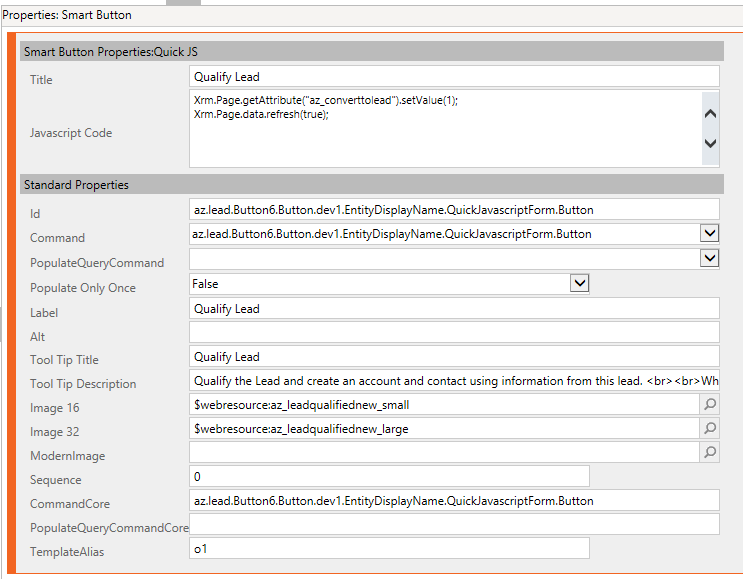
Once you have clicked OK, you will be able to see the smart button properties. You can change the images and use the ones you added to your solution. Although you could use the out of the box Qualify Lead image, might be a good idea to use something different to show that it’s obviously custom to someone else who might need to make changes after you. You can also modify the label, tool tip title and tool tip description.
Xrm.Page.getAttribute("az_converttolead").setValue(1);
Xrm.Page.data.refresh(true);
Once you have added it and changed your image it should look something like this. Right click on the default Qualify button and hide it so it isn’t confusing to the users.

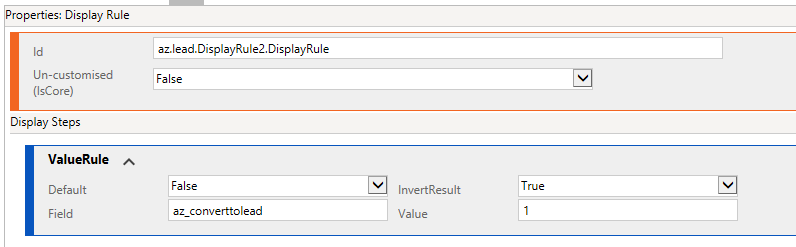
From the Solution elements, click on the new command to see the properties. By adding the smart button it’s done all of this for you. Really slick and awesome right? 🙂 From the Display Rules section, click Add Display Rule.
Add in a ValueRule which determines when the button is displayed. We want to show the button by default but hide the button if the field value is Yes (1). Now click Publish to push the changes to your D365 instance.
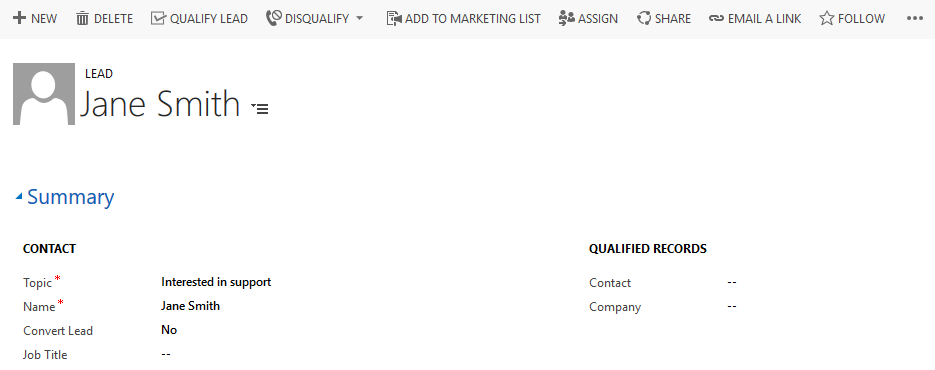
Right, now test it out! Navigate to an unqualified Lead record. You should see your new Qualify Lead button, and the Convert Lead value is No. Click on the Qualify Lead button from the ribbon.
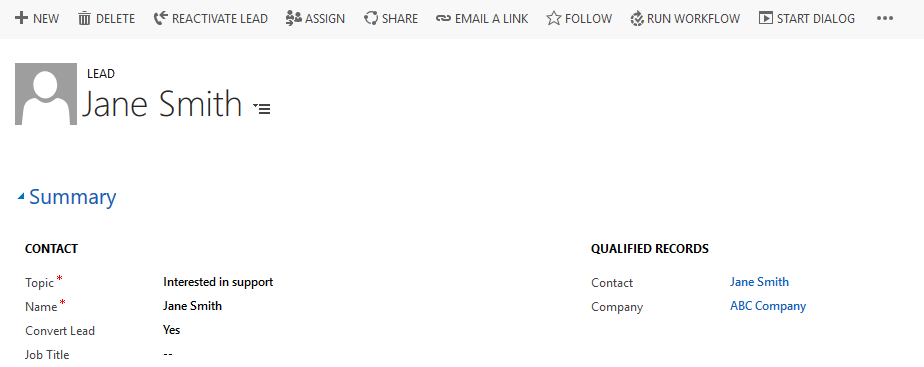
As soon as the button is clicked, the javascript jumps in to action. It changes the Convert Lead field value from No to Yes and saves the record. This then triggers the first workflow created which is creating the Account and the Contact record and changing the status of the lead to qualified. The display rule then means the Qualify Lead button is hidden, and only the Reactive Lead button is shown. If the Reactivate Lead button is used, this will change the Convert Lead field back to No, which will allow the Qualify Lead button to be displayed. And… No Opportunity is created! Yeah! ????
While there are other ways to achieve this, these steps give you a no code solution to changing the standard Lead to Opportunity process in Dynamics 365 CRM making it a Lead to Account & Contact process instead. Hopefully this will help others who wish to achieve the same!
Check out the latest post:
Start A Power Automate Flow From Your Custom Page
This is just 1 of 592 articles. You can browse through all of them by going to the main blog page, or navigate through different categories to find more content you are interested in. You can also subscribe and get new blog posts emailed to you directly.
This is great, thanks Megan!
We have just upgraded to D365 and had to have a consultant house make a difficult code solution to get this. This is awesome that we can now change it out with this!
Great blog, thanks for the insights!
Hi Vivian, thank you so much for taking the time to comment. This is exactly the reason I write articles like this, in the hopes that the examples I post will help others. While the Lead to Opportunity process is perfect for some organisations, having an Opportunity for each qualified Lead just doesn’t make any sense for others. Hope it works out well for you!
Hi,
I saw your post and It’s Great!!
I tried your solution but in my CRM occurs this error when I click the custom button:
Error: ‘invalid or unexpected token’
I think that this error is for the JS Xrm.Page.getAttribute(“xxx_converttolead”).setValue(1);
Sorry for my English
Thanks
Sergio
Hi Sergio,
Thanks for the comment! Just curious, do you have the field (xxx_converttolead) somewhere on your form? If it’s not on the form it won’t work. You can add it to test it and then once you know it’s working you can hide it. Of course it could be something else, but that would be my first guess!
Megan
I Megan,
Thanks for the answer: the field Convert Lead (xxx_converttolead) is in the form.
I tried to remove (in quick JS) –> ” Xrm.Page.getAttribute(“az_converttolead”).setValue(1); ” to keep Xrm.Page.data.refresh(true); and the form correctly refresh if I click my custom button
Thanks
Sergio
Problem Solved!
I cut and paste yuor code:
Xrm.Page.getAttribute(“az_converttolead”).setValue(1);
Xrm.Page.data.refresh(true);
Ribbon Workbench accept -> ” “ <-
Thank for all!! =D
Sergio
Ah! Sorry Sergio, pesky formatting! I will edit the code in the post. Glad you figured it out and it’s working!
Hello Megan, great write up!
I am however having the same issue as Sergio.
“1 is not a valid status code for state code LeadState.Qualified on lead with Id 4004a81f-1990-e811-a95a-000d3a1d777d. If you contact support, please provide the technical details. ”
I am using the below, my variable is poly_convertlead and it is on the form. It actually gets switched from No to Yes after button press.
Xrm.Page.getAttribute(“poly_convertlead”).setValue(1);
Xrm.Page.data.refresh(true);
Any idea what else it could be?
TIA
Ilya
Hi Ilya,
It sounds like it’s different to the issue Sergio was having. He was getting an Error: ‘invalid or unexpected token’. He was able to resolve this by checking the javascript and changing the quotes. Sometimes when copying and pasting the quotes get formatted in a way in which can’t be read correctly in the code. Can you review and confirm that isn’t the issue? Also, have you tried any other Leads to see if you get the same issue?
Megan
Megan,
Thanks for the quick response.
We have a fresh instance of Dynamics and I am creating new test leads. I have created another fresh one and tested again after clearing the “s and manually adding them back in to the Quick JS section.
Here is a snipped of the details:
Starting sync workflow ‘Qualifying Lead’, Id: 55ad5a33-2790-e811-a95a-000d3a1d7b43
Entering ConditionStep1_step: Check if Convert Lead is Yes
Sync workflow ‘Qualifying Lead’ terminated with error ‘1 is not a valid status code for state code LeadState.Qualified on lead with Id d935721e-e590-e811-a95a-000d3a1d777d.’
[Microsoft.Dynamics.MarketingSales.Plugins: Microsoft.Dynamics.MarketingSales.Plugins.QualifyLead.QualifyLeadPlugin]
[0d83dee1-59f3-e611-80c4-02155dc812c3: Microsoft.Dynamics.MarketingSales.Plugins.QualifyLead.QualifyLeadPlugin: QualifyLead of lead]
I triple checked to make sure the rule matches your tutorial.
Thank you
Ilya
Hello Megan,
Was hoping you had any other ideas on the above.
Hi Ilya,
Sorry, I am not sure without looking at how you have everything set up. Happy for you to email me and send me screenshots but even then I can’t guarantee I can resolve it for you.
Megan
Thank you Megan for looking over my screen caps and figuring out what I was doing wrong! Great Blog.
Dear Megan ,
Thanks for the blog post .
I have followed your blog and after implementing same getting same error like Ilya was facing where my On demand workflow is throwing an error stating as details below :
Starting sync workflow ‘QualifyLead’, Id: 0fc49125-e198-e911-a97e-000d3a32c8b8
Entering ConditionStep1_step: Chaeck convertLead is yes
Sync workflow ‘QualifyLead’ terminated with error ‘100000001 is not a valid status code on lead with Id 6b99317c-585d-e911-a978-000d3a310f6b
Please share your comments .
Regards
Hi Karthik, the issue that Ilya had was caused by something in the Qualify Lead workflow. Make sure that the Status field is set to Qualified, and make sure it is not New or any other status. It was set to New in Ilya’s example which caused that error.
Dear Megan,
Thank you for the blog post. Works like a charm in the old user interface.
In the new one however ( the UUI – Unified User Interface) I get an error message when I click on my button:
Error: ‘Value should be of type: Boolean’
Please contact your system Administrator
May you please help? Thank you!
Wishing you a great day!
Kind regards,
Georgi
Hi Georgi, thanks for the comment! That’s interesting…. hmmmm. I haven’t tried it in the UUI or UCI or whatever we want to call it lol. What about trying this as the javascript code isntead? So changing the value from 1 to true?
Xrm.Page.getAttribute(“az_converttolead”).setValue(true);
Xrm.Page.data.refresh(true);
Hey Megan,
Thank you so much! I can’t believe it was that simple. I feel so stupid lol
Works like a charm!!!!
Kind regards,
Georgi
Ah that’s awesome Georgi! It was a lucky guess, but it seemed like it should work. Glad it did!
Thank you so much, this is just brilliant, simple and elegant way to achieve this.
I’m open to seeing more of your work and ideas 🙂
Hi Kiril, thanks for the comment, glad you like it! Hopefully it will help out if you have this kind of requirement.
in case others also have this problem.
i had to replace ” with ‘ for it to work.
Thanks for this amazing how to guide!
Thanks Ben! In Wave 2 Microsoft have introduced this as a new feature to prompt the users to determine if you want the Account, Contact and Opportunity to all be created. Although this approach is still good if you want consistency and don’t want the users to decide that.
Hi Megan,
This is a great article! I appreciate the detailed steps, and I was able to follow through for the implementation I currently have for my customer.
However, when I tried to click on the custom “Qualify Lead” (or in my case simply “Approve”) on the Lead form, after I have performed the suggested steps and published all the changes, I am getting an error popup on the screen with the following message:
Error: ‘SyntaxError: Invalid or unexpected token’
Please contact your system Administrator
It’s not clear to me what I could be missing, or if I have mis-performed any of the steps.
Would you possibly be able to provide some pointers to me? I am happy to provide some follow-up screenshots if that helps.
Thank you very much!
Eric
Hi Eric, you have two options. When I wrote that two years ago it was to get around functionality that was standard, with no way to achieve the same thing out of the box. Since then, Microsoft has introduced new functionality that allows you to change the qualify lead experience. If you look at the System Settings on the Sales tab, you will see that you can change the qualify lead experience. Have you looked at that?
If you have, and it won’t work for you, check out this post from Scott Durow. He updated the Smart Buttons tool for the Unified Interface, and in it includes an example of how to set a value on a form, which will probably give you what you need. So check out this page, and look through his examples. I am not a developer by any means, and using the Smart Buttons tool is the best way that I could achieve it without having to know, understand and write scripts.
http://develop1.net/public/post/2019/12/21/smart-buttons-for-the-unified-interface
Hello Megan,
Thank you very much for your reply! I totally missed out on that new feature in the Settings area. I just tried that and it worked, yes problem solved! 🙂
Many thanks,
Eric
You are very welcome! Going to update this post so people are aware of it from the start, rather than reading all the way through and maybe missing the comments.
Thanks for Wonderful Blog Megan!
I Followed all the steps and it worked fine to the point where it Creates a new Contact in Dynamics. However, it is not creating new Account even though i have Create Account action set to True.
I would really appreciate your response on this. Thanks in advance
Hi Ash. Did you see the update right at the top of the post? You no longer need to configure things for this as Microsoft added it in as functionality a few releases ago.