*** NOTE: ALL INFORMATION IS ACCURATE AT DATE OF PUBLISHING ***
If you are hosting events, you likely have speakers that are going to present on a topic at those webinars or conferences. Speakers can be added to your events with standard out of the box functionality in the D365 Marketing App, but what about including it on the Event page in your Power Pages website? This post will walk through including this information and styling it accordingly to include the speakers profile photo, name and title, bio and social media links. Let’s get started!
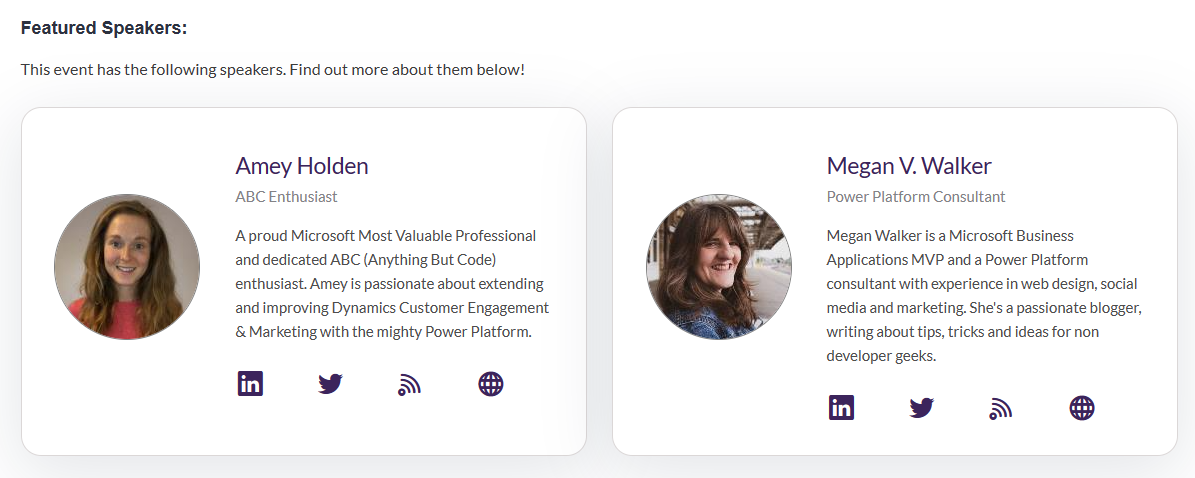
To give you an idea, here is the end result I have for my speakers section at the bottom of an individual event page. It’s clear and easy to see who will be speaking at the event, and gives the visitor of the page some quick ways to find the person online and get in touch.
To add a speaker, go in to the Event planning section of D365 Marketing and then click on Speakers from the navigation. I’ve updated the form to make the layout a bit neater, but this shows you some of the fields you could add. At a minimum I’m adding their name, title and about details and their social media links.

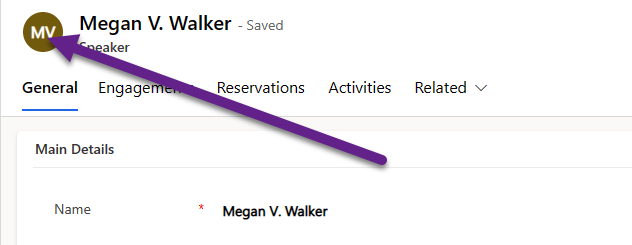
We can also add their profile photo by adding the entity image. This feature exists throughout D365 and you might already use it on Accounts or Contacts. Simply click on the circle next to the name of the record.
You can then browse out for the image to use for their profile pic and upload it.

You could even add the entity image to the Speaker form which might make it easier to see when a speaker hasn’t yet got that image added. It would look like this when on the form. Note that the Open button doesn’t seem to do anything…. 🙄

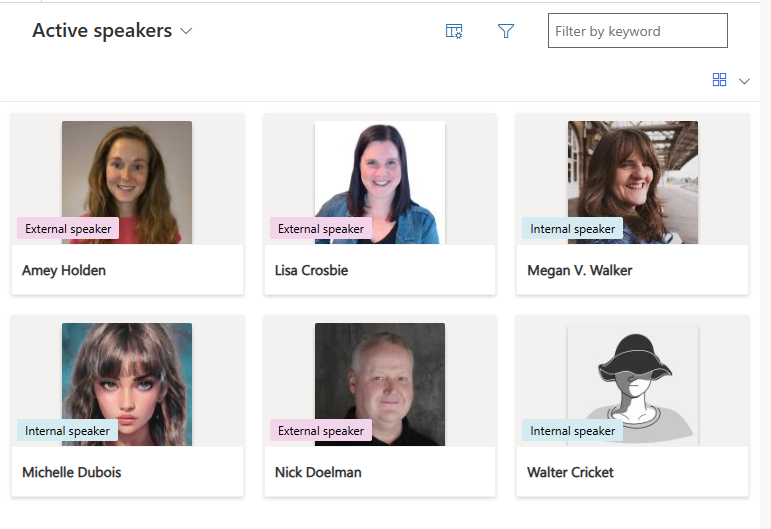
Now we can see our list of Active speakers that can be added to Events.

Or, bonus, if you want to be fancy, you could display your speakers like this using a Gallery Control on your view!
Open one of your Event records and click on the Agenda tab. Scroll down the record until you get to the Speaker Engagements section, then click on New Speaker Engagement. A quick create form will open on the right side. You can add the name of the person, then use the look up to link to their Speaker profile record. Add any costs if required, then save and close the record.

Now let’s walk through the website configuration for your Power Page site. First we will add some Table Permission records. We need to add a read only global record for the Speaker table. This will allow us to display the speaker information on the individual event pages. Link it to whatever Web Roles you will be using in the portal. Unless you want to force someone to log in just to view the Event, you can just use the Anonymous Users Web Role.

Below is the full section I added to my existing individual Event custom Web Template (more on that in this post). The first part with the FetchXML would go directly below the FetchXML to get the Event information. Then the bottom section I added in before the last three <div> tags. I’ll break it down bit by bit to explain what it’s doing.
//ADD TO TOP OF WEB TEMPLATE BELOW EVENT FETCHXML QUERY
{% fetchxml speakers %}
<fetch version="1.0" output-format="xml-platform" mapping="logical" distinct="true" returntotalrecordcount='true' >
  <entity name="msevtmgt_speaker">
    <attribute name="entityimageid" />
    <attribute name="msevtmgt_about" />
    <attribute name="msevtmgt_blog" />
    <attribute name="msevtmgt_linkedin" />
    <attribute name="msevtmgt_name" />
    <attribute name="msevtmgt_speakerid" />
    <attribute name="msevtmgt_title" />
    <attribute name="msevtmgt_twitter" />
    <attribute name="msevtmgt_website" />
<order attribute="msevtmgt_name" />
    <link-entity name="msevtmgt_speakerengagement" from="msevtmgt_speaker" to="msevtmgt_speakerid" link-type="inner" alias="engagement">
      <filter>
        <condition attribute="msevtmgt_event" operator="eq" value="{{requestid}}" />
      </filter>
    </link-entity>
  </entity>
</fetch>
{% endfetchxml %}

//ADD TO BOTTOM OF WEB TEMPLATE ABOVE THE LAST THREE CLOSING DIVS
{% if speakers.results.total_record_count > 0 %}
   {% block speakers %}
{% if speakers.results.total_record_count == 1 %}
<h3>Featured Speaker:</h3>
<div class="speaker-content">This event has the following speaker. Find out more about them below!</div>
{% else %}
<h3>Featured Speakers:</h3>
<div class="speaker-content">This event has the following speakers. Find out more about them below!</div>
{% endif %}
<div class="speaker-grid">
{% for msevtmgt_speaker in speakers.results.entities %}
<div class="speaker-item">
<div class="speaker-image">
<img class="speakerimage_small" src="/Image/download.aspx?entity=msevtmgt_speaker&attribute=entityimage&id={{ msevtmgt_speaker.msevtmgt_speakerid }}">
</div>
<div class="speaker-details">
<div class="speaker-name">{{ msevtmgt_speaker.msevtmgt_name }}</div>
<div class="speaker-title">{{ msevtmgt_speaker.msevtmgt_title }}</div>
<div class="speaker-bio">{{ msevtmgt_speaker.msevtmgt_about }}</div>
<div class="speaker-contact">
{% if msevtmgt_speaker.msevtmgt_linkedin %}<a href="{{ msevtmgt_speaker.msevtmgt_linkedin }}" target="blank"><i class="uil uil-linkedin"></i></a>{% endif %}
{% if msevtmgt_speaker.msevtmgt_twitter %}<a href="{{ msevtmgt_speaker.msevtmgt_twitter }}" target="blank"><i class="uil uil-twitter"></i></a>{% endif %}
{% if msevtmgt_speaker.msevtmgt_blog %}<a href="{{ msevtmgt_speaker.msevtmgt_blog }}" target="blank"><i class="uil uil-rss"></i></a>{% endif %}
{% if msevtmgt_speaker.msevtmgt_website %}<a href="{{ msevtmgt_speaker.msevtmgt_website }}" target="blank"><i class="uil uil-globe"></i></a>{% endif %}
</div>
</div>
</div>
{% endfor %}
</div>
 {% endblock %}
{% endif %}
The FetchXML query is looking at the msevtmgt_speaker table and searching for any Speaker records that have a linked Speaker Engagement record for an Event, using the id from the URL. It sorts the speakers by their name alphabetically. It’s important that we have the return total record count set to true in the first line of the fetch query. We need to know how many speakers were returned so we can know if we even need a Speakers section displayed on the Event page.
{% fetchxml speakers %}
<fetch version="1.0" output-format="xml-platform" mapping="logical" distinct="true" returntotalrecordcount='true' >
  <entity name="msevtmgt_speaker">
    <attribute name="entityimageid" />
    <attribute name="msevtmgt_about" />
    <attribute name="msevtmgt_blog" />
    <attribute name="msevtmgt_linkedin" />
    <attribute name="msevtmgt_name" />
    <attribute name="msevtmgt_speakerid" />
    <attribute name="msevtmgt_title" />
    <attribute name="msevtmgt_twitter" />
    <attribute name="msevtmgt_website" />
<order attribute="msevtmgt_name" />
    <link-entity name="msevtmgt_speakerengagement" from="msevtmgt_speaker" to="msevtmgt_speakerid" link-type="inner" alias="engagement">
      <filter>
        <condition attribute="msevtmgt_event" operator="eq" value="{{requestid}}" />
      </filter>
    </link-entity>
  </entity>
</fetch>
{% endfetchxml %}
Next we are checking to see if the total record count of speakers is greater than zero. We are then going to add in what to do if that is the case. If not, we won’t do anything and no speaker details will be displayed.
{% if speakers.results.total_record_count > 0 %}
{% endif %}
At the start of this post, I showed an image with Featured Speakers, where we had two people. What if there is only one? Showing the phrase Featured Speakers doesn’t make as much sense, so more than likely you would want to show the singular of the word speaker.

To do that, we are checking to see if the total record count of speakers is 1. If it is, we will use the word speaker in the header and text. If not, it must be more than 1, so we can use the word speakers to indicate more than one.
{% if speakers.results.total_record_count == 1 %}
<h3>Featured Speaker:</h3>
<div class="speaker-content">This event has the following speaker. Find out more about them below!</div>
{% else %}
<h3>Featured Speakers:</h3>
<div class="speaker-content">This event has the following speakers. Find out more about them below!</div>
{% endif %}
Now we can add our grid of speakers. This is similar to the approach I have taken to show an overview of all Events, where I did 3 records in a row on the grid. For speakers I am going to include 2 records on a row so using a different class in my CSS. Then for each speaker found in the results of the FetchXML query for the speakers, I am going to include it in a div class called speaker-item. That way I can totally control how it is all customised in terms of the look and feel of the speaker record.
<div class="speaker-grid">
{% for msevtmgt_speaker in speakers.results.entities %}
<div class="speaker-item">
Now we add in the profile pic for the speaker. To do this, we need to create a URL string by combining the name of the entity with the image (msevtmgt_speaker), the name of the attribute that holds the image (entityimage) and the id of the speaker record (msevtmgt_speakerid). All of that combined will then allow us to display the image in the portal. Special thanks to Franco Musso for sharing his findings on how to do this in his blog post here. Check out his site, it’s full of great content!
<div class="speaker-image">
<img class="speakerimage_small" src="/Image/download.aspx?entity=msevtmgt_speaker&attribute=entityimage&id={{ msevtmgt_speaker.msevtmgt_speakerid }}">
</div>
Now you can include whatever details you want to share about the speakers. I am showing the name, title and bio. Then I have a div named speaker-contact where I check to see if the different link fields have a value. They they do, we add in an icon (using IconScout) and wrap the field value around it as a hyperlink. If there is no value, no icon will show so we don’t need to worry about filling data in each of those fields.
<div class="speaker-details">
<div class="speaker-name">{{ msevtmgt_speaker.msevtmgt_name }}</div>
<div class="speaker-title">{{ msevtmgt_speaker.msevtmgt_title }}</div>
<div class="speaker-bio">{{ msevtmgt_speaker.msevtmgt_about }}</div>
<div class="speaker-contact">
{% if msevtmgt_speaker.msevtmgt_linkedin %}<a href="{{ msevtmgt_speaker.msevtmgt_linkedin }}" target="blank"><i class="uil uil-linkedin"></i></a>{% endif %}
{% if msevtmgt_speaker.msevtmgt_twitter %}<a href="{{ msevtmgt_speaker.msevtmgt_twitter }}" target="blank"><i class="uil uil-twitter"></i></a>{% endif %}
{% if msevtmgt_speaker.msevtmgt_blog %}<a href="{{ msevtmgt_speaker.msevtmgt_blog }}" target="blank"><i class="uil uil-rss"></i></a>{% endif %}
{% if msevtmgt_speaker.msevtmgt_website %}<a href="{{ msevtmgt_speaker.msevtmgt_website }}" target="blank"><i class="uil uil-globe"></i></a>{% endif %}
</div>
</div>
Finally we end the section by closing off the last divs and ending the for condition and block.
</div>
{% endfor %}
</div>
 {% endblock %}
{% endif %}
These are all of the styles I have used in my CSS to set up the speaker grid and individual speaker records. Feel free to use this as a starting point.
.speaker-content {
    font-family: 'Lato', sans-serif;
    font-size: 1.3em;
    padding-top: 1em;
}
.speaker-grid {
    display: grid;
    grid-template-columns: repeat(2, 1fr);
    grid-gap: 1em;
    padding: 1em 0em 4em 0em;
	width: 100%;
}
.speaker-item {
    box-shadow: 0 16px 64px 4px rgb(4 16 45 / 10%);
    background-color: white;
    padding: 2em 0em 2em 2em;
    margin: 1em 1em 0em 0em;
    border: 1px solid #dbd7d7;
    border-radius: 20px;
}
img.speakerimage_small {
    border-radius: 50%;
	border: #808080 1px solid;
}
.speaker-image {
    width: 30%;
    float: left;
	display: flex;
    align-items: center;
    justify-content: center;
    height: 90%;
}
.speaker-details {
  width: 65%;
    font-size: 1.2em;
    font-family: 'Lato', sans-serif;
    float: right;
    padding: 1em 2em 0em 0em;
}
.speaker-name {
       color: #3c245c;
	   font-size: 1.5em;
}
.speaker-title {
       color: #838286;
    font-size: 1em;
}
.speaker-bio {
    color: #4d4d4d;
    font-size: 1em;
    padding-top: 1em;
}
.speaker-contact {
    display: grid;
    grid-template-columns: repeat(4, 1fr);
    grid-gap: 0em;
    padding-top: 1em;
	width: 100%;
}
i.uil.uil-linkedin {
    font-size: 2em;
    color: #3c245c;
}
i.uil.uil-twitter {
    font-size: 2em;
    color: #3c245c;
}
i.uil.uil-rss {
    font-size: 2em;
    color: #3c245c;
}
i.uil.uil-globe {
    font-size: 2em;
    color: #3c245c;
}
That’s it! We now have a speakers section that is shown only if speakers have been linked to the Event. If there are, we see a nice grid of all speakers including their profile picture, name, title, bio and social media links.

Check out the latest post:
Use Custom Event Registration Questions To Branch Your Journeys In Customer Insights
This is just 1 of 603 articles. You can browse through all of them by going to the main blog page, or navigate through different categories to find more content you are interested in. You can also subscribe and get new blog posts emailed to you directly.
Hi Megan,
I wonder if you know if and hopefully how to add the image for speakers using the standard registration form?
We often have more than one speaker and would like it to work dynamically just like SpeakerName and SpeakerAbout and run for each speaker.
The dream scenario is to replicate the visuals and functionality we had in the Outbound event portal or what you show in this post, but if we can just add the speaker image for each speaker dynamically that would be great as a step one.
Hi Alexandra, unfortunately there is currently no way to do that. The forms use lists but the configuration for those is not accessible even within the HTML of the form. The only way you could do it would be to add to emails you send out.