*** NOTE: ALL INFORMATION IS ACCURATE AT DATE OF PUBLISHING ***
You’ve got free content on your website, and all you would like in exchange is for someone to fill out a form and tell you about themselves. Providing access to case studies, white papers and eBooks is a great way to share your organisations knowledge on a subject which in turn would hopefully turn in to leads then new business. One of the greatest areas of friction is also having forms on your site. Ask for too little and you don’t know much in return for your expertise, ask for too much and people will likely just provide fake data, or worse… end up on someone else’s website. So how can we create smarter forms in D365 Marketing to capture more data? In this post I will show you how with a little bit of simple JavaScript you can show and hide fields based on what data you already know about them.
The first thing we need to do is make sure our marketing form is of the type landing page, and that the prefill fields option on the summary tab is set to Yes. This means that if a Contact visits a page on our website and has already got cookies enabled in their browser, and we already know who they are, we can populate fields with data we already know about them. This can help save time for the Contact, but also give us the ability to then hide the fields with the data, and show them new fields instead.

Next you need to decide which fields you are going to add to the form in addition to First Name, Last Name and Email address. In this example, I will start off for new people showing the Work Phone Number field. If that has already been provided, then the Job Title field will show. If both the phone and title have been given previously, the City field will then be shown. Add a one column section to the form and move all of the fields in to that same section. Set the padding top and bottom, and margin top and bottom to 0. Because we are hiding two out of three fields each time, this will make sure there are not huge gaps between all of the other fields on the form. You can also make sure the same is done on each of the fields within the section too.

Next, on each field that you want to show or hide, make sure the Prefill field is turned on. Also do the same for First Name, Last Name and Email. This will mean those fields always display that information for anyone already known and it will also save them time when filling out future fields where Prefill has been enabled.

Finally, we need to do something with the Remember Me field. This will have been added to your form automatically as soon as the Prefill fields setting was turned on for your form on the summary tab. It will likely appear at the very top of your form, so move it down right above the submit button so it makes a bit more sense. You can also change the label so that the text displayed helps explain it’s purpose.
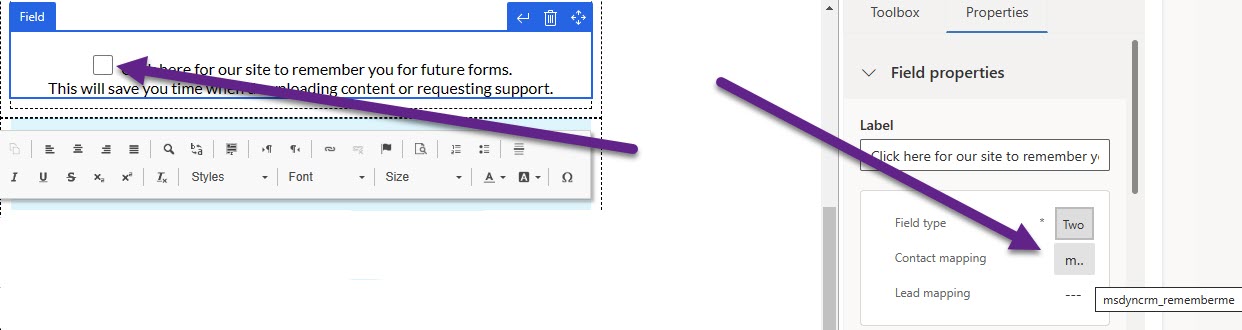
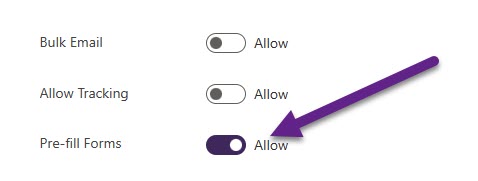
The field is mapped to the Remember Me field or you might see it as Pre-fill Forms field on the Contact. Side note, this is one of the most annoying fields that it was set up backwards compared with the other marketing fields with two options. Grrr!!!
Next, review all of the fields you added by looking at the Related fields grid on the Summary tab of the form. Open up the ones you need to show and hide one by one.

In the URL at the top, go to the very end and copy the id that is visible. This is the GUID (id) of the form field. Copy and paste each of those id’s and store them somewhere so you don’t need to go hunting for them again. We need these for our script.

Ok, so at this point you can make your form live, and then generate your script from the form hosting page. Take the script and add it to the page on your website where you would like the form to go. Now we can get in to the additional script you will need to do the showing and hiding of the fields dynamically. First, thank you to Guido Preite for helping me by answering questions, and George Doubinski for his patience in explaining some of the best practices and creating a better script than I originally made. Here it is in all it’s glory first, then I will break it down and explain how you can use it for your own needs.
<script language="javascript" type="text/javascript">
function showElement(elementId, show) {
    document.getElementById(elementId).style.display = show ? 'block' : 'none';
    document.getElementById(elementId).previousElementSibling.style.display = show ? 'block' : 'none';
}
MsCrmMkt.MsCrmFormLoader.on('afterFormLoad', function () {
    var phoneId = 'ac6a065d-364e-40d6-9a19-d9bf1ed4aa3e';
    var jobTitleId = '7646c7aa-3a6d-4b55-9a82-4d7a255a7eb3';
    var cityId = 'fc0308ab-609e-45c8-9f5e-9eca3511dc39';
    var phoneValue = document.getElementById(phoneId).value;
    var jobTitleValue = document.getElementById(jobTitleId).value;
    var cityValue = document.getElementById(cityId).value;
    showElement(phoneId, false);
    showElement(jobTitleId, false);
    showElement(cityId, false);
    if (!phoneValue) {
        showElement(phoneId, true);
    } else if (!jobTitleValue) {
        showElement(jobTitleId, true);
    } else if (!cityValue) {
        showElement(cityId, true);
    }
});
</script>
Ok, so the first part of the script is creating a function called showElement. It’s then declaring two possible things that could be needed for one of the fields on the form, and it’s label. The script is going to find a field by using an id (the one you got from the form field previously for each field) and it’s previous sibling on the form which will be it’s label. We are either going to show the field by adding block to the display element in the css styles and make sure it is shown, or we are going to add none which will make it hidden. Block is going to be our TRUE value, and None will be our FALSE value. So if a condition is met as true, the field in question will be shown, and if it’s met as false, the field would be hidden. More on this in a bit!
function showElement(elementId, show) {
    document.getElementById(elementId).style.display = show ? 'block' : 'none';
    document.getElementById(elementId).previousElementSibling.style.display = show ? 'block' : 'none';
}
This part is stating that after the form loads we should do everything within the curly brackets.
MsCrmMkt.MsCrmFormLoader.on('afterFormLoad', function () {
These next three lines are declaring variables for each of the three fields on the form that will have prefill allowed and can be shown or hidden depending on if they already contain data. This is where you would add the GUID’s that you got from your own system for each of the fields you are going to show or hide. Make sure to change the variables to something logical. I would suggest using the actual name of the field to make it easier to follow later rather than something too generic.
    var phoneId = 'ac6a065d-364e-40d6-9a19-d9bf1ed4aa3e';
    var jobTitleId = '7646c7aa-3a6d-4b55-9a82-4d7a255a7eb3';
    var cityId = 'fc0308ab-609e-45c8-9f5e-9eca3511dc39';
Now that we have the variables that are storing each of the ids, we can pass those variables in to some additional variables. For each variable that contains the id above, I have a variable that will then store the actual value from the field (if one should already exist because we know who the Contact is and they have already provided that information). Again, name your variables logically. I have just changed the Id part from the variable above and use the word Value instead. Pretty logical I would say!
    var phoneValue = document.getElementById(phoneId).value;
    var jobTitleValue = document.getElementById(jobTitleId).value;
    var cityValue = document.getElementById(cityId).value;
OK, now that we have our variables defined, we are going to use the next lines to run the function defined at the start to hide all three of the fields. So, we are saying for the fields that match the id for phone, job title and city, state false for each one, meaning that the style for displaying the fields and related labels will be set to none, so they will not be displayed.
    showElement(phoneId, false);
    showElement(jobTitleId, false);
    showElement(cityId, false);
We are now actually going to check the values in those three fields and run this in order of checking phone, then job title and then city. In the step above we hide all of the fields and their labels so this next part is really to determine if we should in fact show one of them again. So, we are saying if the phoneValue is empty (there isn’t anything in that field) use the showElement function to change things to true, which would set the style for display that field and it’s related label to block, which means it would be shown. Then the script would stop checking further. If there is a value in the phone field, move on to check the job title field and do the same. If there is a value in that field, move to the city field. If all three fields contain data already (because they have been prefilled with data), don’t do anything else. In that case, only the First Name, Last Name, Email and Comments box would show. Finally, the script is closed off.
if (!phoneValue) {
        showElement(phoneId, true);
    } else if (!jobTitleValue) {
        showElement(jobTitleId, true);
    } else if (!cityValue) {
        showElement(cityId, true);
    }
This is what the form looks like when someone visits the page for the first time. They can fill this out, and IF they click the Remember Me box at the bottom, this will update the field to allow prefill on their Contact record.

Then the next time they come to this form (or other forms with prefill allowed), they will see their name and email address, but the next field shown to them will be either the Job Title field or the City field.

Check out the latest post:
Use Custom Event Registration Questions To Branch Your Journeys In Customer Insights
This is just 1 of 603 articles. You can browse through all of them by going to the main blog page, or navigate through different categories to find more content you are interested in. You can also subscribe and get new blog posts emailed to you directly.
What happens in this scenario if we have all the contacts data from our previous CRM platform? Most of them have not selected the Remember Me option previously, but we want to reach out to get a specific update from customers that have not done any work in six months. Are we able to still prefill the form with their data?
Hi Mark, it would only work if the Remember Me field is set to allow that, so if it’s not, then you can’t use this feature. Also, one thing to note, this is ONLY for Outbound forms, and there is currently no equivalent for Realtime forms.