*** NOTE: ALL INFORMATION IS ACCURATE AT DATE OF PUBLISHING ***
We send out emails and assume they get to their desired destination. Every so often you might get some kind of notification if the recipient’s email address is wrong, or no longer exists… but then that’s an issue on their side. What about the times your emails are not received? How do you know? What if it’s only once every so often? I recently started to suspect there was an issue with my emails not always making it. A few too many times I was told ‘oh I didn’t get your email’, and some were clients which wasn’t good at all. Once, and I could blame it on them perhaps, but 4 or 5 times and I started to worry.
I had heard of SPF, a Sender Policy Framework, which is used to help prevent others from sending out messages from your domain but hadn’t delved into it too much. I was also aware that there were other things that could cause issues but wasn’t sure what to do to fix things. One of my brothers (Dan Rumney) has a ton of experience with web hosting and domain management, so I sent him a panicked stressed message… HELP ME! ????
How Emails Work
A domain is hosted somewhere, in my case, it’s with GoDaddy. If I was just sending emails direct out of GoDaddy, life would be great, and everything would likely always end up reaching the recipients each time. However, I don’t send emails that way. I send emails out of Office 365 for the most part. I also send invoices out via FreeAgent and send marketing emails from ConvertKit. My brother gave a great analogy to understand how the destination email systems view emails received. If I received a letter from my friend who lives in the next city in England, but the postmark was from somewhere in Canada, and I know she hasn’t been there, I would think it was suspicious.
So how do we tell those destination email systems that it’s OK that an email was sent from Office 365, FreeAgent or ConvertKit because it was sent from me? I need them to know that it’s OK to get emails from those places using my meganvwalker.com domain. This is where the aforementioned SPF comes in. An SPF TXT record is set up in DNS for a domain. This record determines if a sender is permitted to send on behalf of a domain. Without this information, your emails are at the mercy of any spam policy configured on each destination server, leaving it up to fate what happens to them.
Another record that can be created is a DKIM (Domain Keys Identified Mail) record. This also gives information to the receiver, giving the ability to check that the received email was sent and authorised by the owner of the domain. By adding a DKIM digital secured encrypted signature to the header of each message, a server can determine it’s legitimate.
Sorting Out Your SPF Record
First things first, only do this if you are comfortable with the DNS area within your domain manager. If not, check with your website administrator and have them confirm what’s set up for your domain. An SPF record is set up as a TXT record. For the host, you might need to specify your domain directly, so check with your host provider first. In GoDaddy, it’s the @ symbol to identify the host. Then the TXT value is added, then we save it.
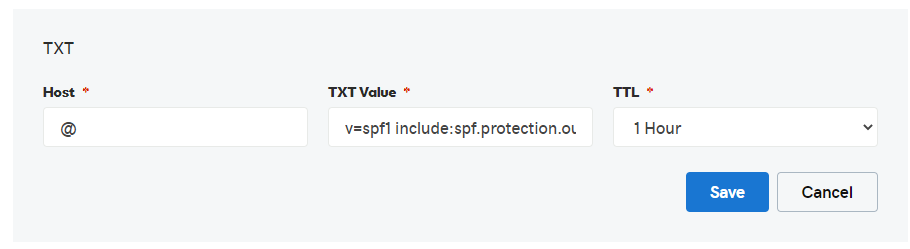
If we use Office 365 as an example, if you link your domain using the Wizard in O365 Admin, this is the SPF record that will be added for you. However, -all is used as an enforcement rule at the end, indicating a hard fail if other services are used. You can read more information about how Microsoft handle things here.
v=spf1 include:spf.protection.outlook.com -all
After finding out from a client that an invoice had gone to junk, I started looking into the accounting software I use and looking at their information about SPF records. I found this from their website:
If you have a strict SPF record, which ends in -all, you’ll need to explicitly add FreeAgent to the list of trusted senders by adding this text to your existing SPF record: include:spf.mtasv.net
So, I adjusted the SPF record to include it, like this:
v=spf1 include:spf.protection.outlook.com include:spf.mtasv.net -all
Adding Other Records
Another problem I had been having was with my marketing emails, which send out emails to a subscription list each time I publish a new blog post (much like this blog will do). The email that I get that notifies me a new email is ready to go out to everyone would always go to my own junk folder. No matter how many times I flagged it as ‘not junk’, it would continue to go there. I’d switched to ConvertKit last year, and felt it was likely tied to that. Within that tool, you could set up your email and confirm it to use to send out emails, with an extra setting to verify the domain itself.
Although their website states that verified sending domains are best for senders who send at least 50,000 messages per month and have an average open rate or at least 20%, they also state that a verified sending domain allows you to set up authentication records (SPF, DKIM, and DMARC) with your web host. This tells mailbox providers like Gmail and Microsoft that you are a real business, and you have given ConvertKit permission to send using your domain on your behalf. I’d ignored this previously, but figured I needed to change this, so I set up the two CNAME records below, based on their instructions here. One adds an SPF record, the other a DKIM record.

Think of all the places that are sending emails on your behalf. What services do you use? Check and see what direction they provide for adding SPF TXT records or CNAME records and get them added in DNS.
Using DKIM To Protect Your Emails
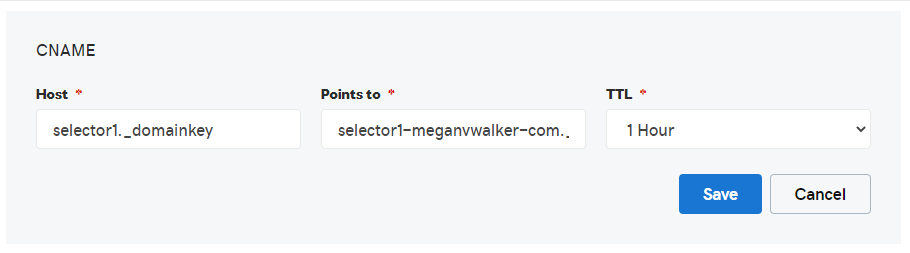
As mentioned earlier, DKIM can be used to prevent your domain from being spoofed and adds a digital signature to outbound email messages in the message header. I thought it would be complicated…. but it was pretty easy to set up. The first thing that’s needed, two new CNAME records in DNS. This was specifically to set up DKIM to validate emails being sent from my domain via Office 365. The host will be selector1._domainkey for the first one and selector2._domainkey for the second one. This then points to selector1-yourdomain-com._domainkey.yourdomain.onmicrosoft.com. So, replace yourdomain-com (with a dash, not a dot) with your own domain, and yourdomain.onmicrosoft.com with your own Microsoft onmicrosoft.com domain. The second CNAME would point to selector2-yourdomain-com._domainkey.yourdomain.onmicrosoft.com.
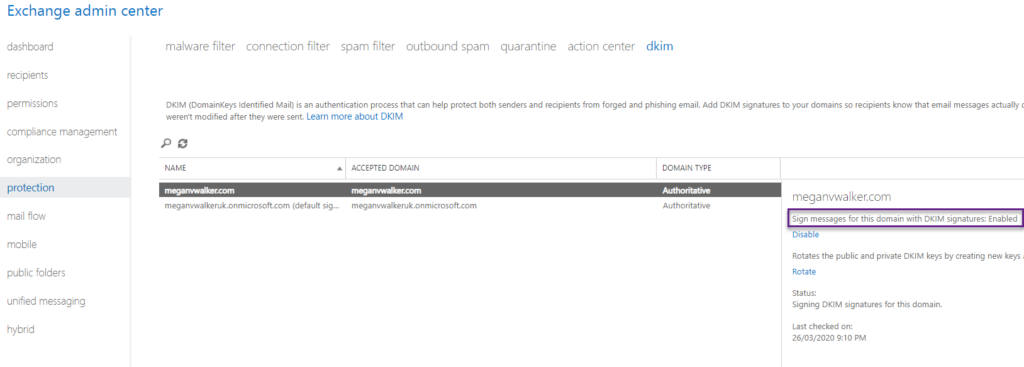
Once you’ve added these in DNS for your domain, go to Office 365 Admin Centre, and navigate to the Exchange Admin Centre using the link on the bottom left. Once in the Exchange admin centre, click on protection from the navigation on the left, then from the top, click on dkim. From here, you will see your custom domain and the onmicrosoft.com domain. Click on the custom domain, and then click on Enable from the panel to the right of the domain. You might need to wait a few moments for it to show as being Enabled depending on how long it takes it to propagate through DNS.
Monitoring Your Domain
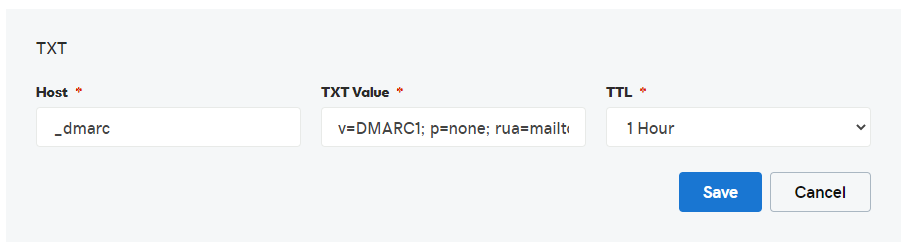
One last thing that has provided me with a tool to monitor the health of my domain as it relates to sending emails. Another type of record is a DMARC (Domain-based Message Authentication, Reporting and Conformance) record. Adding this record provides you with feedback about the SPF and DKIM configurations that you’ve set up. After chatting with my brother, he suggested using a service called dmarcian (this isn’t a promotion, there are likely other tools available so just do your research!). After signing up with their service, you will be able to access the details to ad a DMARC record to your DNS.
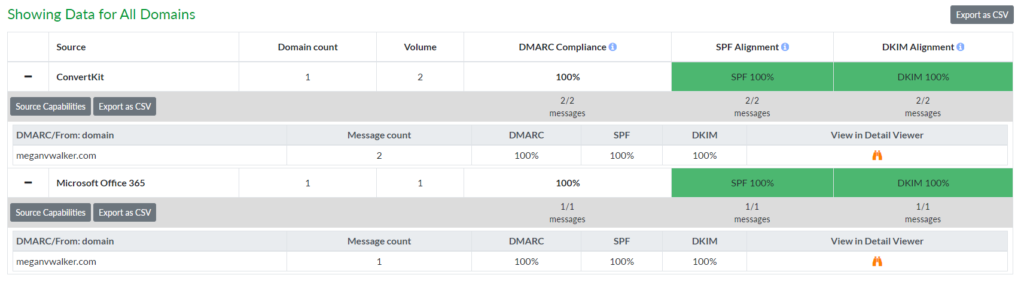
After a couple of days, you’ll start to see data about your sending domain.
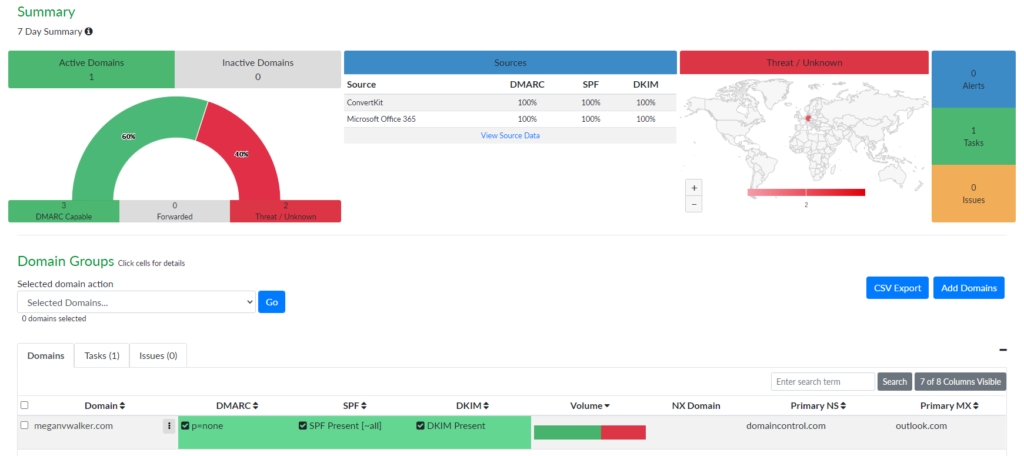
Ideally you see green as we see below, showing ConvertKit and Microsoft Office 365 as being compliant 100% for SPF and DKIM.
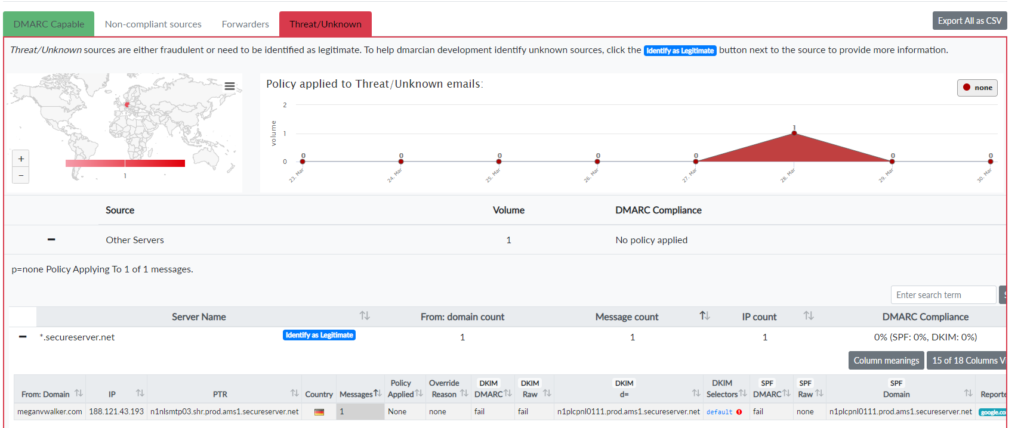
What’s helpful is being able to view anything that’s shown as a threat or unknown. For me, I had forgotten that I have a plugin on my website that sends a thank you email out when I approve a comment on my blog. The unknown server flagged is one from GoDaddy, where my site is hosted. I can then identify the source as legitimate and provide details about it.
Bit of a long post, but hopefully this might help others having similar issues, or perhaps not even knowing they are having issues. It took a long time to realise there were challenges. The high five moment for me was when my next blog post went out, and the notification email that has gone to my junk inbox as spam for the past four months sailed straight into my inbox. Result!
** UPDATE: 2020-04-06 **
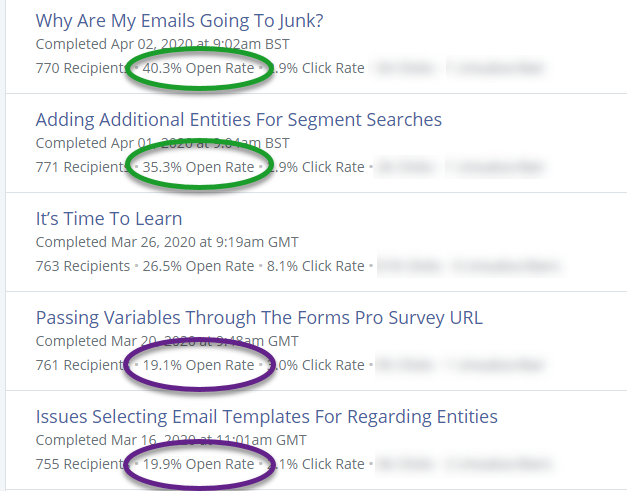
Already, after just a couple of days since making adjustments, I have seen amazing changes to my marketing emails open rate. That’s a pretty impressive leap, up by about 20%. So make sure you check out your own email settings to be sure things are not going by unnoticed, and therefore, unread too!
Check out the latest post:
Use Custom Event Registration Questions To Branch Your Journeys In Customer Insights
This is just 1 of 603 articles. You can browse through all of them by going to the main blog page, or navigate through different categories to find more content you are interested in. You can also subscribe and get new blog posts emailed to you directly.