*** NOTE: ALL INFORMATION IS ACCURATE AT DATE OF PUBLISHING ***
In my Events Portal series using a Power Pages website, I’ve walked through creating a custom Web Template to show details about an individual Event record with a dynamic approach to displaying your D365 Marketing Event Registration form. One thing you’re likely to want to do is have a main Events page that displays an overview of all the upcoming events. This post will walk through how to do that using HTML and Liquid. Let’s jump in!
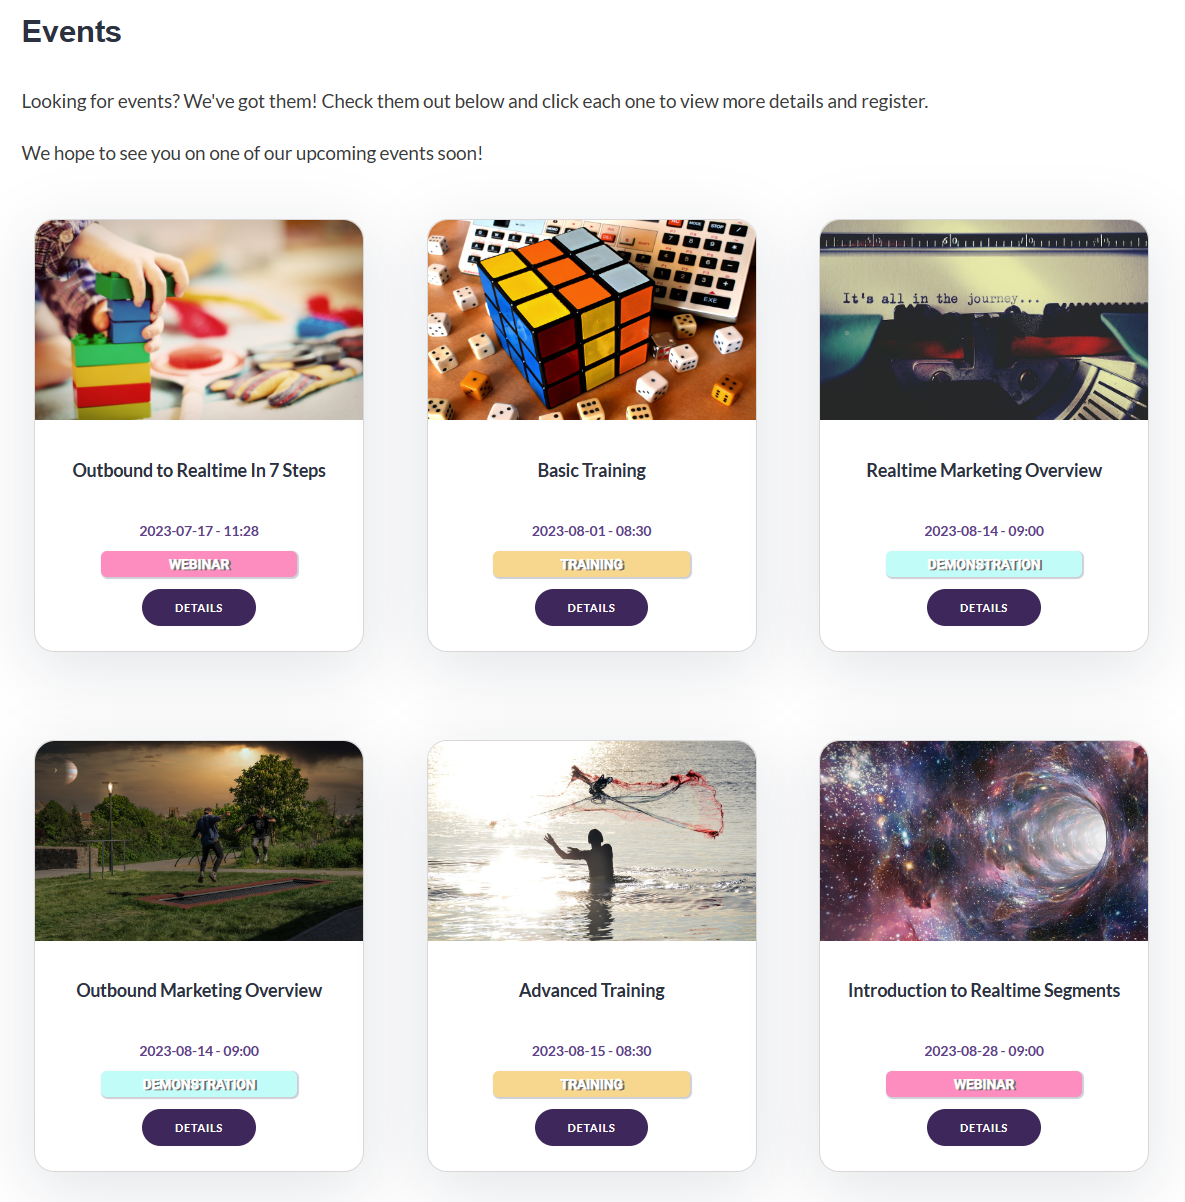
This is the end result of my Events Overview page. Each event is displayed in it’s own card using the Event Image, Event Name, Event Start Date/Time and the Event Type. Visitors to the page can then click to get more details and actually register for the Event. There is a lot of CSS used to style the look and feel of each card, and display all of the Events in a grid panel rather than just a long list using text only.
Make sure you have added a record under Table Permissions in D365. If you don’t include this, no one will be able to see the events. Add the record, call it Events and link to the Event table. Link it to your website and set the privileges as Read only. Once you have saved it. go to the Web Roles section on your new Table Permission record and make sure at least the Anonymous User role has access. This means anyone visiting the site and see the Events without the need to log in.

Next create a new Site Marker record. Call it Event and link to your Website and the individual Event page you should have already created (based on my last post). This is the best approach to linking to pages and using a Site Marker instead of a specific URL (which someone could potentially change in the future). Save the record and then create a new Web Template.
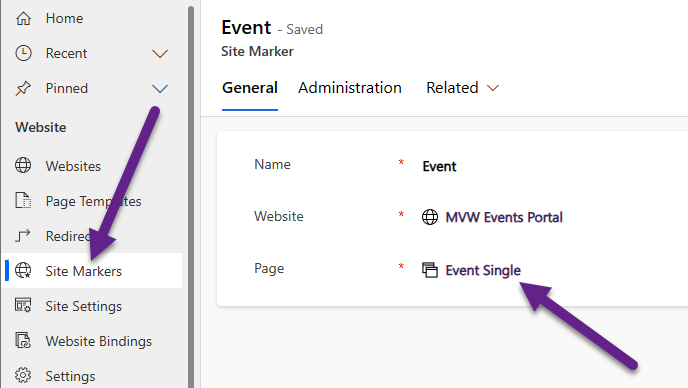
The very first part of the Web Template is one line to actually link back to that Site Marker, using the name you gave it to find the right one. This means we can link back through to the page, and get the correct base URL for an individual Event, again rather than hard coding a URL if that makes sense.
{% assign event_marker = sitemarkers["Event"] %}
Now we need to find all of our Events using a FetchXML query. You might want to bring in more or different fields, but for my purpose I have the Event Name, Event ID, Event Image, Event Start Date, Event Readable Event ID and Event Type. I have some filtering to only bring in those that have had a Marketing Event Form added, the Publish Status is Live and where the start date is greater than or equal to today. Finally, just like I did in the individual event web template, I am getting the Blob CDN URL so I can get the Event Image to use on the cards for each event.
{% fetchxml events %}
<fetch version="1.0" output-format="xml-platform" mapping="logical" distinct="true" returntotalrecordcount='true'>
  <entity name="msevtmgt_event">
    <attribute name="msevtmgt_name" />
    <attribute name="msevtmgt_eventid" />
    <attribute name="msevtmgt_eventimage" />
    <attribute name="msevtmgt_eventstartdate" />
    <attribute name="msevtmgt_readableeventid" />
    <attribute name="msevtmgt_eventtype" />
    <filter>
      <condition attribute="msevtmgt_marketingformid" operator="not-null" />
      <condition attribute="msevtmgt_publishstatus" operator="eq" value="100000003" />
      <condition attribute="msevtmgt_eventstartdate" operator="ge" value="{{ "now" | date: "yyyy-MM-dd" }}" />
    </filter>
    <order attribute="msevtmgt_eventstartdate" />
    <link-entity name="msdyncrm_file" from="msdyncrm_fileid" to="msevtmgt_eventimage" alias="image">
      <attribute name="msdyncrm_blobcdnuri" />
    </link-entity>
  </entity>
</fetch>
{% endfetchxml %}
Next I have some code that is defining what the Events page looks like by adding a hero image in the header, then adding the breadcrumbs, and the Page Copy from whatever you add to the Events Overview page.
<div class="entry-hero"  style="min-height: 418px!important;background: url('/images/events.jpg')no-repeat 0 44%!important;
    background-size: cover!important;">
	<div class="entry-hero-wrapper">
<h1 class="entry-title">Events Overview</h1>
</div>
</div>
<div class="container">
  <div class="page-heading">
    {% block breadcrumbs %}
      {% include 'Breadcrumbs' %}
    {% endblock %}
  {% block title %}
    {% include 'Page Header' %}

  {% endblock %}
 </div>
 <div class="row">
  <div class="col-md-12">
    <div id="mainContent">
    {% block main %}
    {% include 'Page Copy' %}
I wanted to display the Events in a grid format that would repeat three Events on each row. Then I wanted to format each Event with a nice box shadow around it to make them stand out. These are the two CSS styles I added for this, hopefully this helps as a starting point!
.grid {
    display: grid;
    grid-template-columns: repeat(3, 1fr);
    grid-gap: 3em;
    padding-top: 1em;
}
.item {
    box-shadow: 0 16px 64px 4px rgb(4 16 45 / 10%);
    background-color: white;
    padding-bottom: 2em;
    margin: 1em 1em 3em 1em;
    border: 1px solid #dbd7d7;
	border-radius: 20px;
}
This section checks to make sure there is at least one Event that has been brought back from the FetchXML query. So if there is more than zero, we then create a grid and for each Event in the results, we create it as an item and add in things like the image, the name, the date and the details. I’ve surrounded all of that in a hyperlink so that someone could click anywhere on the Event item and be taken to the individual Event record.
{% if events.results.total_record_count > 0 %}
<div class="grid">
{% for msevtmgt_event in events.results.entities %}
<div class="item">
<a href="{{ event_marker.url }}?id={{ msevtmgt_event.msevtmgt_eventid }}&readableEventId={{ msevtmgt_event.msevtmgt_readableeventid }}">
<img class="eventimage_small" src="{{ msevtmgt_event['image.msdyncrm_blobcdnuri'] }}"><p>
<div class="event_name">{{ msevtmgt_event.msevtmgt_name }}</div>
<div class="event_date">{{ msevtmgt_event.msevtmgt_eventstartdate | date: "yyyy-MM-dd - HH:mm" }}</div>
<div class="event-details"><button class="event-button">DETAILS</button></div>
</a>
</div>
{% endfor %}
</div>
</div>
</div>
</div>
{% endif %}
Here is a break down of the structure of the URL that is being created. First we take the URL from the Site Marker record by pulling in the event_marker value that was assigned from the start of the Web Template. Then we add in two parameters. First, we add in an id which will be the msevtmgt_eventid value. This makes sure when the link is clicked on, the details that are displayed on the individual Event record are those from the Event with the same GUID. Then we pass through the Readable Event ID which is the msevtmgt_readableeventid value. This value from the URL will then pass through into the Realtime Marketing Form on the individual Event page, making sure that when the person registers, it links their Event Registration record to the correct Event.
<a href="{{ event_marker.url }}?id={{ msevtmgt_event.msevtmgt_eventid }}&readableEventId={{ msevtmgt_event.msevtmgt_readableeventid }}">
That’s it! You should now be able to link your new Web Template to a Page Template. Then create your new Web Page and use the new Page Template. If you’ve put it all together correctly you should end up with an overview of all of your Live upcoming Events on your Event Overview page.
If you would like the entire Web Template code I created, you can copy it below. Notice that I have also added in some logic that sets the background colour of the Event Type label depending which one was used, but that’s just a preference. Once you have your overview page, you can start digging in to your CSS and style each section exactly how you want it to look.
{% assign event_marker = sitemarkers["Event"] %}
{% fetchxml events %}
<fetch version="1.0" output-format="xml-platform" mapping="logical" distinct="true" returntotalrecordcount='true'>
  <entity name="msevtmgt_event">
    <attribute name="msevtmgt_name" />
    <attribute name="msevtmgt_eventid" />
    <attribute name="msdyncrm_marketingformid" />
    <attribute name="msevtmgt_marketingformid" />
    <attribute name="msevtmgt_eventimage" />
    <attribute name="msevtmgt_eventstartdate" />
    <attribute name="msevtmgt_readableeventid" />
    <attribute name="msevtmgt_eventtype" />
    <filter>
      <condition attribute="msevtmgt_marketingformid" operator="not-null" />
<condition attribute="msevtmgt_publishstatus" operator="eq" value="100000003" />
    </filter>
    <order attribute="msevtmgt_eventstartdate" />
    <link-entity name="msdyncrm_file" from="msdyncrm_fileid" to="msevtmgt_eventimage" alias="image">
      <attribute name="msdyncrm_blobcdnuri" />
    </link-entity>
  </entity>
</fetch>
{% endfetchxml %}
 <div class="entry-hero"  style="min-height: 418px!important;background: url('/images/events.jpg')no-repeat 0 44%!important;
    background-size: cover!important;">
	<div class="entry-hero-wrapper">
<h1 class="entry-title">Events Overview</h1>
</div>
</div>
<div class="container">
  <div class="page-heading">
    {% block breadcrumbs %}
      {% include 'Breadcrumbs' %}
    {% endblock %}
  {% block title %}
    {% include 'Page Header' %}

  {% endblock %}
 </div>
 <div class="row">
  <div class="col-md-12">
    <div id="mainContent">
    {% block main %}
    {% include 'Page Copy' %}
{% if events.results.total_record_count > 0 %}
<div class="grid">
{% for msevtmgt_event in events.results.entities %}
<div class="item">
<a href="{{ event_marker.url }}?id={{ msevtmgt_event.msevtmgt_eventid }}&readableEventId={{ msevtmgt_event.msevtmgt_readableeventid }}">
<img class="eventimage_small" src="{{ msevtmgt_event['image.msdyncrm_blobcdnuri'] }}"><p>
<div class="event_name">{{ msevtmgt_event.msevtmgt_name }}</div>
<div class="event_date">{{ msevtmgt_event.msevtmgt_eventstartdate | date: "yyyy-MM-dd - HH:mm" }}</div>
{% if msevtmgt_event.msevtmgt_eventtype.label == "Training" %}
<div class="event_type" style="background:#f7d78d">{{ msevtmgt_event.msevtmgt_eventtype.label }}</div>
{% elseif msevtmgt_event.msevtmgt_eventtype.label == "Webinar" %}
<div class="event_type" style="background:#fc8dbe">{{ msevtmgt_event.msevtmgt_eventtype.label }}</div>
{% elseif msevtmgt_event.msevtmgt_eventtype.label == "Demonstration" %}
<div class="event_type" style="background:#c2fcf8">{{ msevtmgt_event.msevtmgt_eventtype.label }}</div>
{% else %}
<div class="event_type" style="background:#ffffe0">{{ msevtmgt_event.msevtmgt_eventtype.label }}</div>
{% endif %}
<div class="event-details"><button class="event-button">DETAILS</button></div>
</a>
</div>
{% endfor %}
</div>
</div>
</div>
</div>
{% endif %}
{% endblock %}
  </div>
  </div>
 </div>
</div>
Check out the latest post:
Use Custom Event Registration Questions To Branch Your Journeys In Customer Insights
This is just 1 of 603 articles. You can browse through all of them by going to the main blog page, or navigate through different categories to find more content you are interested in. You can also subscribe and get new blog posts emailed to you directly.
Hi Megan, I tried to follow this article, but I cannot find Event Single page. Where is it came from, or I need to create one?
Hi Stefan – take a look at the post that comes before this one. You can read here about creating your Event Single page – https://meganvwalker.com/event-page-using-liquid-web-template-events/
Hi Megan!
Thanks a lot for your publications. For users who the fetchquery don’t return data on the web but in preview return data, we must remember to grant permissions to the entity!! which will get the dara. I spent hours trying to solve the problem until I read about the permissions
Hi Sunat, you are completely right, my apologies! I had listed this elsewhere on another blog, but failed to reference it here. Sorry you had to go hunting for the information! I have since updated the blog to include this part. Fingers crossed I haven’t missed that out on any of the other posts.